MoleHill Getting Started AGAL(转)
1.The OpCode
This is what AGAL looks like:
//vertex shader

m44 op, va0, vc0 // pos to clipspace

mov v0, va1 // copy uv

//pixel shader

tex ft1, v0, fs0 <2d,linear,nomip>

mov oc, ft1
Doesn’t it look like hieroglyphics? What’s the key to access it?
The problem is that AGAL is very little documented at this stage. Let me try to cast some light on this mysterious shading language.
Every line of the shader is a command, specified by a 3 character string called “opcode”.
The syntax of an AGAL code line is the following:
<opcode> <destination> <source 1> <source 2 or sampler>
This is the key. Keep this syntax in mind and AGAL will suddenly stop looking like an unreadable blob.
Following the opcode, depending on the command there can also be a destination, and one or two sources. The destination and the sources are “registers”: small memory areas in the GPU for use by shaders (more on registers below).
AGAL features about 30 different opcodes. The full list of available opcodes can be found in the Molehill documentation. Here are some of the most common opcodes.
mov move data from source1 to destination, component-wise
add destination = source1 + source2, component-wise
sub destination = source1 – source2, component-wise
mul destination = source1 * source2, component-wise
div destination = source1 / source2, component-wise
dp3 dot product (3 components) between source1 and source2
dp4 dot product (4 components) between source1 and source2
m44 multiplication between 4 components vector in source1 and 4×4 matrix in source2
tex texture sample. Load from texture at source2 at coordinates source1.
2.AGAL Registers
Registers are small memory areas in the GPU that AGAL programs (shaders) can use during their execution. Registers are used both for the sources and for the destination of AGAL commands.
You can also pass parameters to your shaders through these registers.
Each register is 128 bits wide, meaning it contains 4 floating point values. Each of these values is called a “component” of the register.
Register components can be accessed both with through the “coordinate” accessors (xyzw), and through the color accessors (rgba).
So, the first component of a register, can be accessed both with:
<register name>.x
and with:
<register name>.r
Some of the opcodes above, like “add”, perform their operations “component wise”. This means that the addition operation is performed component by component.
These are six types of registers available.
1. Attribute Registers
These registers reference to the input VertexBuffer of the vertex shader. Therefore they are only available in vertex shaders.
In order to assign a VertexBuffer to a specific attribute register, use the function Context3D:setVertexBufferAt(), with the proper index.
Then from the shader, access the attribute register with the syntax: va<n>, where <n> is the index number of the attribute register.
There are a total of 8 attribute registers available to vertex shaders.
2. Constant Registers
These registers serve the purpose of passing parameters from Actionscript to the shaders. This is done through the Context3D::setProgramConstants() family of functions.
These registers are accessed from the shader with the syntax: vc<n>, for vertex shaders, and fc<n> for pixel shaders, where <n> is the index number of the constant register.
There are 128 constant registers available to vertex shaders, and 28 constant registers for pixel shaders.
3. Temporary Registers
These registers are available to shaders, that can use them for temporary calculations.
They are accessed with the syntax vt<n> (vertex) and ft<n> (pixel) where <n> is the register number.
There are 8 of these available for vertex shaders, and 8 for pixel shaders.
4. Output Registers
The Output Registers are where vertex and pixel shaders store the output of their calculation. For vertex shaders this output is a clip space position of the vertex. For pixel shaders it is the color of the pixel.
These registers are accessed with the syntax op, for vertex shaders, and oc, for pixel shaders.
There is obviously only one output register for vertex and for pixel shaders.
5. Varying Registers
These registers are used to pass data from vertex shaders to pixel shaders. The data that is passed gets properly interpolated by the GPU, so that the pixel shader receives the correct value for the pixel that is being processed.
Typical data that gets passed in this way is the vertex color, or the UV coordinates for texturing.
These registers can be accessed with the syntax v<n>, where <n> is the register number.
There are 8 varying registers available.
6. Texture Samplers
The texture sampler register are used to pick color values from textures, based on UV coordinates.
The texture to be used is specified through Actionscript with the call Context3D::setTextureAt().
The syntax for using texture samples is: fs<n> <flags>, where <n> is the sampler index, and <flags> is a set of one or more flags that specifies how the sampling should be made.
<flags> is a comma separated set of strings, that defines:
texture dimension. Can be: 2d, 3d, cube
mip mapping. Can be: nomip, mipnone, mipnearest, mipnone
texture filtering. Can be: nearest, linear
texture repeat. Can be: repeat, wrap, clamp.
So, for example, a standard 2d texture without mip mapping, and linear filtering could be sampled into temporary register ft1, with the following line:
“tex ft1, v0, fs0 <2d,linear,nomip> “
where the varying register v0 would hold the interpolated texture UVs.
3.Basic Parts Of Molehill:
3.1.Stage3D
Stage3D is the part that sits in-between Flash and all the GPU goodness. Stage3D does not sit in the display list (you cannot do a addChild on a Stage3D object). Stage3D just exists in the same way that stage just exists. Stage3D sits behind all your regular flash content but in front for the new StageVideo.
3.2.Context3D
A Stage3D will contain a Context3D. Think of it this way... It’s almost the same as Bitmap contains BitmapData. You do not draw to Bitmap in the same way as you do not render stuff in Stage3D. All the work is done with BitmapData the same as Context3D
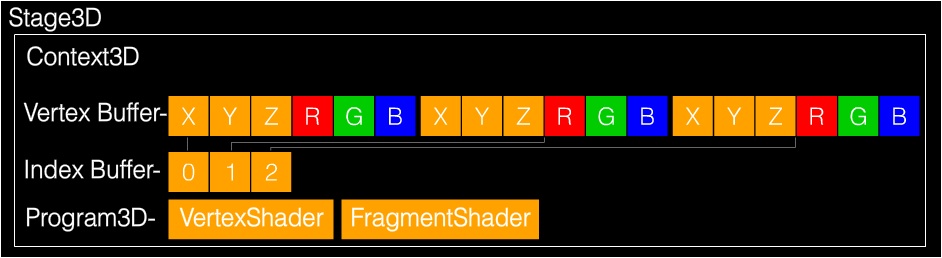
3.3.VertextBuffer3D
Context3D will contain VertexBuffer3D objects. Think of VertexBuffer3D as being “instructions” on what to draw and what it should look like. VertexBuffer3D will contain a Vector.<Number> (array of type Number) that will define vertex position and colour for each vertex. (more on that in a bit)
3.4.IndexBuffer3D
The IndexBuffer3D just like the VertexBuffer3D will contain a Vector. But instead of a Vector.<Number> it contains a Vector.<uint> which defines triangles in VertexBuffer3D. Think of it this way... VertexBuffer3D will contain a bunch of positions but IndexBuffer3D will determine what order those positions should be drawn. As a real world example VertexBuffer3D defines cities on a map then IndexBuffer3D will define what order to visit those cities.
3.5.Program3D
Program3D is a “program” that will run through the data in your VertexBuffer3D and “modify it”. Program3D contains two shaders (smaller programs) that will modify the position of every vertex and figure out what every pixel within a triangle should look like. The two smaller shaders or “programs” are called VertexShader and FragmentShader.
3.6.AGAL
AGAL is a very low level language. It’s used to write your VertexShaders and FragmentShaders. It’s the heart of MoleHill.
3.7.VertexShader
The VertexShader is a small program written in AGAL that will modify the Vertex positions within a triangle. For instance if you wanted to scale, rotate, or move your triangle you would use the VertexShader to do this.
3.8.FragmentShader
The FragmentShader is another small program written in AGAL that will modify the pixels in your triangle. For instance if you want to tint your entire triangle red you would write a small FragmentShader to do that
3.9.Quick diagram on how all the parts interrelate:
4. Using Molehill
When you use Molehill there are really two parts to your program:
* Setup
* Render
4.1.Things we want to do during Setup:
1. Get a Context3D instance from Stage3D
2. Setup the Context3D
3. Create an VertexBuffer
4. Create an IndexBuffer
5. Upload Initial Vertex Data to the VertexBuffer
6. Upload Initial Index Data to the IndexBuffer
7. “Compile” a VertexShader
8. “Compile” a FragmentShader
9. Create a Program3D which will use the above shaders
10. Add a ENTER_FRAME loop which will send data to the GPU
I know that’s a lot of stuff just to get this sucker setup but it’s not as bad as it sounds. Setup is WAY more complicated in my mind then the actual rendering.
4.2.Things we want to do during Render (ENTER_FRAME):
1. Clear the Context3D
2. Set the Program3D that will be using
3. Send the Vertex Buffer to Context3D
4. Setup data for you your shaders (variables)
5. Draw some triangles
6. Update the screen with your drawn triangles
5.Now let’s dig into source code.
The setup part described above is done in the function “onGotContext”. This is because in order to get the Context3D we have to request it and when it’s available Flash will send it to us.
The render part happens in the ENTER_FRAME function listener “onRenderLoop”.
Enjoy... I tried to write as many comments as possible in the code so you can follow along. I should note that this source code is based on Thibault Imbert’s blog post and this video.
import com.adobe.utils.*;

import flash.display.Bitmap;

import flash.display.Sprite;

import flash.display.StageAlign;

import flash.display.StageScaleMode;

import flash.display3D.*;

import flash.display3D.textures.Texture;

import flash.events.*;

import flash.events.Event;

import flash.geom.Matrix3D;

import flash.geom.Rectangle;

import flash.geom.Vector3D;

import flash.utils.Timer;

import flash.utils.getTimer;

[SWF(width="800", height="600", frameRate="60", backgroundColor="#FFFFFF")]

public class AgalSample extends Sprite

{

    [Embed( source = "RockSmooth.jpg" )]

    protected const TextureBitmap:Class;

    protected var context3D:Context3D;

    protected var vertexbuffer:VertexBuffer3D;

    protected var indexBuffer:IndexBuffer3D;

    protected var program:Program3D;

    protected var texture:Texture;

    public function AgalSample()

    {

        stage.stage3Ds[0].addEventListener( Event.CONTEXT3D_CREATE, initMolehill );

        stage.stage3Ds[0].requestContext3D();

        stage.scaleMode = StageScaleMode.NO_SCALE;

        stage.align = StageAlign.TOP_LEFT;

        addEventListener(Event.ENTER_FRAME, onRender);

    }

    protected function initMolehill(e:Event):void

    {

        context3D = stage.stage3Ds[0].context3D;

        context3D.configureBackBuffer(800, 600, 1, true);

        var vertices:Vector.<Number> = Vector.<Number>([

                                                -0.5,-0.5,0, 0, 0, // x, y, z, u, v

                                                -0.5, 0.5, 0, 0, 1,

                                                0.5, 0.5, 0, 1, 1,

                                                0.5, -0.5, 0, 1, 0]);

        // 4 vertices, of 5 Numbers each

        vertexbuffer = context3D.createVertexBuffer(4, 5);

        // offset 0, 4 vertices

        vertexbuffer.uploadFromVector(vertices, 0, 4);

        // total of 6 indices. 2 triangles by 3 vertices each

        indexBuffer = context3D.createIndexBuffer(6);

        // offset 0, count 6

        indexBuffer.uploadFromVector (Vector.<uint>([0, 1, 2, 2, 3, 0]), 0, 6);

        var bitmap:Bitmap = new TextureBitmap();

        texture=context3D.createTexture(bitmap.bitmapData.width, bitmap.bitmapData.height, Context3DTextureFormat.BGRA, false);

        texture.uploadFromBitmapData(bitmap.bitmapData);

        var vertexShaderAssembler : AGALMiniAssembler = new AGALMiniAssembler();

        vertexShaderAssembler.assemble( Context3DProgramType.VERTEX,

                                                "m44 op, va0, vc0\n" + // pos to clipspace

                                                "mov v0, va1" // copy uv

        );

        var fragmentShaderAssembler : AGALMiniAssembler= new AGALMiniAssembler();

        fragmentShaderAssembler.assemble( Context3DProgramType.FRAGMENT,

                                                "tex ft1, v0, fs0 <2d,linear,nomip>\n" +

                                                "mov oc, ft1"

        );

        program = context3D.createProgram();

        program.upload(vertexShaderAssembler.agalcode, fragmentShaderAssembler.agalcode);

    }

    protected function onRender(e:Event):void

    {

        if ( !context3D )

            return;

        context3D.clear ( 1, 1, 1, 1 );

        // vertex position to attribute register 0

        context3D.setVertexBufferAt (0, vertexbuffer, 0, Context3DVertexBufferFormat.FLOAT_3);

        // uv coordinates to attribute register 1

        context3D.setVertexBufferAt(1, vertexbuffer, 3, Context3DVertexBufferFormat.FLOAT_2);

        // assign texture to texture sampler 0

        context3D.setTextureAt(0, texture);

        // assign shader program

        context3D.setProgram(program);

        var m:Matrix3D = new Matrix3D();

        m.appendRotation( getTimer()/50, Vector3D.Z_AXIS);

        context3D.setProgramConstantsFromMatrix(Context3DProgramType.VERTEX, 0, m, true);

        context3D.drawTriangles(indexBuffer);

        context3D.present();

    }

}
原文:http://labs.jam3.ca/2011/03/molehill-getting-started/
MoleHill Getting Started AGAL(转)的更多相关文章
- 初探Stage3D(二) 了解AGAL
关于本文 本文并无打算事无巨细的介绍一遍AGAL,仅仅是对现有文档的一些理解及汇总,所以请先阅读相参考文档 AGAL概念 参考资料 http://www.adobe.com/devnet/flashp ...
- Stage3d AGAL GPU处理照片 旧照片效果 sepia || pixelbender
如果看不到下边的flash,请更新flash player到最新版本. 利用AGAL实现旧照片效果,大家可以对照一下之前一篇文章,关于图像处理(pixelbender).硬件处理肯定会更快,但这里无法 ...
- Stage3d 由浅到深理解AGAL的管线vertex shader和fragment shader || 简易教程 学习心得 AGAL 非常非常好的入门文章
Everyday Stage3D (一) Everyday Stage3D (二) Triangle Everyday Stage3D (三) AGAL的基本概念 Everyday Stage3D ( ...
- 新人补钙系列教程之:Molehill底层API中最重要的Context3D
Context3D,是一个三维空间的处理环境,负责创建并处理三维对象的各个要素如顶点.片段.透视等等,并将处理的结果使用AGAL(Adobe图形汇编语言)上传给显卡进行运算,运算结果最终被回传给CPU ...
- stage3D基础三------什么是AGAL(转)
原文链接 http://www.adobe.com/cn/devnet/flashplayer/articles/hello-triangle.html 在本文中,你将研究一个能够正常运行的基于Sta ...
- Shader与AGAL(From 7yue)
- (转) [it-ebooks]电子书列表
[it-ebooks]电子书列表 [2014]: Learning Objective-C by Developing iPhone Games || Leverage Xcode and Obj ...
- 3D游戏中的画质与效率适配
哪里来的需求? 众所周知,由于不同的设备配置不同.导致其CPU和GPU处理能力有高有低.同样的游戏想要在所有设备上运行流畅且画面精美,是不可能的.这就需要我们针对不同的设备能力进行画质调节,以保证 ...
- 基于Adobe Flash平台的3D页游技术剖析
写在前面 从黑暗之光,佛本是道,大战神的有插件3D页游.再到如今的魔龙之戒. 足以证明,3D无插件正在引领页游技术的潮流. 目前,要做到3D引擎,有以下几个选择. 说到这里,我们发现.这些都不重要. ...
随机推荐
- Python学习笔记-字符串
Python之使用字符串 1.所有的标准序列操作(索引,分片,乘法,判断成员资格,求长度,取最小值,最大值)对字符串同样适用.但是字符串都是不可变的. 2.字符串格式化使用字符串格式化操作符即%. f ...
- Android平板电脑开发— — —碎片
碎片是一种可以嵌入在活动中的UI片段,它能让程序更加合理与充分地使用大屏幕的空间,碎片通常都是在平板电脑开发中才会使用 简单实例 左碎片布局 <?xml version="1.0&qu ...
- Linq二 LinqToSql
虽然微软已经停止更新了LinqToSql,但是目前的已完全满足目前的需求. 第一步:添加LinqToSql 第二步:将其关联的Sqlserver数据库 第三步:数据库已变成实体类 第四步:可以对数据库 ...
- android基础(三)ContentProvider
ContentProvider主要用于在不同的应用程序之间实现数据共享,它提供了一套完整的机制,允许一个程序访问另一个程序中的数据,同时还能保证被访问数据的安全性,目前内容提供其实android实现跨 ...
- 团队开发——冲刺2.d
冲刺阶段二(第四天) 1.昨天做了什么? 把收集的图标进行统一整理,使用相同风格.类型,使界面更加美观. 2.今天准备做什么? 开始写测试计划书. 3.遇到什么困难? 关于昨天遇到的问题:在游戏界面加 ...
- 如何把TOMCAT 添加到服务中自动启动
1.配置系统参数: JAVA_HOME:C:\Program Files\Java\jdk1.8.0_51 //本机Jdk的安装路径,已配置相关Java应用的无需再配置. CATALINA_HOM ...
- [转]深入理解学习GIT工作流
深入理解学习Git工作流 字数13437 阅读2761 评论3 喜欢70 个人在学习git工作流的过程中,从原有的 SVN 模式很难完全理解git的协作模式,直到有一天我看到了下面的文章,好多遗留在心 ...
- 利用move_base导航--42
摘要: 原创博客:转载请标明出处:http://www.cnblogs.com/zxouxuewei/ 各位博友好长时间又没有写博客了,突然发现上班和在学校是不一样的,在公司的却没有时间写博客了,不过 ...
- c++new/delete---9
原创博客:转载请标明出处:http://www.cnblogs.com/zxouxuewei/ C++new和delete实现原理 new 与delete是C++预定的操作符,它们一般需要配套使用 ...
- HDU 2577(DP)
题意:要求一个字符串输入,按键盘的最少次数.有Caps Lock和Shift两种转换大小写输入的方式 思路:用dpa与dpb数组分别记录Caps Lock的开关状态,dpa表示不开,dpb表示开 代码 ...