记微软OpenHack机器学习挑战赛
有幸参加了微软OpenHack挑战赛,虽然题目难度不大,但是很有意思,学到了很多东西,还有幸认识了微软梁健老师,谢谢您的帮助!同时还认识同行的很多朋友,非常高兴,把这段难忘的比赛记录一下~~也分享一下代码,给那些没有参加的朋友,
数据集(文末链接)
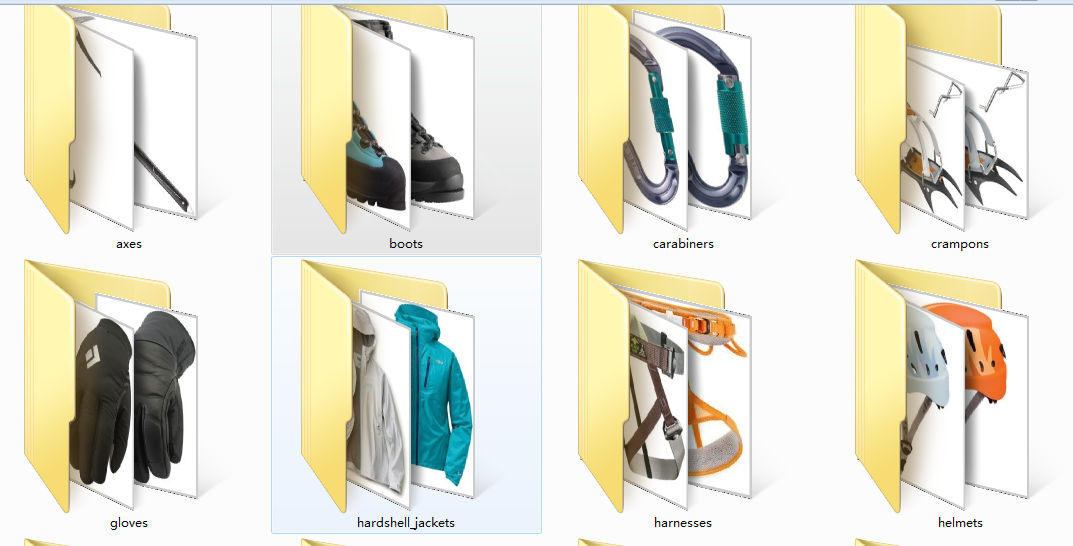
首先每支队伍会收到一个数据集,它是一个登山公司提供的装备图片,有登山镐,鞋子,登山扣,不知道叫什么的雪地爪?手套,冲锋衣,安全带。。。一共12个类别,每个类别几百个样本,我们的任务就是对这些图片分类和识别
简单看一下:
赛题:
赛题共有6道,简单描述一下:
1、搭建环境(略过)
2、图像正规化(包括颜色和大小)
3、通过机器学习方法对图像分类,precision>0.8
4、通过深度学习方法对图像分类,precision>0.9
5、部署(略过)
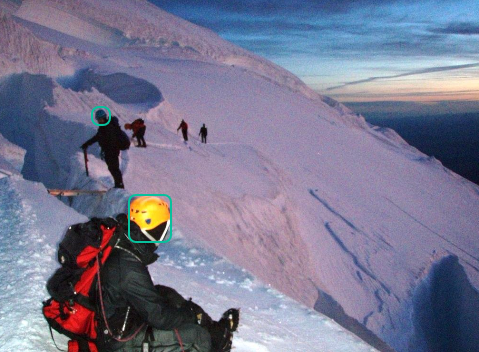
6、目标检测(用全新的数据集,检测雪地中的登山者是否带头盔!!航拍图像,有点难度~)
_______________________________________
下面是每道题目的详细描述和代码
题目2
完成以下任务:
选择一种基本颜色,例如白色并填充所有图片尺寸不是1:1比例的图像
不通过直接拉伸的方式,重塑至128x128x3像素的阵列形状
确保每个图像的像素范围从0到255(包含或[0,255]),也称为“对比度拉伸”(contrast stretching).
标准化或均衡以确保像素在[0,255]范围内.
成功完成的标准
团队将在Jupyter Notebook中运行一个代码单元,绘制原始图像,然后绘制填充后的像素值归一化或均衡图像, 展示给教练看.
团队将在Jupyter notebook 为教练运行一个代码单元,显示的像素值的直方图应该在0到255的范围内(包括0和255).
def normalize(src):

    arr = array(src)

    arr = arr.astype('float')

    # Do not touch the alpha channel

    for i in range(3):

        minval = arr[...,i].min()

        maxval = arr[...,i].max()

        if minval != maxval:

            arr[...,i] -= minval

            arr[...,i] *= (255.0/(maxval-minval))

    arr = arr.astype(uint8)

    return Image.fromarray(arr,'RGB')

import matplotlib.pyplot as plt

from PIL import ImageColor

from matplotlib.pyplot import imshow

from PIL import Image

from pylab import *

import copy

plt.figure(figsize=(10,10)) #设置窗口大小

# src = Image.open("100974.jpeg")

src = Image.open("rose.jpg")

src_array = array(src)

plt.subplot(2,2,1), plt.title('src')

plt.imshow(src), plt.axis('off')

ar=src_array[:,:,0].flatten()

ag=src_array[:,:,1].flatten()

ab=src_array[:,:,2].flatten()

plt.subplot(2,2,2),  plt.title('src hist')

plt.axis([0,255,0,0.03])

plt.hist(ar, bins=256, normed=1,facecolor='red',edgecolor='r',hold=1) #原始图像直方图

plt.hist(ag, bins=256, normed=1,facecolor='g',edgecolor='g',hold=1) #原始图像直方图

plt.hist(ab, bins=256, normed=1,facecolor='b',edgecolor='b') #原g始图像直方图

dst = normalize(src)

dst_array = array(dst)

plt.subplot(2,2,3), plt.title('dst')

plt.imshow(dst), plt.axis('off')

ar=dst_array[:,:,0].flatten()

ag=dst_array[:,:,1].flatten()

ab=dst_array[:,:,2].flatten()

plt.subplot(2,2,4),  plt.title('dst hist')

plt.axis([0,255,0,0.03])

plt.hist(ar, bins=256, normed=1,facecolor='red',edgecolor='r',hold=1) #原始图像直方图

plt.hist(ag, bins=256, normed=1,facecolor='g',edgecolor='g',hold=1) #原始图像直方图

plt.hist(ab, bins=256, normed=1,facecolor='b',edgecolor='b') #原g始图像直方图

题目3
使用一个非参数化分类方法(参考 参考文档)来创建一个模型,预测新的户外装备图像的分类情况,训练来自挑战2的预处理过的128x128x3的装备图像。所使用的算法可以从scikit-learn库中挑选现有的非参数化算法来做分类。向教练展示所提供的测试数据集的精确度,并且精确度分数需要超过80%。
dir_data ="data/preprocess_images/"

equipments = ['axes', 'boots', 'carabiners', 'crampons', 'gloves', 'hardshell_jackets', 'harnesses', 'helmets',

              'insulated_jackets', 'pulleys', 'rope', 'tents']

train_data = []

y = []

import os

from PIL import Image

for equip_name in equipments:

    dir_equip = dir_data + equip_name

    for filename in os.listdir(dir_equip):

        if(filename.find('jpeg')!=-1):

            name = dir_equip + '/' + filename

            img = Image.open(name).convert('L')

            train_data.append(list(img.getdata()))

            y.append(equip_name)
from sklearn import svm

from sklearn.cross_validation import train_test_split

train_X,test_X, train_y, test_y = train_test_split(train_data, y, test_size = 0.3, random_state = 0)

from sklearn import neighbors

from sklearn.metrics import precision_recall_fscore_support as score

from sklearn.metrics import precision_score,recall_score

clf_knn = neighbors.KNeighborsClassifier(algorithm='kd_tree')

clf_knn.fit(train_X, train_y)

y_pred = clf_knn.predict(test_X)
print(__doc__)

import itertools

import numpy as np

import matplotlib.pyplot as plt

from sklearn import svm, datasets

from sklearn.model_selection import train_test_split

from sklearn.metrics import confusion_matrix

def plot_confusion_matrix(cm, classes,

                          normalize=False,

                          title='Confusion matrix',

                          cmap=plt.cm.Blues):

    """

    This function prints and plots the confusion matrix.

    Normalization can be applied by setting `normalize=True`.

    """

    if normalize:

        cm = cm.astype('float') / cm.sum(axis=1)[:, np.newaxis]

        print("Normalized confusion matrix")

    else:

        print('Confusion matrix, without normalization')

    print(cm)

    plt.imshow(cm, interpolation='nearest', cmap=cmap)

    plt.title(title)

    plt.colorbar()

    tick_marks = np.arange(len(classes))

    plt.xticks(tick_marks, classes, rotation=45)

    plt.yticks(tick_marks, classes)

    fmt = '.2f' if normalize else 'd'

    thresh = cm.max() / 2.

    for i, j in itertools.product(range(cm.shape[0]), range(cm.shape[1])):

        plt.text(j, i, format(cm[i, j], fmt),

                 horizontalalignment="center",

                 color="white" if cm[i, j] > thresh else "black")

    plt.tight_layout()

    plt.ylabel('True label')

    plt.xlabel('Predicted label')

# Compute confusion matrix

# cnf_matrix = confusion_matrix(y_test, y_pred)

np.set_printoptions(precision=2)

confusion_mat = confusion_matrix(test_y, y_pred, labels = equipments)

# Plot non-normalized confusion matrix

plt.figure(figsize=(10,10))

plot_confusion_matrix(confusion_mat, classes=equipments,

                      title='Confusion matrix, without normalization')

# Plot normalized confusion matrix

plt.figure(figsize=(10,10))

plot_confusion_matrix(confusion_mat, classes=equipments, normalize=True,

                      title='Normalized confusion matrix')

plt.show()
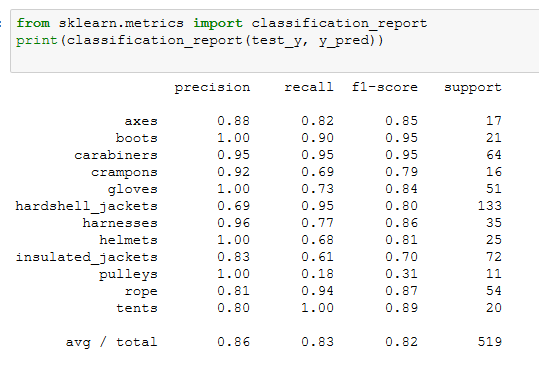
因为要求精确度>0.8,sklearn中的很多算法应该都能满足,我选择了准确度比较高的KNN来建模,应该足够用了

算一下presion和recall,轻松超越0.8
题目4
挑战完成标准,使用深度学习模型,如CNN分析复杂数据
团队将在Jupyter Notebook上为教练运行一个代码单元,展示模型的准确度为90%或更高
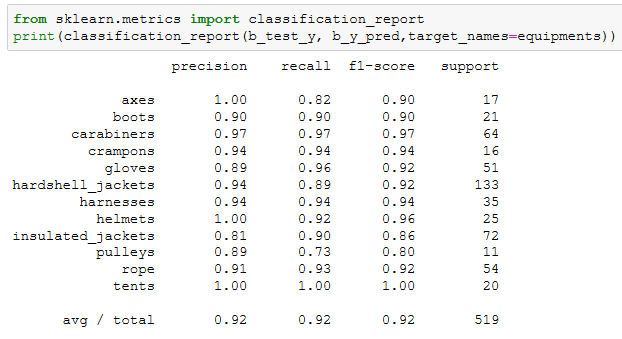
准确度如果要>0.9,sklearn中的机器学习算法就很难达到了,关键时刻只能上CNN
import matplotlib.pyplot as plt

from PIL import ImageColor

from matplotlib.pyplot import imshow

from PIL import Image

from pylab import *

dir_data ="data/preprocess_images/"

equipments = ['axes', 'boots', 'carabiners', 'crampons', 'gloves', 'hardshell_jackets', 'harnesses', 'helmets',

              'insulated_jackets', 'pulleys', 'rope', 'tents']

train_data = []

y = []

import os

from PIL import Image

i=0

for equip_name in equipments:

    dir_equip = dir_data + equip_name

    for filename in os.listdir(dir_equip):

        if(filename.find('jpeg')!=-1):

            name = dir_equip + '/' + filename

            img = Image.open(name).convert('L')

            train_data.append(array(img).tolist())

            y.append(i)

    i += 1

train_data = np.asarray(train_data)
from sklearn import svm

from sklearn.cross_validation import train_test_split

import numpy as np

import keras

num_classes=12

img_rows=128

img_cols=128

train_X, test_X, train_y, test_y = train_test_split(train_data, y, test_size = 0.3, random_state = 0)

train_X = train_X.reshape(train_X.shape[0], img_rows, img_cols, 1)

test_X = test_X.reshape(test_X.shape[0], img_rows, img_cols, 1)

train_X = train_X.astype('float32')

test_X = test_X.astype('float32')

train_X /= 255

test_X /= 255

print('x_train shape:', train_X.shape)

print(train_X.shape[0], 'train samples')

print(test_X.shape[0], 'test samples')

# convert class vectors to binary class matrices

train_y = keras.utils.to_categorical(train_y, num_classes)

test_y = keras.utils.to_categorical(test_y, num_classes)
from keras.layers import Dense, Activation, Convolution2D, MaxPooling2D, Flatten

from keras.models import Sequential

from keras.layers import Convolution2D,MaxPooling2D, Conv2D

import keras

model = Sequential()

model.add(Conv2D(32, kernel_size=(3, 3),

                 activation='relu',

                 input_shape=(128, 128, 1)))

model.add(MaxPooling2D(pool_size=(2, 2)))

model.add(Conv2D(64, (3, 3), activation='relu'))

model.add(MaxPooling2D(pool_size=(2, 2)))

# model.add(Dropout(0.25))

model.add(Flatten())

model.add(Dense(128, activation='relu'))

# model.add(Dropout(0.5))

model.add(Dense(12, activation='softmax'))

model.compile(loss=keras.losses.categorical_crossentropy,

              optimizer=keras.optimizers.Adadelta(),

              metrics=['accuracy'])

model.fit(train_X, train_y,

          batch_size=128,

          epochs=50,

          verbose=1,

          validation_data=(test_X, test_y))

score = model.evaluate(test_X, test_y, verbose=0)

print('Test loss:', score[0])

print('Test accuracy:', score[1])
CNN的混淆矩阵比KNN的好了不少
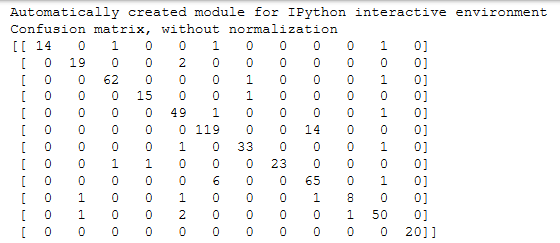
训练了好多次,不断调整各个卷积层和参数,终于达到了一个比较好的效果~~
题目6
使用深度学习框架,基于一个常用的模型,比如Faster R-CNN,训练一个目标检测的模型。这个模型需要能够检测并且使用方框框出图片中出现的每一个头盔。
这道题目首先要自己标注样本,几百张图像标注完累的半死。。。这里我们使用VOTT来标注,它会自动生成一个样本描述文件,很方便。Faster R-CNN的程序我们参考了git上的一个红细胞检测的项目,https://github.com/THULiusj/CosmicadDetection-Keras-Tensorflow-FasterRCNN,代码非常多就不贴了
最后来一张效果图
本文数据集和VOTT工具 链接:
https://pan.baidu.com/s/1FFw0PLJrrOhwR6J1HexPJA
提取码 s242
记微软OpenHack机器学习挑战赛的更多相关文章
- 微软分布式机器学习工具包DMTK——初窥门径
在现在机器学习如日中天的大背景下,微软亚洲研究院的实习岗位中,机器学习组的工作也是维护DMTK,参与算法改进,那么在此之前我们得了解DMTK是个啥. DMTK由一个服务于分布式机器学习的框架和一组分布 ...
- 年轻的心与渐行渐近的梦——记微软-斯坦福产品设计创新课程ME310
作者:中国科学技术大学 王牧 Stanford D. School 2014年6月,沐浴着加州的阳光,在斯坦福大学(下文简称Stanford)完成汇报后,历时一年的创新设计课程ME310的项目结束 ...
- 机器学习数据集,主数据集不能通过,人脸数据集介绍,从r包中获取数据集,中国河流数据集
机器学习数据集,主数据集不能通过,人脸数据集介绍,从r包中获取数据集,中国河流数据集 选自Microsoft www.tz365.Cn 作者:Lee Scott 机器之心编译 参与:李亚洲.吴攀. ...
- 【机器学习Machine Learning】资料大全
昨天总结了深度学习的资料,今天把机器学习的资料也总结一下(友情提示:有些网站需要"科学上网"^_^) 推荐几本好书: 1.Pattern Recognition and Machi ...
- 【转】自学成才秘籍!机器学习&深度学习经典资料汇总
小编都深深的震惊了,到底是谁那么好整理了那么多干货性的书籍.小编对此人表示崇高的敬意,小编不是文章的生产者,只是文章的搬运工. <Brief History of Machine Learn ...
- 机器学习(Machine Learning)&深度学习(Deep Learning)资料
<Brief History of Machine Learning> 介绍:这是一篇介绍机器学习历史的文章,介绍很全面,从感知机.神经网络.决策树.SVM.Adaboost到随机森林.D ...
- 机器学习(Machine Learning)&深入学习(Deep Learning)资料
<Brief History of Machine Learning> 介绍:这是一篇介绍机器学习历史的文章,介绍很全面,从感知机.神经网络.决策树.SVM.Adaboost 到随机森林. ...
- 机器学习(Machine Learning)&深度学习(Deep Learning)资料【转】
转自:机器学习(Machine Learning)&深度学习(Deep Learning)资料 <Brief History of Machine Learning> 介绍:这是一 ...
- 机器学习&深度学习经典资料汇总,data.gov.uk大量公开数据
<Brief History of Machine Learning> 介绍:这是一篇介绍机器学习历史的文章,介绍很全面,从感知机.神经网络.决策树.SVM.Adaboost到随机森林.D ...
随机推荐
- SQL Server 2008R2 代理服务-开启
,点击开始菜单-所有程序-SQLServer2008R2-配置工具-SQLServer配置管理器 2,选择SQLServer服务 3,找到SqlServer代理(MSSQLSERVER),双击或右键选 ...
- 三款功能强大代码比较工具Beyond compare、DiffMerge、WinMerge
我们经常会遇到需要比较同一文件的不同版本,特别是代码文件.如果人工去对比查看,势必费时实力还会出现纰漏和错误,因此我们需要借助一些代码比较的工具来自动完成这些工作.这里介绍3款比较流行且功能强大的工具 ...
- Java_Path_01_路径问题
二.参考资料 1.java 路径问题 2.Java路径问题最终解决方案—可定位所有资源的相对路径寻址 3.Java获取文件的路径 4.Thread.currentThread().getContext ...
- less语言特性
作为CSS的一种扩展,LESSCSS不仅向下兼容CSS的语法,而且连新增的特性也是使用CSS的语法.这样的设计使得学习LESS很轻松,而且你可以在任何时候回退到CSS. 变量 很容易理解: @nice ...
- 网络编程学习笔记-TCP拥塞控制机制
为了防止网络的拥塞现象,TCP提出了一系列的拥塞控制机制.最初由V. Jacobson在1988年的论文中提出的TCP的拥塞控制由“慢启动(Slow start)”和“拥塞避免(Congestion ...
- Windows下使用vim编写代码,使用nmake编译代码,使用vs来调试代码
1.编写代码 2.编写Makefile,如果要调试, 2.1.需要在编译的时候加上/Zi ( Generates complete debugging information),编译由cl.exe来完 ...
- AtCoder Beginner Contest 106 2018/08/18
A - Garden Time limit : 2sec / Memory limit : 1000MB Score: 100 points Problem Statement There is a ...
- PowerDesigner根据SQL文件生成PDM数据字典
当PowerDesigner不能直接连接到数据库的时候,可以用到下面这个方法生成数据字典(直接连接数据库生成数据字典在上次随笔中有介绍). 具体操作步骤截图: ↓↓↓这里选择的sql文件是从数据库导出 ...
- 【Lintcode】036.Reverse Linked List II
题目: Reverse a linked list from position m to n. Given m, n satisfy the following condition: 1 ≤ m ≤ ...
- PC lint -sem 用法示例
-sem(std::auto_ptr::auto_ptr,custodial(1)) // the auto_ptr class type // handles custody automagical ...