ubuntu16.04 安装opencv3.3
from: http://www.pyimagesearch.com/2016/10/24/ubuntu-16-04-how-to-install-opencv/
Step #1: Install OpenCV dependencies on Ubuntu 16.04
Most (in fact, all) steps in this tutorial will be accomplished by using your terminal. To start, open up your command line and update the apt-get package manager to refresh and upgrade and pre-installed packages/libraries:
Shell
|
1
2
|
$ sudo apt-get update
$ sudo apt-get upgrade
|
Next, let’s install some developer tools:
Shell
|
1
|
$ sudo apt-get install build-essential cmake pkg-config
|
The pkg-config package is (very likely) already installed on your system, but be sure to include it in the above apt-get command just in case. The cmake program is used to automatically configure our OpenCV build.
OpenCV is an image processing and computer vision library. Therefore, OpenCV needs to be able to load various image file formats from disk such as JPEG, PNG, TIFF, etc. In order to load these images from disk, OpenCV actually calls other image I/O libraries that actually facilitate the loading and decoding process. We install the necessary ones below:
Shell
|
1
|
$ sudo apt-get install libjpeg8-dev libtiff5-dev libjasper-dev libpng12-dev
|
Okay, so now we have libraries to load images from disk — but what about video? Use the following commands to install packages used to process video streams and access frames from cameras:
Shell
|
1
2
|
$ sudo apt-get install libavcodec-dev libavformat-dev libswscale-dev libv4l-dev
$ sudo apt-get install libxvidcore-dev libx264-dev
|
OpenCV ships out-of-the-box with a very limited set of GUI tools. These GUI tools allow us to display an image to our screen ( cv2.imshow ), wait for/record keypresses ( cv2.waitKey ), track mouse events ( cv2.setMouseCallback ), and create simple GUI elements such as sliders and trackbars. Again, you shouldn’t expect to be building full-fledged GUI applications with OpenCV — these are just simple tools that allow you to debug your code and build very simple applications.
Internally, the name of the module that handles OpenCV GUI operations is highgui . Thehighgui module relies on the GTK library, which you should install using the following command:
Shell
|
1
|
$ sudo apt-get install libgtk-3-dev
|
Next, we install libraries that are used to optimize various functionalities inside OpenCV, such as matrix operations:
Shell
|
1
|
$ sudo apt-get install libatlas-base-dev gfortran
|
We’ll wrap up Step #1 by installing the Python development headers and libraries for both Python 2.7 and Python 3.5 (that way you have both):
Shell
|
1
|
$ sudo apt-get install python2.7-dev python3.5-dev
|
Note: If you do not install the Python development headers and static library, you’ll run into issues during Step #4 where we run cmake to configure our build. If these headers are not installed, then the cmake command will be unable to automatically determine the proper values of the Python interpreter and Python libraries. In short, the output of this section will look “empty” and you will not be able to build the Python bindings. When you get to Step #4, take the time to compare your output of the command to mine.
Step #2: Download the OpenCV source
At the time of this article’s publication, the most recent version of OpenCV is 3.1.0 , which we download a .zip of and unarchive using the following commands:
Shell
|
1
2
3
|
$ cd ~
$ wget -O opencv.zip https://github.com/Itseez/opencv/archive/3.1.0.zip
$ unzip opencv.zip
|
When new versions of OpenCV are released you can check the official OpenCV GitHub and downloaded the latest release by changing the version number of the .zip .
However, we’re not done downloading source code yet — we also need the opencv_contribrepository as well:
Shell
|
1
2
|
$ wget -O opencv_contrib.zip https://github.com/Itseez/opencv_contrib/archive/3.1.0.zip
$ unzip opencv_contrib.zip
|
Why are we bothering to download the contrib repo as well?
Well, we want the full install of OpenCV 3 to have access to features (no pun intended) such as SIFT and SURF. In OpenCV 2.4, SIFT and SURF were included in the default installation of OpenCV. However, with the release of OpenCV 3+, these packages have been moved to contrib, which houses either (1) modules that are currently in development or (2) modules that are marked as “non-free” (i.e., patented). You can learn more about the reasoning behind the SIFT/SURF restructuring in this blog post.
Note: You might need to expand the commands above using the “<=>” button during your copy and paste. The .zip in the 3.1.0.zip may be cutoff in smaller browser windows. For convenience, I have included the full URL of both the opencv archive as well as theopencv_contrib archive below:
- https://github.com/opencv/opencv/archive/3.1.0.zip
- https://github.com/opencv/opencv_contrib/archive/3.1.0.zip
I also want to mention that both your opencv and opencv_contrib versions should be the same (in this case, 3.1.0 ). If the versions numbers do not matchup, you could very easily run into compile time errors (or worse, runtime errors that are near impossible to debug).
Step #3: Setup your Python environment — Python 2.7 or Python 3
We are now ready to start configuring our Python development environment for the build. The first step is to install pip , a Python package manager:
Shell
|
1
2
3
|
$ cd ~
$ wget https://bootstrap.pypa.io/get-pip.py
$ sudo python get-pip.py
|
I’ve mentioned this in every single OpenCV + Python install tutorial I’ve ever done, but I’ll say it again here today: I’m a huge fan of both virtualenv and virtualenvwrapper. These Python packages allow you to create separate, independent Python environments for eachproject that you are working on.
In short, using these packages allows you to solve the “Project X depends on version 1.x, but Project Y needs 4.x dilemma. A fantastic side effect of using Python virtual environments is that you can keep your system Python neat, tidy, and free from clutter.
While you can certainly install OpenCV with Python bindings without Python virtual environments, I highly recommend you use them as other PyImageSearch tutorials leverage Python virtual environments. I’ll also be assuming that you have both virtualenv and virtualenvwrapper installed throughout the remainder of this guide.
If you would like a full, detailed explanation on why Python virtual environments are a best practice, you should absolutely give this excellent blog post on RealPython a read. I also provide some commentary on why I personally prefer Python virtual environments in the first half of this tutorial.
Again, let me reiterate that it’s standard practice in the Python community to be leveraging virtual environments of some sort, so I suggest you do the same:
Shell
|
1
2
|
$ sudo pip install virtualenv virtualenvwrapper
$ sudo rm -rf ~/get-pip.py ~/.cache/pip
|
Once we have virtualenv and virtualenvwrapper installed, we need to update our~/.bashrc file to include the following lines at the bottom of the file:
Shell
|
1
2
3
|
# virtualenv and virtualenvwrapper
export WORKON_HOME=$HOME/.virtualenvs
source /usr/local/bin/virtualenvwrapper.sh
|
The ~/.bashrc file is simply a shell script that Bash runs whenever you launch a new terminal. You normally use this file to set various configurations. In this case, we are setting an environment variable called WORKON_HOME to point to the directory where our Python virtual environments live. We then load any necessary configurations fromvirtualenvwrapper .
To update your ~/.bashrc file simply use a standard text editor. I would recommend usingnano , vim , or emacs . You can also use graphical editors as well, but if you’re just getting started, nano is likely the easiest to operate.
A more simple solution is to use the cat command and avoid editors entirely:
Shell
|
1
2
3
|
$ echo -e "\n# virtualenv and virtualenvwrapper" >> ~/.bashrc
$ echo "export WORKON_HOME=$HOME/.virtualenvs" >> ~/.bashrc
$ echo "source /usr/local/bin/virtualenvwrapper.sh" >> ~/.bashrc
|
After editing our ~/.bashrc file, we need to reload the changes:
Shell
|
1
|
$ source ~/.bashrc
|
Note: Calling source on .bashrc only has to be done once for our current shell session. Anytime we open up a new terminal, the contents of .bashrc will be automatically executed (including our updates).
Now that we have installed virtualenv and virtualenvwrapper , the next step is to actually create the Python virtual environment — we do this using the mkvirtualenv command.
But before executing this command, you need to make a choice: Do you want to use Python 2.7 or Python 3?
The outcome of your choice will determine which command you run in the following section.
Creating your Python virtual environment
If you decide to use Python 2.7, use the following command to create a Python 2.7 virtual environment:
Shell
|
1
|
$ mkvirtualenv cv -p python2
|
Otherwise, use this command to create a Python 3 virtual environment:
Shell
|
1
|
$ mkvirtualenv cv -p python3
|
Regardless of which Python command you decide to use, the end result is that we have created a Python virtual environment named cv (short for “computer vision”).
You can name this virtual environment whatever you like (and create as many Python virtual environments as you want), but for the time bing, I would suggest sticking with the cv name as that is what I’ll be using throughout the rest of this tutorial.
Verifying that you are in the “cv” virtual environment
If you ever reboot your Ubuntu system; log out and log back in; or open up a new terminal, you’ll need to use the workon command to re-access your cv virtual environment. An example of the workon command follows:
Shell
|
1
|
$ workon cv
|
To validate that you are in the cv virtual environment, simply examine your command line — if you see the text (cv) preceding your prompt, then you are in the cv virtual environment:
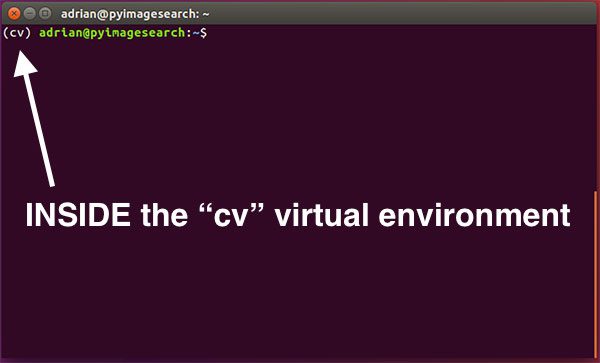
Figure 1: Make sure you see the “(cv)” text on your prompt, indicating that you are in the cv virtual environment.
Otherwise, if you do not see the cv text, then you are not in the cv virtual environment:
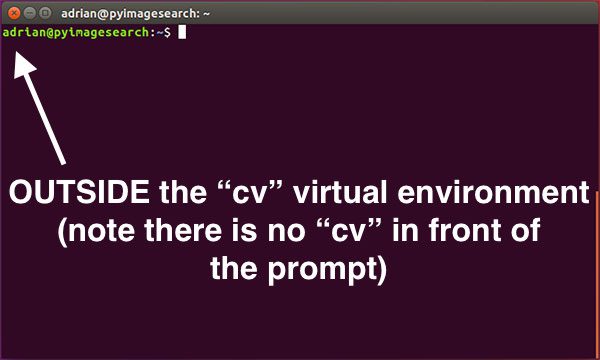
Figure 2: If you do not see the “(cv)” text on your prompt, then you are not in the cv virtual environment and need to run the “workon” command to resolve this issue.
To access the cv virtual environment simply use the workon command mentioned above.
Install NumPy into your Python virtual environment
The final step before we compile OpenCV is to install NumPy, a Python package used for numerical processing. To install NumPy, ensure you are in the cv virtual environment (otherwise NumPy will be installed into the system version of Python rather than the cv environment). From there execute the following command:
Shell
|
1
|
$ pip install numpy
|
Step #4: Configuring and compiling OpenCV on Ubuntu 16.04
At this point, all of our necessary prerequisites have been installed — we are now ready to compile and OpenCV!
But before we do that, double-check that you are in the cv virtual environment by examining your prompt (you should see the (cv) text preceding it), and if not, use the workon command:
Shell
|
1
|
$ workon cv
|
After ensuring you are in the cv virtual environment, we can setup and configure our build using CMake:
Shell
|
1
2
3
4
5
6
7
8
9
10
|
$ cd ~/opencv-3.1.0/
$ mkdir build
$ cd build
$ cmake -D CMAKE_BUILD_TYPE=RELEASE \
-D CMAKE_INSTALL_PREFIX=/usr/local \
-D INSTALL_PYTHON_EXAMPLES=ON \
-D INSTALL_C_EXAMPLES=OFF \
-D OPENCV_EXTRA_MODULES_PATH=~/opencv_contrib-3.1.0/modules \
-D PYTHON_EXECUTABLE=~/.virtualenvs/cv/bin/python \
-D BUILD_EXAMPLES=ON ..
|
The above commands change directory to ~/opencv-3.1.0 , which if you have been following this tutorial is where you downloaded and unarchived the .zip files.
Note: If you are getting an error related to stdlib.h: No such file or directory during either the cmake or make phase of this tutorial you’ll also need to include the following option to CMake: -D ENABLE_PRECOMPILED_HEADERS=OFF . In this case I would suggest deleting your build directory, re-creating it, and then re-running CMake with the above option included. This will resolve the stdlib.h error. Thank you to Carter Cherry and Marcin for pointing this out in the comments section!
Inside this directory we create a sub-directory named build and change into it. The build directory is where the actual compile is going to take place.
Finally, we execute cmake to configure our build.
Before we move on to the actual compilation of OpenCV, make sure you examine the output of CMake!
To do this, scroll down the section titled Python 2 and Python 3 .
If you are compiling OpenCV on Ubuntu 16.04 with Python 2.7 support, make sure thePython 2 section includes valid paths to the Interpreter , Libraries , numpy , andpackages path . Your output should be similar to mine below:
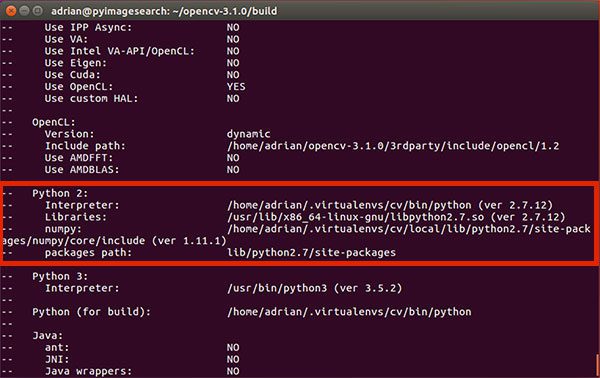
Figure 3: Ensuring that Python 2.7 will be used when compiling OpenCV 3 for Ubuntu 16.04.
Examining this output, you can see that:
- The Interpreter points to the Python 2.7 binary in the cv virtual environment.
- Libraries points to the Python 2.7 library (which we installed during the final step of Step #1).
- The numpy value points to our NumPy installation in the cv virtual environment.
- And finally, the packages path points to lib/python2.7/site-packages . When combined with the CMAKE_INSTALL_PREFIX , this means that after compiling OpenCV, we’ll find our cv2.so bindings in /usr/local/lib/python2.7/site-packages/ .
Similarly, if you’re compiling OpenCV 16.04 with Python 3 support, you’ll want to ensure your Python 3 section looks similar to mine below:
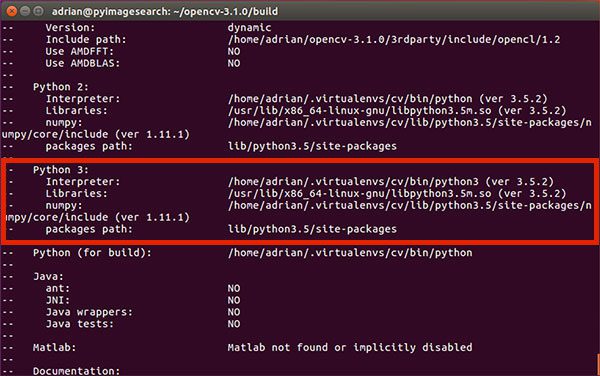
Figure 4: Validating that Python 3 will be used when compiling OpenCV 3 for Ubuntu 16.04.
Again, notice how my Interpreter , Libraries , numpy and packages path have all been correctly set.
If you do not see the cv virtual environments in these variable paths, it’s almost certainly because you are NOT in the cv virtual environment prior to running CMake!
If that is indeed the case, simply access the cv virtual environment by calling workon cv and re-run the CMake command mentioned above.
Assuming your CMake command exited without any errors, you can now compile OpenCV:
Shell
|
1
|
$ make -j4
|
The -j switch controls the number of processes to be used when compiling OpenCV — you’ll want to set this value to the number of processors/cores on your machine. In my case, I have a quad-core processor, so I set -j4 .
Using multiple processes allows OpenCV to compile faster; however, there are times where race conditions are hit and the compile bombs out. While you can’t really tell if this is the case without a lot of previous experience compiling OpenCV, if you do run into an error, my first suggestion would be to run make clean to flush the build, followed by compiling using only a single core:
Shell
|
1
2
|
$ make clean
$ make
|
Below you can find a screenshot of a successful OpenCV + Python compile on Ubuntu 16.04:
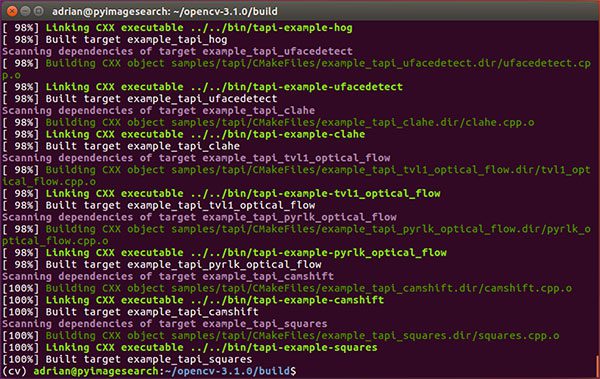
Figure 5: Successfully compiling OpenCV 3 for Ubuntu 16.04.
The last step is to actually install OpenCV 3 on Ubuntu 16.04:
Shell
|
1
2
|
$ sudo make install
$ sudo ldconfig
|
Step #5: Finish your OpenCV install
You’re coming down the home stretch, just a few more steps to go and your Ubuntu 16.04 system will be all setup with OpenCV 3.
For Python 2.7:
After running sudo make install , your Python 2.7 bindings for OpenCV 3 should now be located in /usr/local/lib/python-2.7/site-packages/ . You can verify this using the ls command:
Shell
|
1
2
3
|
$ ls -l /usr/local/lib/python2.7/site-packages/
total 1972
-rw-r--r-- 1 root staff 2016608 Sep 15 09:11 cv2.so
|
Note: In some cases, you may find that OpenCV was installed in/usr/local/lib/python2.7/dist-packages rather than /usr/local/lib/python2.7/site-packages (note dist-packages versus site-packages ). If your cv2.so bindings are not in the site-packages directory, be sure to check dist-pakages .
The final step is to sym-link our OpenCV cv2.so bindings into our cv virtual environment for Python 2.7:
Shell
|
1
2
|
$ cd ~/.virtualenvs/cv/lib/python2.7/site-packages/
$ ln -s /usr/local/lib/python2.7/site-packages/cv2.so cv2.so
|
For Python 3.5:
After running sudo make install , your OpenCV + Python 3 bindings should be located in/usr/local/lib/python3.5/site-packages/ . Again, you can verify this using the ls command:
Shell
|
1
2
3
|
$ ls -l /usr/local/lib/python3.5/site-packages/
total 1972
-rw-r--r-- 1 root staff 2016816 Sep 13 17:24 cv2.cpython-35m-x86_64-linux-gnu.so
|
I’ve been puzzled regarding this behavior ever since OpenCV 3 was released, but for some reason, when compiling OpenCV with Python 3 support, the output cv2.so filename is different. The actual filename might vary for you, but it should look something similar tocv2.cpython-35m-x86_64-linux-gnu.so .
Again, I have no idea exactly why this happens, but it’s a very easy fix. All we need to do is rename the file:
Shell
|
1
2
|
$ cd /usr/local/lib/python3.5/site-packages/
$ sudo mv cv2.cpython-35m-x86_64-linux-gnu.so cv2.so
|
After renaming cv2.cpython-35m-x86_64-linux-gnu.so to simply cv2.so , we can sym-link our OpenCV bindings into the cv virtual environment for Python 3.5:
Shell
|
1
2
|
$ cd ~/.virtualenvs/cv/lib/python3.5/site-packages/
$ ln -s /usr/local/lib/python3.5/site-packages/cv2.so cv2.so
|
Step #6: Testing your OpenCV install
Congratulations, you now have OpenCV 3 installed on your Ubuntu 16.04 system!
To verify that your installation is working:
- Open up a new terminal.
- Execute the workon command to access the cv Python virtual environment.
- Attempt to import the Python + OpenCV bindings.
I have demonstrated how to perform these steps below:
Shell
|
1
2
3
4
5
6
7
8
9
10
|
$ cd ~
$ workon cv
$ python
Python 3.5.2 (default, Jul 5 2016, 12:43:10)
[GCC 5.4.0 20160609] on linux
Type "help", "copyright", "credits" or "license" for more information.
>>> import cv2
>>> cv2.__version__
'3.1.0'
>>>
|
As you can see, I can import my OpenCV bindings into my Python 3.5 shell.
Below follows a screenshot of me utilizing the same steps outlined in this tutorial and importing OpenCV bindings into a Python 2.7 shell:
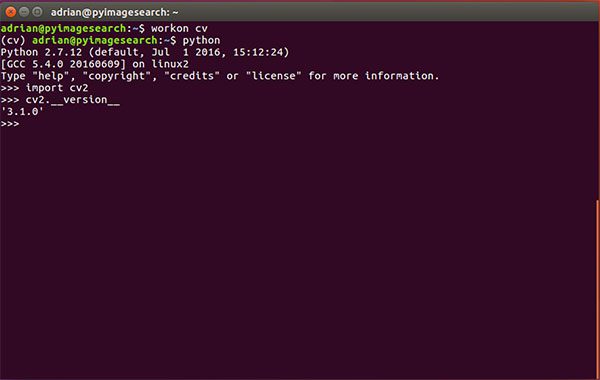
Figure 6: Ensuring that I can successfully import my Python + OpenCV bindings on Ubuntu 16.04.
Thus, regardless of which Python version you decide to use, simply follow the steps detailed in this tutorial and you’ll be able to install OpenCV + Python on your Ubuntu 16.04 system.
Once OpenCV has been installed, you can delete both the opencv-3.1.0 andopencv_contrib-3.1.0 directories (along with their associated .zip files):
Shell
|
1
2
|
$ cd ~
$ rm -rf opencv-3.1.0 opencv_contrib-3.1.0 opencv.zip opencv_contrib.zip
|
But again, be careful when running this command! You’ll want to make sure you have properly installed OpenCV on your system prior to blowing along these directories. Otherwise, you’ll need to restart the entire compile process!
Troubleshooting and FAQ
In this section, I address some of the common questions, problems, and issues that arise when installing OpenCV on Ubuntu 16.04.
Q. When I execute mkvirtualenv or workon , I get a “command not found error”.
A. There are three primary reasons why you would be getting this error message, all of which are related to Step #3:
- First, make sure you have installed virtualenv and virtualenvwrapper using thepip package manager. You can verify this by running pip freeze , examining the output, and ensuring that you see both virtualenv and virtualenvwrapper in the list of installed packages.
- Your ~/.bashrc file may not be updated correctly. To diagnose this, use a text editor such as nano and view the contents of your ~/.bashrc file. At the bottom of the file, you should see the proper export and source commands are present (again, check Step #3 for the commands that should be appended to ~/.bashrc ).
- After editing your ~/.bashrc file, you may have forgotten to source it and reload its contents. Make sure you run source ~/.bashrc after editing it to ensure the contents are reloaded — this will give you access to the mkvirtualenv and workon commands.
Q. Whenever I open a new terminal, logout, or reboot my Ubuntu system, I cannot execute the mkvirtualenv or workon commands.
A. See reason #2 from the previous question.
Q. When I (1) open up a Python shell that imports OpenCV or (2) execute a Python script that calls OpenCV, I get an error: Import Error: No module named cv2 .
A. Unfortunately, the exact cause of this error message is extremely hard to diagnose as there are multiple reasons this could be happening. In general, I recommend the following suggestions to help diagnose and resolve the error:
- Make sure you are in the cv virtual environment by using the workon cv command. If this command gives you an error, then see the first question in this FAQ.
- If after you’ve ensured your ~/.bashrc file has been updated properly and source ‘d, then try investigating the contents of the site-packages directory in your cv virtual environment. You can find the site-packages directory in~/.virtualenvs/cv/lib/python2.7/site-packages/ or~/.virtualenvs/cv/lib/python3.5/site-packages/ depending on your Python version. Make sure that (1) there is a cv2.so file in this site-packages directory and (2) that it’s properly sym-linked to a valid, existing file.
- Be sure to check the site-packages (and even dist-packages ) directory for the system install of Python located in /usr/local/lib/python2.7/site-packages/ and/usr/local/lib/python3.5/site-packages/ , respectively. Ideally, you should have acv2.so file there.
- If all else fails, check in your build/lib directory of your OpenCV build. There shouldbe a cv2.so file there (provided that both cmake and make executed without error). If the cv2.so file is present, manually copy it into both the system site-packages directory as well as the site-packages directory for the cv virtual environment.
So, what’s next?
Congrats! You now have a brand new, fresh install of OpenCV on your Ubuntu 16.04 system — and I’m sure you’re just itching to leverage your install to build some awesome computer vision apps…
…but I’m also willing to bet that you’re just getting started learning computer vision and OpenCV, and probably feeling a bit confused and overwhelmed on exactly where to start.
Personally, I’m a big fan of learning by example, so a good first step would be to have some fun and read this blog post on detecting cats in images/videos. This tutorial is meant to be very hands-on and demonstrate how you can (quickly) build a Python + OpenCV application to detect the presence of cats in images.
And if you’re really interested in leveling-up your computer vision skills, you should definitely check out my book, Practical Python and OpenCV + Case Studies. My book not only covers the basics of computer vision and image processing, but also teaches you how to solve real-world computer vision problems including face detection in images and video streams, object tracking in video, and handwriting recognition.
ubuntu16.04 安装opencv3.3的更多相关文章
- Ubuntu16.04安装opencv-3.4.2
原文链接: https://m.oldpan.me/archives/ubuntu-install-opencv-from-source 第一步:更新我们的系统 sudo apt-get update ...
- Ubuntu16.04安装OpenCV3.2以及PCL1.8
最近在学习slam14讲,需要配置一些环境<视觉slam十四讲> 这本书中已经给出如何配置相关环境的比较详细的说明,但是有些环境并无卵用,比如OpenCV以及PCL 这里给出自己屡试不爽的 ...
- ubuntu16.04 安装opencv3.2.0以及opencv_contrib-3.2.0
1.需要的包:sudo apt-get install build-essentialsudo apt-get install cmake git libgtk2.0-dev pkg-config l ...
- ubuntu16.04安装opencv3.4.0
老实说这篇记录可能拖了有8个月了,早在去年6月份我应该是第一遍安装opencv.当时懒得记录,以为自己什么都能记得住.后来由于电脑各种原因,需要重装opencv,装的时候发现啥都记不住了.然后又得去找 ...
- ubuntu16.04 安装opencv3.4
1.去官网下载opencv,在本教程中选用的时opencv3.4.1,其他版本的配置方法异曲同工. 下载链接http://opencv.org/releases.html,选择sources版本 2. ...
- ubuntu16.04安装opencv3.4.1教程
最近opencv3.4.1发布了,想换个新的试试鲜,于是把配置的过程通过博文的方式记录下来,方便查阅. 本教程原为3.3.0,但经过博主亲测,3.4.0.3.4.1皆适用 1.去官网下载opencv, ...
- ubuntu16.04 安装opencv3.4.0
参考 https://www.cnblogs.com/arkenstone/p/6490017.html https://blog.csdn.net/u013180339/article/detail ...
- ubuntu16.04 安装opencv3
(opencvC++) luo@luo-ThinkPad-W540:20181205$ conda install --channel https://conda.anaconda.org/menpo ...
- Ubuntu16.04安装opencv for python/c++
Ubuntu16.04安装opencv for python/c++ 网上关于opencv的安装已经有了不少资料,但是没有一篇资料能让我一次性安装成功,因此花费了大量时间去解决各种意外,希望这篇能给一 ...
随机推荐
- ORA-10997:another startup/shutdown operation of this instance in progress解决方法
SQL> startup ORA-10997: another startup/shutdown operation of this instance inprogress ORA-09967: ...
- C#继承基本控件实现自定义控件 (转帖)
自定义控件分三类: 1.复合控件:基本控件组合而成.继承自UserControl 2.扩展控件:继承基本控件,扩展一些属性与事件.比如继承Button 3.自定义控件:直接继承自Control 第一种 ...
- Servlet是单例的吗?
如题,是吗?首先我们得搞清楚啥是单例.一聊起单例,条件反射的第一个想到的自然是单例模式.单例模式的定义:一个类有且仅有一个实例,并且自行实例化向整个系统提供.如果按照Java中单例的定义,那么当Ser ...
- 【python】正则表达式-正则表达式常见的字符和符号表
正则表达式常见的字符和符号表:
- win7 配置微软的深度学习caffe
win7 配置微软的深度学习caffe 官方下载: https://github.com/Microsoft/caffe 然后 直接修改caffe目录下的windows目录下的项目的props文件 ...
- C# 教程
http://www.runoob.com/csharp/csharp-tutorial.html
- PMP学习笔记
PMI:Project Management Institute,项目管理协会于1969年在美国成立,致力于全球范围内的项目管理研究.标准制定和出版.价值倡导.职业认证和学位 课程认证.现在,PMI已 ...
- php语言介绍分析
1,胡说八道 php设计专门用于web开发的编程语言,易学易用得到广泛应用的同时也饱受诟病,简单易学使得初学者用最短的时间很容易实现自己的WEB站点,且开源项目丰富,是中小型公司热衷的选择.但是,随着 ...
- 【Hibernate学习笔记-5.1】使用@Transient修饰不想持久保存的属性
作者:ssslinppp 1. 摘要 在默认情况下,持久化类的所有属性会自动映射到数据表的数据列.如果在实际应用中不想持久化保存某些属性,则可以考虑使用@Transient来修饰他们. ...
- Neutron 理解 (1): Neutron 所实现的网络虚拟化 [How Neutron Virtualizes Network]
学习 Neutron 系列文章: (1)Neutron 所实现的网络虚拟化 (2)Neutron OpenvSwitch + VLAN 虚拟网络 (3)Neutron OpenvSwitch + GR ...
