UI5-文档-4.9-Component Configuration
在我们介绍了模型-视图-控制器(MVC)概念的所有三个部分之后,现在我们将讨论SAPUI5的另一个重要的结构方面。
在这一步中,我们将把所有UI资产封装在一个独立于索引的组件中。html文件。组件是SAPUI5应用程序中使用的独立且可重用的部件。无论何时访问资源,我们都将相对于组件(而不是相对于index.html)执行此操作。这种架构上的变化允许我们的应用程序在比静态索引更灵活的环境中使用。html页面,如在周围的容器中,如SAP Fiori launchpad。
Preview

An input field and a description displaying the value of the input field (No visual changes to last step)
Coding
You can view and download all files at Walkthrough - Step 9.

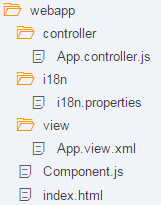
Folder Structure for this Step
在此步骤之后,您的项目结构将如图所示。我们将创建Component.js文件并修改app中的相关文件。
webapp/Component.js (New)
sap.ui.define([

   "sap/ui/core/UIComponent"

], function (UIComponent) {

   "use strict";

   return UIComponent.extend("", {

      init : function () {

         // call the init function of the parent

         UIComponent.prototype.init.apply(this, arguments);

      }

   });

});
我们创建一个初始组件。在webapp文件夹中的js文件将保存我们的应用程序设置。组件的init函数由SAPUI5在实例化组件时自动调用。我们的组件继承自基本类sap.ui.core.UIComponent,必须在重写的init方法中对基类的init函数进行超调用。
webapp/Component.js
sap.ui.define([

   "sap/ui/core/UIComponent",

   "sap/ui/model/json/JSONModel",

   "sap/ui/model/resource/ResourceModel"

], function (UIComponent, JSONModel, ResourceModel) {

   "use strict";

   return UIComponent.extend("sap.ui.demo.walkthrough.Component", {

      metadata : {

         rootView: {

            "viewName": "sap.ui.demo.walkthrough.view.App",

            "type": "XML",

            "async": true,

            "id": "app"

         }

      },

      init : function () {

         // call the init function of the parent

         UIComponent.prototype.init.apply(this, arguments);

         // set data model

         var oData = {

            recipient : {

               name : "World"

            }

         };

         var oModel = new JSONModel(oData);

         this.setModel(oModel);

         // set i18n model

         var i18nModel = new ResourceModel({

            bundleName : "sap.ui.demo.walkthrough.i18n.i18n"

         });

         this.setModel(i18nModel, "i18n");

      }

   });

});
在init函数中,我们实例化了数据模型和i18n模型,就像以前在app控制器中所做的那样。请注意,模型是直接在组件上设置的,而不是在组件的根视图上设置的。但是,由于嵌套控件会自动从其父控件继承模型,因此模型也可以在视图中使用。该Component.js文件现在由两部分组成:新的元数据部分定义了对根视图的引用,以及前面介绍的初始化组件时调用的init函数。正如我们之前所做的,而不是直接在index.html中显示根视图。组件现在将管理app视图的显示。
webapp/controller/App.controller.js
sap.ui.define([

   "sap/ui/core/mvc/Controller",

   "sap/m/MessageToast"

], function (Controller, MessageToast) {

   "use strict";

   return Controller.extend("sap.ui.demo.walkthrough.controller.App", {

      onShowHello : function () {

         // read msg from i18n model

         var oBundle = this.getView().getModel("i18n").getResourceBundle();

         var sRecipient = this.getView().getModel().getProperty("/recipient/name");

         var sMsg = oBundle.getText("helloMsg", [sRecipient]);

         // show message

         MessageToast.show(sMsg);

      }

   });

});
删除onInit函数和所需模块;这现在在组件中完成。现在您已经看到了上面显示的代码。
webapp/index.html
<!DOCTYPE html>

<html>

   <head>

      <meta http-equiv="X-UA-Compatible" content="IE=edge">

      <meta charset="utf-8">

      <title>Walkthrough</title>

      <script

         id="sap-ui-bootstrap"

         src="/resources/sap-ui-core.js"

         data-sap-ui-theme="sap_belize"

         data-sap-ui-libs="sap.m"

         data-sap-ui-bindingSyntax="complex"

         data-sap-ui-compatVersion="edge"

         data-sap-ui-preload="async"

         data-sap-ui-resourceroots='{

            "sap.ui.demo.walkthrough": "./"

         }' >

      </script>

      <script>

         sap.ui.getCore().attachInit(function () {

            new sap.ui.core.ComponentContainer({

         name: "sap.ui.demo.walkthrough",

         settings : {

            id : "walkthrough"

         }

            }).placeAt("content");

         });

      </script>

   </head>

   <body class="sapUiBody" id="content">

   </body>

</html>
Conventions
在索引页上,我们现在实例化组件,而不是应用程序视图。辅助方法sap.ui.core.ComponentContainer通过搜索组件实例化组件。作为参数传入的名称空间中的js文件。组件自动加载我们在上面定义的根视图并显示它。如果现在调用index.html文件,应用程序应该仍然看起来一样,但现在被打包成一个UI组件.
▪组件名为component .js。
▪组件与应用程序的所有UI资产一起位于webapp文件夹中。
▪index.html文件被有效地使用,它位于webapp文件夹中。
Parent topic: Walkthrough
Previous: Step 8: Translatable Texts
Next: Step 10: Descriptor for Applications
Related Information
API Reference:sap.ui.core.mvc.ViewType
Samples:sap.ui.core.mvc.ViewType
UI5-文档-4.9-Component Configuration的更多相关文章
- Ehcache 3.7文档—基础篇—XML Configuration
你可以使用xml配置创建CacheManager,根据这个schema definition ( http://www.ehcache.org/documentation/3.7/xsds.html# ...
- SpringBoot系列: 使用 Swagger 生成 API 文档
SpringBoot非常适合开发 Restful API程序, 我们都知道为API文档非常重要, 但要维护好难度也很大, 原因有: 1. API文档如何能被方便地找到? 以文件的形式编写API文档都有 ...
- springBoot Swagger2 接口文档生成
// 生成配置类 package com.irm.jd.config.swagger; import org.springframework.context.annotation.Bean; impo ...
- spring整合mybatis错误:Caused by: org.xml.sax.SAXParseException; lineNumber: 5; columnNumber: 62; 文档根元素 "mapper" 必须匹配 DOCTYPE 根 "configuration"。
运行环境:jdk1.7.0_17+tomcat 7 + spring:3.2.0 +mybatis:3.2.7+ eclipse 错误:Caused by: org.xml.sax.SAXParseE ...
- BooStrap4文档摘录 2 Content, Component
Content Reboot:从新写了主要元素的排列. 本章讲了各种元素及其相关的类. ⚠️ 文档左上角有搜索栏. Components Alert✅ Badge✅ Button✅和Button gr ...
- SpingMVC 核心技术帮助文档
声明:本篇文档主要是用于参考帮助文档,没有实例,但几乎包含了SpringMVC 4.2版本的所有核心技术,当前最新版本是4.3,4.2的版本已经经是很新的了,所以非常值得大家一读,对于读完这篇文档感觉 ...
- Spring Boot文档阅读
原因之初 最初习惯百度各种博客教程,然后跟着操作,因为觉得跟着别人走过的路走可以少走很多弯路,省时间.然而,很多博客的内容并不够完整,甚至错误,看多了的博客甚至有千篇一律的感觉.此外,博客毕竟是记载博 ...
- 分享一个集成在项目中的REST APIs文档框架swagger
1 为什么是使用swagger? 1-1 当后台开发人员开发好接口,是不是还要重新书写一份接口文档提给前端人员,当然对于程序员最不喜欢的就是书写文档(当然文档是必须的,有利于项目的维护) 1-2 当后 ...
- springmvc+swagger构建Restful风格文档
本次和大家分享的是java方面的springmvc来构建的webapi接口+swagger文档:上篇文章分享.net的webapi用swagger来构建文档,因为有朋友问了为啥.net有docpage ...
- Unity文档阅读 第一章 入门
Before you learn about dependency injection and Unity, you need to understand why you should use the ...
随机推荐
- 01.ubuntu14.04安装HI3518EV200 SDK的过程
转载,侵删 1.海思SDK安装编译 Hi3518EV200_SDK是基于Hi3518EV200_DMEB的软件开发包,包含了在Linux相关应用开发时使用的各种工具及其源代码,是用户开发中最基本的软件 ...
- 机器学习Hands On Lab
fetch_data fetch_mldata默认路径是在scikit_learn_data路径下,mnist的mat文件其实直接放置到scikit_lean/mldata下面即可通过fetch_ml ...
- Mybatis常见面试题 三
1.什么是mybatis? (1)mybatis是一个优秀的基于java的持久层框架,它内部封装了jdbc,使开发者只需要关注sql语句本身,而不需要花费精力去处理加载驱动.创建连接.创建statem ...
- Letterbox,Pillarbox和Pan&Scan
Auto 不改变窗口设置16:9 PillarBox: 4:3的图像,在16:9的显示屏上显示时,上下到顶,左右会添加黑边. 16:9 Pan&Scan 4:3的图像,在16:9的显示屏上显示 ...
- java 网络编程TCP
客户端 服务端
- BASIC-17_蓝桥杯_矩阵乘法
示例代码: #include <stdio.h>#define N 30 int main(void){ int n = 0 , m = 0 , sum = 0; int i = 0 , ...
- 【Hibernate学习笔记-3】在Spring下整合Hibernate时, 关于sessionFactory的类型的说明
摘要 在Spring下整合Hibernate时,关于sessionFactory的配置方式主要有两种,分别为注解配置方式,和xml配置方式,下面将对这两种配置方式进行介绍. 1. sessionFac ...
- js中replace的用法(两种常用举例,还有好多用法不一一列举)
1.替换特定字符 <html><body> <script type="text/javascript"> var str="Visi ...
- 操作系统-移动操作系统-百科: iOS(苹果公司的移动操作系统)
ylbtech-操作系统-移动操作系统-百科: iOS(苹果公司的移动操作系统) iOS是由苹果公司开发的移动操作系统.苹果公司最早于2007年1月9日的Macworld大会上公布这个系统,最初是设计 ...
- C# winfrom ComboBox 调整下拉菜单的高度
1.设置属性 // 1.属性设置 DrawMode ->OwnerDrawVariable this.cboBoxPostID.DrawMode = System.Windows.Forms.D ...
