Spring Security教程(六):自定义过滤器进行认证处理
这里接着上篇的自定义过滤器,这里主要的是配置自定义认证处理的过滤器,并加入到FilterChain的过程。
在我们自己不在xml做特殊的配置情况下,security默认的做认证处理的过滤器为UsernamePasswordAuthenticationFilter,通过查看源码知道,做认证处理的方法为attemptAuthentication,这个方法的主要作用就是将用户输入的账号和密码,封装成一个UsernamePasswordAuthenticationToken对象,然后通过setDetails方法将这个对象储存起来,然后调用this.getAuthenticationManager().authenticate(authRequest)方法返回一个Authentication对象。其中这个过程this.getAuthenticationManager().authenticate(authRequest)又调用的其他的许多类,这里简单的讲解下:
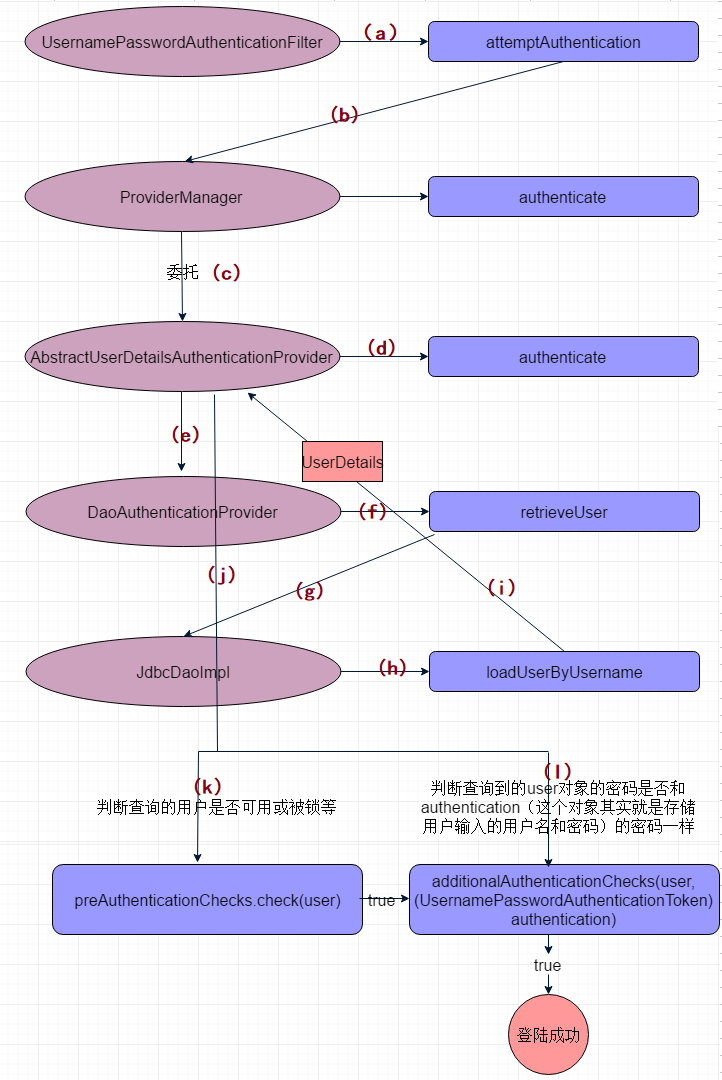
UsernamePasswordAuthenticationFilter-->ProviderManager-->AbstractUserDetailsAuthenticationProvider-->DaoAuthenticationProvider-->JdbcDaoImpl
根据这个顺序我画了个图方便记忆

当输入用户名和密码后,点击登陆到达UsernamePasswordAuthenticationFilter的attemptAuthentication方法,这个方法是登陆的入口,然后其调用ProviderManager中的authenticate方法,而ProviderManager委托给AbstractUserDetailsAuthenticationProvider的authenticate做,然后AbstractUserDetailsAuthenticationProvider又调用DaoAuthenticationProvider中的retrieveUser,在DaoAuthenticationProvider类的retrieveUser方法中,因为要通过输入的用户名获取到一个UserDetails,所以其调用JdbcDaoImpl中的loadUserByUsername方法,该方法给它的调用者返回一个查询到的用户(UserDetails),最终AbstractUserDetailsAuthenticationProvider的authenticate方法中会得到一个UserDetails对象user,然后接着执行preAuthenticationChecks.check(user)和additionalAuthenticationChecks(user, (UsernamePasswordAuthenticationToken) authentication);其中前面这个方法是判断,查询的用户是否可用或被锁等,后面的则是判断查询到的user对象的密码是否和authentication(这个对象其实就是存储用户输入的用户名和密码)的密码一样,若一样则表示登陆成功,若错误,则throw new BadCredentialsException(messages.getMessage("AbstractUserDetailsAuthenticationProvider.badCredentials", "Bad credentials"), userDetails);Bad credentials这个消息就是登陆失败后的信息。初步的讲解了登陆过程中类的调用,那么下面这个例子就是自定义一个MyUsernamePasswordAuthenticationFilter来代替默认的 UsernamePasswordAuthenticationFilter。
一、自定义MyUsernamePasswordAuthenticationFilter
- package com.zmc.demo;
- import javax.servlet.http.HttpServletRequest;
- import javax.servlet.http.HttpServletResponse;
- import javax.servlet.http.HttpSession;
- import org.springframework.beans.factory.annotation.Autowired;
- import org.springframework.security.authentication.AuthenticationManager;
- import org.springframework.security.authentication.AuthenticationServiceException;
- import org.springframework.security.authentication.UsernamePasswordAuthenticationToken;
- import org.springframework.security.core.Authentication;
- import org.springframework.security.core.AuthenticationException;
- import org.springframework.security.core.context.SecurityContextHolder;
- import org.springframework.security.core.userdetails.UserDetailsService;
- import org.springframework.security.core.userdetails.jdbc.JdbcDaoImpl;
- import org.springframework.security.crypto.password.PasswordEncoder;
- import org.springframework.security.web.authentication.UsernamePasswordAuthenticationFilter;
- import org.springframework.util.StringUtils;
- /**
- * @classname MyUsernamePasswordAuthenticationFilter
- * @author ZMC
- * @time 2017-1-13
- *
- */
- public class MyUsernamePasswordAuthenticationFilter extends UsernamePasswordAuthenticationFilter {
- public static final String USERNAME = "j_username";
- public static final String PASSWORD = "j_password";
- /**
- * @Description:用户登录验证方法入口
- * @param :args
- * @return
- * @throws Exception
- */
- @Override
- public Authentication attemptAuthentication(HttpServletRequest request,
- HttpServletResponse response) throws AuthenticationException {
- if (!request.getMethod().equals("POST")) {
- throw new AuthenticationServiceException(
- "Authentication method not supported: "
- + request.getMethod());
- }
- String username = this.obtainUsername(request);
- String password = this.obtainPassword(request);
- // 加密密码(根据“密码{用户名})进行加密
- // String sh1Password = password + "{" + username + "}";
- // PasswordEncoder passwordEncoder = new
- // StandardPasswordEncoderForSha1();
- // String result = passwordEncoder.encode(sh1Password);
- // UserInfo userDetails = (UserInfo)
- // userDetailsService.loadUserByUsername(username);
- if (username == null) {
- username = "";
- }
- if (password == null) {
- password = "";
- }
- username = username.trim();
- UsernamePasswordAuthenticationToken authRequest = new UsernamePasswordAuthenticationToken(
- username, password);
- // Allow subclasses to set the "details" property
- setDetails(request, authRequest);
- return this.getAuthenticationManager().authenticate(authRequest);
- }
- /**
- * @Description:获取密码
- * @param :args
- * @return
- * @throws Exception
- */
- @Override
- protected String obtainPassword(HttpServletRequest request) {
- // TODO Auto-generated method stub
- Object obj = request.getParameter(PASSWORD);
- return null == obj ? "" : obj.toString();
- }
- /**
- * @Description:获取用户名
- * @param :args
- * @return
- * @throws Exception
- */
- @Override
- protected String obtainUsername(HttpServletRequest request) {
- // TODO Auto-generated method stub
- Object obj = request.getParameter(USERNAME);
- return null == obj ? "" : obj.toString().trim().toLowerCase();
- }
- }
上述的代码这样写其实和默认的UsernamePasswordAuthenticationFilter并没有什么区别,但是这里主要是学会将自定义的Filter加入到security中的FilterChain中去,实际上这个方法中,一般会直接验证用户输入的和通过用户名从数据库里面查到的用户的密码是否一致,如果不一致,就抛异常,否则继续向下执行。
二、配置MyUsernamePasswordAuthenticationFilter并将其加入到FilterChain中去
MyUsernamePasswordAuthenticationFilter有filterProcessesUrl属性为登陆的过滤的地址,authenticationManager为authentication-manager标签中配置的东西,authenticationSuccessHandler为验证成功后跳转的处理器,authenticationFailureHandler为验证失败的处理器。另外还要配置一个出登陆引导的处bean:LoginUrlAuthenticationEntryPoint
配置代码如下:
- <?xml version="1.0" encoding="UTF-8"?>
- <beans:beans xmlns="http://www.springframework.org/schema/security"
- xmlns:beans="http://www.springframework.org/schema/beans" xmlns:xsi="http://www.w3.org/2001/XMLSchema-instance"
- xsi:schemaLocation="http://www.springframework.org/schema/beans
- http://www.springframework.org/schema/beans/spring-beans-3.0.xsd
- http://www.springframework.org/schema/context
- http://www.springframework.org/schema/context/spring-context-3.1.xsd
- http://www.springframework.org/schema/tx
- http://www.springframework.org/schema/tx/spring-tx-3.0.xsd
- http://www.springframework.org/schema/security
- http://www.springframework.org/schema/security/spring-security.xsd">
- <http pattern="/login.jsp" security="none"></http>
- <http auto-config="false" entry-point-ref="loginUrlAuthenticationEntryPoint">
- <!-- <form-login login-page="/login.jsp" default-target-url="/index.jsp"
- authentication-failure-url="/login.jsp?error=true" /> -->
- <logout invalidate-session="true" logout-success-url="/login.jsp"
- logout-url="/j_spring_security_logout" />
- <custom-filter ref="myUsernamePasswordAuthenticationFilter" position="FORM_LOGIN_FILTER" />
- <!-- 通过配置custom-filter来增加过滤器,before="FILTER_SECURITY_INTERCEPTOR"表示在SpringSecurity默认的过滤器之前执行。 -->
- <custom-filter ref="filterSecurityInterceptor" before="FILTER_SECURITY_INTERCEPTOR" />
- </http>
- <beans:bean id="loginUrlAuthenticationEntryPoint"
- class="org.springframework.security.web.authentication.LoginUrlAuthenticationEntryPoint">
- <beans:property name="loginFormUrl" value="/login.jsp" />
- </beans:bean>
- <!-- 数据源 -->
- <beans:bean id="dataSource" class="com.mchange.v2.c3p0.ComboPooledDataSource"
- destroy-method="close">
- <!-- 此为c3p0在spring中直接配置datasource c3p0是一个开源的JDBC连接池 -->
- <beans:property name="driverClass" value="com.mysql.jdbc.Driver" />
- <beans:property name="jdbcUrl"
- value="jdbc:mysql://localhost:3306/springsecuritydemo?useUnicode=true&characterEncoding=UTF-8" />
- <beans:property name="user" value="root" />
- <beans:property name="password" value="" />
- <beans:property name="maxPoolSize" value="50"></beans:property>
- <beans:property name="minPoolSize" value="10"></beans:property>
- <beans:property name="initialPoolSize" value="10"></beans:property>
- <beans:property name="maxIdleTime" value="25000"></beans:property>
- <beans:property name="acquireIncrement" value="1"></beans:property>
- <beans:property name="acquireRetryAttempts" value="30"></beans:property>
- <beans:property name="acquireRetryDelay" value="1000"></beans:property>
- <beans:property name="testConnectionOnCheckin" value="true"></beans:property>
- <beans:property name="idleConnectionTestPeriod" value="18000"></beans:property>
- <beans:property name="checkoutTimeout" value="5000"></beans:property>
- <beans:property name="automaticTestTable" value="t_c3p0"></beans:property>
- </beans:bean>
- <beans:bean id="builder" class="com.zmc.demo.JdbcRequestMapBulider">
- <beans:property name="dataSource" ref="dataSource" />
- <beans:property name="resourceQuery"
- value="select re.res_string,r.name from role r,resc re,resc_role rr where
- r.id=rr.role_id and re.id=rr.resc_id" />
- </beans:bean>
- <beans:bean id="myUsernamePasswordAuthenticationFilter"
- class="com.zmc.demo.MyUsernamePasswordAuthenticationFilter
- ">
- <beans:property name="filterProcessesUrl" value="/j_spring_security_check" />
- <beans:property name="authenticationManager" ref="authenticationManager" />
- <beans:property name="authenticationSuccessHandler"
- ref="loginLogAuthenticationSuccessHandler" />
- <beans:property name="authenticationFailureHandler"
- ref="simpleUrlAuthenticationFailureHandler" />
- </beans:bean>
- <beans:bean id="loginLogAuthenticationSuccessHandler"
- class="org.springframework.security.web.authentication.SavedRequestAwareAuthenticationSuccessHandler">
- <beans:property name="targetUrlParameter" value="/index.jsp" />
- </beans:bean>
- <beans:bean id="simpleUrlAuthenticationFailureHandler"
- class="org.springframework.security.web.authentication.SimpleUrlAuthenticationFailureHandler">
- <beans:property name="defaultFailureUrl" value="/login.jsp" />
- </beans:bean>
- <!-- 认证过滤器 -->
- <beans:bean id="filterSecurityInterceptor"
- class="org.springframework.security.web.access.intercept.FilterSecurityInterceptor">
- <!-- 用户拥有的权限 -->
- <beans:property name="accessDecisionManager" ref="accessDecisionManager" />
- <!-- 用户是否拥有所请求资源的权限 -->
- <beans:property name="authenticationManager" ref="authenticationManager" />
- <!-- 资源与权限对应关系 -->
- <beans:property name="securityMetadataSource" ref="securityMetadataSource" />
- </beans:bean>
- <!-- acl领域模型 -->
- <beans:bean class="com.zmc.demo.MyAccessDecisionManager" id="accessDecisionManager">
- </beans:bean>
- <!-- -->
- <authentication-manager alias="authenticationManager">
- <authentication-provider>
- <jdbc-user-service data-source-ref="dataSource"
- users-by-username-query="select username,password,status as enabled from user where username = ?"
- authorities-by-username-query="select user.username,role.name from user,role,user_role
- where user.id=user_role.user_id and
- user_role.role_id=role.id and user.username=?" />
- </authentication-provider>
- </authentication-manager>
- <beans:bean id="securityMetadataSource"
- class="com.zmc.demo.MyFilterInvocationSecurityMetadataSource">
- <beans:property name="builder" ref="builder"></beans:property>
- </beans:bean>
- </beans:beans>
三、结果
Spring Security教程(六):自定义过滤器进行认证处理的更多相关文章
- Spring Security教程(五):自定义过滤器从数据库从获取资源信息
在之前的几篇security教程中,资源和所对应的权限都是在xml中进行配置的,也就在http标签中配置intercept-url,试想要是配置的对象不多,那还好,但是平常实际开发中都往往是非常多的资 ...
- Spring Security教程(八):用户认证流程源码详解
本篇文章主要围绕下面几个问题来深入源码: 用户认证流程 认证结果如何在多个请求之间共享 获取认证用户信息 一.用户认证流程 上节中提到Spring Security核心就是一系列的过滤器链,当一个请求 ...
- Spring Security教程(三):自定义表结构
在上一篇博客中讲解了用Spring Security自带的默认数据库存储用户和权限的数据,但是Spring Security默认提供的表结构太过简单了,其实就算默认提供的表结构很复杂,也不一定能满足项 ...
- Spring Security教程(二):自定义数据库查询
Spring Security教程(二):自定义数据库查询 Spring Security自带的默认数据库存储用户和权限的数据,但是Spring Security默认提供的表结构太过简单了,其实就 ...
- Spring Security 解析(六) —— 基于JWT的单点登陆(SSO)开发及原理解析
Spring Security 解析(六) -- 基于JWT的单点登陆(SSO)开发及原理解析 在学习Spring Cloud 时,遇到了授权服务oauth 相关内容时,总是一知半解,因此决定先把 ...
- Spring Security 教程 大牛的教程
https://www.iteye.com/blog/elim-2247073 Spring Security 教程 Spring Security(20)——整合Cas Spring Securit ...
- Spring Security教程(三)
在上一篇博客中讲解了用Spring Security自带的默认数据库存储用户和权限的数据,但是Spring Security默认提供的表结构太过简单了,其实就算默认提供的表结构很复杂,也不一定能满足项 ...
- Spring Security 实战干货:图解Spring Security中的Servlet过滤器体系
1. 前言 我在Spring Security 实战干货:内置 Filter 全解析对Spring Security的内置过滤器进行了罗列,但是Spring Security真正的过滤器体系才是我们了 ...
- Spring 系列教程之自定义标签的解析
Spring 系列教程之自定义标签的解析 在之前的章节中,我们提到了在 Spring 中存在默认标签与自定义标签两种,而在上一章节中我们分析了 Spring 中对默认标签的解析过程,相信大家一定已经有 ...
随机推荐
- VB数组的清除
在一个程序中,同一数组只能用Dim语句定义一次.但有时可能需要清除数组的内容或对数组重新定义,这可以用:Erase语句来实现. 格式:Erase(数组名)[,(数组名)] 功能:用于重新初始化静态数组 ...
- 关于gitblit成功启动,但在阿里云外网地址无法访问的问题
1.配置/data/defaults.properties server.httpBindInterface= 此处什么都不要填空着就好. # Specify the interface for Je ...
- __set() __get() _isset() __unset() 在__unset() 在类中没有事先声明和已经声明过的属性调用unset的区别
<?php //echo strtr("I Love Mysql, Love PHP", "Mysql","MYSQL"); //$a ...
- Jenkins的安装(最为简单的安装方法)
1.Jenkins的安装(最为简单的安装方法) (1)下载Jenkins(一个war文件) (2)cmd运行:java -jar jenkins.war [Jenkins需要IDK1.5以上的版本] ...
- 下载完整版Chrome离线安装文件的官方地址
只在自己账号下安装Download Google Chrome Standalone Offline Installer (32-bit) http://www.google.com/chrome/ ...
- 给Java程序员的几条建议
对于Java程序猿学习的建议 这一部分其实也算是今天的重点,这一部分用来回答很多群里的朋友所问过的问题,那就是LZ你是如何学习Java的,能不能给点建议? 今天LZ是打算来点干货,因此咱们就不说一些学 ...
- 【转】【MySQL】MySQL的双机互信实战
[转]https://www.cnblogs.com/mchina/archive/2013/03/15/2956017.html MySQL双机实战原理:利用ssh传输文件,通过公.私钥的共享,实现 ...
- 远程阿里云window服务器报错身份验证错误
整理文章,很久之前遇到的一个问题,一直呆在草稿箱,特发布出来,帮助可能遇到该问题的人 mstsc连接时报错如下 解决方法: 修改本地安全组策略[安全组 gpedit.msc]
- 简述MVC
强调:mvc不是框架而是一种设计模式 分层结构的好处:1.降低了代码之间的耦合性 2.提高了代码的重用性 一. 概述 MVC的全名Model View Controller,即模型-视图-控制器的缩写 ...
- Debug 路漫漫-01
运行到子函数时提示报错: === 这个断点一步步debug下来是顺利的,但是咋就超出数组范围了呢,这会是什么问题. ——sess肯定超过索引了,那个sess(:,2)的值肯定超过V的行数了. ——由 ...
