CountDownLatch原理分析
CountDownLatch原理分析
CountDownLatch是一个同步工具类,它允许一个或多个线程一直等待,直到其他线程执行完后再执行。例如,应用程序的主线程希望在负责启动框架服务的线程已经启动所有框架服务之后执行。
CountDownLatch使用示例:
首先我们写一个示例,看看怎么使用CountDownLatch工具类
CountDownLatchTest.java
package com.study.thread.juc_thread.base;

import java.util.concurrent.CountDownLatch;

/**

 * <p>Description: CountDownLatch 在所有任务结束之前,一个或者多线线程可以一直等待(通过计数器来判断) </p>

 * @author duanfeixia

 * @date 2019年8月12日

 */

public class CountDownLatchTest {

	static CountDownLatch countDown = new CountDownLatch(10);//10个线程任务

	/**

	 * <p>Description: 主线程执行任务</p>

	 * @author duanfeixia

	 * @date 2019年8月12日

	 */

	static class BossThread extends Thread{

		public void run(){

			System.out.println("boss已经到达会议室,共有"+countDown.getCount()+"人参加会议...");

			//等待人齐

			try {

				countDown.await();//进入阻塞队列

			} catch (InterruptedException e) {

				e.printStackTrace();

			}

			System.out.println("人已经到齐啦,开会啦...");

		}

	}

	/**

	 * <p>Description:子线程执行任务 </p>

	 * @author duanfeixia

	 * @date 2019年6月24日

	 */

	static class EmployThread extends Thread{

		@Override

		public void run() {

			System.out.println(Thread.currentThread().getName()+"到达会议室,还有"+countDown.getCount()+"人未到");

			countDown.countDown();//计数器-1

		}

	}

	/*测试启动*/

	public static void main(String args[]){

		new BossThread().start();

		int len=(int) countDown.getCount();

		for(int i=0;i<len;i++){

			new EmployThread().start();

		}

	}

}
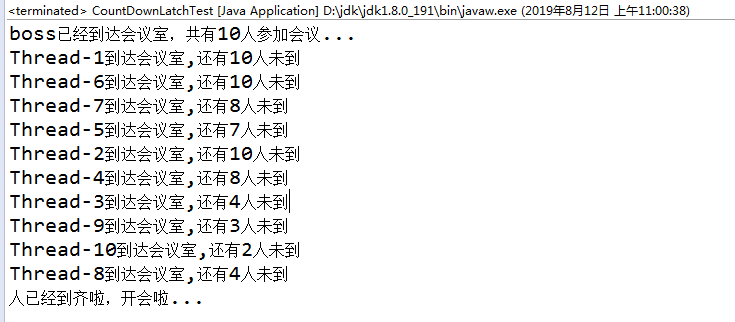
测试结果如下:(每次执行的结果都会不一样哦)

CountDownLatch原理解析
CountDownLatch内部依赖Sync实现,而Sync继承AQS。
CountDownLatch主要分析以下三点:
1. 构造方法 (创建CountDownLatch对象时指定线程个数)
2. await()方法的实现 (当前线程计数器为0之前一致等待,除非线程被中断)
3. countDown()方法的实现 (每执行一个线程方法就将计数器减一,当计数为0时 启用当前线程)
CountDownLatch的静态内部类 Sync (这里我们需要特别注意的一点是 Sync 继承了 AbstractQueuedSynchronizer 类, 重要方法会被重写)
 private static final class Sync extends AbstractQueuedSynchronizer {

        private static final long serialVersionUID = 4982264981922014374L;

        Sync(int count) {

            setState(count);

        }

        int getCount() {

            return getState();

        }

        protected int tryAcquireShared(int acquires) {

            return (getState() == 0) ? 1 : -1;

        }

        protected boolean tryReleaseShared(int releases) {

            // Decrement count; signal when transition to zero

            for (;;) {

                int c = getState();

                if (c == 0)

                    return false;

                int nextc = c-1;

                if (compareAndSetState(c, nextc))

                    return nextc == 0;

            }

        }

    }
>> CountDownLatch只提供了一个有参构造方法: (参数计数器总量)
  public CountDownLatch(int count) {

        if (count < 0) throw new IllegalArgumentException("count < 0");

        this.sync = new Sync(count);

    }
>> await() 方法 [注释: 以下 AQS 均表示 AbstractQueuedSynchronizer ]
初步进入我们会发现调用的是 CountDownLacth 的 await() -- >> 获取共享锁
 public void await() throws InterruptedException {

        sync.acquireSharedInterruptibly(1);

    }
acquireSharedInterruptibly() 方法是父类 AQS 中定义的,这里会发现此方法是被final修饰的,无法被重写,但是子类可以重写里面调用的 tyAcquireShared(arg) 方法
    public final void acquireSharedInterruptibly(int arg)

            throws InterruptedException {

        if (Thread.interrupted())

            throw new InterruptedException();

        if (tryAcquireShared(arg) < 0)

            doAcquireSharedInterruptibly(arg);

    }
先来看看 AQS 中 默认对 tryAcquireShared方法的默认实现
   protected int tryAcquireShared(int arg) {

        throw new UnsupportedOperationException();

    }
CountDownLatch中的内部类 Sync对 AQS 的 tryAcquireShared方法进行了复写
当前计数器的值为0的时候 返回 1 #获取锁成功,直接返回 线程可继续操作
当前计数器的值不为0的时候 返回 -1. #获取锁失败 ,开始进入队列中排队等待。接下来就会继续按照 AQS acquireSharedInterruptibly 方法中的逻辑,执行 doAcquireSharedInterruptibly(int arg)
 protected int tryAcquireShared(int acquires) {

      return (getState() == 0) ? 1 : -1;

 }
AQS 中 doAcquireSharedInterruptibly(int arg) 实现如下 (该方法为一个自旋方法会尝试一直去获取同步状态)
 /**

     * Acquires in shared interruptible mode.

     * @param arg the acquire argument

     */

    private void doAcquireSharedInterruptibly(int arg)

        throws InterruptedException {

        final Node node = addWaiter(Node.SHARED);

        boolean failed = true;

        try {

            for (;;) {

                final Node p = node.predecessor();

                if (p == head) {

                    int r = tryAcquireShared(arg);

                    if (r >= 0) {

                        setHeadAndPropagate(node, r);

                        p.next = null; // help GC

                        failed = false;

                        return;

                    }

                }

                if (shouldParkAfterFailedAcquire(p, node) &&

                    parkAndCheckInterrupt())

                    throw new InterruptedException();

            }

        } finally {

            if (failed)

                cancelAcquire(node);

        }

    }
这里需要进一步说明的是方法 parkAndCheckInterrupt ,调用 LockSupport的park方法,禁用当前线程
LockSupport是JDK中比较底层的类,用来创建锁和其他同步工具类的基本线程阻塞原语。
  private final boolean parkAndCheckInterrupt() {

        LockSupport.park(this);

        return Thread.interrupted();

    }
>> countDown()方法的实现
CountDownLatch方法中实现如下,方法递减锁存器的计数,如果计数到达零,则释放所有等待的线程。 -->> 释放共享锁
   public void countDown() {

        sync.releaseShared(1);

    }
AQS中 releaseShared方法的实现如下:(同样 releaseShared方法被final修饰 不能被重写 但是我们CountDownLatch的内部类 Sync重写了 tryReleaseShared方法)
 public final boolean releaseShared(int arg) {

        if (tryReleaseShared(arg)) {

            doReleaseShared();

            return true;

        }

        return false;

    }
Sync中 tryReleaseShared方法的实现
protected boolean tryReleaseShared(int releases) {

            // Decrement count; signal when transition to zero

            for (;;) {

                int c = getState();//获取锁状态

                if (c == 0)

                    return false; //计数器为0的时候 说明释放锁成功 直接返回

                int nextc = c-1; //将计数器减一 使用CAS更新计算器的值

                if (compareAndSetState(c, nextc))

                    return nextc == 0;

            }

        }
然后执行 AQS 中 releaseShared方法中的 doReleaseShared方法 去释放锁信息
 private void doReleaseShared() {

        /*

         * Ensure that a release propagates, even if there are other

         * in-progress acquires/releases.  This proceeds in the usual

         * way of trying to unparkSuccessor of head if it needs

         * signal. But if it does not, status is set to PROPAGATE to

         * ensure that upon release, propagation continues.

         * Additionally, we must loop in case a new node is added

         * while we are doing this. Also, unlike other uses of

         * unparkSuccessor, we need to know if CAS to reset status

         * fails, if so rechecking.

         */

        for (;;) {

            Node h = head;

            if (h != null && h != tail) {

                int ws = h.waitStatus;

                if (ws == Node.SIGNAL) {

                    if (!compareAndSetWaitStatus(h, Node.SIGNAL, 0))

                        continue;            // loop to recheck cases

                    unparkSuccessor(h);

                }

                else if (ws == 0 &&

                         !compareAndSetWaitStatus(h, 0, Node.PROPAGATE))

                    continue;                // loop on failed CAS

            }

            if (h == head)                   // loop if head changed

                break;

        }

    }
这里需要特别说明的是 unparkSuccessor(h)方法,调用 LockSupport的unpark方法 启动当前线程
  /**

     * Wakes up node's successor, if one exists.

     *

     * @param node the node

     */

    private void unparkSuccessor(Node node) {

        /*

         * If status is negative (i.e., possibly needing signal) try

         * to clear in anticipation of signalling.  It is OK if this

         * fails or if status is changed by waiting thread.

         */

        int ws = node.waitStatus;

        if (ws < 0)

            compareAndSetWaitStatus(node, ws, 0);

        /*

         * Thread to unpark is held in successor, which is normally

         * just the next node.  But if cancelled or apparently null,

         * traverse backwards from tail to find the actual

         * non-cancelled successor.

         */

        Node s = node.next;

        if (s == null || s.waitStatus > 0) {

            s = null;

            for (Node t = tail; t != null && t != node; t = t.prev)

                if (t.waitStatus <= 0)

                    s = t;

        }

        if (s != null)

            LockSupport.unpark(s.thread);

    }
总结:
CountDownLatch内部通过共享锁实现。在创建CountDownLatch实例时,需要传递一个int型的参数:count,该参数为计数器的初始值,也可以理解为该共享锁可以获取的总次数。
当某个线程调用await()方法,程序首先判断count的值是否为0,如果不会0的话则会一直等待直到为0为止。
当其他线程调用countDown()方法时,则执行释放共享锁状态,使count值 – 1。
当在创建CountDownLatch时初始化的count参数,必须要有count线程调用countDown方法才会使计数器count等于0,锁才会释放,前面等待的线程才会继续运行。注意CountDownLatch不能回滚重置。
参考博客地址:http://cmsblogs.com/?p=2253
CountDownLatch原理分析的更多相关文章
- Java 线程同步组件 CountDownLatch 与 CyclicBarrier 原理分析
1.简介 在分析完AbstractQueuedSynchronizer(以下简称 AQS)和ReentrantLock的原理后,本文将分析 java.util.concurrent 包下的两个线程同步 ...
- java并发包&线程池原理分析&锁的深度化
java并发包&线程池原理分析&锁的深度化 并发包 同步容器类 Vector与ArrayList区别 1.ArrayList是最常用的List实现类,内部是通过数组实现的, ...
- AQS工作原理分析
AQS工作原理分析 一.大致介绍1.前面章节讲解了一下CAS,简单讲就是cmpxchg+lock的原子操作:2.而在谈到并发操作里面,我们不得不谈到AQS,JDK的源码里面好多并发的类都是通过Sy ...
- Redisson 实现分布式锁的原理分析
写在前面 在了解分布式锁具体实现方案之前,我们应该先思考一下使用分布式锁必须要考虑的一些问题. 互斥性:在任意时刻,只能有一个进程持有锁. 防死锁:即使有一个进程在持有锁的期间崩溃而未能主动释放锁, ...
- Redisson 实现分布式锁原理分析
Redisson 实现分布式锁原理分析 写在前面 在了解分布式锁具体实现方案之前,我们应该先思考一下使用分布式锁必须要考虑的一些问题. 互斥性:在任意时刻,只能有一个进程持有锁. 防死锁:即使有 ...
- Handler系列之原理分析
上一节我们讲解了Handler的基本使用方法,也是平时大家用到的最多的使用方式.那么本节让我们来学习一下Handler的工作原理吧!!! 我们知道Android中我们只能在ui线程(主线程)更新ui信 ...
- Java NIO使用及原理分析(1-4)(转)
转载的原文章也找不到!从以下博客中找到http://blog.csdn.net/wuxianglong/article/details/6604817 转载自:李会军•宁静致远 最近由于工作关系要做一 ...
- 原子类java.util.concurrent.atomic.*原理分析
原子类java.util.concurrent.atomic.*原理分析 在并发编程下,原子操作类的应用可以说是无处不在的.为解决线程安全的读写提供了很大的便利. 原子类保证原子的两个关键的点就是:可 ...
- Android中Input型输入设备驱动原理分析(一)
转自:http://blog.csdn.net/eilianlau/article/details/6969361 话说Android中Event输入设备驱动原理分析还不如说Linux输入子系统呢,反 ...
随机推荐
- 设置QQ环境变量
1.右击此电脑 → 属性 win10用户可以直接按 'win'键 ,输入 "系统环境变量" 2.点击 高级系统环境设置 → 环境变量 3.在系统变量里找到 path → 编辑 4. ...
- Java环境变量配置超详细教程
https://blog.csdn.net/Mxdon_on/article/details/89461365 概述 Java的环境配置并不是特别难,但是对刚上手的新手来说确实是一个大问题 首先下载j ...
- 清晰明了的javascript版动态规划
算法是一种艺术,给人感觉很不好接近,但是一旦你和ta熟络了,你就能发现这门艺术的内在是多么美妙且多变. 对于前端来说,算法也许不是最重要的,在日常工作中,几乎很少用到.所以很多人也不是很感冒. 不过呢 ...
- C# 生成全球唯一标识符GUID
string strguid = Guid.NewGuid().ToString();//57d99d89-caab-482a-a0e9-a0a803eed3ba 生成标准的标志符 (36位标准)st ...
- Nginx实现负载均衡时常用的分配服务器策略
场景 Nginx配置实例-负载均衡实例:平均访问多台服务器: https://blog.csdn.net/BADAO_LIUMANG_QIZHI/article/details/103019576 在 ...
- ShowDoc速记
编写文档好工具showdoc部署 参考:https://www.showdoc.cc/ 一定要看,一定要用卷,丢失数据的痛苦,痛何如哉. https://www.cnblogs.com/harrych ...
- delete和Vue.$delete删除数组的区别
delete delete只是被删除的元素变成了 empty/undefined ,其他的元素的键值对应关系还是不变. Vue.$delete 直接删除了数组中元素,数组的键值对应关系发生相应变化 例 ...
- 用python爬虫简单爬取 笔趣网:类“起点网”的小说
首先:文章用到的解析库介绍 BeautifulSoup: Beautiful Soup提供一些简单的.python式的函数用来处理导航.搜索.修改分析树等功能. 它是一个工具箱,通过解析文档为用户提供 ...
- 【重学Node.js 第5篇】部署项目到腾讯云服务器
课程介绍看这里:https://www.cnblogs.com/zhangran/p/11963616.html 项目github地址:https://github.com/hellozhangran ...
- HttpRunner学习1--Windows&Linux安装httprunner
最近在学习HttpRunner,这是一款开源的接口测试框架,可用于HTTP(S)协议的接口测试.通过该框架,我们只需维护一份 YAML/JSON 脚本,即可轻松的进行接口自动化. 更多的介绍,大家可以 ...
