SSH整合框架+mysql简单的实现
SSH整合框架+mysql简单的实现
1. 框架整合原理:
struts2整合Spring 两种:
一种struts2自己创建Action,自动装配Service ;
一种 将Action交给Spring管理,通过Bean依赖,注入Service
**** 引入jar包,改写Struts2 默认对象工厂, 默认StrutsObjectFactory 改为 StrutsSpringObjectFactory
spring整合hibernate, 将sessionFactory 由Spring管理,将SessionFactory 注入HibernateTemplate , DAO通过HibernateTemplate 操作Hibernate 。
2. 导入jar包(struts2、spring、hibernate框架需要的包及详细说明)
通过这个过程,了解SSH框架所需要的jar包,以及它们的各自用途。下面是我引入的最小jar包的列表:
Struts2 9个
1.struts2-core-2.2.3.jar struts的核心jar包。
2.freemarker-2.3.16.jar Freemarker是struts2默认的模版语言
3.commons-logging-1.1.1.jar Apache Commons包中的一个,包含了日志功能,必须使用的jar包
4.ognl-3.0.1.jar Struts2默认的表达式语言OGNL:对象图形化导航语言
5.xwork-core-2.2.3.jar Struts2核心包,毕竟struts2很大部分是来webwork6.commons-io-2.0.1.jar 封装了一些输入输出流的常用操作
7.commons-fileupload-1.2.2.jar 用来实现文件上传
8. struts2-json-plugin-2.2.3.jar JSON 插件提供了一个 "json" 结果类型来把 action 序列化成 JSON
9. struts2-spring-plugin-2.1.6.jar 使struts2能集成到spring中
Spring框架 13个
1.org.springframework.aop.jar 包含在应用中使用Spring的AOP特性时所需的类
2. org.springframework.beans.jar 所有应用都要用到的,它包含访问配置文件、创建和管理bean以及进行Inversion of Control / Dependency Injection(IoC/DI)操作相关的所有类。
3.org.springframework.context.support.jar 包含支持缓存Cache(ehcache)、JCA、JMX、邮件服务(Java Mail、COS Mail)、任务计划Scheduling(Timer、Quartz)方面的类。
4.org.springframework.context.jar 为Spring核心提供了大量扩展。可以找到使用Spring ApplicationContext特性时所需的全部类,JDNI所需的全部类,UI方面的用来与模板(Templating)引擎如 Velocity、FreeMarker、 JasperReports集成的类,以及校验Validation方面的相关类。
5.org.springframework.core.jar 包含Spring框架基本的核心工具类,Spring其它组件要都要使用到这个包里的类,是其它组件的基本核心。
6.org.springframework.expression.jar Spring表达式语言
7.org.springframework.jdbc.jar 包含对Spring对JDBC数据访问进行封装的所有类。
8.org.springframework.jms.jar 提供了对JMS 1.0.2/1.1的支持类。
9. org.springframework.orm.jar 包含Spring对DAO特性集进行了扩展,使其支持 iBATIS、JDO、OJB、TopLink,因为Hibernate已经独立成包了,现在不包含在这个包里了。这个jar文件里大部分的类都要依赖spring-dao.jar里的类,用这个包时你需要同时包含spring-dao.jar包。
10.org.springframework.transaction.jar 为JDBC、Hibernate、JDO、JPA等提供的一致的声明式和编程式事务管理。
11.org.springframework.web.struts.jar Struts框架支持,可以更方便更容易的集成Struts框架。
12.org.springframework.web.jar 包含Web应用开发时,用到Spring框架时所需的核心类,包括自动载入WebApplicationContext特性的类、Struts与JSF集成类、文件上传的支持类、Filter类和大量工具辅助类。
13. org.springframework.asm.jar Spring独立的asm程序, Spring2.5.6的时候需要asmJar 包,3.0开始提供他自己独立的asmJar
Hibernate3框架10个
1.hibernate3.jar 这个是hibernate3.0的核心jar包,必须的,没的选,像我们常用的Session,Query,Transaction都位于这个jar文件中,必要。
2.cglib-2.1.3.jar CGLIB库,Hibernate用它来实现PO字节码的动态生成,非常核心的库,必要。
3.asm.jar ASM字节码库 如果使用“cglib”则必要,必要
4.asm-attrs.jar ASM字节码库 如果使用“cglib”则必要,必要
5.ehcache.jar EHCache缓存 如果没有其它缓存,则必要,必要
6.antlr.jar 语言转换工,Hibernate利用它实现 HQL 到 SQL。 ANother Tool for Language Recognition是一个工具,必要
7.jta.jar JTA规范,当Hibernate使用JTA的时候需要,不过AppServer都会带上,所以也是多余的。但是为了测试方便建议还是带上。必要
8.commons-collections.jar ApacheCommons包中的一个,包含了一些Apache开发的集合类,功能比java.util.*强大。必要
9.dom4j 是一个Java的XMLAPI,类似于jdom,用来读写XML文件的。Hibernate用它来读写配置文件。必要
10.C3P0.jar C3P0数据库连接池提供数据库连接池
其他4个
1. com.springsource.javax.mail-1.4.0.jar Java email组建,提供email的常用方法
2. mysql-connector-java-5.0.8-bin.jar mysql数据库驱动
3. commons-lang-2.3.jar Apache Commons包中的一个,包含了一些数据类型工具类,是java.lang.*的扩展。必须使用的jar包http://commons.apache.org/lang/
4. log4j-1.2.15.jar 提供日志功能http://logging.apache.org/log4j/
单元测试和其他
junit-4.10.jar
xercesImpl-2.8.1.jar ---这里用到Base64编码(可以不引入)
*网上下载相关包链接:
Struts2:http://struts.apache.org/2.2.3/index.html
hibernate3:http://sourceforge.net/projects/hibernate/files/hibernate3/
spring3:http://www.springsource.org/download
3. 创建web项目与包结构:
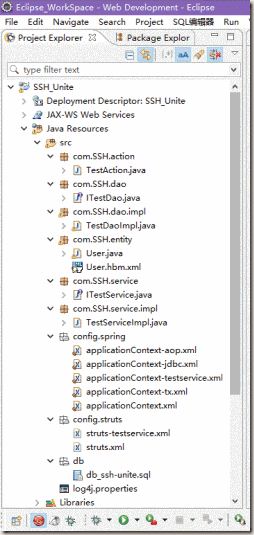
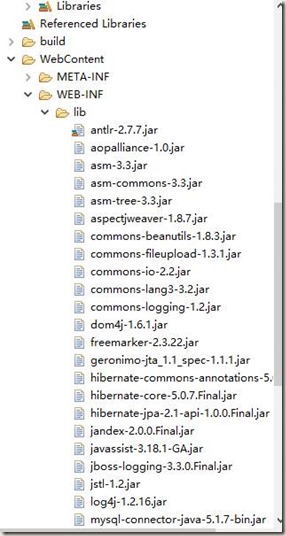
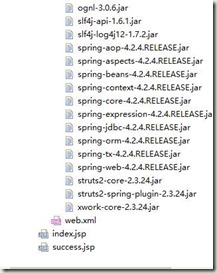
4. 配置SSH开发框架
一般Java都是三层架构 数据访问层(dao) 业务逻辑层(biz 或者services) 界面层(ui)

action 是业务层的一部分,是一个管理器 (总开关)(作用是取掉转)(取出前台界面的数据,调用biz方法,转发到下一个action或者页面)  模型成(model)一般是实体对象(把现实的的事物变成java中的对象)作用是一暂时存储数据方便持久化(存入数据库或者写入文件)而是 作为一个包裹封装一些数据来在不同的层以及各种java对象中使用  dao是数据访问层 就是用来访问数据库实现数据的持久化(把内存中的数据永久保存到硬盘中)
Dao主要做数据库的交互工作

Modle 是模型 存放你的实体类

Service 做相应的业务逻辑处理

Action是一个控制器
1.在web.xml中加入如下代码令服务器自动加载Spring ,Struts,Hibernate
1: xml version="1.0" encoding="UTF-8"?>
2: <web-app xmlns:xsi="http://www.w3.org/2001/XMLSchema-instance"
3: xmlns="http://java.sun.com/xml/ns/javaee"
4: xsi:schemaLocation="http://java.sun.com/xml/ns/javaee http://java.sun.com/xml/ns/javaee/web-app_2_5.xsd"
5: id="WebApp_ID" version="2.5">
6:
7: <listener>
8: <listener-class>org.springframework.web.context.ContextLoaderListenerlistener-class>
9: listener>
10:
11:
12: <context-param>
13: <param-name>contextConfigLocationparam-name>
14: <param-value>classpath:config/spring/applicationContext.xmlparam-value>
15: context-param>
16:
17:
18: <filter>
19: <filter-name>characterEncodingFilterfilter-name>
20: <filter-class>org.springframework.web.filter.CharacterEncodingFilterfilter-class>
21: <init-param>
22: <param-name> encodingparam-name>
23: <param-value>UTF-8param-value>
24: init-param>
25: filter>
26: <filter-mapping>
27: <filter-name>characterEncodingFilterfilter-name>
28: <url-pattern>/*url-pattern>
29: filter-mapping>
30:
31:
32:
33:
34:
35: <filter>
36: <filter-name>OpenSessionInViewFilterfilter-name>
37: <filter-class>org.springframework.orm.hibernate5.support.OpenSessionInViewFilterfilter-class>
38: filter>
39: <filter-mapping>
40: <filter-name>OpenSessionInViewFilterfilter-name>
41: <url-pattern>/*url-pattern>
42: filter-mapping>
43:
44:
45:
46: <filter>
47: <filter-name>struts2filter-name>
48: <filter-class>org.apache.struts2.dispatcher.ng.filter.StrutsPrepareAndExecuteFilterfilter-class>
49:
50: <init-param>
51: <param-name>configparam-name>
52: <param-value>struts-default.xml,struts-plugin.xml,config/struts/struts.xmlparam-value>
53: init-param>
54: filter>
55: <filter-mapping>
56: <filter-name>struts2filter-name>
57: <url-pattern>/*url-pattern>
58: filter-mapping>
59:
60: <display-name>SSH_Unitedisplay-name>
61: <welcome-file-list>
62: <welcome-file>index.jspwelcome-file>
63: welcome-file-list>
64:
65:
66: web-app>
  .csharpcode {

	font-size: small; font-family: consolas, "Courier New", courier, monospace; color: black; background-color: #ffffff

}

.csharpcode pre {

	font-size: small; font-family: consolas, "Courier New", courier, monospace; color: black; background-color: #ffffff

}

.csharpcode pre {

	margin: 0em

}

.csharpcode .rem {

	color: #08000

}

.csharpcode .kwrd {

	color: #000ff

}

.csharpcode .str {

	color: #06080

}

.csharpcode .op {

	color: #000c0

}

.csharpcode .preproc {

	color: #cc6633

}

.csharpcode .asp {

	background-color: #ffff00

}

.csharpcode .html {

	color: S00000

}

.csharpcode .attr {

	color: #ff0000

}

.csharpcode .alt {

	width: 100%; margin: 0em; background-color: #f4f4f4

}

.csharpcode .lnum {

	color: O06060

}
2.配置主Spring的配置文件用于加载其实的Spring其它的配置文件:
1: xml version="1.0" encoding="UTF-8"?>
2: <beans xmlns="http://www.springframework.org/schema/beans"
3: xmlns:xsi="http://www.w3.org/2001/XMLSchema-instance" xmlns:aop="http://www.springframework.org/schema/aop"
4: xmlns:tx="http://www.springframework.org/schema/tx"
5: xsi:schemaLocation="http://www.springframework.org/schema/beans
6: http://www.springframework.org/schema/beans/spring-beans.xsd
7: http://www.springframework.org/schema/tx
8: http://www.springframework.org/schema/tx/spring-tx.xsd
9: http://www.springframework.org/schema/aop
10: http://www.springframework.org/schema/aop/spring-aop.xsd">
11:
12:
13:
14: <import resource="applicationContext-*.xml" />
15:
16:
22:
23: beans>
.csharpcode {
font-size: small; font-family: consolas, "Courier New", courier, monospace; color: black; background-color: #ffffff
}
.csharpcode pre {
font-size: small; font-family: consolas, "Courier New", courier, monospace; color: black; background-color: #ffffff
}
.csharpcode pre {
margin: 0em
}
.csharpcode .rem {
color: #08000
}
.csharpcode .kwrd {
color: #000ff
}
.csharpcode .str {
color: #06080
}
.csharpcode .op {
color: #000c0
}
.csharpcode .preproc {
color: #cc6633
}
.csharpcode .asp {
background-color: #ffff00
}
.csharpcode .html {
color: S00000
}
.csharpcode .attr {
color: #ff0000
}
.csharpcode .alt {
width: 100%; margin: 0em; background-color: #f4f4f4
}
.csharpcode .lnum {
color: O06060
}
3.配置 applicationContext-tx.xml 文件用于统一管理事务相关的配置
1: xml version="1.0" encoding="UTF-8"?>
2: <beans xmlns="http://www.springframework.org/schema/beans"
3: xmlns:xsi="http://www.w3.org/2001/XMLSchema-instance"
4: xmlns:aop="http://www.springframework.org/schema/aop"
5: xmlns:tx="http://www.springframework.org/schema/tx"
6: xsi:schemaLocation="http://www.springframework.org/schema/beans
7: http://www.springframework.org/schema/beans/spring-beans.xsd
8: http://www.springframework.org/schema/tx
9: http://www.springframework.org/schema/tx/spring-tx.xsd
10: http://www.springframework.org/schema/aop
11: http://www.springframework.org/schema/aop/spring-aop.xsd">
12:
13:
14:
15: <bean id="transactionManager" class="org.springframework.orm.hibernate5.HibernateTransactionManager">
16:
17: <property name="sessionFactory" ref="sessionFactory">property>
18: bean>
19:
20:
21: <tx:advice id="txAdvice" transaction-manager="transactionManager">
22:
23: <tx:attributes>
24: <tx:method name="*" read-only="false" propagation="REQUIRED"/>
25: <tx:method name="find*" read-only="true" propagation="SUPPORTS"/>
26: tx:attributes>
27: tx:advice>
28:
29:
30: <aop:config>
31: <aop:advisor advice-ref="txAdvice" pointcut-ref="pt1"/>
32: aop:config>
33: beans>
4.配置 applicationContext-aop.xml 文件用于统一管理AOP相关的配置
1: xml version="1.0" encoding="UTF-8"?>
2: <beans xmlns="http://www.springframework.org/schema/beans"
3: xmlns:xsi="http://www.w3.org/2001/XMLSchema-instance" xmlns:aop="http://www.springframework.org/schema/aop"
4: xmlns:tx="http://www.springframework.org/schema/tx"
5: xsi:schemaLocation="http://www.springframework.org/schema/beans
6: http://www.springframework.org/schema/beans/spring-beans.xsd
7: http://www.springframework.org/schema/tx
8: http://www.springframework.org/schema/tx/spring-tx.xsd
9: http://www.springframework.org/schema/aop
10: http://www.springframework.org/schema/aop/spring-aop.xsd">
11:
12:
13: <aop:config>
14:
15: <aop:pointcut expression="execution(* com.SSH.service.impl.*.*(..))" id="pt1" />
16: aop:config>
17: beans>
.csharpcode {
font-size: small; font-family: consolas, "Courier New", courier, monospace; color: black; background-color: #ffffff
}
.csharpcode pre {
font-size: small; font-family: consolas, "Courier New", courier, monospace; color: black; background-color: #ffffff
}
.csharpcode pre {
margin: 0em
}
.csharpcode .rem {
color: #08000
}
.csharpcode .kwrd {
color: #000ff
}
.csharpcode .str {
color: #06080
}
.csharpcode .op {
color: #000c0
}
.csharpcode .preproc {
color: #cc6633
}
.csharpcode .asp {
background-color: #ffff00
}
.csharpcode .html {
color: S00000
}
.csharpcode .attr {
color: #ff0000
}
.csharpcode .alt {
width: 100%; margin: 0em; background-color: #f4f4f4
}
.csharpcode .lnum {
color: O06060
}
5.配置 applicationContext-jdbc.xml 文件用于统一管理所有和连接数据库相关的配置
1: xml version="1.0" encoding="UTF-8"?>
2: <beans xmlns="http://www.springframework.org/schema/beans"
3: xmlns:xsi="http://www.w3.org/2001/XMLSchema-instance" xmlns:aop="http://www.springframework.org/schema/aop"
4: xmlns:tx="http://www.springframework.org/schema/tx"
5: xsi:schemaLocation="http://www.springframework.org/schema/beans
6: http://www.springframework.org/schema/beans/spring-beans.xsd
7: http://www.springframework.org/schema/tx
8: http://www.springframework.org/schema/tx/spring-tx.xsd
9: http://www.springframework.org/schema/aop
10: http://www.springframework.org/schema/aop/spring-aop.xsd">
11:
12:
13: <bean id="sessionFactory"
14: class="org.springframework.orm.hibernate5.LocalSessionFactoryBean">
15:
16: <property name="dataSource" ref="dataSource">property>
17:
18: <property name="hibernateProperties">
19: <props>
20: <prop key="hibernate.dialect">org.hibernate.dialect.MySQLDialectprop>
21: <prop key="hibernate.show_sql">trueprop>
22: <prop key="hibernate.format_sql">falseprop>
23: <prop key="hibernate.hbm2ddl.auto">updateprop>
24: <prop key="hibernate.current_session_context_class">org.springframework.orm.hibernate5.SpringSessionContext
25: prop>
26: props>
27: property>
28:
29: <property name="mappingLocations">
30: <array>
31:
32: <value>classpath:com/SSH/entity/*.hbm.xmlvalue>
33: array>
34: property>
35: bean>
36:
37:
38:
39: <bean id="dataSource"
40: class="org.springframework.jdbc.datasource.DriverManagerDataSource">
41: <property name="driverClassName" value="com.mysql.jdbc.Driver">property>
42: <property name="url" value="jdbc:mysql://localhost:3306/SSH_Unite">property>
43: <property name="username" value="root">property>
44: <property name="password" value="password">property>
45: bean>
46: beans>
.csharpcode {
font-size: small; font-family: consolas, "Courier New", courier, monospace; color: black; background-color: #ffffff
}
.csharpcode pre {
font-size: small; font-family: consolas, "Courier New", courier, monospace; color: black; background-color: #ffffff
}
.csharpcode pre {
margin: 0em
}
.csharpcode .rem {
color: #08000
}
.csharpcode .kwrd {
color: #000ff
}
.csharpcode .str {
color: #06080
}
.csharpcode .op {
color: #000c0
}
.csharpcode .preproc {
color: #cc6633
}
.csharpcode .asp {
background-color: #ffff00
}
.csharpcode .html {
color: S00000
}
.csharpcode .attr {
color: #ff0000
}
.csharpcode .alt {
width: 100%; margin: 0em; background-color: #f4f4f4
}
.csharpcode .lnum {
color: O06060
}
6.配置单个指定文件 applicationContext-testservice.xml 文件 统一管理持久层,业务层与动作类
1: xml version="1.0" encoding="UTF-8"?>
2: <beans xmlns="http://www.springframework.org/schema/beans"
3: xmlns:xsi="http://www.w3.org/2001/XMLSchema-instance" xmlns:aop="http://www.springframework.org/schema/aop"
4: xmlns:tx="http://www.springframework.org/schema/tx"
5: xsi:schemaLocation="http://www.springframework.org/schema/beans
6: http://www.springframework.org/schema/beans/spring-beans.xsd
7: http://www.springframework.org/schema/tx
8: http://www.springframework.org/schema/tx/spring-tx.xsd
9: http://www.springframework.org/schema/aop
10: http://www.springframework.org/schema/aop/spring-aop.xsd">
11:
12: <bean id="testDao" class="com.SSH.dao.impl.TestDaoImpl">
13:
14: <property name="sessionFactory" ref="sessionFactory">property>
15: bean>
16:
17:
18: <bean id="testService" class="com.SSH.service.impl.TestServiceImpl">
19:
20: <property name="testDao" ref="testDao">property>
21: bean>
22:
23:
24:
25: <bean id="testAction" class="com.SSH.action.TestAction" scope="prototype">
26:
27: <property name="testService" ref="testService">property>
28: bean>
29:
30:
31: beans>
.csharpcode {
font-size: small; font-family: consolas, "Courier New", courier, monospace; color: black; background-color: #ffffff
}
.csharpcode pre {
font-size: small; font-family: consolas, "Courier New", courier, monospace; color: black; background-color: #ffffff
}
.csharpcode pre {
margin: 0em
}
.csharpcode .rem {
color: #08000
}
.csharpcode .kwrd {
color: #000ff
}
.csharpcode .str {
color: #06080
}
.csharpcode .op {
color: #000c0
}
.csharpcode .preproc {
color: #cc6633
}
.csharpcode .asp {
background-color: #ffff00
}
.csharpcode .html {
color: S00000
}
.csharpcode .attr {
color: #ff0000
}
.csharpcode .alt {
width: 100%; margin: 0em; background-color: #f4f4f4
}
.csharpcode .lnum {
color: O06060
}
7.配置struts.xml文件 统一管理struts的公共配置文件
1: xml version="1.0" encoding="UTF-8"?>
2: DOCTYPE struts PUBLIC
3: "-//Apache Software Foundation//DTD Struts Configuration 2.3//EN"
4: "http://struts.apache.org/dtds/struts-2.3.dtd">
5: <struts>
6:
7:
8: <constant name="struts.devMode" value="true">constant>
9:
10:
11: <package name="myDefault" extends="struts-default" abstract="true">
12:
13: package>
14:
15:
16:
17: <include file="config/struts/struts-*.xml">include>
18: struts>
.csharpcode {
font-size: small; font-family: consolas, "Courier New", courier, monospace; color: black; background-color: #ffffff
}
.csharpcode pre {
font-size: small; font-family: consolas, "Courier New", courier, monospace; color: black; background-color: #ffffff
}
.csharpcode pre {
margin: 0em
}
.csharpcode .rem {
color: #08000
}
.csharpcode .kwrd {
color: #000ff
}
.csharpcode .str {
color: #06080
}
.csharpcode .op {
color: #000c0
}
.csharpcode .preproc {
color: #cc6633
}
.csharpcode .asp {
background-color: #ffff00
}
.csharpcode .html {
color: S00000
}
.csharpcode .attr {
color: #ff0000
}
.csharpcode .alt {
width: 100%; margin: 0em; background-color: #f4f4f4
}
.csharpcode .lnum {
color: O06060
}
8.配置 struts-testservice.xml 文件 动作类配置便于统一管理动作类(TestAction)
1: xml version="1.0" encoding="UTF-8"?>
2: DOCTYPE struts PUBLIC
3: "-//Apache Software Foundation//DTD Struts Configuration 2.3//EN"
4: "http://struts.apache.org/dtds/struts-2.3.dtd">
5: <struts>
6:
7: <constant name="struts.enable.DynamicMethodInvocation" value="true">constant>
8:
9: <package name="test" extends="myDefault" namespace="/test">
10:
15:
16: <action name="testAction_*" class="testAction" method="{1}">
17: <result name="success" >/success.jspresult>
18: <result name="input">/index.jspresult>
19: action>
20:
21: package>
22: struts>
.csharpcode {
font-size: small; font-family: consolas, "Courier New", courier, monospace; color: black; background-color: #ffffff
}
.csharpcode pre {
font-size: small; font-family: consolas, "Courier New", courier, monospace; color: black; background-color: #ffffff
}
.csharpcode pre {
margin: 0em
}
.csharpcode .rem {
color: #08000
}
.csharpcode .kwrd {
color: #000ff
}
.csharpcode .str {
color: #06080
}
.csharpcode .op {
color: #000c0
}
.csharpcode .preproc {
color: #cc6633
}
.csharpcode .asp {
background-color: #ffff00
}
.csharpcode .html {
color: S00000
}
.csharpcode .attr {
color: #ff0000
}
.csharpcode .alt {
width: 100%; margin: 0em; background-color: #f4f4f4
}
.csharpcode .lnum {
color: O06060
}
9.编写控制器action动作类 TestAction.java类
1: package com.SSH.action;
2:
3: import com.SSH.entity.User;
4: import com.SSH.service.ITestService;
5: import com.opensymphony.xwork2.ActionSupport;
6: import com.opensymphony.xwork2.ModelDriven;
7:
8: /**
9: * Test 动作类
10: *
11: * @author HRuinger
12: *
13: */
14:
15: public class TestAction extends ActionSupport implements ModelDriven {
16:
17: private static final long serialVersionUID = 1L;
18:
19: private User user = new User();
20:
21: private ITestService testService;
22:
23: public void setTestService(ITestService testService) {
24: this.testService = testService;
25: }
26:
27: @Override
28: public User getModel() {
29: // TODO Auto-generated method stub
30: return user;
31: }
32:
33: // 用户登录
34: public String login() {
35: User exUser = testService.findUser(user);
36: if (exUser != null) {
37: return SUCCESS;
38: } else {
39: // 说明错误了
40: this.addActionError("亲,用户名或者密码错误");
41: return INPUT;
42: }
43: }
44:
45: }
10.编写Service层 接口ITestService.java
1: package com.SSH.service;
2:
3: import com.SSH.entity.User;
4:
5: public interface ITestService {
6:
7: User findUser(User user);
8:
9: }
11.编写Service层实现类TestServiceImpl.java
1: package com.SSH.service.impl;
2:
3: import com.SSH.dao.ITestDao;
4: import com.SSH.entity.User;
5: import com.SSH.service.ITestService;
6:
7: /**
8: * 业务实现层
9: *
10: * @author HRuinger
11: *
12: */
13:
14: public class TestServiceImpl implements ITestService {
15:
16: private ITestDao testDao;
17:
18: public void setTestDao(ITestDao testDao) {
19: this.testDao = testDao;
20: }
21:
22: @Override
23: public User findUser(User user) {
24:
25: return testDao.find(user);
26: }
27:
28: }
12.编写数据访问层(Dao层)接口 ITestDao.java类
1: package com.SSH.dao;
2:
3: import com.SSH.entity.User;
4:
5: /**
6: *
7: * @author HRuinger
8: *
9: */
10:
11:
12: public interface ITestDao {
13:
14:
15: User find(User user);
16:
17: }
13.编写访问层实现类TestDaoImpl.java
1: package com.SSH.dao.impl;
2:
3: import java.util.List;
4:
5: import org.springframework.orm.hibernate5.support.HibernateDaoSupport;
6:
7: import com.SSH.dao.ITestDao;
8: import com.SSH.entity.User;
9:
10: /**
11: *
12: * @author HRuinger
13: *
14: */
15:
16: public class TestDaoImpl extends HibernateDaoSupport implements ITestDao {
17:
18: @Override
19: public User find(User user) {
20: String username =user.getUsername();
21: String password = user.getPassword();
22: String hql = "from User u where u.username = ? and u.password = ?";
23: List list = (List) this.getHibernateTemplate().find(hql, username,password);
24: if(list != null && list.size() > 0){
25: return list.get(0);
26: }
27: return null;
28: }
29:
30: }
14.编写实体类(模型)Userjava类
1: package com.SSH.entity;
2: // Generated 2016-9-26 17:31:58 by Hibernate Tools 5.1.0.Beta1
3:
4: /**
5: * User generated by hbm2java
6: */
7: public class User implements java.io.Serializable {
8:
9: private Integer id;
10: private String username;
11: private String password;
12:
13: public User() {
14: }
15:
16: public User(String username, String password) {
17: this.username = username;
18: this.password = password;
19: }
20:
21: public Integer getId() {
22: return this.id;
23: }
24:
25: public void setId(Integer id) {
26: this.id = id;
27: }
28:
29: public String getUsername() {
30: return this.username;
31: }
32:
33: public void setUsername(String username) {
34: this.username = username;
35: }
36:
37: public String getPassword() {
38: return this.password;
39: }
40:
41: public void setPassword(String password) {
42: this.password = password;
43: }
44:
45: @Override
46: public String toString() {
47: return "User [id=" + id + ", username=" + username + ", password=" + password + "]";
48: }
49:
50: }
15.编写映射文件User.hbm.xml
1: xml version="1.0"?>
2: DOCTYPE hibernate-mapping PUBLIC "-//Hibernate/Hibernate Mapping DTD 3.0//EN"
3: "http://www.hibernate.org/dtd/hibernate-mapping-3.0.dtd">
4:
5: <hibernate-mapping>
6: <class name="com.SSH.entity.User" table="user">
7: <id name="id" type="java.lang.Integer">
8: <column name="id" />
9: <generator class="identity" />
10: id>
11: <property name="username" type="string">
12: <column name="username" length="20" />
13: property>
14: <property name="password" type="string">
15: <column name="password" length="20" />
16: property>
17: class>
18: hibernate-mapping>
<-- 14、15 两步可以用eclipse的插件来生成对应的文件,依据对应的数据库 -->
16.用到的对应的数据库文件 db_ssh-unite.sql
首先创建ssh_unite数据库:
create database ssh_unite;
然后运行下面语句便可:
1: /*
2: Navicat MySQL Data Transfer
3:
4: Source Server : Mysql
5: Source Server Version : 50549
6: Source Host : localhost:3306
7: Source Database : ssh_unite
8:
9: Target Server Type : MYSQL
10: Target Server Version : 50549
11: File Encoding : 65001
12:
13: Date: 2016-09-29 15:29:54
14: */
15:
16: SET FOREIGN_KEY_CHECKS=0;
17:
18: -- ----------------------------
19: -- Table structure for user
20: -- ----------------------------
21: DROP TABLE IF EXISTS `user`;
22: CREATE TABLE `user` (
23: `id` int(11) NOT NULL AUTO_INCREMENT,
24: `username` varchar(20) DEFAULT NULL,
25: `password` varchar(20) DEFAULT NULL,
26: PRIMARY KEY (`id`)
27: ) ENGINE=InnoDB AUTO_INCREMENT=4 DEFAULT CHARSET=utf8;
28:
29: -- ----------------------------
30: -- Records of user
31: -- ----------------------------
32: INSERT INTO `user` VALUES ('1', 'aaa', 'aaa');
33: INSERT INTO `user` VALUES ('2', 'bb', 'bbb');
34: INSERT INTO `user` VALUES ('3', 'HRuinger', '1234');
效果图片:
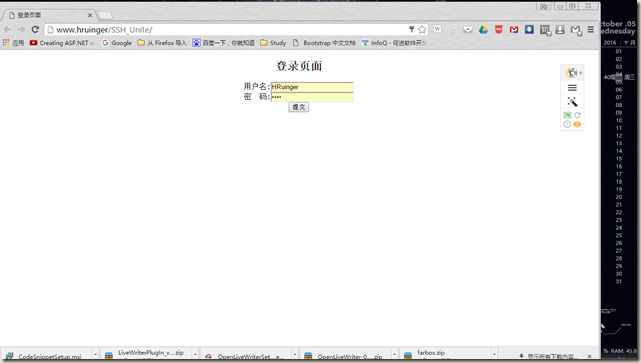
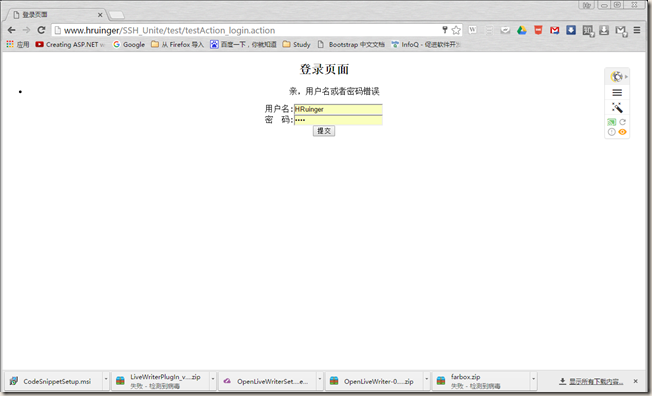
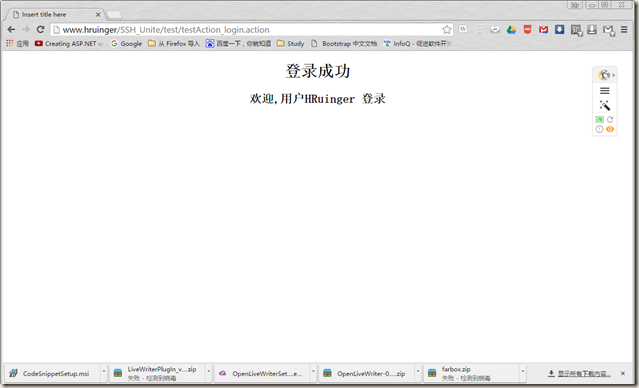
有需要源代码 的请留言,到时 再上传。
.csharpcode {
font-size: small; font-family: consolas, "Courier New", courier, monospace; color: black; background-color: #ffffff
}
.csharpcode pre {
font-size: small; font-family: consolas, "Courier New", courier, monospace; color: black; background-color: #ffffff
}
.csharpcode pre {
margin: 0em
}
.csharpcode .rem {
color: #08000
}
.csharpcode .kwrd {
color: #000ff
}
.csharpcode .str {
color: #06080
}
.csharpcode .op {
color: #000c0
}
.csharpcode .preproc {
color: #cc6633
}
.csharpcode .asp {
background-color: #ffff00
}
.csharpcode .html {
color: S00000
}
.csharpcode .attr {
color: #ff0000
}
.csharpcode .alt {
width: 100%; margin: 0em; background-color: #f4f4f4
}
.csharpcode .lnum {
color: O06060
}
SSH整合框架+mysql简单的实现的更多相关文章
- 如何搭建一个WEB服务器项目(一)—— 开篇 ,搭建SSH整合框架
使用Intellij IDEA2019创建SSH(Spring+SpringMVC+Hibernate+Maven整合)项目 观前提示:本系列文章有关服务器以及后端程序这些概念,我写的全是自己的理解, ...
- SSH整合框架
实现登录.新闻增删改查.树形菜单 引入pom.xml <project xmlns="http://maven.apache.org/POM/4.0.0" xmlns:xsi ...
- Struts2 SSH整合框架返回json时,要注意懒加载问题
返回的这个json对象,要保证它里面的所有属性都已经取出来了(即不是proxy或者是懒加载),否则当struts框架将该对象转化成json数据时,会报出一个no session的错误. 因此你要将该懒 ...
- 在SSH整合框架中经常会用到Service层,请问大家这个Service层有什么具体的作用,可不可以不用这个Service层呢?
有效地分离数据访问层(DAO)和业务层(SERVICE),使之各司其职,举例说明:如果DAO层访问数据库,得到的数据根据业务需要要进行加密,那么取数据和把数据加密就是2个步骤,访问数据和业务逻辑加工, ...
- Hibernate 注解时 hibernate.hbm.xml的配置方法 以及与SSH整合里的配置方式
①纯Hibernate开发: 当你在Bean中写入注解后,需要告诉hibernate哪些类使用了注解. 方法是在hibernate.hbm.xml文件中配置 <!DOCTYPE hibernat ...
- 整合SSH框架实现简单登录
SSH整合的大体结构:我们将Struts2和hibernate交给spring来管理 创建好web项目之后,首先当然是先引入需要的pom节点,需要的pom的节点可以在Maven官方仓库中下载https ...
- SSH三大框架的搭建整合(struts2+spring+hibernate)(转)
原文地址:http://blog.csdn.net/kyle0349/article/details/51751913 尊重原创,请访问原文地址 SSH说的上是javaweb经典框架,不能说100% ...
- 三大框架SSH整合
三大框架SSH整合 -------------------------------Spring整合Hibernate------------------------------- 一.为什么要整合Hi ...
- 【转载】Ssh整合开发介绍和简单的登入案例实现
Ssh整合开发介绍和简单的登入案例实现 Ssh整合开发介绍和简单的登入案例实现 一 介绍: Ssh是strtus2-2.3.1.2+ spring-2.5.6+hibernate-3.6.8整合的开 ...
随机推荐
- 银河英雄传说 2002年NOI全国竞赛
时间限制: 1 s 空间限制: 256000 KB 题目等级 : 大师 Master 题目描述 Description 公元五八○一年,地球居民迁移至金牛座α第二行星,在那里发表银河联邦创立宣言,同年 ...
- nyoj_214_单调递增子序列(二)_201403182131
单调递增子序列(二) 时间限制:1000 ms | 内存限制:65535 KB 难度:4 描述 给定一整型数列{a1,a2...,an}(0<n<=100000),找出单调递增最长 ...
- HDU——1130 How Many Trees?
How Many Trees? Time Limit: 2000/1000 MS (Java/Others) Memory Limit: 65536/32768 K (Java/Others)T ...
- codevs——1675 大质数 2
1675 大质数 2 时间限制: 1 s 空间限制: 1000 KB 题目等级 : 钻石 Diamond 题解 题目描述 Description 小明因为没做作业而被数学老师罚站,之 ...
- MYSQL中有关表的简单操作
#创建表 CREATE TABLE table02( tid INT, tname VARCHAR(20)); #查看所有表SHOW TABLES; #查看表的结构DESC table01; #修改表 ...
- SiteMesh2-简介
简介: SiteMesh类似与ASP.NET的模板页. SiteMesh是由一个基于Web页面布局.装饰以及与现存Web应用整合的框架.它能帮助我们在由大量页面构成的项目中创建一致的页面布局和外观,如 ...
- mac下,redis的安装与配置
一.安装redis 1.到官网下载redis最新版本号,我下载的是3.0.3 http://redis.io/ 2.拷贝redis-3.0.3到/usr/local文件夹 3.解压缩sudo tar ...
- ubuntu 建立加密分區及其安全刪除
加密分區1: sudo apt-get install cryptsetup2: 用“磁盤實用工具“,建立新的分區 或者 格式化現有分區,且勾選“加密底層設備“,按提示設定密碼3:同時選擇加密條件:i ...
- 微软的技术态度 -- 从其对于CRT的设计考虑说起(Thought on the CRT - What Microsoft Prefers)
很多人从C语言学习过来的人都知道,在编写程序时用到的像printf这样的函数,是作为该语言标准库函数提供的,这也是C语言标准中规定的内容.因此,操作系统必须对其保持一定程度上的透明,也就是说,作为一个 ...
- go语言笔记——调试还很弱,用gdb来做?可用panic和defer。格式化代码使用gofmt,貌似我的vim插件是自带
3.3 调试器 应用程序的开发过程中调试是必不可少的一个环节,因此有一个好的调试器是非常重要的,可惜的是,Go 在这方面的发展还不是很完善.目前可用的调试器是 gdb,最新版均以内置在集成开发环境 L ...
