ubuntu4.04服务器添加虚拟主机
虚拟主机常用于在一个单独的IP地址上提供多个域名的网站服务。如果有人想在单个VPS的单个IP地址运行多个网站,这是非常有用的。在这个教程中,让我告诉你如何设置在Ubuntu 14.04 LTS的Apache网页服务器设置虚拟主机。请注意,这个教程只针对Ubuntu14.04的32位版本。
我不保证它也可以工作在其它更低的Ubuntu版本或者Ubuntu衍生版本(虽然可能过程是类似的)。
方案
在这个教程中,我会使用Ubuntu 14.04 32位 LTS,并搭建2个测试网站分别命名为“unixmen1.local” 和 “unixmen2.local”.我的测试机分别为192.168.1.250/24和server.unixmen.local。你可以根据你的需要更改虚拟域名。
安装Apache网站服务器
安装apache服务器之前,我们来更新一下我们的Ubuntu服务器:
- sudo apt-get update
然后,用下面命令来安装apache网络服务器:
- sudo apt-get install apache2
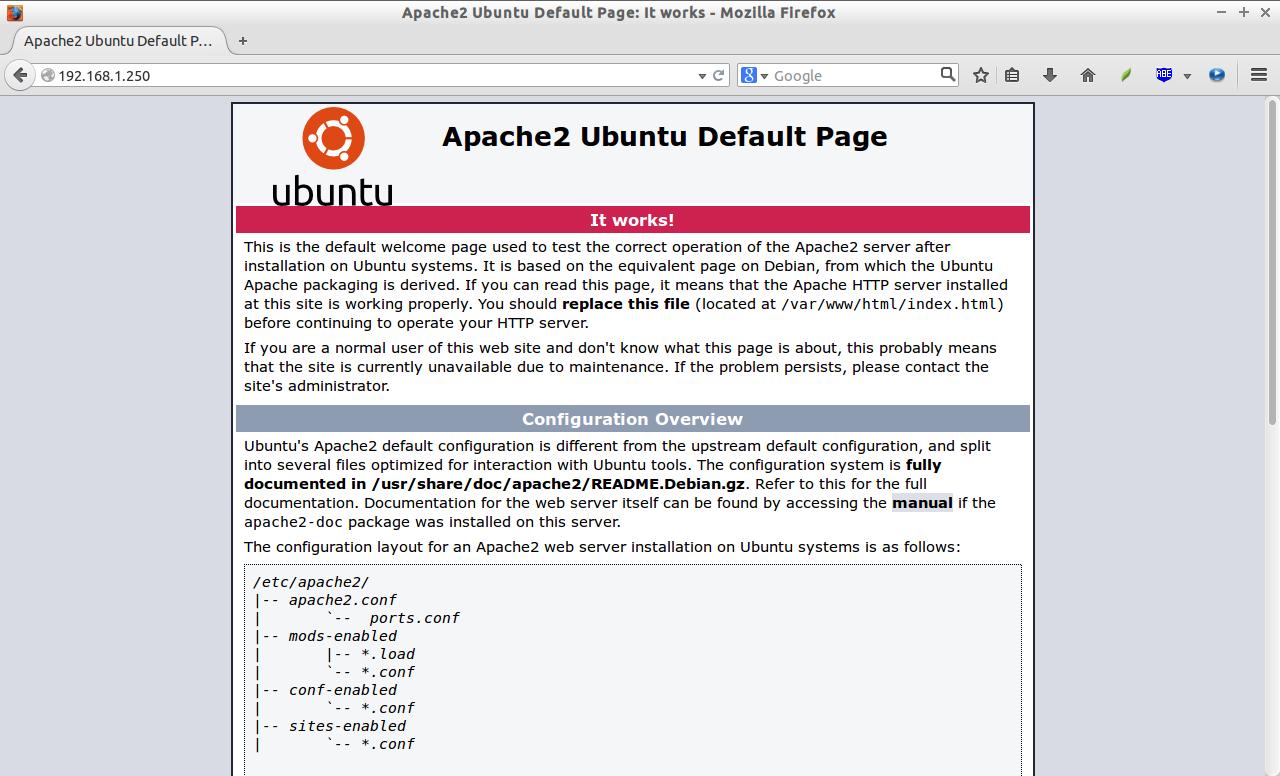
安装apache服务器之后,让我们通过这个URL http://你的服务器的IP地址/ 来测试网站服务器是否正常工作

如你所见,apache服务器已经工作了。
设置虚拟主机
1.创建虚拟目录
现在,让我们继续安装虚拟主机。正如我先前所述,我要新建2台虚拟主机分别命名为“unixmen1.local”和“unixmen2.local”.
创建一个公用的文件夹来存放这两台虚拟主机的数据。
首先,让我们为unixmen1.local这个站点创建一个目录:
- sudo mkdir -p /var/www/unixmen1.local/public_html
接着,为for unixmen2.local站点创建一个目录:
- sudo mkdir -p /var/www/unixmen2.local/public_html
2. 设置所有者和权限
上面目录现在只有root拥有权限。我们需要修改这2个目录的拥有权给普通用户,而不仅仅是root用户。
- sudo chown -R $USER:$USER /var/www/unixmen1.local/public_html/
- sudo chown -R $USER:$USER /var/www/unixmen2.local/public_html/
“$USER”变量指向了当前的登录用户。
设置读写权限给apache网页根目录(/var/www)及其子目录,这样每个人都可以从目录中读取文件。
- sudo chmod -R 755 /var/www/
这样,我们就创建好了一些文件夹来保存网络相关数据并分配必要的权限和所属用户。
3. 为虚拟主机创建示例页
现在,我们给网站增加示例页。第一步,让我们给虚拟主机unixmen1.local创建一个示例页。
给unixmen1.local虚拟主机创建一个示例页,
- sudo vi /var/www/unixmen1.local/public_html/index.html
添加以下内容:
- <html>
- <head>
- <title>www.unixmen1.local</title>
- </head>
- <body>
- <h1>Welcome To Unixmen1.local website</h1>
- </body>
- </html>
保存并关闭文件。
同样的,添加示例页到第二台虚拟主机。
- sudo vi /var/www/unixmen2.local/public_html/index.html
添加以下内容:
- <html>
- <head>
- <title>www.unixmen2.local</title>
- </head>
- <body>
- <h1>Welcome To Unixmen2.local website</h1>
- </body>
- </html>
保存并关闭文件。
4. 创建虚拟主机配置文件
默认情况下,apache有一个默认的虚拟主机文件叫000-default.conf。我们将会复制000-default.conf文件内容到我们新的虚拟主机配置文件中。
- sudo cp /etc/apache2/sites-available/000-default.conf /etc/apache2/sites-available/unixmen1.local.conf
- sudo cp /etc/apache2/sites-available/000-default.conf /etc/apache2/sites-available/unixmen2.local.conf
确保虚拟主机配置文件末尾包含.conf扩展名。
现在,修改unximen1.local.conf文件以符合需求。
- sudo vi /etc/apache2/sites-available/unixmen1.local.conf
使相关的变化直接呈现在unixmen1站点中(译注:以“#”开头的注释行可以忽略。)。
- <VirtualHost *:80>
- # The ServerName directive sets the request scheme, hostname and port that
- # the server uses to identify itself. This is used when creating
- # redirection URLs. In the context of virtual hosts, the ServerName
- # specifies what hostname must appear in the request's Host: header to
- # match this virtual host. For the default virtual host (this file) this
- # value is not decisive as it is used as a last resort host regardless.
- # However, you must set it for any further virtual host explicitly.
- #ServerName www.example.com
- ServerAdmin webmaster@unixmen1.local
- ServerName unixmen1.local
- ServerAlias www.unixmen1.local
- DocumentRoot /var/www/unixmen1.local/public_html
- # Available loglevels: trace8, ..., trace1, debug, info, notice, warn,
- # error, crit, alert, emerg.
- # It is also possible to configure the loglevel for particular
- # modules, e.g.
- #LogLevel info ssl:warn
- ErrorLog ${APACHE_LOG_DIR}/error.log
- CustomLog ${APACHE_LOG_DIR}/access.log combined
- # For most configuration files from conf-available/, which are
- # enabled or disabled at a global level, it is possible to
- # include a line for only one particular virtual host. For example the
- # following line enables the CGI configuration for this host only
- # after it has been globally disabled with "a2disconf".
- #Include conf-available/serve-cgi-bin.conf
- </VirtualHost>
同理,修改第二台主机文件。
- sudo vi /etc/apache2/sites-available/unixmen2.local.conf
使相关的修改在unixmen2 站点呈现出来。
- <VirtualHost *:80>
- # The ServerName directive sets the request scheme, hostname and port that
- # the server uses to identify itself. This is used when creating
- # redirection URLs. In the context of virtual hosts, the ServerName
- # specifies what hostname must appear in the request's Host: header to
- # match this virtual host. For the default virtual host (this file) this
- # value is not decisive as it is used as a last resort host regardless.
- # However, you must set it for any further virtual host explicitly.
- #ServerName www.example.com
- ServerAdmin webmaster@unixmen2.local
- ServerName unixmen2.local
- ServerAlias www.unixmen2.local
- DocumentRoot /var/www/unixmen2.local/public_html
- # Available loglevels: trace8, ..., trace1, debug, info, notice, warn,
- # error, crit, alert, emerg.
- # It is also possible to configure the loglevel for particular
- # modules, e.g.
- #LogLevel info ssl:warn
- ErrorLog ${APACHE_LOG_DIR}/error.log
- CustomLog ${APACHE_LOG_DIR}/access.log combined
- # For most configuration files from conf-available/, which are
- # enabled or disabled at a global level, it is possible to
- # include a line for only one particular virtual host. For example the
- # following line enables the CGI configuration for this host only
- # after it has been globally disabled with "a2disconf".
- #Include conf-available/serve-cgi-bin.conf
- </VirtualHost>
修改虚拟主机文件后,禁用默认的虚拟主机配置(000.default.conf),然后启用新的虚拟主机配置,如下所示。
- sudo a2dissite 000-default.conf
- sudo a2ensite unixmen1.local.conf
- sudo a2ensite unixmen2.local.conf
最后,重启apache服务器。
- sudo service apache2 restart
就是这样。现在,我们成功地配置了apach虚拟主机在我们的Ubuntu服务器上
这个这个教程中有一点是最重要的,就是在设置的最后将默认的配置文件禁用掉,将新的配置文件启用, a2dissite a2ensite 这两个命令。
ubuntu4.04服务器添加虚拟主机的更多相关文章
- LNMP一键安装包添加虚拟主机、删除虚拟主机及如何使用伪静态
本文主要介绍LNMP一键安装包添加虚拟主机.删除虚拟主机及如何使用伪静态. 一.添加虚拟主机通俗点就是在VPS/服务商上添加一个网站(域名). 需要执行如下命令:/root/vhost.sh 执行后会 ...
- nginx 添加虚拟主机 支持php 伪静态
1添加虚拟主机 进入 /usr/local/nginx/conf/vhost 目录, 创建虚拟主机配置文件 demo.neoease.com.conf ({域名}.conf). 2. 打开配置文件, ...
- 云服务器、虚拟主机和VPS的区别
虚拟主机就是利用网络空间技术,把一台服务器分成许多的"虚拟"的主机,每一台网络空间都具有独立的域名和IP地址,具有完整的Internet服务器功能.网络空间之间完全独立,在外界看来 ...
- centos7 安装 iRedmail 后 给nginx添加虚拟主机
iRedmail安装参考官方文档和 https://ywnz.com/linuxyffq/4563.html 准备工作 更新操作系统 yum update -y 安装必要组件 yum install ...
- MQTT协议 局域网和广域网 云服务器和虚拟主机、VPS SSH和FTP、SFTP
MQTT协议 MQTT协议就很好的解决了coap存在的问题.MQTT协议是由IBM开发的即时通讯协议,相比来说比较适合物联网场景的通讯协议.MQTT协议采用发布/订阅模式,所有的物联网终端都通过TC ...
- web服务器-nginx虚拟主机
web服务器-nginx虚拟主机 一 虚拟主机介绍 就是把一台物理服务器划分成多个虚拟的服务器, 每一个虚拟主机都可以有独立的域名和独立的目录,同时发布俩个网站. 二. 基于IP的虚拟主机 应用场景: ...
- ubuntu12.04下 安装虚拟主机
Ubuntu Linux 方法一 一.修改/etc/apache2/sites-available/ 1. 打开目录 /etc/apache2/sites-available/, 发现 default ...
- Ubuntu Server 14.04 & Apache2.4 虚拟主机、模块重写、隐藏入口文件配置
环境: Ubuntu Server 14.04 , Apache2.4 一.Apache2.4 虚拟主机配置 01. 新建一份配置文件 在apache2.4中,虚拟主机的目录是通过/etc/apach ...
- Apache2.4.6 添加虚拟主机
apache2.4 与 apache2.2 的虚拟主机配置写法有所不同 apache2.2的写法: <VirtualHost *:80> ServerName domain.com Doc ...
随机推荐
- UIWindow学习
写在前面 本文内容绝大部分都参考唐巧大神的<iOS开发进阶>,只是结合不是特别长的开发经验加以补充:最后基于UIWindow自定义了一个类似于微信的ActionSheet. UIWindo ...
- 「网络流24题」「Codevs1237」 餐巾计划问题
1237 餐巾计划问题 时间限制: 1 s 空间限制: 128000 KB 题目等级 : 钻石 Diamond 题目描述 Description 一个餐厅在相继的 N 天里,每天需用的餐巾数不尽相 ...
- 「NOIP2000」「Codevs1042」 进制转换
题目描述 Description 我们可以用这样的方式来表示一个十进制数: 将每个阿拉伯数字乘以一个以该数字所处位置的(值减1)为指数,以10为底数的幂之和的形式.例如:123可表示为 1*102+2 ...
- 【TJOI2013】 单词
[题目链接] 点击打开链接 [算法] AC自动机+递推 [代码] #include<bits/stdc++.h> using namespace std; #define MAXN 200 ...
- NYOJ1——A+B Problem NYOJ2——括号配对问题
A+B Problem 时间限制:3000 ms | 内存限制:65535 KB 难度:0 描述:此题为练手用题,请大家计算一下a+b的值 输入:输入两个数,a,b 输出:输出a+b的值 样 ...
- 爱奇艺面试Python,竟然挂在第5轮……
今天给大家分享我曾经在爱奇艺的面试,过程还是比较有意思的,可以给大家一些参考 聊骚阶段 嗲妹妹:你好,我是爱奇艺的HR,我们正在招聘运维开发岗位,请问您最近有在看工作机会吗? 我:(这声音也太酥了吧我 ...
- Codeforces Round #422 (Div. 2) C. Hacker, pack your bags!(更新数组)
传送门 题意 给出n个区间[l,r]及花费\(cost_i\),找两个区间满足 1.区间和为指定值x 2.花费最小 分析 先用vector记录(l,r,cost)和(r,l,cost),按l排序,再设 ...
- 5.replace的用法,while循环,continue
1.relace s='dadk12' print(s.replace('生活','dd'))==打印返回dadk12,即使没有也不会报错. 2.while continue while循环输出 1 ...
- Codeforces Round #516 Div2 (A~D)By cellur925
比赛传送门 A. Make a triangle! 题目大意:给你三根木棒,选出其中一根木棒增加它的长度,使构成三角形,问增加的长度最小是多少. 思路:签到题,根据样例/三角形性质不难发现,答案就是最 ...
- FZu Problem 2236 第十四个目标 (线段树 + dp)
题目链接: FZu Problem 2236 第十四个目标 题目描述: 给出一个n个数的序列,问这个序列内严格递增序列有多少个?不要求连续 解题思路: 又遇到了用线段树来优化dp的题目,线段树节点里 ...
