STM32F4 LTDC学习
很久没有写东西了,也很久没看文档了吼吼,觉得有点无聊,找来F4看看,主要看F429。督促自己多看多记录。
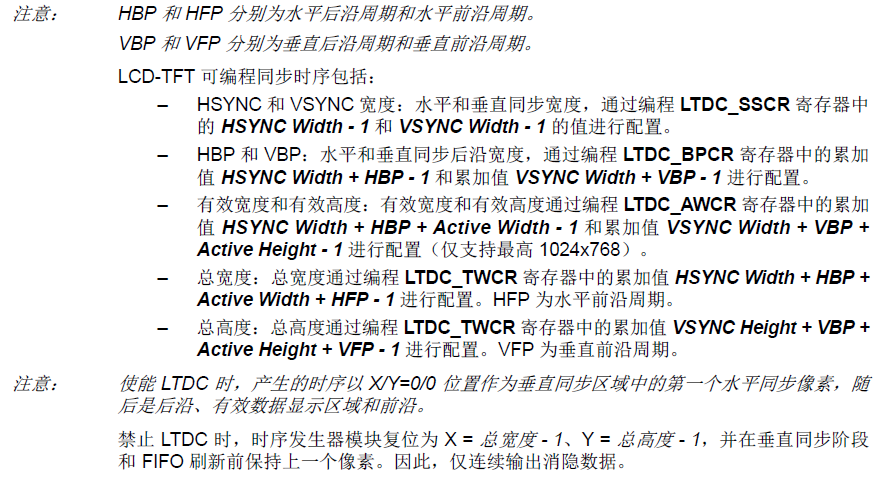
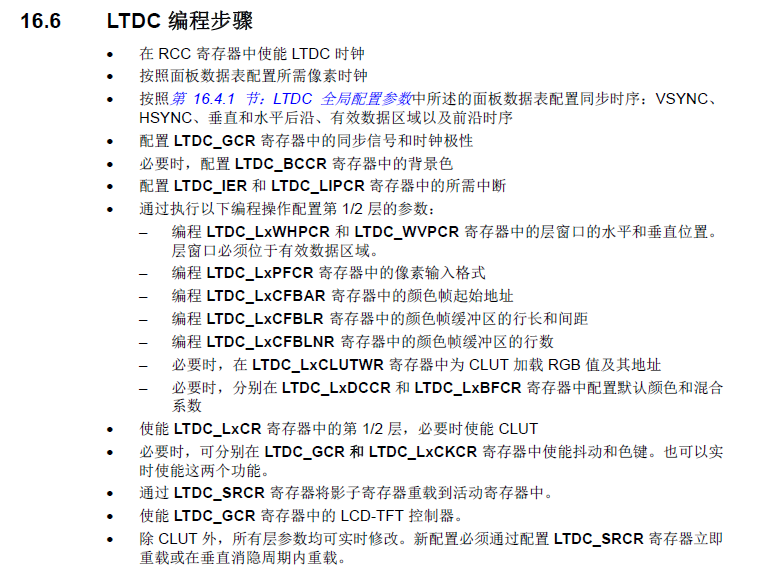
首先配置同步时序先看参考手册
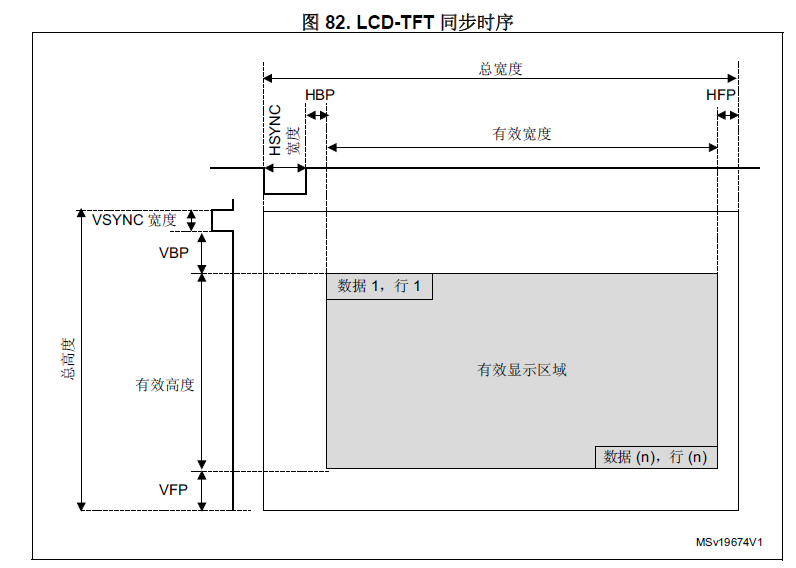
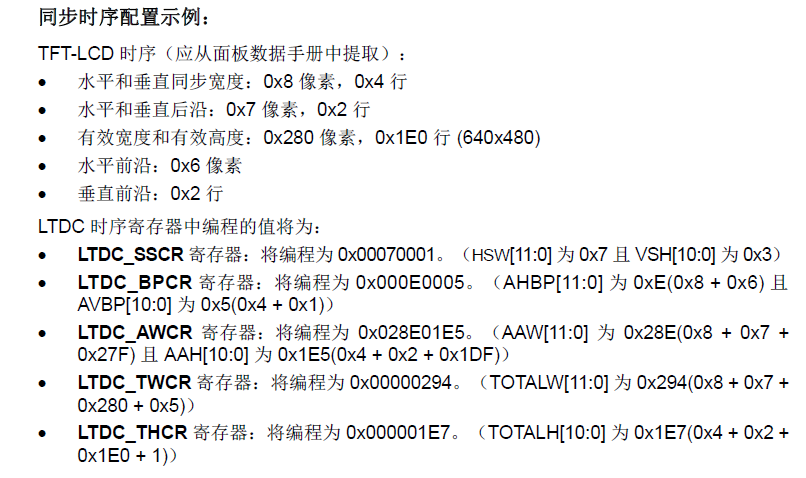
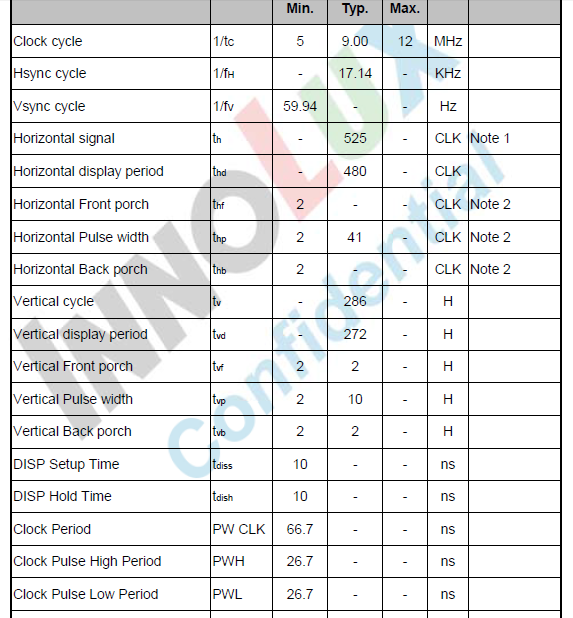
下面看一个实际例子,一块439的开发板
设置:
LTDC_InitStruct.LTDC_HorizontalSync = ;
/* */
LTDC_InitStruct.LTDC_VerticalSync = ;
/* */
LTDC_InitStruct.LTDC_AccumulatedHBP = ;
/* */
LTDC_InitStruct.LTDC_AccumulatedVBP = ;
/* */
LTDC_InitStruct.LTDC_AccumulatedActiveW = ;
/* */
LTDC_InitStruct.LTDC_AccumulatedActiveH = ;
/* */
LTDC_InitStruct.LTDC_TotalWidth = ;
/* */
LTDC_InitStruct.LTDC_TotalHeigh = ; LTDC_Init(<DC_InitStruct);
配置时序
注意每个参数定义,之前是累加
看下完整的初始化代码
void LCD_Init(void)
{
LTDC_InitTypeDef LTDC_InitStruct;
LTDC_Layer_InitTypeDef LTDC_Layer_InitStruct;
LTDC_Layer_TypeDef LTDC_Layerx; /* IO¿Ú³õʼ»¯ */
LCD_GPIOInit(); LCD_DisplayOff();
/* ʹÄÜLCDʱÖÓ */
RCC_APB2PeriphClockCmd(RCC_APB2Periph_LTDC, ENABLE);
/* ʹÄÜDMAʧ×Ù*/
RCC_AHB1PeriphClockCmd(RCC_AHB1Periph_DMA2D, ENABLE); /* ˮƽͬ²½ÐźÅ---µÍµçƽÓÐЧ */
LTDC_InitStruct.LTDC_HSPolarity = LTDC_HSPolarity_AL;
/* ´¹Ö±Í¬²½ÐźÅ---µÍµçƽÓÐЧ */
LTDC_InitStruct.LTDC_VSPolarity = LTDC_VSPolarity_AL;
/* Êý¾ÝʹÄÜÐźÅ---µÍµçƽÓÐЧ */
LTDC_InitStruct.LTDC_DEPolarity = LTDC_DEPolarity_AL;
/* ÏñËØʱÖÓÅäÖÃ--- */
LTDC_InitStruct.LTDC_PCPolarity = LTDC_DEPolarity_AL;
/* LCD±³¹âÉèÖà */
LTDC_InitStruct.LTDC_BackgroundRedValue = ;
LTDC_InitStruct.LTDC_BackgroundGreenValue = ;
LTDC_InitStruct.LTDC_BackgroundBlueValue = ;
/*
****************************************************************************
*PLLSAI_VCO = HSE*PLLSAI_N / PLL_M = 8 * 192 / 8 = 192MHz
*PLLLCDCLK = PLLSAI_VCO / PLLSAI_R = 192 / 3 = 64 Mhz
*LTDC clock frequency = PLLLCDCLK / RCC_PLLSAIDivR = 64 / 8 = 8 Mhz
****************************************************************************
*/
RCC_PLLSAIConfig(, , );
RCC_LTDCCLKDivConfig(RCC_PLLSAIDivR_Div4);
/* ʹÄÜPLLSAIʱÖÓ */
RCC_PLLSAICmd(ENABLE);
/* µÈ´ýPLLSAIʱÖÓ */
while(RCC_GetFlagStatus(RCC_FLAG_PLLSAIRDY) == RESET){}
/* */
LTDC_InitStruct.LTDC_HorizontalSync = ;
/* */
LTDC_InitStruct.LTDC_VerticalSync = ;
/* */
LTDC_InitStruct.LTDC_AccumulatedHBP = ;
/* */
LTDC_InitStruct.LTDC_AccumulatedVBP = ;
/* */
LTDC_InitStruct.LTDC_AccumulatedActiveW = ;
/* */
LTDC_InitStruct.LTDC_AccumulatedActiveH = ;
/* */
LTDC_InitStruct.LTDC_TotalWidth = ;
/* */
LTDC_InitStruct.LTDC_TotalHeigh = ; LTDC_Init(<DC_InitStruct); LTDC_Layer_InitStruct.LTDC_HorizontalStart = ;
LTDC_Layer_InitStruct.LTDC_HorizontalStop = ( + - );
LTDC_Layer_InitStruct.LTDC_VarticalStart = ;
LTDC_Layer_InitStruct.LTDC_VerticalStop = ( + - ); /* Pixel Format configuration*/
LTDC_Layer_InitStruct.LTDC_PixelFormat = LTDC_Pixelformat_RGB565;
/* Alpha constant (255 totally opaque) */
LTDC_Layer_InitStruct.LTDC_ConstantAlpha = ;
/* Default Color configuration (configure A,R,G,B component values) */
LTDC_Layer_InitStruct.LTDC_DefaultColorBlue = ;
LTDC_Layer_InitStruct.LTDC_DefaultColorGreen = ;
LTDC_Layer_InitStruct.LTDC_DefaultColorRed = ;
LTDC_Layer_InitStruct.LTDC_DefaultColorAlpha = ;
/* Configure blending factors */
LTDC_Layer_InitStruct.LTDC_BlendingFactor_1 = LTDC_BlendingFactor1_CA;
LTDC_Layer_InitStruct.LTDC_BlendingFactor_2 = LTDC_BlendingFactor2_CA;
/* the length of one line of pixels in bytes + 3 then :
Line Lenth = Active high width x number of bytes per pixel + 3
Active high width = LCD_PIXEL_WIDTH
number of bytes per pixel = 2 (pixel_format : RGB565)
*/
LTDC_Layer_InitStruct.LTDC_CFBLineLength = (( * ) + );
/* the pitch is the increment from the start of one line of pixels to the
start of the next line in bytes, then :
Pitch = Active high width x number of bytes per pixel
*/
LTDC_Layer_InitStruct.LTDC_CFBPitch = ( * );
/* configure the number of lines */
LTDC_Layer_InitStruct.LTDC_CFBLineNumber = ; /* Input Address configuration */
LTDC_Layer_InitStruct.LTDC_CFBStartAdress = LCD_FRAME_BUFFER; LTDC_LayerInit(LTDC_Layer1, <DC_Layer_InitStruct); /* Configure Layer2 */
LTDC_Layer_InitStruct.LTDC_CFBStartAdress = LCD_FRAME_BUFFER + BUFFER_OFFSET;
LTDC_Layer_InitStruct.LTDC_BlendingFactor_1 = LTDC_BlendingFactor1_PAxCA;
LTDC_Layer_InitStruct.LTDC_BlendingFactor_2 = LTDC_BlendingFactor2_PAxCA;
LTDC_LayerInit(LTDC_Layer2, <DC_Layer_InitStruct); LTDC_ReloadConfig(LTDC_IMReload); /* Enable foreground & background Layers */
LTDC_LayerCmd(LTDC_Layer1, ENABLE);
// LTDC_LayerCmd(LTDC_Layer2, ENABLE);
LTDC_ReloadConfig(LTDC_IMReload); LCD_DisplayOn();
}
LCD_Init
LTDC_DefaultColorBlue就是背景色
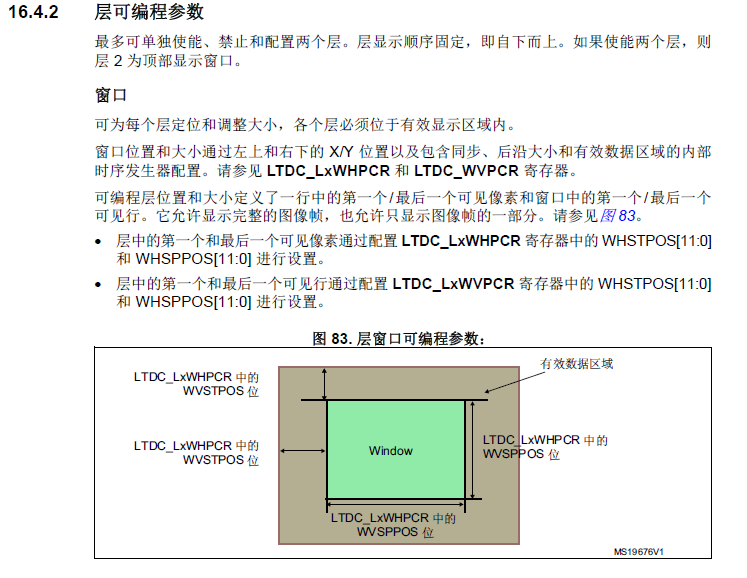
每个Layer支持窗口(Window)操作,所谓Window,就是指该层的图像只有在Window区域内有效,而Window区域外则用该层的DefaultColor填充。如下图:

填色直接写内存
 int main (void)

 {

   uint32_t i, j;

   uint16_t *addr = (uint16_t *)LCD_FRAME_BUFFER;

   SDRAM_Init();

   LCD_Init();

     j = ;

   while () {

     for (i = ; i < 0x2000000;i++);

     for (i = ; i <  * ; i++)

     {

       addr[i] =  << j;

     }

     j++;

     if (j > )j = ;

   }

 }
LCD display RGB
STM32F4 LTDC学习的更多相关文章
- STM32F4 LTDC
首先配置同步时序先看参考手册 下面看一个实际例子,一块439的开发板 设置: 配置时序 LTDC_InitStruct.LTDC_HorizontalSync = ; /* */ LTDC_InitS ...
- STM32F4编程手册学习2_内存模型
STM32F4编程手册学习2_内存模型 1. 内存映射 MCU将资源映射到一段固定的4GB可寻址内存上,如下图所示. 内存映射将内存分为几块区域,每一块区域都有一个定义的内存类型,一些区域还有一些附加 ...
- STM32F4 编程手册学习1_编程模型
STM32F4 programming manual_1 1. 处理器模式与特权等级 处理器模式分为以下两种: 线程模式: 用来执行应用软件: 处理器从reset出来时,进入线程模式: CONTROL ...
- STM32F4时钟配置分析
//学习STM32F4的过程中关于时钟上面讲的比较好 特地转发与大家分享 STM32F4时钟设置分析 原文博客链接:http://blog.csdn.net/jdh99,作者:jdh,转载请注明. 环 ...
- STM32学习笔记(二)——串口控制LED
开发板芯片:STM32F407ZGT6 PA9-USART1_TX,PA10-USART1_RX; PF9-LED0,PF10-LED1; 一.串口1配置过程(不使用串口中断): 1.使能时钟,包括G ...
- STM32学习笔记(三)——外部中断的使用
开发板芯片:STM32F407ZGT6 硬件连接:PE3-KEY1 一.STM32F4的中断介绍 STM32F4的每个IO都可以作为外部中断输入,很强大的功能吧!以前学习的51只有两个外部中断. ST ...
- STM32学习笔记(四)——串口控制LED(中断方式)
目录: 一.时钟使能,包括GPIO的时钟和串口的时钟使能 二.设置引脚复用映射 三.GPIO的初始化配置,注意要设置为复用模式 四.串口参数初始化配置 五.中断分组和中断优先级配置 六.设置串口中断类 ...
- STM32学习笔记:【001】常见数据查阅
了方便开发学习,现整理在学习过程中经常查阅的资料 (注意,以下资料都可以在ST给出官方手册中查到) 本人所持型号:STM32F429ZI-DISCOVERY, 芯片内核 :Cortex - ...
- STM32学习笔记:【001】时钟树与RCC
导言 如果学过单片机的同学应该不会陌生,学习51单片机时最经常听到的就是“最小系统”. 最小系统里面少不了晶振,否则单片机无法工作. 单片机需要晶振(时钟源)来工作,那么对于STM32芯片同样如此. ...
随机推荐
- hdu 3940
#include<stdio.h> #include<math.h> #include<string.h> double first(double vx,doubl ...
- 《大话设计模式》Python版代码实现
上一周把<大话设计模式>看完了,对面向对象技术有了新的理解,对于一个在C下写代码比较多.偶尔会用到一些脚本语言写脚本的人来说,很是开阔眼界.<大话设计模式>的代码使用C#写成的 ...
- csu 1600: Twenty-four point
传送门 1600: Twenty-four point Time Limit: 1 Sec Memory Limit: 128 MBSubmit: 490 Solved: 78[Submit][S ...
- Spring注解 @Component、@Repository、@Service、@Controller @Resource、@Autowired、@Qualifier 解析
@Repository.@Service.@Controller 这几个是一个类型,其实@Component 跟他们也是一个类型的 Spring 2.5 中除了提供 @Component 注释外,还定 ...
- POJ 1753 Flip Game【枚举】
题目链接: http://poj.org/problem?id=1753 题意: 由白块黑块组成的4*4方格,每次换一个块的颜色,其上下左右的块也会被换成相反的颜色.问最少换多少块,使得最终方格变为全 ...
- Construct Binary Tree from Preorder and Inorder Traversal (DFS,参考)
Given preorder and inorder traversal of a tree, construct the binary tree. Note:You may assume that ...
- CORS:Source.priciple implimentation in Spring
Cors(Cross-origin Resource Sharing)一种跨域访问技术,基本思想是使用自定义的HTTP头部允许浏览器和服务器相互了解对方,从而决定响应成功与否. CORS与JSONP对 ...
- HDU 4786 Fibonacci Tree(生成树,YY乱搞)
http://acm.hdu.edu.cn/showproblem.php? pid=4786 Fibonacci Tree Time Limit: 4000/2000 MS (Java/Others ...
- PHP的类中的常量,静态变量的问题。
自己在写一个小型的 angularJS 库的时候,觉得 javascript 中的很多概念有点像是PHP中的概念. 像类常量, 类中的静态变量(类的静态变量是类的所有实例都共享的),这些概念虽然在 j ...
- webpack-Module Resolution(模块解析)
模块解析(Module Resolution) resolver 是一个库(library),用于帮助找到模块的绝对路径.一个模块可以作为另一个模块的依赖模块,然后被后者引用,如下: import f ...