什么是maven(二)
转自博主--一杯凉茶
maven项目构建ssh工程(父工程与子模块的拆分与聚合)
前一节我们明白了maven是个什么玩意,这一节就来讲讲他的一个重要的应用场景,也就是通过maven将一个ssh项目分割为不同的几个部分独立开发,很重要,加油
--WH
一、maven父工程与子模块的拆分与聚合原理
问题描述:将ssh工程拆分为多个模块开发
1.1、拆分原理
创建一个maven project(pom),然后在创建三个子模块(maven moudule),其中三个子模块,分别为 dao、service、web,也就是将三层的内容分别独立为一个项目,进一步将耦合性降低,其中如何将他们连接起来了,看下图。
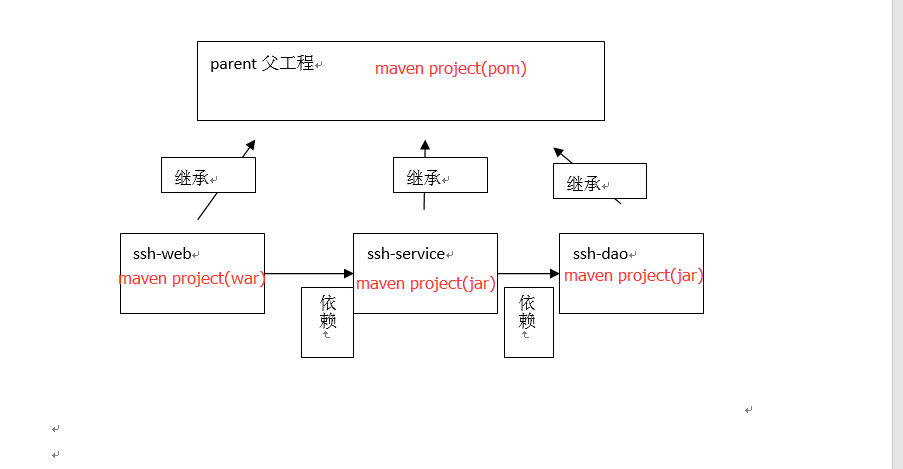
为什么需要创建parent父工程来管理其下三个子模块呢?并让其子模块继承他呢?
继承是为了消除重复,如果将dao、service、web分开创建独立的工程则每个工程的pom.xml文件中的内容存在重复,比如:设置编译版本、锁定spring的版本的等,可以将这些重复的配置提取出来在父工程的pom.xml中定义
将三层都独立分开来了,web层如何调用service层代码?service层又如何调用dao层的代码呢?
这个在没有maven之前是不可以这样做的,但是有了maven一切都不一样了,web层调用service层的代码其实很简单,因为service是一个完整的项目,那么我们在web层这个项目中想要使用别得项目中的代码,只需要通过maven的pom.xml文件编写对应的坐标,将其jar包加入进来即可达到目的,因此,看图中,ssh-web依赖ssh-service,ssh-service依赖ssh-dao,其中的原理就是我说的这样,所以才能将这三层分开成独立的项目,并且进一步抽取其公有依赖的jar包,统一交由父工程来管理,这就maven带来的效果。
1.2、聚合原理
项目开发通常是分组分模块开发,每个模块开发完成要运行整个工程需要将每个模块聚合在一起运行,比如:dao、service、web三个工程最终会打一个独立的war运行
二、案例实现
问题描述:使用maven将ssh项目进行分模块,并且实现从web到dao层的数据的存取进行实验
2.1、创建maven-parent父模块
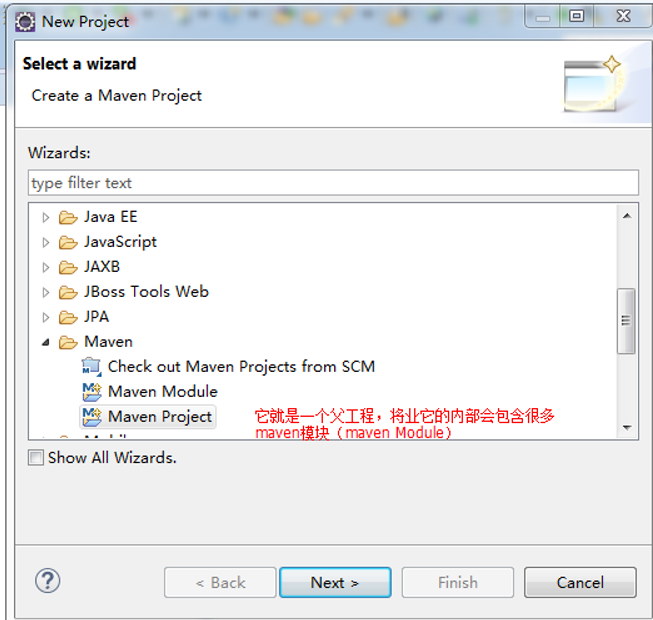
点击next
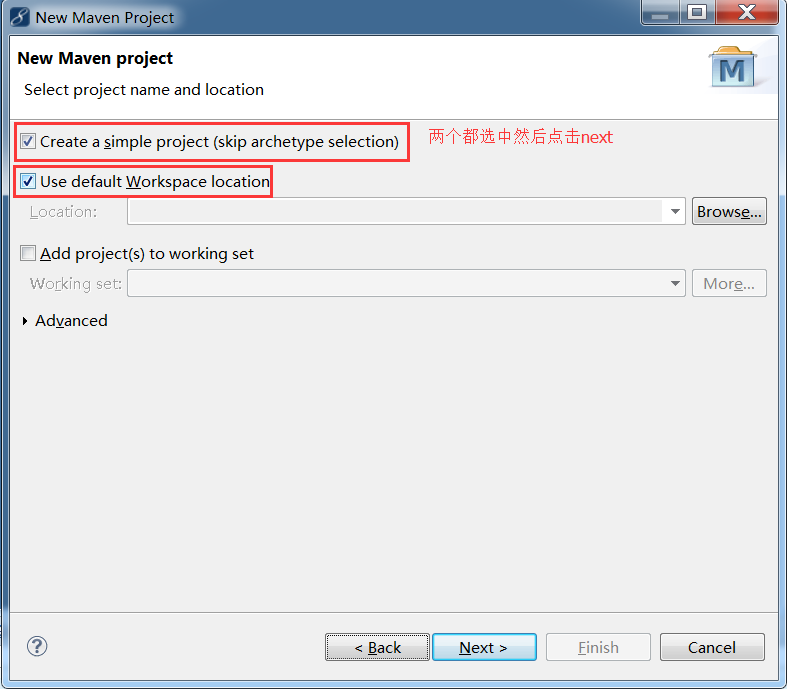
点击next
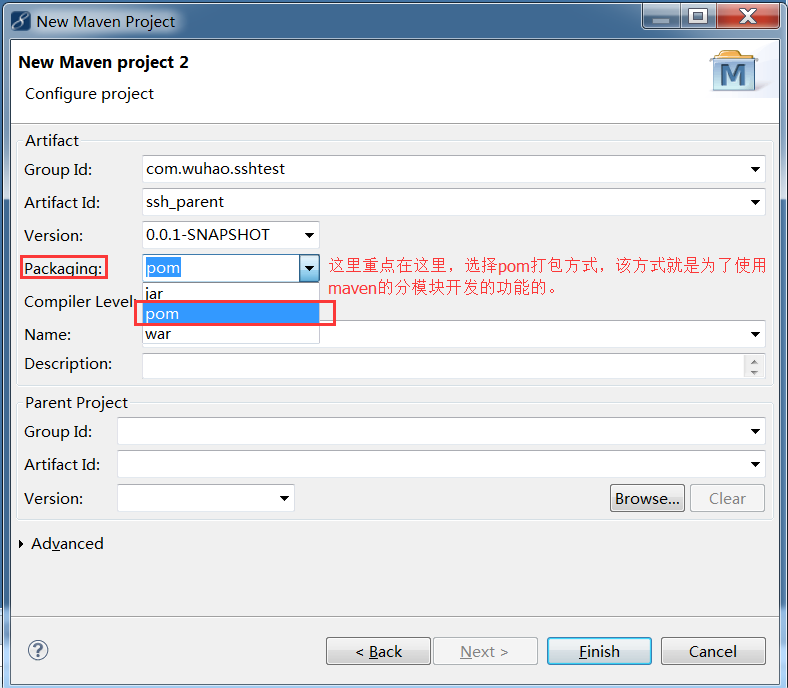
创建好之后的父工程如图

从它的目录结构可以看出,父工程本身不写代码,它里面有一个pom.xml文件,这个文件可以将多个子模块中通用的jar所对应的坐标,集中在父工程中配置,将来的子模块就可以不需要在pom.xml中配置通用jar的坐标le、
在父工程的pom.xml中抽取一些重复的配置的,比如:锁定jar包的版本、设置编译版本等,一般这种都不需要我们自己临时配置,网上或者公司都有已经写好了的,每次使用就直接丢过来即可。下面给一个我收藏的额。嘿嘿
<project xmlns="http://maven.apache.org/POM/4.0.0" xmlns:xsi="http://www.w3.org/2001/XMLSchema-instance" xsi:schemaLocation="http://maven.apache.org/POM/4.0.0 http://maven.apache.org/xsd/maven-4.0.0.xsd">

  <modelVersion>4.0.0</modelVersion>

  <groupId>com.wuhao.sshtest</groupId>

  <artifactId>ssh_parent</artifactId>

  <version>0.0.1-SNAPSHOT</version>

  <packaging>pom</packaging>

  <!-- 为了确定每个框架的版本号 -->

  <!-- 锁定版本 -->

      <properties>

         <spring.version>4.2.4.RELEASE</spring.version>

        <struts2.version>2.3.24</struts2.version>

        <hibernate.version>5.0.7.Final</hibernate.version>

        <slf4j.version>1.6.6</slf4j.version>

        <log4j.version>1.2.12</log4j.version>

        <shiro.version>1.2.3</shiro.version>

        <cxf.version>3.0.1</cxf.version>

        <c3p0.version>0.9.1.2</c3p0.version>

        <mysql.version>5.1.6</mysql.version>

    </properties>

      <!-- 锁定版本,struts2-2.3.24、spring4.2.4、hibernate5.0.7 -->

    <dependencyManagement>

        <dependencies>

            <dependency>

                <groupId>org.springframework</groupId>

                <artifactId>spring-context</artifactId>

                <version>${spring.version}</version>

            </dependency>

            <dependency>

                <groupId>org.springframework</groupId>

                <artifactId>spring-aspects</artifactId>

                <version>${spring.version}</version>

            </dependency>

            <dependency>

                <groupId>org.springframework</groupId>

                <artifactId>spring-orm</artifactId>

                <version>${spring.version}</version>

            </dependency>

            <dependency>

                <groupId>org.springframework</groupId>

                <artifactId>spring-test</artifactId>

                <version>${spring.version}</version>

            </dependency>

            <dependency>

                <groupId>org.springframework</groupId>

                <artifactId>spring-web</artifactId>

                <version>${spring.version}</version>

            </dependency>

            <dependency>

                <groupId>org.hibernate</groupId>

                <artifactId>hibernate-core</artifactId>

                <version>${hibernate.version}</version>

            </dependency>

            <dependency>

                <groupId>org.apache.struts</groupId>

                <artifactId>struts2-core</artifactId>

                <version>${struts2.version}</version>

            </dependency>

            <dependency>

                <groupId>org.apache.struts</groupId>

                <artifactId>struts2-spring-plugin</artifactId>

                <version>${struts2.version}</version>

            </dependency>

        </dependencies>

    </dependencyManagement>

  <dependencies>

      <dependency>

            <groupId>org.apache.httpcomponents</groupId>

            <artifactId>httpclient</artifactId>

            <version>4.4</version>

        </dependency>

        <dependency>

            <groupId>com.alibaba</groupId>

            <artifactId>fastjson</artifactId>

            <version>1.1.37</version>

        </dependency>

        <dependency>

            <groupId>commons-beanutils</groupId>

            <artifactId>commons-beanutils</artifactId>

            <version>1.9.1</version>

        </dependency>

        <!-- <dependency>

            <groupId>org.quartz-scheduler</groupId>

            <artifactId>quartz</artifactId>

            <version>2.2.1</version>

        </dependency> -->

        <dependency>

          <groupId>commons-fileupload</groupId>

          <artifactId>commons-fileupload</artifactId>

          <version>1.3.1</version>

        </dependency>

        <!-- jstl -->

         <dependency>

          <groupId>jstl</groupId>

          <artifactId>jstl</artifactId>

          <version>1.2</version>

        </dependency>

        <!-- shiro -->

         <!-- apache shiro dependencies -->

         <!-- <dependency>

            <groupId>org.apache.shiro</groupId>

            <artifactId>shiro-all</artifactId>

            <version>${shiro.version}</version>

         </dependency> -->

       <!-- spring -->

        <dependency>

            <groupId>org.aspectj</groupId>

            <artifactId>aspectjweaver</artifactId>

            <version>1.6.8</version>

        </dependency>

         <dependency>

            <groupId>org.springframework</groupId>

            <artifactId>spring-aop</artifactId>

            <version>${spring.version}</version>

        </dependency>

        <dependency>

          <groupId>org.springframework</groupId>

          <artifactId>spring-context</artifactId>

          <version>${spring.version}</version>

        </dependency>

        <dependency>

          <groupId>org.springframework</groupId>

          <artifactId>spring-context-support</artifactId>

          <version>${spring.version}</version>

        </dependency>

        <dependency>

          <groupId>org.springframework</groupId>

          <artifactId>spring-web</artifactId>

          <version>${spring.version}</version>

        </dependency>

        <dependency>

          <groupId>org.springframework</groupId>

          <artifactId>spring-orm</artifactId>

          <version>${spring.version}</version>

        </dependency>

        <dependency>

          <groupId>org.springframework</groupId>

          <artifactId>spring-beans</artifactId>

          <version>${spring.version}</version>

        </dependency>

        <dependency>

          <groupId>org.springframework</groupId>

          <artifactId>spring-core</artifactId>

          <version>${spring.version}</version>

        </dependency>

        <!-- struts2  begin -->

        <dependency>

            <groupId>org.apache.struts</groupId>

            <artifactId>struts2-core</artifactId>

            <version>${struts2.version}</version>

            <exclusions>

                <exclusion>

                    <artifactId>javassist</artifactId>

                    <groupId>javassist</groupId>

                </exclusion>

            </exclusions>

        </dependency>

        <dependency>

            <groupId>org.apache.struts</groupId>

            <artifactId>struts2-spring-plugin</artifactId>

            <version>${struts2.version}</version>

        </dependency>

        <dependency>

            <groupId>org.apache.struts</groupId>

            <artifactId>struts2-json-plugin</artifactId>

            <version>${struts2.version}</version>

        </dependency>

        <dependency>

              <groupId>org.apache.struts</groupId>

              <artifactId>struts2-convention-plugin</artifactId>

              <version>${struts2.version}</version>

          </dependency>

        <!-- struts2  end -->

        <!-- hibernate begin -->

        <dependency>

            <groupId>org.hibernate</groupId>

            <artifactId>hibernate-core</artifactId>

            <version>${hibernate.version}</version>

        </dependency>

        <dependency>

            <groupId>org.hibernate</groupId>

            <artifactId>hibernate-entitymanager</artifactId>

            <version>${hibernate.version}</version>

        </dependency>

        <dependency>

            <groupId>org.hibernate</groupId>

            <artifactId>hibernate-validator</artifactId>

            <version>5.2.1.Final</version>

        </dependency>

        <!-- hibernate end -->

        <dependency>

              <groupId>c3p0</groupId>

              <artifactId>c3p0</artifactId>

              <version>${c3p0.version}</version>

          </dependency>

        <!-- <dependency>

            <groupId>org.apache.cxf</groupId>

            <artifactId>cxf-rt-frontend-jaxws</artifactId>

            <version>${cxf.version}</version>

        </dependency>

        <dependency>

            <groupId>org.apache.cxf</groupId>

            <artifactId>cxf-rt-transports-http</artifactId>

            <version>${cxf.version}</version>

        </dependency> -->

        <!-- log start -->

        <dependency>

            <groupId>log4j</groupId>

            <artifactId>log4j</artifactId>

            <version>${log4j.version}</version>

        </dependency>

        <dependency>

            <groupId>org.slf4j</groupId>

            <artifactId>slf4j-api</artifactId>

            <version>${slf4j.version}</version>

        </dependency>

        <dependency>

            <groupId>org.slf4j</groupId>

            <artifactId>slf4j-log4j12</artifactId>

            <version>${slf4j.version}</version>

        </dependency>

        <!-- log end -->

        <!-- Javamail -->

    <!--     <dependency>

          <groupId>javax.mail</groupId>

          <artifactId>mail</artifactId>

          <version>1.4.4</version>

        </dependency> -->

        <dependency>

            <groupId>commons-lang</groupId>

            <artifactId>commons-lang</artifactId>

            <version>2.6</version>

        </dependency>

        <dependency>

            <groupId>org.codehaus.xfire</groupId>

            <artifactId>xfire-core</artifactId>

            <version>1.2.6</version>

        </dependency>

        <dependency>

           <groupId>dom4j</groupId>

           <artifactId>dom4j</artifactId>

           <version>1.6</version>

        </dependency>

        <!-- <dependency>

            <groupId>org.apache.poi</groupId>

            <artifactId>poi</artifactId>

            <version>3.11</version>

        </dependency>

        <dependency>

            <groupId>org.apache.poi</groupId>

            <artifactId>poi-ooxml</artifactId>

            <version>3.11</version>

        </dependency>

        <dependency>

            <groupId>org.apache.poi</groupId>

            <artifactId>poi-ooxml-schemas</artifactId>

            <version>3.11</version>

        </dependency> -->

        <dependency>

          <groupId>junit</groupId>

          <artifactId>junit</artifactId>

          <version>3.8.1</version>

          <scope>test</scope>

        </dependency>

        <dependency>

            <groupId>mysql</groupId>

            <artifactId>mysql-connector-java</artifactId>

            <version>${mysql.version}</version>

        </dependency>

       <!--  <dependency>

            <groupId>com.oracle</groupId>

            <artifactId>ojdbc14</artifactId>

            <version>10.2.0.4.0</version>

        </dependency> -->

        <dependency>

            <groupId>javax.servlet</groupId>

            <artifactId>servlet-api</artifactId>

            <version>2.5</version>

            <scope>provided</scope>

        </dependency>

        <dependency>

            <groupId>javax.servlet.jsp</groupId>

            <artifactId>jsp-api</artifactId>

            <version>2.0</version>

            <scope>provided</scope>

        </dependency>

        <dependency>

            <groupId>net.sf.ehcache</groupId>

            <artifactId>ehcache-core</artifactId>

            <version>2.6.6</version>

        </dependency>

  </dependencies>

   <build>

     <finalName>sshtest</finalName>

    <pluginManagement>

        <plugins>

            <plugin>

                <groupId>org.apache.maven.plugins</groupId>

                <artifactId>maven-compiler-plugin</artifactId>

                <version>3.2</version>

                <configuration>

                    <source>1.7</source>

                    <target>1.7</target>

                    <encoding>UTF-8</encoding>

                    <showWarnings>true</showWarnings>

                </configuration>

            </plugin>

        </plugins>

    </pluginManagement>

  </build>

</project>
maven父工程整合ssh通用的pom.xml配置
2.2、创建maven-dao子模块

点next进入如下图
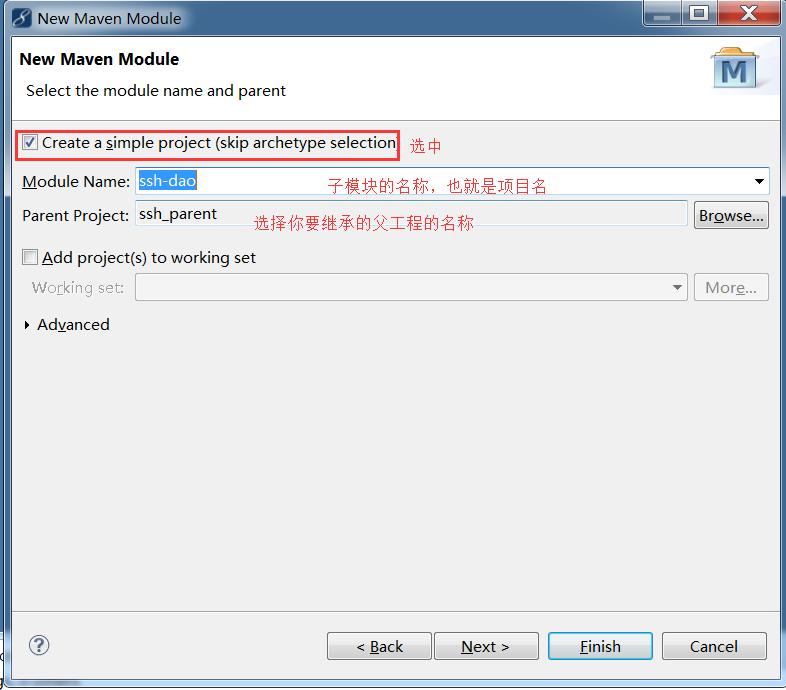
点击next,如下图
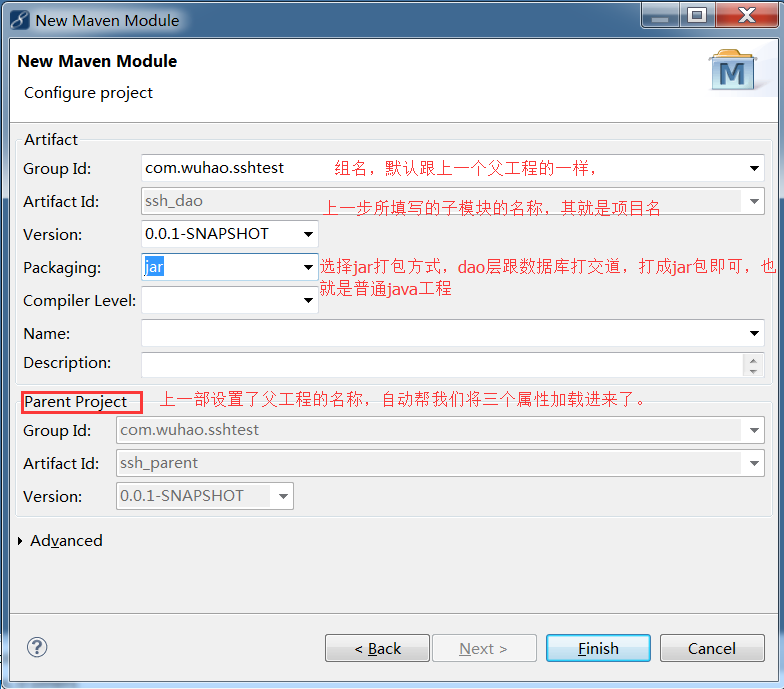
点击finish,完成,查看父工程中的pom.xml文件

查看ssh_dao中的pom.xml文件,会发现多了一个 parent结点,并且内部所包含的结点,其实就是父工程的坐标

查看ssh_dao的目录结构
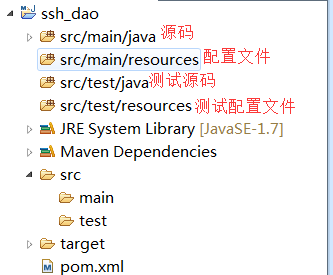
因为是在dao层,和数据库打交道,那么就在这个项目中,需要配置hibernate.hbm.xml和hibernate.cfg.xml,但是又集成了spring,所以hibernate.cfg.xml就不需要了,添加applicationContext.xml即可(这里需要有spring整合hibernate的基础)
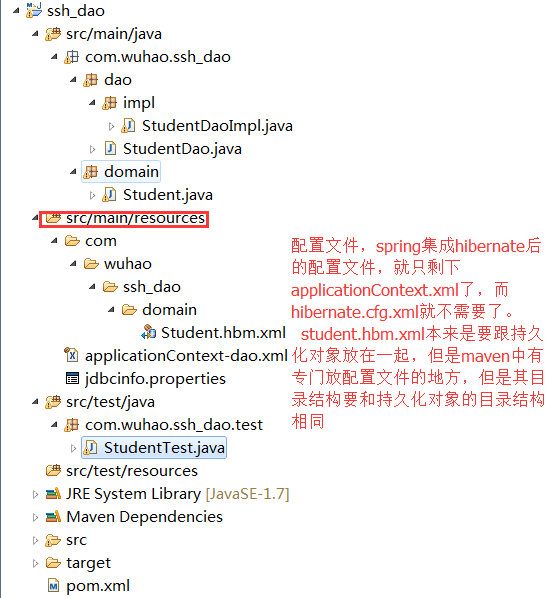
注意:将applicationContext.xml拆分出一个applicationContext-dao.xml,此文件中只配置dao
<?xml version="1.0" encoding="UTF-8"?>

<beans xmlns="http://www.springframework.org/schema/beans"

       xmlns:xsi="http://www.w3.org/2001/XMLSchema-instance"

       xmlns:aop="http://www.springframework.org/schema/aop"

       xmlns:tx="http://www.springframework.org/schema/tx"

       xmlns:context="http://www.springframework.org/schema/context"

       xsi:schemaLocation="http://www.springframework.org/schema/beans

                              http://www.springframework.org/schema/beans/spring-beans.xsd

                              http://www.springframework.org/schema/tx

                              http://www.springframework.org/schema/tx/spring-tx.xsd

                              http://www.springframework.org/schema/aop

                              http://www.springframework.org/schema/aop/spring-aop.xsd

                              http://www.springframework.org/schema/context

                              http://www.springframework.org/schema/context/spring-context.xsd">

    <!-- 1 加载properties文件 -->

    <context:property-placeholder location="classpath:jdbcinfo.properties"/>

    <!-- 2 配置数据源 -->

    <bean id="dataSource" class="com.mchange.v2.c3p0.ComboPooledDataSource">

        <property name="driverClass" value="${jdbc.driverClass}"></property>

        <property name="jdbcUrl" value="${jdbc.jdbcUrl}"></property>

        <property name="user" value="${jdbc.user}"></property>

        <property name="password" value="${jdbc.password}"></property>

    </bean>

    <!-- 3 配置hibernate SessionFactory 注意:这里使用的是hibernate5,要看你使用的jar包是什么版本的,每个人不一样。-->

    <bean id="sessionFactory" class="org.springframework.orm.hibernate5.LocalSessionFactoryBean">

        <!-- 3.1 配置数据源

            * <property name="属性名" ref="另一个bean引用">

                name 必须是对象的setter方法推断获得,setDataSource(...), 去掉set DataSource ,首字母小写  dataSource

            * ref 其他bean引用 <bean id=""> 可以任意,一般情况与上面属性名称相同。

        -->

        <property name="dataSource" ref="dataSource"></property>

        <!-- 3.2 配置hibernate其他属性

            * 在hibernate.cfg.xml 配置文件 “hibernate.dialect” 和 “dialect” 等效的

            * 在spring配置文件中,必须使用“hibernate.dialect”

        -->

        <property name="hibernateProperties">

            <props>

                <!-- 方言 -->

                <prop key="hibernate.dialect">org.hibernate.dialect.MySQL5Dialect</prop>

                <!-- 显示sql语句 -->

                <prop key="hibernate.show_sql">true</prop>

                <!-- 格式化sql语句 -->

                <prop key="hibernate.format_sql">true</prop>

            </props>

        </property>

        <!-- 3.3 加载映射文件

            com/wuhao/ssh_dao/Student/domain/Student.hbm.xml

            com/wuhao/ssh_dao/xxx/domain/xxx.hbm.xml

            com/wuhao/ssh_dao/*/domain/*.hbm.xml

            <property name="mappingLocations" value="classpath:com/wuhao/ssh_dao/domain/*.hbm.xml"></property>

        -->

         <property name="mappingLocations" value="classpath:com/wuhao/ssh_dao/domain/Student.hbm.xml"></property>

    </bean>

     <!-- hibernate中通过sessionFactory创建得session对对象进行操作,spring提供一个hibernateTemplate进行操作,跟spring中的jdbcTemplate一样,

     继承HibernateDaoSupport后,注入SessionFactory即可,在dao层就不用在写hibernateTemplate的set方法了。

        -->

    <bean id="studentDao" class="com.wuhao.ssh_dao.dao.impl.StudentDaoImpl">

        <property name="sessionFactory" ref="sessionFactory"></property>

    </bean>

</beans>
aplicationContext-dao.xml
jdbc.driverClass=com.mysql.jdbc.Driver

jdbc.jdbcUrl=jdbc:mysql://localhost:3306/test

jdbc.user=root

jdbc.password=root
jdbcinfo.properties
其他几个Student.java这些就不用看了,太简单了。
StudentTest.java这个需要讲解一下,因为这里使用junit测试的时候,会报错,报的错误是找不到junit的jar包,这里我们就会很疑惑,为什么会找不到该jar包呢,不是在父工程里面都导入了junit的jar包了吗?这里出错的原因是传递依赖的范围问题。
将父工程看做A项目(下面简称A),将该子模块ssh_dao看做B项目(下面简称B),A依赖junit的jar包是直接依赖。B继承A(实际操作就是B中填写A的坐标)也可以看成一种依赖,那么就是这样一种关系,B 依赖 A 依赖 junit, A依赖junit是直接依赖没错,那么B跟junit的关系就叫做传递(间接)依赖,我们知道A依赖的junit时,junit的jar包可以设置在A中的使用范围,就是scope属性,可以为compile,test等,而junit设置的是test,只在A中测试的时候用,那么B想用junit时,junit的作用范围是不是也是test呢?这就有一种关系。具体看表。

按照刚才上面的例子,来看看在B中,junit的作用范围是什么?首先看B 依赖 A,直接依赖,并且A在B中的作用范围是compile(没设置就默认),所以在直接依赖这一列中找到compile这一行,也就是用红色框框框起来的一行,然后B 依赖 junit,对A来说,A 是传递依赖 junit,这时候看junit设置的作用范围是多少(也就是看junit在B中的使用范围是什么)?看传递依赖这一行,junit设置的是test,找到test这一列,看相交的地方,是空的,则说明,junti在B中的test范围不能够使用,其实看图,B中任何范围内都不能够使用junit,这样你就理解了这张图是什么意思。这只是原理,实际上我们解决这种问题的时候,用一个简单粗暴的解决方案。什么jar包丢失了,我们就再次导入一次jar包即可。
所以在ssh_dao子模块的pom.xml中有junit的坐标才能使用test

2.3、创建ssh_service子模块
方法同ssh_dao模块创建方法一样,模块名称为ssh_service。
看ssh_service和ssh_parent的pom.xml文件,会出现和ssh_dao创建时一样的情况,ssh_service多出一个parents结点,ssh_parent多个一个module结点


在ssh_service的pom.xml中添加两个依赖
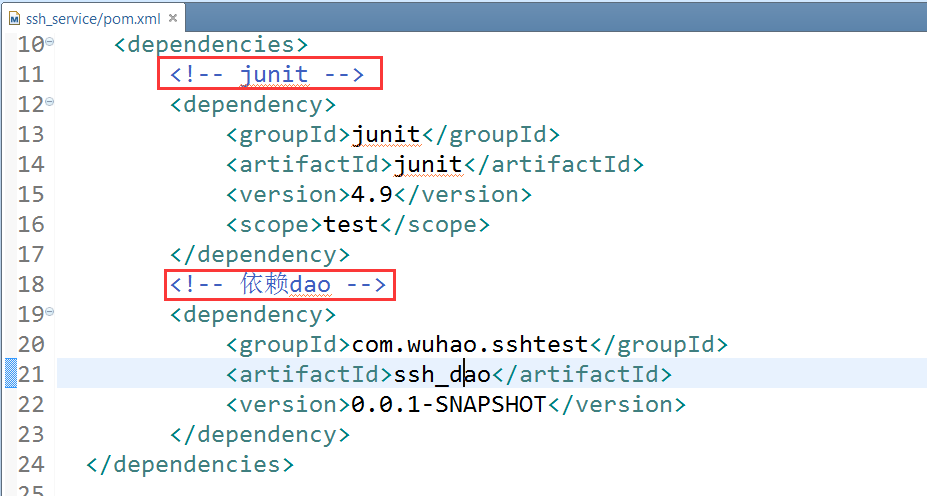
然后编写service层的代码,
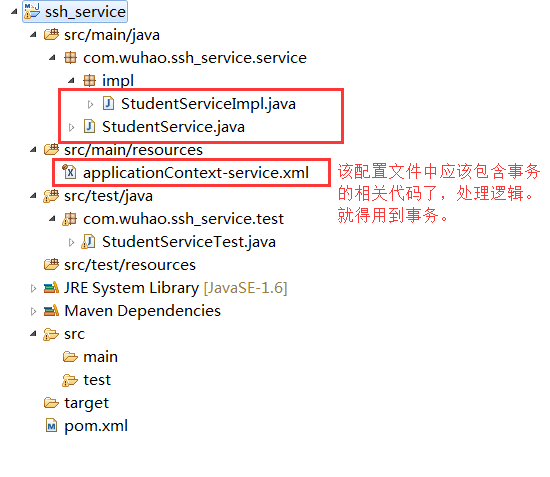
主要关注一下applicationContext-service.xml中的事务的相关代码
<?xml version="1.0" encoding="UTF-8"?>

<beans xmlns="http://www.springframework.org/schema/beans"

       xmlns:xsi="http://www.w3.org/2001/XMLSchema-instance"

       xmlns:aop="http://www.springframework.org/schema/aop"

       xmlns:tx="http://www.springframework.org/schema/tx"

       xmlns:context="http://www.springframework.org/schema/context"

       xsi:schemaLocation="http://www.springframework.org/schema/beans

                              http://www.springframework.org/schema/beans/spring-beans.xsd

                              http://www.springframework.org/schema/tx

                              http://www.springframework.org/schema/tx/spring-tx.xsd

                              http://www.springframework.org/schema/aop

                              http://www.springframework.org/schema/aop/spring-aop.xsd

                              http://www.springframework.org/schema/context

                              http://www.springframework.org/schema/context/spring-context.xsd">

        <!-- 事务管理器 -->

    <bean id="transactionManager" class="org.springframework.orm.hibernate5.HibernateTransactionManager">

        <property name="sessionFactory" ref="sessionFactory"></property>

    </bean>

    <!--  事务通知 -->

    <tx:advice id="txAdvice" transaction-manager="transactionManager">

        <tx:attributes>

            <tx:method name="save*" propagation="REQUIRED"/>

            <tx:method name="insert*" propagation="REQUIRED"/>

            <tx:method name="update*" propagation="REQUIRED"/>

            <tx:method name="delete*" propagation="REQUIRED"/>

            <tx:method name="get*" read-only="true"/>

            <tx:method name="*" propagation="REQUIRED"/>

        </tx:attributes>

    </tx:advice>

    <!-- aop -->

    <aop:config>

        <aop:pointcut id="pointcut" expression="execution(* cn.wuhao.ssh_service.service.impl.*.*(..))" />

        <aop:advisor advice-ref="txAdvice" pointcut-ref="pointcut" />

    </aop:config>

         <!-- 在StudentService中注入StudentDao -->

         <bean id="studentService" class="com.wuhao.ssh_service.service.impl.StudentServiceImpl">

             <property name="studentDao" ref="studentDao"></property>

         </bean>

</beans>
aplicationContext-service.xml
该层的测试,需要将ssh_dao中的applicationContext-dao.xml将ssh_service的applicationContext-service.xml包含进去才能够实验的通。这里不做测试,
2.4、创建ssh_web子模块
方法同maven-dao模块创建方法,模块名称为ssh-web,注意:打包方式为war,而不再是jar包了,因为该层需要放到tomcat中去。与浏览器交互,就是web项目了,所以打成war包
和前面一样,ssh_parent的pom.xml中增加一个module结点,而ssh_web的pom.xml中增加一个parent结点
这个也很简单,就是跟写普通的struts2是一样的,只不过是和spring的结合,有什么对象,都通过spring来给予,并且这里多做一个事情,就是将之前的applicationContext配置文件进行结合,看下图
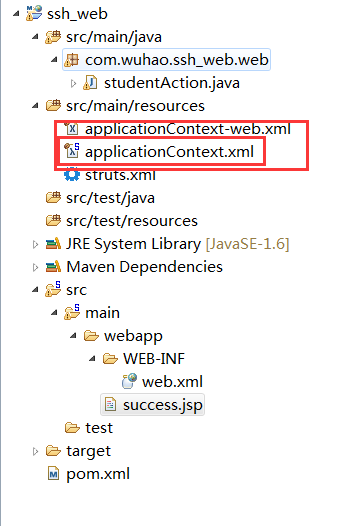
<?xml version="1.0" encoding="UTF-8"?>

<beans xmlns="http://www.springframework.org/schema/beans"

    xmlns:xsi="http://www.w3.org/2001/XMLSchema-instance"

    xmlns:p="http://www.springframework.org/schema/p"

    xmlns:context="http://www.springframework.org/schema/context"

    xmlns:tx="http://www.springframework.org/schema/tx"

    xmlns:aop="http://www.springframework.org/schema/aop"

    xsi:schemaLocation="http://www.springframework.org/schema/beans

    http://www.springframework.org/schema/beans/spring-beans.xsd

    http://www.springframework.org/schema/aop

    http://www.springframework.org/schema/aop/spring-aop.xsd

    http://www.springframework.org/schema/tx

    http://www.springframework.org/schema/tx/spring-tx.xsd

    http://www.springframework.org/schema/context

    http://www.springframework.org/schema/context/spring-context.xsd">

    <import resource="classpath:applicationContext-dao"/>

    <import resource="classpath:applicationContext-service"/>

    <import resource="classpath:applicationContext-web"/>

</beans>
application.xml
web.xml中配置struts2的拦截器和spring的监听器
<?xml version="1.0" encoding="UTF-8"?>

<web-app xmlns:xsi="http://www.w3.org/2001/XMLSchema-instance"

    xmlns="http://java.sun.com/xml/ns/javaee" xsi:schemaLocation="http://java.sun.com/xml/ns/javaee http://java.sun.com/xml/ns/javaee/web-app_2_5.xsd" id="WebApp_ID" version="2.5">

<!--spring配置文件的加载的监听 器-->

    <context-param>

        <param-name>contextConfigLocation</param-name>

        <param-value>classpath:applicationContext.xml</param-value>

    </context-param>

    <listener>

        <listener-class>org.springframework.web.context.ContextLoaderListener</listener-class>

    </listener>

     <!--2.懒加载   OpenSessionInviewFilter   noSession or session is closed-->

    <filter>

        <filter-name>openSessionInViewFilter</filter-name>

        <filter-class>org.springframework.orm.hibernate5.support.OpenSessionInViewFilter</filter-class>

        <init-param>

            <param-name>singleSession</param-name>

            <param-value>true</param-value>

        </init-param>

        <init-param>

            <param-name>sessionFactoryBeanName</param-name>

            <param-value>sessionFactory</param-value>

        </init-param>

    </filter>

    <filter-mapping>

        <filter-name>openSessionInViewFilter</filter-name>

        <url-pattern>/*</url-pattern>

    </filter-mapping>

      <!--3.struts2核心控制器-->

     <filter>

        <filter-name>struts2</filter-name>

        <filter-class>org.apache.struts2.dispatcher.ng.filter.StrutsPrepareAndExecuteFilter</filter-class>

    </filter>

    <filter-mapping>

        <filter-name>struts2</filter-name>

        <url-pattern>/*</url-pattern>

    </filter-mapping>

</web-app>
web.xml
这里注意一个问题,struts跟spring整合的时候,Struts.xml中的class应该填写spring配置文件中的id。
2.5、总结与启动
父工程和子模块都写完之后,就成这样了

运行调试即可。这里我遇到一个小问题,一直解决不了,
三、总结
理解了这个分模块与聚合的作用,并且知道如何开发即可。加油。确实搞的有点烦躁。
什么是maven(二)的更多相关文章
- maven(二) maven项目构建ssh工程(父工程与子模块的拆分与聚合)
前一节我们明白了maven是个什么玩意,这一节就来讲讲他的一个重要的应用场景,也就是通过maven将一个ssh项目分割为不同的几个部分独立开发,很重要,加油 --WH 一.maven父工程与子模块的拆 ...
- 转帖:maven(二) maven项目构建ssh工程(父工程与子模块的拆分与聚合)
出处:http://www.cnblogs.com/whgk/p/7121336.html 前一节我们明白了maven是个什么玩意,这一节就来讲讲他的一个重要的应用场景,也就是通过maven将一个ss ...
- Maven(二)使用eclipse创建maven多模块项目
maven作为一种自动化构建工具,在现在的企业应用开发中运用非常普遍. 企业项目一般都比较大,多采用maven管理的多模块项目,下面直接上创建步骤 一.创建一个maven项目
- Ubuntu 14.04 Android 使用Maven二 创建自己的Mavenproject
依据https://code.google.com/p/maven-android-plugin/wiki/GettingStarted 介绍,有两种方法能够创建Mavenproject. 第一种方法 ...
- Maven二
1 回顾 1.1 Maven的好处 节省空间 对jar包做了统一管理 依赖管理 一键构建 可跨平台 应用在大型项目可提高开发效率 1.2 Maven安装部署配置 1.3 Maven的仓库 本地仓库 远 ...
- maven(二):创建一个可用的maven项目,完整过程
环境:eclipse4.5 (内置maven插件) 创建maven项目 文件菜单--新建--其他-- maven project 下一步 选择web 结构 group id: 指项目在maven本地 ...
- maven(二)
1.1 Maven的好处 节省空间 对jar包做了统一管理 依赖管理 一键构建 可跨平台 应用在大型项目可提高开发效率 1.2 Maven安装部署配置 1.3 Maven的仓库 ...
- maven(二)基于intellij idea搭建ssm的maven项目结构
项目配置文件整合步骤 1.这里使用maven来引入项目所需要的jar包,所以也就不需要手动来管理jar包了. pom.xml 配置模板如下: <project xmlns="http: ...
- maven(二)基于intellij idea搭建maven项目
搭建步骤: 1.File -> New Module,进入创建项目窗口. 接着下一步,这里需要注在Properties中添加一个参数 archetypeCatalog=internal,不加这个 ...
- maven(二)创建一个maven的web项目中解决Cannot change version of project facet Dynamic web module to 2.5
我们用Eclipse创建Maven结构的web项目的时候选择了Artifact Id为maven-artchetype-webapp,由于这个catalog比较老,用的servlet还是2.3的,而一 ...
随机推荐
- Java学习(十七)
Java多态的学习差不多有3个小时,老师还夹杂着一些编译器运用的知识. 这是多态的基本知识: 我们可以创建父类引用指向子类对象,这就是多态的一种.(这种也叫向下转型) Pet c=new Cat(); ...
- 菜鸡的Java笔记 第十六 - java 引用传递
referenceDelivery 引用传递是整个java 的精髓,也是所有初学者最难学的地方 引用的本质:同一块堆内存可以被不同的栈内存所指向 下面通过三道程序来进行引用传 ...
- windows defender antivirus占用内存解决教程
[windows defender关闭常见问题] windows defender antivirus占用内存解决教程: 1.按下"Win+R"打开"运行" 2 ...
- Java LinkedList小记
1. 基本用法 LinkedList实现了List.Deque.Queue接口,可以按照队列.栈和双端队列的方式进行操作.LinkedList有两个构造方法,一个是默认构造,另一个接受Collecti ...
- Qt5加载SVG格式的图片并更颜色
QIcon MainWindow::qiconFromSvg(QString svg_path, QString color) { QPixmap img(svg_path); QPainter qp ...
- Python 3 快速入门 2 —— 流程控制与函数
本文假设你已经有一门面向对象编程语言基础,如Java等,且希望快速了解并使用Python语言.本文对重点语法和数据结构以及用法进行详细说明,同时对一些难以理解的点进行了图解,以便大家快速入门.一些较偏 ...
- 洛谷 P1224 - [NOI2013] 向量内积(随机化)
洛谷题面传送门 一道很神的随机化. 首先由于我们要求向量点乘 \(\bmod k\) 的值,因此我们可以将所有 \(x_{i,j}\) 都模上 \(k\),显然该操作不影响结果正确性. 注意到这里的 ...
- Codeforces 1476G - Minimum Difference(带修莫队+根号平衡)
Codeforces 题目传送门 & 洛谷题目传送门 震惊!我竟然独立切掉了这道 *3100 的题! 虽然此题难度的确虚高,感觉真实评分也就 2800~2900 罢.但感觉还是挺有成就感的( ...
- 【豆科基因组】小豆(红豆)adzuki bean, Vigna angularis基因组2015
目录 一.来源 研究一:Draft genome sequence of adzuki bean, Vigna angularis 研究二:Genome sequencing of adzuki be ...
- PHP 获取两个日期相差多少年,多少月,多少天,多少小时,并填充数组
PHP 获取两个日期相差多少年,多少月,多少天,多少小时,并填充数组 <?php /** * 获取两个日期相差多少年,多少月,多少天,多少小时,并填充数组 * @param [type] $st ...
