[Spring] 学习Spring Boot之二:整合MyBatis并使用@Trasactional管理事务
一、配置及准备工作
1、在 Maven 的 pom 文件中新增以下依赖:
<dependency>

    <groupId>mysql</groupId>

    <artifactId>mysql-connector-java</artifactId>

    <version>runtime</version>

</dependency>

<dependency>

    <groupId>org.mybatis.spring.boot</groupId>

    <artifactId>mybatis-spring-boot-starter</artifactId>

    <version>1.3.0</version>

</dependency>
2、在 application.properties 中配置 mysql 的链接信息:
spring.datasource.url=jdbc:mysql://localhost:3306/demo

spring.datasource.username=root

spring.datasource.password=123456

spring.datasource.driver-class-name=com.mysql.jdbc.Driver
3、在数据库中创建 user_info 表:
CREATE TABLE user_info

(

  account  VARCHAR(20) NOT NULL PRIMARY KEY,

  nickname VARCHAR(20) NULL,

  phone    CHAR(11)    NULL,

  password CHAR(32)    NOT NULL,

  email    VARCHAR(50) NULL

) ENGINE = InnoDB DEFAULT CHARSET=utf8;
二、使用 mybatis generator 自动生成代码
1、在 Maven 的 pom 文件中添加如下插件:
<plugin>

    <groupId>org.mybatis.generator</groupId>

    <artifactId>mybatis-generator-maven-plugin</artifactId>

    <version>1.3.2</version>

    <configuration>
     <configurationFile>${basedir}/src/main/resources/mybatis-generator.xml</configurationFile>

        <overwrite>true</overwrite>

        <verbose>true</verbose>

    </configuration>

</plugin>
2、将如下 mybatis-generator.xml 配置文件放入到 src/main/resources 目录下:
<?xml version="1.0" encoding="UTF-8"?>

<!DOCTYPE generatorConfiguration

        PUBLIC "-//mybatis.org//DTD MyBatis Generator Configuration 1.0//EN"

        "http://mybatis.org/dtd/mybatis-generator-config_1_0.dtd">

<generatorConfiguration>

    <!-- 数据库驱动:选择你的本地硬盘上面的数据库驱动包-->

    <classPathEntry  location="/Users/tengyunhao/.m2/repository/mysql/mysql-connector-java/5.1.21/mysql-connector-java-5.1.21.jar"/>

    <context id="DB2Tables"  targetRuntime="MyBatis3">

        <commentGenerator>

            <property name="suppressDate" value="false"/>

            <!-- 是否去除自动生成的注释 true:是 : false:否 -->

            <property name="suppressAllComments" value="false"/>

        </commentGenerator>

        <!--数据库链接URL,用户名、密码 -->

        <jdbcConnection driverClass="com.mysql.jdbc.Driver" connectionURL="jdbc:mysql://localhost/demo" userId="root" password="123456">

        </jdbcConnection>

        <javaTypeResolver>

            <property name="forceBigDecimals" value="false"/>

        </javaTypeResolver>

        <!-- 生成模型的包名和位置-->

        <javaModelGenerator targetPackage="com.tengyunhao.demo.entity" targetProject="src/main/java">

            <property name="enableSubPackages" value="true"/>

            <property name="trimStrings" value="true"/>

        </javaModelGenerator>

        <!-- 生成映射文件的包名和位置-->

        <sqlMapGenerator targetPackage="mapping" targetProject="src/main/resources">

            <property name="enableSubPackages" value="true"/>

        </sqlMapGenerator>

        <!-- 生成DAO的包名和位置-->

        <javaClientGenerator type="XMLMAPPER" targetPackage="com.tengyunhao.demo.mapper" targetProject="src/main/java">

            <property name="enableSubPackages" value="true"/>

        </javaClientGenerator>

        <!-- 要生成的表 tableName是数据库中的表名或视图名 domainObjectName是实体类名-->

        <table tableName="user_info" domainObjectName="UserInfo" enableCountByExample="false" enableUpdateByExample="false" enableDeleteByExample="false" enableSelectByExample="false" selectByExampleQueryId="false"></table>

    </context>

</generatorConfiguration>
mybatis-generator.xml
3、添加运行配置
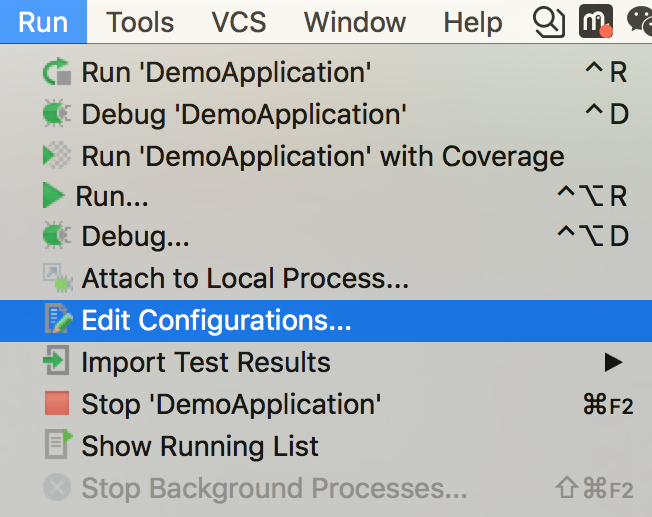
点击 run -> Edit Configurations

点击 + 号,添加一个 Maven 的配置

4、运行

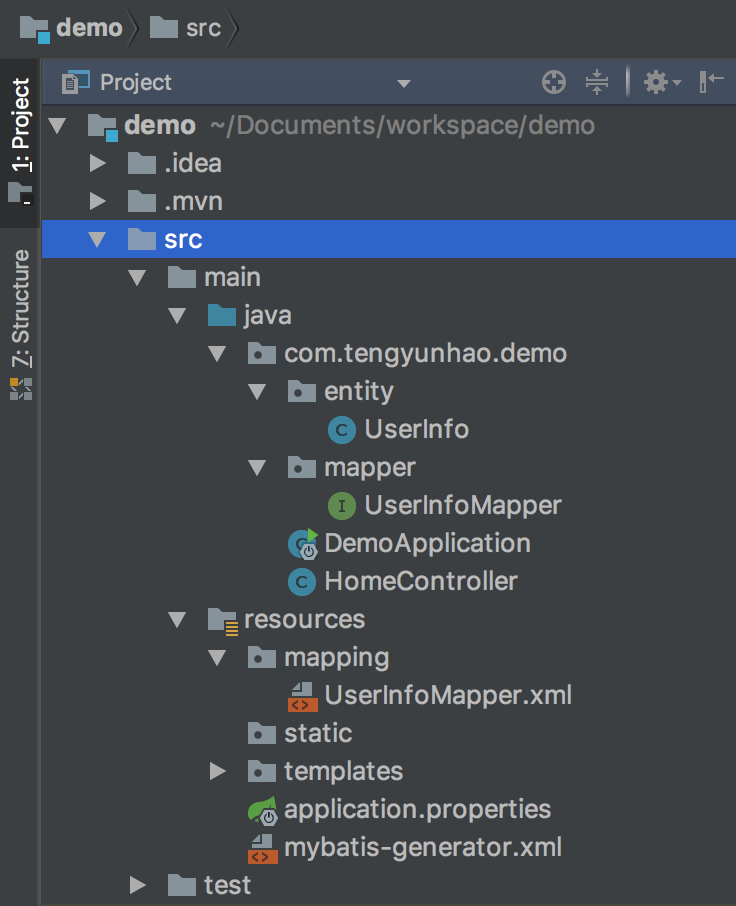
运行后我们就可以在相应的目录下看到生成的代码了,如图:

三、基本使用
1、编写 Service 接口及 Service 实现类:
public interface UserService {

    int addUser(UserInfo userInfo);

    UserInfo getUserByAccount(String account);

}
@Service

public class UserServiceImpl implements UserService {

    @Autowired

    private UserInfoMapper userInfoMapper;

    @Override

    public int addUser(UserInfo userInfo) {

        return userInfoMapper.insert(userInfo);

    }

    @Override

    public UserInfo getUserByAccount(String account) {

        return userInfoMapper.selectByPrimaryKey(account);

    }

}
2、编写 Controller 类:
@RestController

@RequestMapping("/user")

public class UserController {

    @Autowired

    private UserService userService;

    @RequestMapping(value = "account", method = RequestMethod.POST)

    public int addUser(String account, String password, String nickname) {

        UserInfo userInfo = new UserInfo();

        userInfo.setAccount(account);

        userInfo.setPassword(password);

        userInfo.setNickname(nickname);

        return userService.addUser(userInfo);

    }

    @RequestMapping(value = "account", method = RequestMethod.GET)

    public UserInfo getUserByAccount(String account) {

        return userService.getUserByAccount(account);

    }

}
给 UserMapper 加上 @Mapper 注解(我这不加注解会报错)
3、配置 mybastis
首先在 application.properties 中新增如下配置:
mybatis.mapper-locations=classpath:mapping/*.xml

mybatis.config-location=classpath:mybatis-config.xml
然后将 mybatis-config.xml 配置文件放到 src/main/resources 目录下:
<?xml version="1.0" encoding="UTF-8" ?>

<!DOCTYPE configuration

        PUBLIC "-//mybatis.org//DTD Config 3.0//EN"

        "http://mybatis.org/dtd/mybatis-3-config.dtd">

<configuration>

    <typeAliases>

    </typeAliases>

</configuration>
mybatis-config.xml
4、运行项目进行测试
这时我们就可以启动项目了。
另外 IDEA 提供了进行接口测试的工具,打开方式为 Tools -> Test RESTful Web Service,如下图所示:

四、添加事务
我们只需要在 Service 实现类中的方法上加入 @Trasactional 注解,默认当抛出异常的时候就会触发事务的回滚,从源码角度来看一下如何使用其参数:
@Target({ElementType.METHOD, ElementType.TYPE})

@Retention(RetentionPolicy.RUNTIME)

@Inherited

@Documented

public @interface Transactional {

    /** 指定事务管理器 */

    @AliasFor("transactionManager")

    String value() default "";

    /** 指定事务的限定符 */

    @AliasFor("value")

    String transactionManager() default "";

    /** 事务传播行为,默认为支持当前事务,当前没有事务则创建一个 */

    Propagation propagation() default Propagation.REQUIRED;

    /** 事务隔离级别,默认按数据库默认隔离级别 */

    Isolation isolation() default Isolation.DEFAULT;

    /** 事务超时时间 */

    int timeout() default TransactionDefinition.TIMEOUT_DEFAULT;

    /** 读写或只读事务,默认读写事务 */

    boolean readOnly() default false;

    /** 触发事务回滚的异常类 */

    Class<? extends Throwable>[] rollbackFor() default {};

    /** 同上 */

    String[] rollbackForClassName() default {};

    /** 不会导致事务回滚的异常类 */

    Class<? extends Throwable>[] noRollbackFor() default {};

    /** 同上 */

    String[] noRollbackForClassName() default {};

}
在 Service 实现类加入 @Trasactional 注解后,还需要在入口类添加 @EnableTransactionManagement 注解,来开启事务:
@EnableTransactionManagement

@SpringBootApplication

public class DemoApplication {

    public static void main(String[] args) {

        SpringApplication.run(DemoApplication.class, args);

    }

}
[Spring] 学习Spring Boot之二:整合MyBatis并使用@Trasactional管理事务的更多相关文章
- spring boot 1.4 整合 mybatis druid
http://www.jianshu.com/p/cef49ad91ba9spring boot 1.4 整合 mybatis druid
- SpringBoot 源码解析 (九)----- Spring Boot的核心能力 - 整合Mybatis
本篇我们在SpringBoot中整合Mybatis这个orm框架,毕竟分析一下其自动配置的源码,我们先来回顾一下以前Spring中是如何整合Mybatis的,大家可以看看我这篇文章Mybaits 源码 ...
- Spring Boot 2.x整合mybatis及druid数据源及逆向工程
1逆向工程 1)db.properties #============================# #===== Database sttings =====# #=============== ...
- Spring Boot2 系列教程 (九) | SpringBoot 整合 Mybatis
前言 如题,今天介绍 SpringBoot 与 Mybatis 的整合以及 Mybatis 的使用,本文通过注解的形式实现. 什么是 Mybatis MyBatis 是支持定制化 SQL.存储过程以及 ...
- 【转】Spring学习---Spring 学习总结
什么是Spring ? Spring是一个开源框架,Spring是于2003 年兴起的一个轻量级的Java 开发框架,由Rod Johnson在其著作Expert One-On-One J2EEDev ...
- springboot(二)整合mybatis,多数据源和事务管理
-- 1.整合mybatis -- 2.整合多数据源 -- 3. 整合事务 代码地址:https://github.com/showkawa/springBoot_2017/tree/master/ ...
- Java开发学习(三十九)----SpringBoot整合mybatis
一.回顾Spring整合Mybatis Spring 整合 Mybatis 需要定义很多配置类 SpringConfig 配置类 导入 JdbcConfig 配置类 导入 MybatisConfig ...
- Spring 学习——Spring框架结构、概念
maven项目结构 记忆:在一个项目中,project下一层级时src,也就是源文件,所有需要进行编译的文件都是在这个目录下,其实也就是这一个目录,然后向下扩展.在src目录下,存在main文件夹,里 ...
- [原创]java WEB学习笔记109:Spring学习---spring中事物管理
博客的目的:①总结自己的学习过程,相当于学习笔记 ②将自己的经验分享给大家,相互学习,互相交流,不可商用 内容难免出现问题,欢迎指正,交流,探讨,可以留言,也可以通过以下方式联系. 本人互联网技术爱好 ...
随机推荐
- Easy Pipeline,一种轻量级的Python Pipeline库
嗯,很久没有写博客了,最近的工作都是偏开发性质的,以至于没有时间对自己感兴趣的领域进行探索,感觉个人的成长停滞了一些.如何在枯燥的工作中,提取出有助于自己成长的养分,对于每个人来说都是不小的考验. 这 ...
- 【Android UI设计与开发】第04期:引导界面(四)仿人人网V5.9.2最新版引导界面
这一篇我将会以人人网的引导界面为实例来展开详细的讲解,人人网的引导界面比较的新颖,不同于其他应用程序千篇一律的靠滑动来引导用户,而是以一个一个比较生动形象的动画效果展示在用户们的面前,有一种给人眼前一 ...
- WebService技术,服务端and客户端JDK-wsimport工具(一)
使用webservice服务,需要了解几个名词:soap 简单对象协议.http+xml . WSDL 先看下代码结构: 服务端代码与客户端代码分别处于两不同的包中 一.服务端内容 服务端: @Web ...
- keycode值对照表
转载自:https://segmentfault.com/a/1190000005828048 字母和数字键的键码值(keyCode) 按键 键码 按键 键码 按键 键码 按键 键码 A 65 J 7 ...
- DevOps架构下如何进行微服务性能测试?
一. 微服务架构下的性能测试挑战 微服务与DevOps 微服务是实现DevOps的重要架构 微服务3S原则 DevOps核心点 微服务架构下的业务特点 亿级用户的平台 单服务业务随时扩容 服务之间存在 ...
- 强化学习算法Policy Gradient
1 算法的优缺点 1.1 优点 在DQN算法中,神经网络输出的是动作的q值,这对于一个agent拥有少数的离散的动作还是可以的.但是如果某个agent的动作是连续的,这无疑对DQN算法是一个巨大的挑战 ...
- PAT甲题题解-1072. Gas Station (30)-dijkstra最短路
题意:从m个加油站里面选取1个站点,使得其离住宅的最近距离mindis尽可能地远,并且离所有住宅的距离都在服务范围ds之内.如果有很多相同mindis的加油站,输出距所有住宅平均距离最小的那个.如果平 ...
- 团队作业Week6:规格说明书编写
(1)请分析你们团队项目的典型用户和场景,并写一个团队博客发布你们团队项目的功能规格说明书. (2)再写一个博客团队博客发布你们项目的设计文档(技术规格说明书). 截止时间:2015-11-03
- Daily Scrum - 11/26
Meeting Minutes 今天是Sprint 3第一天,任烁向我们交代了他那边的代码情况,他这两天回学校有点事,人千和章玮暂时先熟悉一下他写的那部分,正在试图将代码merge起来.重阳实现了进度 ...
- 黄金分割点(第五周 c语言版)
在上一周,学习其他课程的同时,用C语言编写了黄金分割点小游戏.因为要做界面需要mfc,当时学的时候还做了个简单的计算器.目前c++的知识忘的差不多了,所以就先用C语言来实现算法.打算接下来的一周复习c ...
