利用Warensoft Stock Service编写高频交易软件--DEMO
利用Warensoft Stock Service编写高频交易软件
无论是哪种交易软件,对于程序员来讲,最麻烦的就是去实现各种算法。本文以SAR算法的实现过程为例,为大家说明如何使用Warensoft Stock Service来实现高频交易软件的快速开发。
目前WarensoftStockService已经实现了C# 版本的客户端驱动,可以直接在Nuget上搜索Warensoft并安装。客户端驱动已经编译为跨平台.net standard1.6版本,可以在桌面应用(WPF,Winform)、Xamarin手机应用(WP,Android,IOS)、Web(asp.net,asp.net core)中应用,操作系统可以是Window,Android,IOS,IMAC,Linux。
下面将以Android为例(注:本Demo可以直接平移到WPF中),说明SAR指标的实现过程,其他指标计算的综合应用,在其他文章中会专门讲解。
- 软件环境说明
|
IDE |
VS2017 RC |
|
客户端 |
Android4.4 |
|
服务器环境 |
Ubuntu16 |
|
客户端运行环境 |
Xamarin.Forms |
|
客户端图形组件 |
Oxyplot |
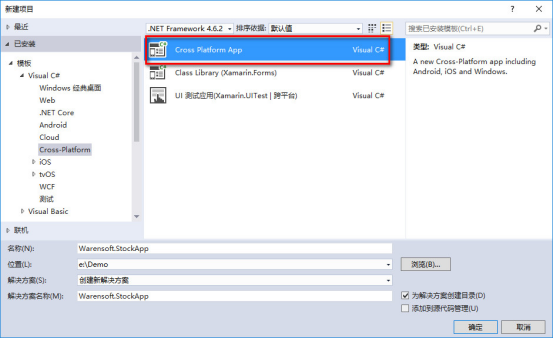
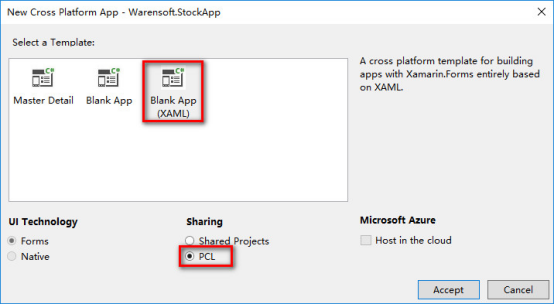
- 建立一个Xamarin.Forms手机App
这里选择基于XAML的App,注意共享库使用PCL。
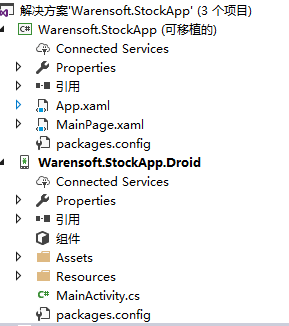
工程目录下图所示:
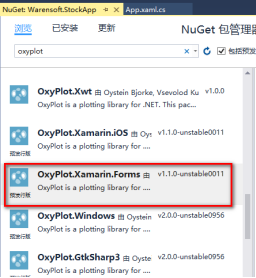
- 添加Nuget引用包
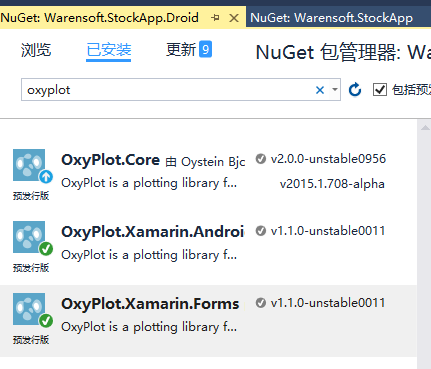
首先,为Warensoft.StockApp共享库添加Oxyplot引用(此处可能需要科学上网),如下图所示:
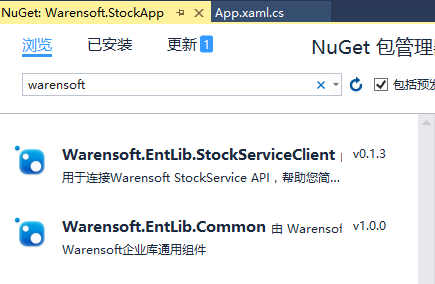
然后再分别安装Warensoft.EntLib.Common,Warensoft.EntLib.StockServiceClient,如下图所示:
然后为Warensoft.StockApp.Droid添加OxyPlot的NuGet引用,如下所示:
然后在Android的MainActivity中加入平台注册代码:
OxyPlot.Xamarin.Forms.Platform.Android.PlotViewRenderer.Init();
MainActivity.cs的代码如下所示:
protected override void OnCreate(Bundle bundle)

        {

            TabLayoutResource = Resource.Layout.Tabbar;

            ToolbarResource = Resource.Layout.Toolbar;

            OxyPlot.Xamarin.Forms.Platform.Android.PlotViewRenderer.Init();

            base.OnCreate(bundle);

            global::Xamarin.Forms.Forms.Init(this, bundle);

            LoadApplication(new App());

        }
- 实现主窗口
主界面的实现采用MVVM模式来实现,关于MVVM的讲解,网上应该有很多了,后面的文章中,我会把我自己的理解写出来,让大家分享。本DEMO的MVVM框架已经集成在了Warensoft.EntLib.Common中,使用起来很简单。
第一步:
编写主界面(需要了解XAML语法),并修改MainPage.xaml,如代码如下:
<?xml version="1.0" encoding="utf-8" ?>

<ContentPage xmlns="http://xamarin.com/schemas/2014/forms"

             xmlns:x="http://schemas.microsoft.com/winfx/2009/xaml"

             xmlns:local="clr-namespace:Warensoft.StockApp"

             xmlns:oxy="clr-namespace:OxyPlot.Xamarin.Forms;assembly=OxyPlot.Xamarin.Forms"

             x:Class="Warensoft.StockApp.MainPage">

    <!--

    此处要注意在头中注册OxyPlot的命名空间

    xmlns:oxy="clr-namespace:OxyPlot.Xamarin.Forms;assembly=OxyPlot.Xamarin.Forms"-->

    <Grid>

        <!--此处添加图形组件-->

        <oxy:PlotView Model="{Binding Model}" VerticalOptions="Center" HorizontalOptions="Center" />

    </Grid>

</ContentPage>
第二步:
打开MainPage.xaml.cs并为视图(图面)添加其对应的模型,代码如下(注意要引入Warensoft.EntLib.Common):
public partial class MainPage : ContentPage

    {

        public MainPage()

        {

            InitializeComponent();

            //此处注册ViewModel

            this.BindingContext = new MainPageViewModel();

        }

    }

    public class MainPageViewModel : ViewModelBase

    {

        public override Task ShowCancel(string title, string message)

        {

            throw new NotImplementedException();

        }

        public override Task<bool> ShowConfirm(string title, string message)

        {

            throw new NotImplementedException();

        }

        public override void ShowMessage(string message)

        {

            Application.Current.MainPage.DisplayAlert("提示",message,"OK");

        }

        protected override void InitBindingProperties()

        {

        }

}
第三步:
定义图像组件的模型,并为图像添加X、Y坐标轴,添加一个K线和一条直线,代码如下所示:
  public PlotModel Model

        {

            get { return this.GetProperty<PlotModel>("Model"); }

            set { this.SetProperty("Model", value); }

        }

        protected override void InitBindingProperties()

        {

            this.Model = new PlotModel();

            //添加X、Y轴

            this.Model.Axes.Add(new OxyPlot.Axes.DateTimeAxis()

            {

                Position = AxisPosition.Bottom,

                StringFormat = "HH:mm",

                MajorGridlineStyle = LineStyle.Solid,

                IntervalType = DateTimeIntervalType.Minutes,

                IntervalLength = ,

                MinorIntervalType = DateTimeIntervalType.Minutes,

                Key = "Time",

            });

            this.Model.Axes.Add(new OxyPlot.Axes.LinearAxis()

            {

                Position = AxisPosition.Right,

                MajorGridlineStyle = LineStyle.Solid,

                MinorGridlineStyle = LineStyle.Dot,

                IntervalLength = ,

                IsPanEnabled = false,

                IsZoomEnabled = false,

                TickStyle = TickStyle.Inside,

            });

            //添加K线和直线

            this.candle = new OxyPlot.Series.CandleStickSeries();

            this.line = new OxyPlot.Series.LineSeries() { Color = OxyColors.Blue };

            this.Model.Series.Add(this.candle);

            this.Model.Series.Add(this.line);

        }
第四步:
添加获取K线函数(以OKCoin为例),代码如下:
/// <summary>

        /// 读取OKCoin的15分钟K线

        /// </summary>

        /// <returns></returns>

        public async Task<List<Kline>> LoadKline()

        {

            var url = $"https://www.okcoin.cn/api/v1/kline.do?symbol=btc_cny&type=15min&size=100";

            HttpClient client = new HttpClient();

            var result = await client.GetStringAsync(url);

            dynamic k = Newtonsoft.Json.JsonConvert.DeserializeObject(result);

            List<Kline> lines = new List<Kline>();

            int index = ;

            foreach (var item in k)

            {

                List<double> d = new List<double>();

                foreach (var dd in item)

                {

                    d.Add((double)((dynamic)dd).Value);

                }

                lines.Add(new Kline() { Data = d.ToArray()});

                index++;

            }

            return lines;

        }
第五步:
添加定时刷新并绘制图像的函数,代码如下所示:
private StockServiceDriver driver;

        public async Task UpdateData()

        {

            //初始化WarensoftSocketService客户端驱动,此处使用的是测试用AppKey和SecretKey

            this.driver = new StockServiceDriver("C6651783-A3B9-4B72-8B02-A2E67A59C5A6", "6C442B3AF58D4DDA81BB03B353C0D7D8");

            await Task.Run(async()=>

            {

                while (true)

                {

                    try

                    {

                        //读取K线

                        var kline =await this.LoadKline();

                        //远程Warensoft Stock Service 分析SAR曲线

                        var sar = await this.driver.GetSAR(kline);

                        //绘图,注意办为需要更新UI,因此需要在主线程中执行更新代码

                        this.SafeInvoke(()=> {

                            //每次更新前,需要将旧数据清空

                            this.candle.Items.Clear();

                            this.line.Points.Clear();

                            foreach (var item in kline.OrderBy(k=>k.Time))

                            {

                                //注意将时间改为OxyPlot能识别的格式

                                var time = OxyPlot.Axes.DateTimeAxis.ToDouble(item.Time);

                                this.candle.Items.Add(new HighLowItem(time,item.High,item.Low,item.Open,item.Close));

                            }

                            if (sar.OperationDone)

                            {

                                foreach (var item in sar.AdditionalData.OrderBy(s=>s.DateTime))

                                {

                                    var time= OxyPlot.Axes.DateTimeAxis.ToDouble(item.DateTime);

                                    this.line.Points.Add(new DataPoint(time, item.Value));

                                }

                            }

                            //更新UI

                            this.Model.InvalidatePlot(true);

                        });

                    }

                    catch (Exception ex)

                    {

                    }

                    await Task.Delay();

                }

            });

        }
完整的ViewModel代码如下:
using System;

using System.Collections.Generic;

using System.Linq;

using System.Text;

using System.Threading.Tasks;

using Xamarin.Forms;

using Warensoft.EntLib.Common;

using Warensoft.EntLib.StockServiceClient;

using OxyPlot;

using OxyPlot.Axes;

using OxyPlot.Series;

using Warensoft.EntLib.StockServiceClient.Models;

using System.Net.Http;

namespace Warensoft.StockApp

{

    public partial class MainPage : ContentPage

    {

        public MainPage()

        {

            InitializeComponent();

            this.BindingContext = new MainPageViewModel();

        }

    }

    public class MainPageViewModel : ViewModelBase

    {

        private CandleStickSeries candle;

        private LineSeries line;

        public override Task ShowCancel(string title, string message)

        {

            throw new NotImplementedException();

        }

        public override Task<bool> ShowConfirm(string title, string message)

        {

            throw new NotImplementedException();

        }

        public override void ShowMessage(string message)

        {

            Application.Current.MainPage.DisplayAlert("提示",message,"OK");

        }

        public PlotModel Model

        {

            get { return this.GetProperty<PlotModel>("Model"); }

            set { this.SetProperty("Model", value); }

        }

        protected override void InitBindingProperties()

        {

            this.Model = new PlotModel();

            //添加X、Y轴

            this.Model.Axes.Add(new OxyPlot.Axes.DateTimeAxis()

            {

                Position = AxisPosition.Bottom,

                StringFormat = "HH:mm",

                MajorGridlineStyle = LineStyle.Solid,

                IntervalType = DateTimeIntervalType.Minutes,

                IntervalLength = ,

                MinorIntervalType = DateTimeIntervalType.Minutes,

                Key = "Time",

            });

            this.Model.Axes.Add(new OxyPlot.Axes.LinearAxis()

            {

                Position = AxisPosition.Right,

                MajorGridlineStyle = LineStyle.Solid,

                MinorGridlineStyle = LineStyle.Dot,

                IntervalLength = ,

                IsPanEnabled = false,

                IsZoomEnabled = false,

                TickStyle = TickStyle.Inside,

            });

            //添加K线和直线

            this.candle = new OxyPlot.Series.CandleStickSeries();

            this.line = new OxyPlot.Series.LineSeries() { Color = OxyColors.Blue };

            this.Model.Series.Add(this.candle);

            this.Model.Series.Add(this.line);

            this.UpdateData();

        }

        /// <summary>

        /// 读取OKCoin的15分钟K线

        /// </summary>

        /// <returns></returns>

        public async Task<List<Kline>> LoadKline()

        {

            var url = $"https://www.okcoin.cn/api/v1/kline.do?symbol=btc_cny&type=15min&size=100";

            HttpClient client = new HttpClient();

            var result = await client.GetStringAsync(url);

            dynamic k = Newtonsoft.Json.JsonConvert.DeserializeObject(result);

            List<Kline> lines = new List<Kline>();

            int index = ;

            foreach (var item in k)

            {

                List<double> d = new List<double>();

                foreach (var dd in item)

                {

                    d.Add((double)((dynamic)dd).Value);

                }

                lines.Add(new Kline() { Data = d.ToArray()});

                index++;

            }

            return lines;

        }

        private StockServiceDriver driver;

        public async Task UpdateData()

        {

            //初始化WarensoftSocketService客户端驱动,此处使用的是测试用AppKey和SecretKey

            this.driver = new StockServiceDriver("C6651783-A3B9-4B72-8B02-A2E67A59C5A6", "6C442B3AF58D4DDA81BB03B353C0D7D8");

            await Task.Run(async()=>

            {

                while (true)

                {

                    try

                    {

                        //读取K线

                        var kline =await this.LoadKline();

                        //远程Warensoft Stock Service 分析SAR曲线

                        var sar = await this.driver.GetSAR(kline);

                        //绘图,注意办为需要更新UI,因此需要在主线程中执行更新代码

                        this.SafeInvoke(()=> {

                            //每次更新前,需要将旧数据清空

                            this.candle.Items.Clear();

                            this.line.Points.Clear();

                            foreach (var item in kline.OrderBy(k=>k.Time))

                            {

                                //注意将时间改为OxyPlot能识别的格式

                                var time = OxyPlot.Axes.DateTimeAxis.ToDouble(item.Time);

                                this.candle.Items.Add(new HighLowItem(time,item.High,item.Low,item.Open,item.Close));

                            }

                            if (sar.OperationDone)

                            {

                                foreach (var item in sar.AdditionalData.OrderBy(s=>s.DateTime))

                                {

                                    var time= OxyPlot.Axes.DateTimeAxis.ToDouble(item.DateTime);

                                    this.line.Points.Add(new DataPoint(time, item.Value));

                                }

                            }

                            //更新UI

                            this.Model.InvalidatePlot(true);

                        });

                    }

                    catch (Exception ex)

                    {

                    }

                    await Task.Delay();

                }

            });

        }

    }

}
最后编译,并部署到手机上,最终运行效果如下:
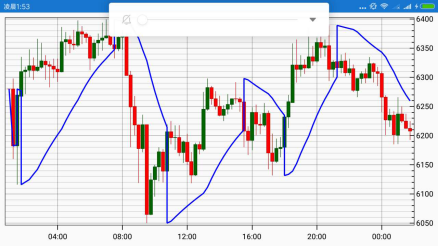
最终编译完毕的APK文件(下载)。
作者:科学家
Email:warensoft@163.com
微信:43175692
利用Warensoft Stock Service编写高频交易软件--DEMO的更多相关文章
- 利用Warensoft Stock Service编写高频交易软件
利用Warensoft Stock Service编写高频交易软件 无论是哪种交易软件,对于程序员来讲,最麻烦的就是去实现各种算法.本文以SAR算法的实现过程为例,为大家说明如何使用Warensoft ...
- 利用Warensoft Stock Service编写高频交易软件--客户端驱动接口说明
Warensoft Stock Service Api客户端接口说明 Warensoft Stock Service Api Client Reference 本项目客户端驱动源码已经发布到GitHu ...
- Warensoft Stock Service Api客户端接口说明
Warensoft Stock Service Api客户端接口说明 Warensoft Stock Service Api Client Reference 可使用环境(Available Envi ...
- 利用 Django REST framework 编写 RESTful API
利用 Django REST framework 编写 RESTful API Updateat 2015/12/3: 增加 filter 最近在玩 Django,不得不说 rest_framewor ...
- 第三百五十七节,Python分布式爬虫打造搜索引擎Scrapy精讲—利用开源的scrapy-redis编写分布式爬虫代码
第三百五十七节,Python分布式爬虫打造搜索引擎Scrapy精讲—利用开源的scrapy-redis编写分布式爬虫代码 scrapy-redis是一个可以scrapy结合redis搭建分布式爬虫的开 ...
- C++:利用如下公式,编写函数计算∏的值,直到最后一项的绝对值小于e,主程序接收从键盘输入的e,输出∏的值(保留5位小数)。 ∏/4 = 1-1/3+1/5-1/7...
利用如下公式,编写函数计算∏的值,直到最后一项的绝对值小于e,主程序接收从键盘输入的e,输出∏的值(保留5位小数). ∏/4 = 1-1/3+1/5-1/7... #include <iostr ...
- 通过利用immutability的能力编写更安全和更整洁的代码
通过利用immutability的能力编写更安全和更整洁的代码 原文:Write safer and cleaner code by leveraging the power of "Imm ...
- Android -- 利用Broadcast开启Service(转)
Broadcast和Service都是Android四大组建之一的. 这里的广播是动态的,自己注册的一个广播. 这种最典型的用法就是利用开机广播,然后再起自己的服务,也就是在Android手机中做到开 ...
- 利用python web框架django实现py-faster-rcnn demo实例
操作系统.编程环境及其他: window7 cpu python2.7 pycharm5.0 django1.8x 说明:本blog是上一篇blog(http://www.cnblogs.co ...
随机推荐
- Codeforces Round #543 (Div. 2) D 双指针 + 模拟
https://codeforces.com/contest/1121/problem/D 题意 给你一个m(<=5e5)个数的序列,选择删除某些数,使得剩下的数按每组k个数以此分成n组(n*k ...
- Codeforces Round #517 (Div. 2) C. Cram Time(思维+贪心)
https://codeforces.com/contest/1065 题意 给你a,b,让你找尽量多的自然数,使得他们的和<=a,<=b,用在a和b的自然数不能重复 思路 假如只有一个数 ...
- shell知识积累
Ubuntu下常用的快捷键:https://blog.csdn.net/u010771356/article/details/53543041 变量名和等号之间不能有空格,变量名中间不能有空格,可以使 ...
- 使用bat批处理文件定时自动备份oracle数据库并上传ftp服务器
一.使用bat批处理文件备份oracle(前提是配置好oracle数据库客户端) @echo off set databasename=orcl //数据库名 set username=ninic ...
- jq页面加载分割截图
<script> $(document).ready(function() { if (!Array.prototype.forEach) { Array.prototype.forEac ...
- jquery实现图片上传前本地预览功能
HTML <img id="pic" src="" > <input id="upload" name="fil ...
- POJ3258--River Hopscotch(Binary Search similar to POJ2456)
Every year the cows hold an event featuring a peculiar version of hopscotch that involves carefully ...
- 界面及Activity参数设置
去标题栏(在onCreate中) requestWindowFeature(Window.FEATURE_NO_TITLE); 设置全屏(在onCreate中) getWindow().setFlag ...
- js加减运算·传参
<!DOCTYPE html><html> <head> <meta charset="utf-8" /> <title> ...
- 点聚weboffice插件自定义菜单
https://blog.csdn.net/u014547764/article/details/53818637 1.在jsp中引用excel插件:首先项目中要有:WebOffice.zip.web ...