Java WEB框架——SSM之Hello world
一、建立项目
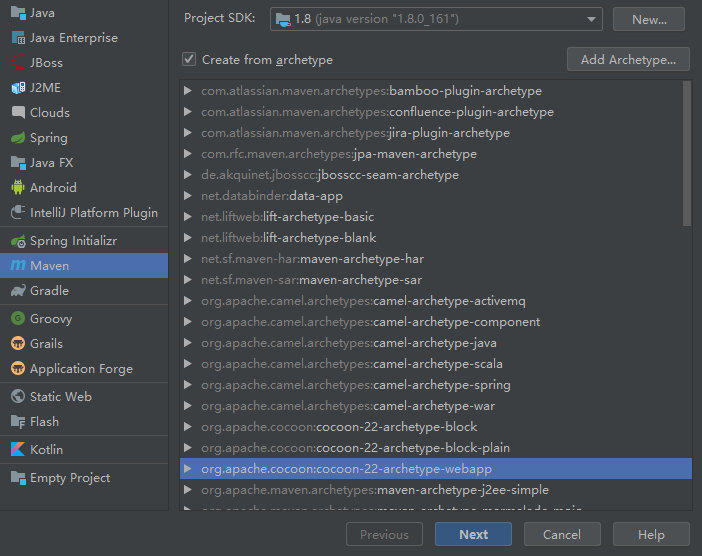
先搭建一个webapp项目(要选creat from arctype)
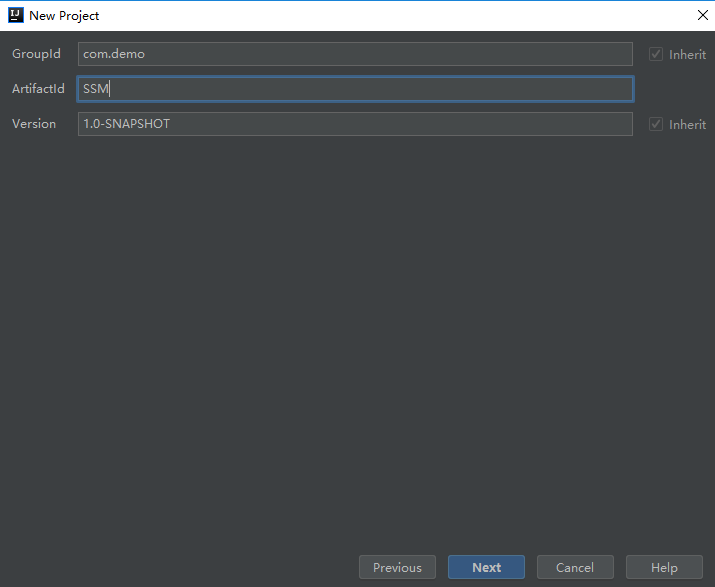
起名
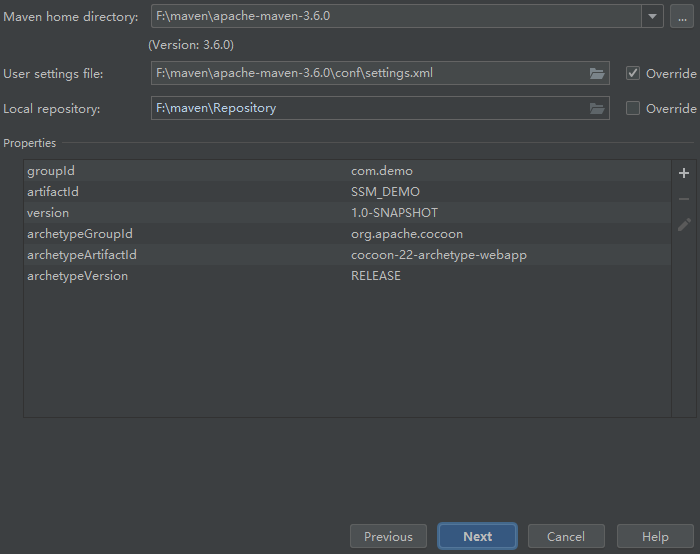
选择maven路径,settings.xml那里要选择override才可以在资源管理器中浏览。接下来直接Next直到Finish。
二、构建文件目录
main下面新建java文件夹,并且标记为sources root
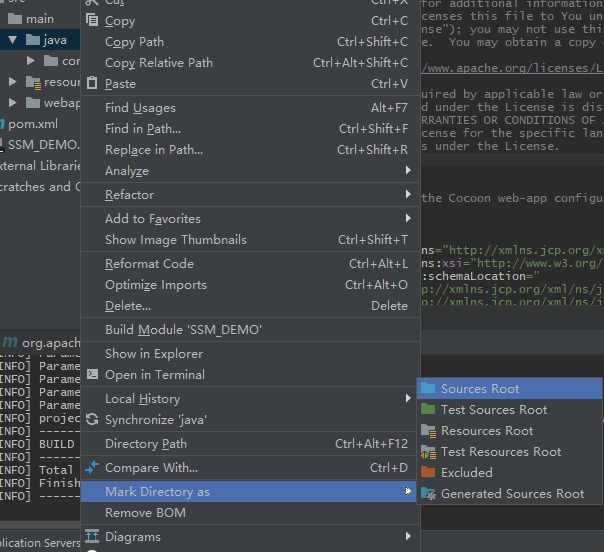
然后同样的操作把resource文件夹变成resources root
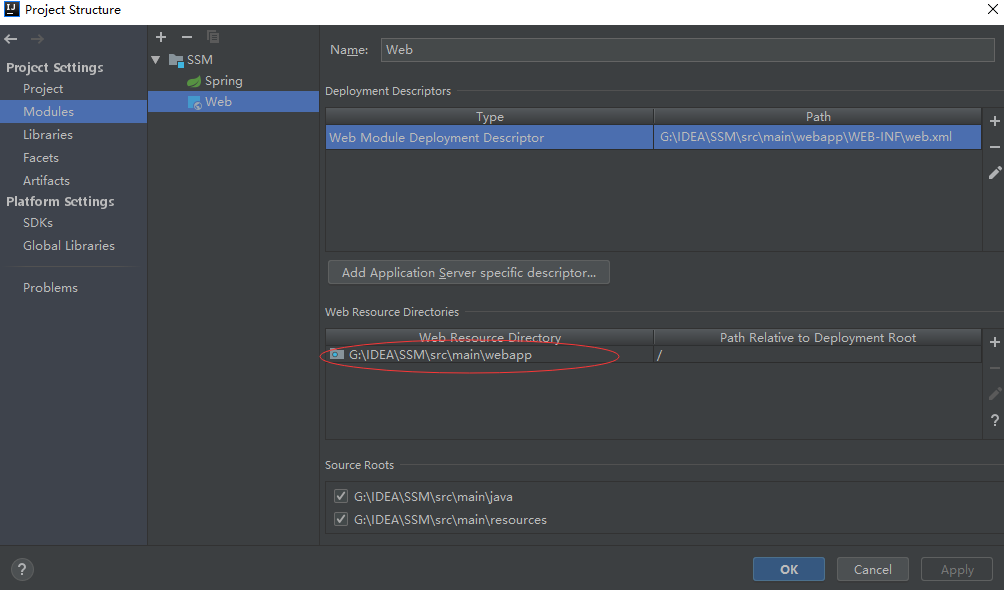
打开project structure找到Modules,如下图所示,如果没有Web,那就点击左上角的加号添加,然后把下面红圈处的路径改为你webapp的路径。
然后就会变成下面这样,src下面的三个文件夹各有自己的特色。

java下面放java文件,建立该建立的package;webapp下面有一个WEB-INF文件夹,首先要有一个web.xml;项目根目录和src文件夹下还有pom.xml和.idea文件夹以及SSM.iml
三、代码
POM.XML
先打开pom.xml,pom全程Project Object Model,是maven的文件。maven的世界里必须要有pom文件。
该文件用于管理:源代码、配置文件、开发者的信息和角色、问题追踪系统、组织信息、项目授权、项目的url、项目的依赖关系等等。(来源)
<?xml version="1.0" encoding="UTF-8"?>

<!--

  Licensed to the Apache Software Foundation (ASF) under one

  or more contributor license agreements.  See the NOTICE file

  distributed with this work for additional information

  regarding copyright ownership.  The ASF licenses this file

  to you under the Apache License, Version 2.0 (the

  "License"); you may not use this file except in compliance

  with the License.  You may obtain a copy of the License at

   http://www.apache.org/licenses/LICENSE-2.0

  Unless required by applicable law or agreed to in writing,

  software distributed under the License is distributed on an

  "AS IS" BASIS, WITHOUT WARRANTIES OR CONDITIONS OF ANY

  KIND, either express or implied.  See the License for the

  specific language governing permissions and limitations

  under the License.

-->

<!-- $Id: pom.xml 642118 2008-03-28 08:04:16Z reinhard $ -->

<project xmlns="http://maven.apache.org/POM/4.0.0" xmlns:xsi="http://www.w3.org/2001/XMLSchema-instance" xsi:schemaLocation="http://maven.apache.org/POM/4.0.0 http://maven.apache.org/maven-v4_0_0.xsd">

  <modelVersion>4.0.0</modelVersion>

  <packaging>war</packaging>

  <name>SSM</name>

  <groupId>com.demo</groupId>

  <artifactId>SSM</artifactId>

  <version>1.0-SNAPSHOT</version>

  <build>

    <plugins>

      <plugin>

        <groupId>org.mortbay.jetty</groupId>

        <artifactId>maven-jetty-plugin</artifactId>

        <version>6.1.7</version>

        <configuration>

          <connectors>

            <connector implementation="org.mortbay.jetty.nio.SelectChannelConnector">

              <port>8888</port>

              <maxIdleTime>30000</maxIdleTime>

            </connector>

          </connectors>

          <webAppSourceDirectory>${project.build.directory}/${pom.artifactId}-${pom.version}</webAppSourceDirectory>

          <contextPath>/</contextPath>

        </configuration>

      </plugin>

    </plugins>

  </build>

  <dependencies>

    <dependency>

      <groupId>junit</groupId>

      <artifactId>junit</artifactId>

      <version>3.8.1</version>

      <scope>test</scope>

    </dependency>

    <!-- Servlet Library -->

    <!-- http://mvnrepository.com/artifact/javax.servlet/javax.servlet-api -->

    <dependency>

      <groupId>javax.servlet</groupId>

      <artifactId>javax.servlet-api</artifactId>

      <version>3.1.0</version>

      <scope>provided</scope>

    </dependency>

    <!-- Spring dependencies -->

    <!-- http://mvnrepository.com/artifact/org.springframework/spring-core -->

    <dependency>

      <groupId>org.springframework</groupId>

      <artifactId>spring-core</artifactId>

      <version>4.1.4.RELEASE</version>

    </dependency>

    <!-- http://mvnrepository.com/artifact/org.springframework/spring-web -->

    <dependency>

      <groupId>org.springframework</groupId>

      <artifactId>spring-web</artifactId>

      <version>4.1.4.RELEASE</version>

    </dependency>

    <!-- http://mvnrepository.com/artifact/org.springframework/spring-webmvc -->

    <dependency>

      <groupId>org.springframework</groupId>

      <artifactId>spring-webmvc</artifactId>

      <version>4.1.4.RELEASE</version>

    </dependency>

  </dependencies>

</project>
我坦白,pom文件是抄别人的,毕竟我只是一个刚开始学习新手,不先抄无从下手啊。抄完发现全是错误,各种can not resolve
此时IDEA会提示maven project need to be imported,表示你修改了pom文件,此时需要同步下载相应的jar包,这时出现两个选项,一个是imported changes,还有一个是Enable auto-import。 后者会自动更新,前者手动更新,不过应该都没太差,选择之后都会进行同步,同步后大部分错误会消失。
WEB.XML
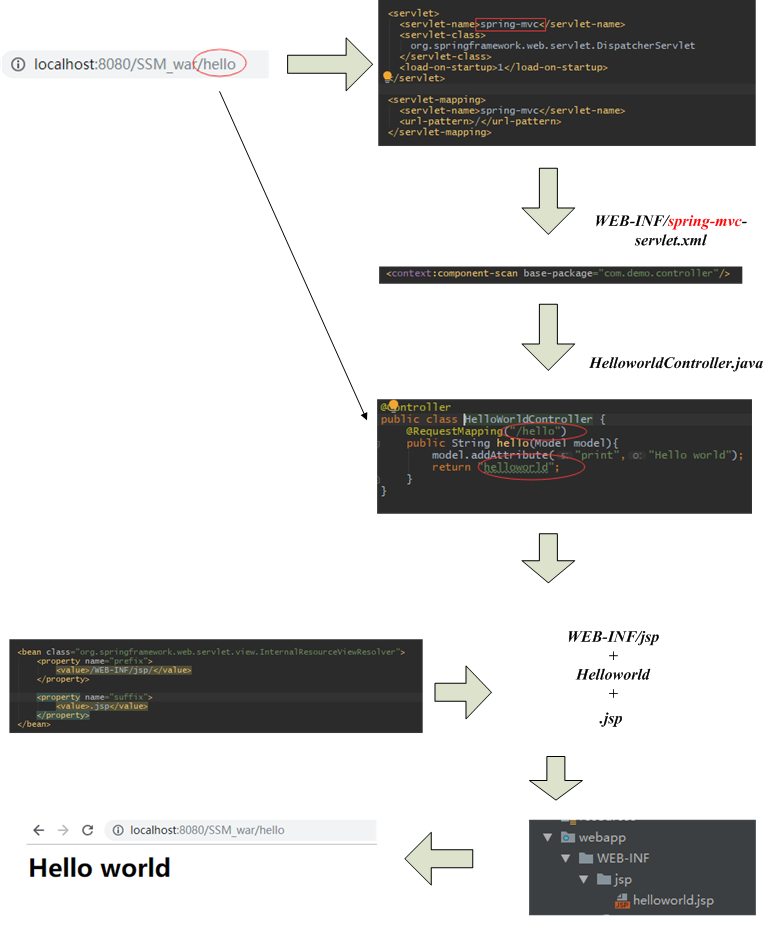
<web-app xmlns:xsi="http://www.w3.org/2001/XMLSchema-instance"

         xmlns="http://java.sun.com/xml/ns/javaee"

         xsi:schemaLocation="http://java.sun.com/xml/ns/javaeehttp://java.sun.com/xml/ns/javaee/web-app_3_0.xsd"

         id="WebApp_ID" version="3.0">

  <display-name>HelloWorldSpring</display-name>

  <servlet>

    <servlet-name>spring-mvc</servlet-name>

    <servlet-class>

      org.springframework.web.servlet.DispatcherServlet

    </servlet-class>

    <load-on-startup>1</load-on-startup>

  </servlet>

  <servlet-mapping>

    <servlet-name>spring-mvc</servlet-name>

    <url-pattern>/</url-pattern>

  </servlet-mapping>

  <!-- Other XML Configuration -->

  <!-- Load by Spring ContextLoaderListener -->

  <context-param>

    <param-name>contextConfigLocation</param-name>

    <param-value> /WEB-INF/root-context.xml</param-value>

  </context-param>

  <!-- Spring ContextLoaderListener -->

  <listener>

    <listener-class>org.springframework.web.context.ContextLoaderListener</listener-class>

  </listener>

</web-app>
web.xml是具有固定一些标签,例如context-param、listener、servlet等, Tomcat启动之后会加载web.xml,servlet-name代表名称,url-pattern表示何种url被访问时触发该servlet。而DispatcherServlet则会在/WEB-INF文件夹下搜寻{servlet-name}-servlet.xml的文件,即spring-mvc-servlet.xml。
spring-mvc-servlet.xml
<?xml version="1.0" encoding="UTF-8"?>

<beans xmlns="http://www.springframework.org/schema/beans"

       xmlns:xsi="http://www.w3.org/2001/XMLSchema-instance"

       xmlns:p="http://www.springframework.org/schema/p"

       xmlns:context="http://www.springframework.org/schema/context"

       xmlns:mvc="http://www.springframework.org/schema/mvc"

       xsi:schemaLocation="http://www.springframework.org/schema/beans

  http://www.springframework.org/schema/beans/spring-beans-4.1.xsd

  http://www.springframework.org/schema/context

  http://www.springframework.org/schema/context/spring-context-4.1.xsd

  http://www.springframework.org/schema/mvc

  http://www.springframework.org/schema/mvc/spring-mvc-4.1.xsd">

    <context:component-scan base-package="com.demo.controller"/>

    <context:annotation-config/>

    <bean class="org.springframework.web.servlet.view.InternalResourceViewResolver">

        <property name="prefix">

            <value>/WEB-INF/jsp/</value>

        </property>

        <property name="suffix">

            <value>.jsp</value>

        </property>

    </bean>

</beans>
该文件会通过base-package生命作用范围,InternalResourceViewResolver类会将该包下面的类中@RequestMapping获得的字符串作为视图的名称。
HelloworldController.java
package com.demo.controller;

import org.springframework.stereotype.Controller;

import org.springframework.ui.Model;

import org.springframework.web.bind.annotation.RequestMapping;

@Controller

public class HelloWorldController {

    @RequestMapping("/hello")

    public String hello(Model model){

        model.addAttribute("print","Hello world");

        return "helloworld";

    }

}
前缀/WEB-INF/jsp+字符串helloworld+后缀.jsp 组成路径:/WEB-INF/jsp/helloworld.jsp
正是这个文件:

helloworld.jsp
<%--

  Created by IntelliJ IDEA.

  User: wym

  Date: 2019/10/3

  Time: 21:42

  To change this template use File | Settings | File Templates.

--%>

<%@ page contentType="text/html;charset=UTF-8" language="java" %>

<html>

<head>

    <title>Title</title>

</head>

<body>

<h1>${print}</h1>

</body>

</html>
三、运行
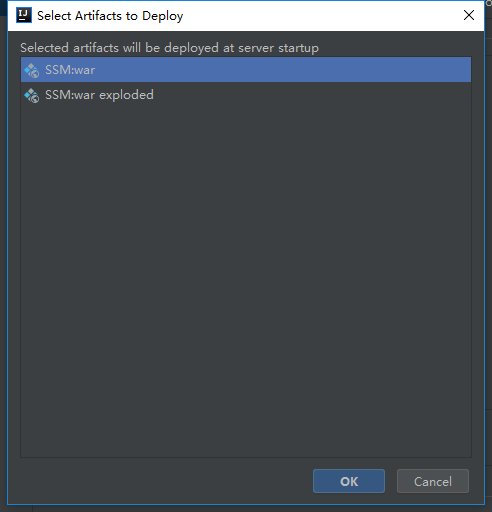
添加Artifacts-war
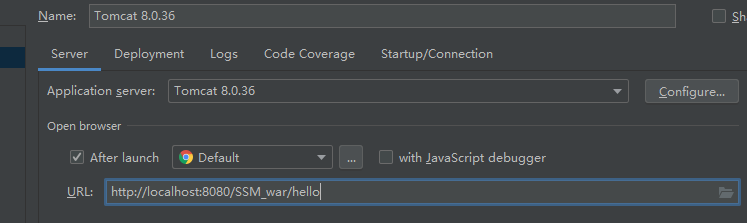
配置默认路径
运行,
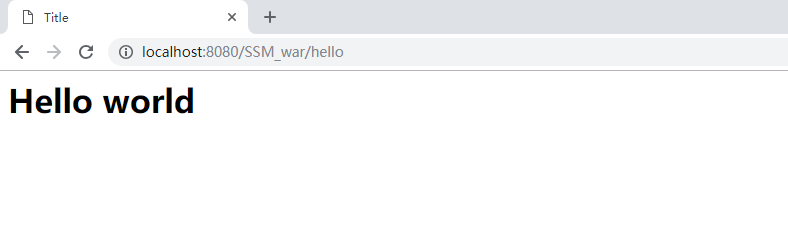
阶段性成功吧,但是完全没有使用数据库,因此算不上SSM,最多是maven+springMVC的简单demo.
四、总结
参照https://www.cnblogs.com/fht-litost/p/9873936.html
Java WEB框架——SSM之Hello world的更多相关文章
- Java WEB框架——SSM迈向M之登录
1.pom.xml 关于pom.xml,<version>等标签先暂时不谈,<dependency> 的作用主要是添加相应的支持包,比如spring,servlet,jdbc等 ...
- 读《架构探险——从零开始写Java Web框架》
内容提要 <架构探险--从零开始写Java Web框架>首先从一个简单的 Web 应用开始,让读者学会如何使用 IDEA.Maven.Git 等开发工具搭建 Java Web 应用:接着通 ...
- [转]轻量级 Java Web 框架架构设计
工作闲暇之余,我想设计并开发一款轻量级 Java Web 框架,看看能否取代目前最为流行的而又越来越重的 Spring.Hibernate 等框架.请原谅在下的大胆行为与不自量力,本人不是为了重造轮子 ...
- 【EatBook】-NO.3.EatBook.3.JavaArchitecture.2.001-《架构探险:从零开始写Java Web框架》-
1.0.0 Summary Tittle:[EatBook]-NO.3.EatBook.3.JavaArchitecture.2.001-<架构探险:从零开始写Java Web框架>- S ...
- 架构探险笔记3-搭建轻量级Java web框架
MVC(Model-View-Controller,模型-视图-控制器)是一种常见的设计模式,可以使用这个模式将应用程序进行解耦. 上一章我们使用Servlet来充当MVC模式中的Controller ...
- java web框架发展的新趋势--跨界轻型App
“跨界(cross over)在汽车界已然成风,将轿车.SUV.跑车和MPV等多种不同元素融为一体的混搭跨界车型,正在成为汽车设计领域的新趋势.从个人而言,当包容.多元的审美要求和物质要求越来越强烈时 ...
- Smart Framework:轻量级 Java Web 框架
Smart Framework:轻量级 Java Web 框架 收藏 黄勇 工作闲暇之余,我开发了一款轻量级 Java Web 框架 —— Smart Framework. 开发该框架是为了: 加 ...
- Java Web框架前景浅析
基于三(多)层架构模式,典型WEB系统的总体架构如下图所示: 在上述分层架构中,整个应用被划分为两大部分: 客户端:基于浏览器提供信息展现.用户交互等功能.所采用的技术主要有:HTML/HTML5.J ...
- JAVA web 框架集合
“框架”犹如滔滔江水连绵不绝, 知道有它就好,先掌握自己工作和主流的框架: 在研究好用和新框架. 主流框架教程分享在Java帮帮-免费资源网 其他教程需要时间制作,会陆续分享!!! 152款框架,你还 ...
随机推荐
- (转)利用Beautiful Soup去抓取p标签下class=jstest的内容
1.利用Beautiful Soup去抓取p标签下class=jstest的内容 import io import sys import bs4 as bs import urllib.request ...
- Redis(1.14)Redis日常管理与维护
[1]持久化 如果不做持久化,用replication去保证可用性,另外最后可以通过引用从数据库同步最新数据. 因此注释掉所有的持久化策略,添加一条带空字符串参数的save指令,也能移除之前所有配置的 ...
- Web在线报表设计器使用指南
市面上的报表工具有很多,虽说功能大同小异,但每一个报表工具都有各自明确的定位,选择最合适的工具,才能达到事半功倍的效果. 本文将要介绍的ActiveReports报表工具,可全面满足 .NET 报表开 ...
- WijmoJS V2019.0 Update2发布:再度增强 React 和 Vue 框架的组件功能
前端开发工具包 WijmoJS 在2019年的第二个主要版本 V2019.0 Update2 已经发布,本次发布涵盖了React 和 Vue 框架下 WijmoJS 前端组件的功能增强,并加入更为易用 ...
- Linux-echo:打印彩色输出
脚本可以使用转义序列在终端中生成彩色文本 文本颜色是由对应的色彩码来描述的.其中包括: 重置=0,黑色=30,红色=31,绿色=32, 黄色=33,蓝色=34,洋红=35,青色=36,白色=37. 要 ...
- 【Redis】Redis持久化
Redis数据持久化 Redis的特性: 易扩展,大数据高性能,多样灵活的数据模型,受限内存 Redis默认端口: 6379 Redis数据持久化分为有两种: RDB: 每隔一段时间就把内存数据写入磁 ...
- Ubuntu 下几种软件安装的方法小结
1.tar.gz软件包的安装 1)解压tar.gz包 .tar.gz -C /home/Desktop # 将软件包名.tar.gz解压到指定的目录下 2)进入解压后的文件目录下 执行“./ ...
- Linux7_MySQL5.7_主从复制_scripts
# cat my_full_backup.sh #!/bin/bash BEGINTIME=`date +"%Y-%m-%d %H:%M:%S"` format_time=`dat ...
- T100弹出是否确认窗体方式
例如: IF NOT cl_ask_confirm('aim-00108') THEN CALL s_transaction_end(') CALL cl_err_collect_show() RET ...
- [Jenkins]初次访问Jenkins,输入密码后,页面卡在空白界面一直未加载出内容_解决方案
问题描述 安装Jenkins,初次访问Jenkins(http://localhost:8002,端口号根据各自设置而不同,本例是8002),输入Jenkins初始化的管理密码之后,浏览器中一直卡在空 ...