java-mybaits-012-mybatis-Interceptor-拦截器读写分离四种实现方案
一、概述
基本项目搭建
技术框架:spring web mvc 、日志【slf4j、log4j2】、mybatis、druid、jetty插件启动、mybatis-generator逆向配置生产dao、分页插件pagehelper
项目地址:https://github.com/bjlhx15/mybatis.git 中的mybatis-readwrite-split 基础项目
二、Spring+MyBatis实现读写整理
2.1、方案一、【读写mapper分开写】
通过MyBatis配置文件创建读写分离两个DataSource,每个SqlSessionFactoryBean对象的mapperLocations属性制定两个读写数据源的配置文件。将所有读的操作配置在读文件中,所有写的操作配置在写文件
- 优点:实现简单
- 缺点:维护麻烦,需要对原有的xml文件进行重新修改,不支持多读,不易扩展
实现方式
项目地址:https://github.com/bjlhx15/mybatis.git 中的mybatis-readwrite-split-001 基础项目
核心xml配置:
<?xml version="1.0" encoding="UTF-8"?>

<beans xmlns="http://www.springframework.org/schema/beans"

       xmlns:xsi="http://www.w3.org/2001/XMLSchema-instance"

       xsi:schemaLocation="

    http://www.springframework.org/schema/beans http://www.springframework.org/schema/beans/spring-beans.xsd">

    <!-- 连接池基本 父类 -->

    <bean id="abstractDataSource" abstract="true" class="com.alibaba.druid.pool.DruidDataSource" destroy-method="close">

        <property name="driverClassName" value="com.mysql.jdbc.Driver"/>

        <!-- 配置获取连接等待超时的时间 -->

        <property name="maxWait" value="60000"/>

        <!-- 配置间隔多久才进行一次检测,检测需要关闭的空闲连接,单位是毫秒 -->

        <property name="timeBetweenEvictionRunsMillis" value="60000"/>

        <!-- 配置一个连接在池中最小生存的时间,单位是毫秒 -->

        <property name="minEvictableIdleTimeMillis" value="300000"/>

        <property name="validationQuery" value="SELECT 'x'"/>

        <property name="testWhileIdle" value="true"/>

        <property name="testOnBorrow" value="false"/>

        <property name="testOnReturn" value="false"/>

        <!-- 打开PSCache,并且指定每个连接上PSCache的大小 -->

        <property name="poolPreparedStatements" value="true"/>

        <property name="maxPoolPreparedStatementPerConnectionSize" value="20"/>

<!--        <property name="filters" value="config"/>-->

<!--        <property name="connectionProperties" value="config.decrypt=true"/>-->

    </bean>

    <!--读连接池-->

    <bean id="readDataSource" parent="abstractDataSource">

        <!-- 基本属性 url、user、password -->

        <property name="url" value="jdbc:mysql://192.168.1.1:3358/test"/>

        <property name="username" value="root"/>

        <property name="password" value="root"/>

        <!-- 配置初始化大小、最小、最大 -->

        <property name="initialSize" value="10"/>

        <property name="minIdle" value="10"/>

        <property name="maxActive" value="10"/>

    </bean>

    <!--读写连接池-->

    <bean id="writeDataSource" parent="abstractDataSource">

        <!-- 基本属性 url、user、password -->

        <property name="url" value="jdbc:mysql://192.168.1.1:3358/test"/>

        <property name="username" value="root"/>

        <property name="password" value="root"/>

        <!-- 配置初始化大小、最小、最大 -->

        <property name="initialSize" value="10"/>

        <property name="minIdle" value="10"/>

        <property name="maxActive" value="10"/>

    </bean>

    <!-- 实例化sqlSessionFactory时需要使用上述配置好的数据源以及SQL映射文件 -->

    <bean id="readSqlSessionFactory" class="org.mybatis.spring.SqlSessionFactoryBean">

        <!-- 实例化sqlSessionFactory时需要使用上述配置好的数据源以及SQL映射文件 -->

        <property name="dataSource" ref="readDataSource"/>

        <property name="mapperLocations" value="classpath:mapper/read/*.xml"/>

        <!--    mybatis的全局配置文件 如没有特需 可以不配置    -->

        <property name="configLocation" value="classpath:mybatis.xml"/>

        <!-- 配置分页插件 -->

        <property name="plugins">

            <array>

                <bean class="com.github.pagehelper.PageInterceptor">

                    <property name="properties">

                        <value>

                            helperDialect=mysql

                            reasonable=true

                        </value>

                    </property>

                </bean>

            </array>

        </property>

    </bean>

    <!-- 实例化sqlSessionFactory时需要使用上述配置好的数据源以及SQL映射文件 -->

    <bean id="writeSqlSessionFactory" class="org.mybatis.spring.SqlSessionFactoryBean">

        <!-- 实例化sqlSessionFactory时需要使用上述配置好的数据源以及SQL映射文件 -->

        <property name="dataSource" ref="writeDataSource"/>

        <property name="mapperLocations" value="classpath:mapper/write/*.xml"/>

        <!--    mybatis的全局配置文件 如没有特需 可以不配置    -->

        <property name="configLocation" value="classpath:mybatis.xml"/>

    </bean>

    <!--  必须添加 mapper 得扫描 因为mybatis 生成的mapper没有注解-->

    <bean id="mapperScannerConfigurer1" class="org.mybatis.spring.mapper.MapperScannerConfigurer">

        <property name="basePackage" value="com.github.bjlhx15.mybatis.readwrite.split.repository.read"/>

        <property name="sqlSessionFactoryBeanName" value="readSqlSessionFactory"/>

    </bean>

    <!--  必须添加 mapper 得扫描 因为mybatis 生成的mapper没有注解-->

    <bean id="mapperScannerConfigurer2" class="org.mybatis.spring.mapper.MapperScannerConfigurer">

        <property name="basePackage" value="com.github.bjlhx15.mybatis.readwrite.split.repository.write"/>

        <property name="sqlSessionFactoryBeanName" value="writeSqlSessionFactory"/>

    </bean>

</beans>
2.2、方案二、【AOP,DAO方法加注解】
通过Spring AOP在业务层实现读写分离,在DAO层调用前定义切面,利用Spring的AbstractRoutingDataSource解决多数据源的问题,实现动态选择数据源
- 优点:通过注解的方法在DAO每个方法上配置数据源,原有代码改动量少,易扩展,支持多读
- 缺点:需要在DAO每个方法上配置注解,人工管理,容易出错
实现方式:
项目地址:https://github.com/bjlhx15/mybatis.git 中的mybatis-readwrite-split-002-aop 基础项目
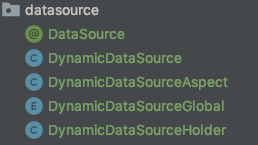
定义如下工具类

xml配置
<?xml version="1.0" encoding="UTF-8"?>

<beans xmlns="http://www.springframework.org/schema/beans"

       xmlns:xsi="http://www.w3.org/2001/XMLSchema-instance" xmlns:tx="http://www.springframework.org/schema/tx"

       xmlns:aop="http://www.springframework.org/schema/aop"

       xsi:schemaLocation="

    http://www.springframework.org/schema/beans http://www.springframework.org/schema/beans/spring-beans.xsd

    http://www.springframework.org/schema/tx http://www.springframework.org/schema/tx/spring-tx.xsd

    http://www.springframework.org/schema/aop  http://www.springframework.org/schema/aop/spring-aop.xsd

">

    <!-- 连接池基本 父类 -->

    <bean id="abstractDataSource" abstract="true" class="com.alibaba.druid.pool.DruidDataSource" destroy-method="close">

        <property name="driverClassName" value="com.mysql.jdbc.Driver"/>

        <!-- 配置获取连接等待超时的时间 -->

        <property name="maxWait" value="60000"/>

        <!-- 配置间隔多久才进行一次检测,检测需要关闭的空闲连接,单位是毫秒 -->

        <property name="timeBetweenEvictionRunsMillis" value="60000"/>

        <!-- 配置一个连接在池中最小生存的时间,单位是毫秒 -->

        <property name="minEvictableIdleTimeMillis" value="300000"/>

        <property name="validationQuery" value="SELECT 'x'"/>

        <property name="testWhileIdle" value="true"/>

        <property name="testOnBorrow" value="false"/>

        <property name="testOnReturn" value="false"/>

        <!-- 打开PSCache,并且指定每个连接上PSCache的大小 -->

        <property name="poolPreparedStatements" value="true"/>

        <property name="maxPoolPreparedStatementPerConnectionSize" value="20"/>

        <!--        <property name="filters" value="config"/>-->

        <!--        <property name="connectionProperties" value="config.decrypt=true"/>-->

    </bean>

    <!--读1连接池-->

    <bean id="dataSourceRead1" parent="abstractDataSource">

        <!-- 基本属性 url、user、password -->

        <property name="url" value="jdbc:mysql://192.168.1.2:3358/test"/>

        <property name="username" value="read"/>

        <property name="password" value="read"/>

        <!-- 配置初始化大小、最小、最大 -->

        <property name="initialSize" value="10"/>

        <property name="minIdle" value="10"/>

        <property name="maxActive" value="10"/>

    </bean>

    <!--读2连接池-->

    <bean id="dataSourceRead2" parent="abstractDataSource">

        <!-- 基本属性 url、user、password -->

        <property name="url" value="jdbc:mysql://192.168.1.2:3358/test"/>

        <property name="username" value="read"/>

        <property name="password" value="read"/>

        <!-- 配置初始化大小、最小、最大 -->

        <property name="initialSize" value="10"/>

        <property name="minIdle" value="10"/>

        <property name="maxActive" value="10"/>

    </bean>

    <!--写连接池-->

    <bean id="dataSourceWrite" parent="abstractDataSource">

        <!-- 基本属性 url、user、password -->

        <property name="url" value="jdbc:mysql://192.168.1.1:3358/test"/>

        <property name="username" value="root"/>

        <property name="password" value="root"/>

        <!-- 配置初始化大小、最小、最大 -->

        <property name="initialSize" value="10"/>

        <property name="minIdle" value="10"/>

        <property name="maxActive" value="10"/>

    </bean>

    <bean id="dataSource" class="com.github.bjlhx15.mybatis.readwrite.split.datasource.DynamicDataSource">

        <property name="writeDataSource" ref="dataSourceWrite"/>

        <property name="readDataSources">

            <list>

                <ref bean="dataSourceRead1"/>

                <ref bean="dataSourceRead2"/>

            </list>

        </property>

        <!--轮询方式-->

        <property name="readDataSourcePollPattern" value="1"/>

        <!--        什么都没有的注释 使用的数据源-->

        <property name="defaultTargetDataSource" ref="dataSourceWrite"/>

    </bean>

    <!--    事务-->

    <tx:annotation-driven transaction-manager="transactionManager"/>

    <bean id="transactionManager" class="org.springframework.jdbc.datasource.DataSourceTransactionManager">

        <property name="dataSource" ref="dataSource"/>

    </bean>

    <!-- 针对myBatis的配置项 -->

    <!-- 配置sqlSessionFactory -->

    <bean id="sqlSessionFactory" class="org.mybatis.spring.SqlSessionFactoryBean">

        <!-- 实例化sqlSessionFactory时需要使用上述配置好的数据源以及SQL映射文件 -->

        <property name="dataSource" ref="dataSource"/>

        <property name="mapperLocations" value="classpath:mapper/auto/**/*.xml"/>

        <!--    mybatis的全局配置文件 如没有特需 可以不配置    -->

        <property name="configLocation" value="classpath:mybatis.xml"/>

        <!-- 配置分页插件 -->

        <property name="plugins">

            <array>

                <bean class="com.github.pagehelper.PageInterceptor">

                    <property name="properties">

                        <value>

                            helperDialect=mysql

                            reasonable=true

                        </value>

                    </property>

                </bean>

            </array>

        </property>

    </bean>

    <!--   配置扫描器  必须添加 mapper 得扫描 因为mybatis 生成的mapper没有注解-->

    <bean class="org.mybatis.spring.mapper.MapperScannerConfigurer">

        <property name="basePackage" value="com.github.bjlhx15.mybatis.readwrite.split.repository"/>

        <property name="sqlSessionFactoryBeanName" value="sqlSessionFactory"/>

    </bean>

    <!-- 配置数据库注解aop -->

    <bean id="dynamicDataSourceAspect"

          class="com.github.bjlhx15.mybatis.readwrite.split.datasource.DynamicDataSourceAspect"/>

    <aop:config>

        <aop:aspect id="c" ref="dynamicDataSourceAspect">

            <aop:pointcut id="tx"

                          expression="execution(* com.github.bjlhx15.mybatis.readwrite.split.repository.auto..*.*(..))"/>

            <aop:before pointcut-ref="tx" method="before"/>

            <aop:after pointcut-ref="tx" method="after"/>

        </aop:aspect>

    </aop:config>

    <!-- 配置数据库注解aop -->

</beans>
需要在使用的方法上添加注解
    @DataSource(DynamicDataSourceGlobal.READ)

    long countByExample(AccountBalanceExample example);
2.3、方案三、【动态代理,mybatis拦截器】【调试中】
通过Mybatis的Plugin在业务层实现数据库读写分离,在MyBatis创建Statement对象前通过拦截器选择真正的数据源,在拦截器中根据方法名称不同(select、update、insert、delete)选择数据源。
- 优点:原有代码不变,支持多读,易扩展
- 缺点:
实现方式:
项目地址:https://github.com/bjlhx15/mybatis.git 中的mybatis-readwrite-split-003 基础项目
定义如下工具类

核心xml配置
<?xml version="1.0" encoding="UTF-8"?>
<beans xmlns="http://www.springframework.org/schema/beans"
xmlns:xsi="http://www.w3.org/2001/XMLSchema-instance" xmlns:tx="http://www.springframework.org/schema/tx"
xmlns:aop="http://www.springframework.org/schema/aop"
xsi:schemaLocation="
http://www.springframework.org/schema/beans http://www.springframework.org/schema/beans/spring-beans.xsd
http://www.springframework.org/schema/tx http://www.springframework.org/schema/tx/spring-tx.xsd
http://www.springframework.org/schema/aop http://www.springframework.org/schema/aop/spring-aop.xsd
"> <!-- 连接池基本 父类 -->
<bean id="abstractDataSource" abstract="true" class="com.alibaba.druid.pool.DruidDataSource" init-method="init" destroy-method="close">
<property name="driverClassName" value="com.mysql.jdbc.Driver"/>
<!-- 配置获取连接等待超时的时间 -->
<property name="maxWait" value="60000"/>
<!-- 配置间隔多久才进行一次检测,检测需要关闭的空闲连接,单位是毫秒 -->
<property name="timeBetweenEvictionRunsMillis" value="60000"/>
<!-- 配置一个连接在池中最小生存的时间,单位是毫秒 -->
<property name="minEvictableIdleTimeMillis" value="300000"/>
<property name="validationQuery" value="SELECT 'x'"/>
<property name="testWhileIdle" value="true"/>
<property name="testOnBorrow" value="false"/>
<property name="testOnReturn" value="false"/>
<!-- 打开PSCache,并且指定每个连接上PSCache的大小 -->
<property name="poolPreparedStatements" value="true"/>
<property name="maxPoolPreparedStatementPerConnectionSize" value="20"/>
<!-- <property name="filters" value="config"/>-->
<!-- <property name="connectionProperties" value="config.decrypt=true"/>--> <!-- 配置初始化大小、最小、最大 -->
<property name="initialSize" value="10"/>
<property name="minIdle" value="10"/>
<property name="maxActive" value="10"/>
</bean>
<!--读1连接池-->
<bean id="dataSourceRead1" parent="abstractDataSource">
<!-- 基本属性 url、user、password -->
<property name="url" value="jdbc:mysql://127.0.0.1:3358/test?useSSL=false&characterEncoding=utf8"/>
<property name="username" value="read"/>
<property name="password" value="read"/>
</bean> <!--读2连接池-->
<bean id="dataSourceRead2" parent="abstractDataSource">
<!-- 基本属性 url、user、password -->
<property name="url" value="jdbc:mysql://127.0.0.1:3358/test?useSSL=false&characterEncoding=utf8"/>
<property name="username" value="read"/>
<property name="password" value="read"/>
</bean> <!--写连接池-->
<bean id="dataSourceWrite" parent="abstractDataSource">
<!-- 基本属性 url、user、password -->
<property name="url" value="jdbc:mysql://127.0.0.1:3358/test?useSSL=false&characterEncoding=utf8"/>
<property name="username" value="root"/>
<property name="password" value="123456"/>
</bean> <bean id="dataSource" class="com.github.bjlhx15.mybatis.readwrite.split.datasource.DynamicRoutingDataSourceProxy">
<property name="writeDataSource" ref="dataSourceWrite"/>
<property name="readDataSources">
<list>
<ref bean="dataSourceRead1"/>
<ref bean="dataSourceRead2"/>
</list>
</property>
<!--轮询方式-->
<property name="readDataSourcePollPattern" value="1"/>
</bean> <!-- 事务-->
<tx:annotation-driven transaction-manager="transactionManager"/> <bean id="transactionManager" class="org.springframework.jdbc.datasource.DataSourceTransactionManager">
<property name="dataSource" ref="dataSource"/>
</bean> <!-- 针对myBatis的配置项 -->
<!-- 配置sqlSessionFactory -->
<bean id="sqlSessionFactory" class="org.mybatis.spring.SqlSessionFactoryBean">
<!-- 实例化sqlSessionFactory时需要使用上述配置好的数据源以及SQL映射文件 -->
<property name="dataSource" ref="dataSource"/>
<property name="mapperLocations" value="classpath:mapper/auto/**/*.xml"/>
<!-- mybatis的全局配置文件 如没有特需 可以不配置 -->
<property name="configLocation" value="classpath:mybatis.xml"/>
<!-- 配置分页插件 -->
<!-- <property name="plugins">-->
<!-- <array>-->
<!-- <bean class="com.github.pagehelper.PageInterceptor">-->
<!-- <property name="properties">-->
<!-- <value>-->
<!-- helperDialect=mysql-->
<!-- reasonable=true-->
<!-- </value>-->
<!-- </property>-->
<!-- </bean>-->
<!-- </array>-->
<!-- </property>-->
</bean> <!-- 配置扫描器 必须添加 mapper 得扫描 因为mybatis 生成的mapper没有注解-->
<!-- <bean class="org.mybatis.spring.mapper.MapperScannerConfigurer">-->
<!-- <property name="basePackage" value="com.github.bjlhx15.mybatis.readwrite.split.repository"/>-->
<!-- <property name="sqlSessionFactoryBeanName" value="sqlSessionFactory"/>-->
<!-- </bean>--> <bean id="sqlSessionTemplate" class="org.mybatis.spring.SqlSessionTemplate">
<constructor-arg ref="sqlSessionFactory" />
</bean>
<!-- 通过扫描的模式,扫描目录下所有的mapper, 根据对应的mapper.xml为其生成代理类-->
<bean id="mapper" class="org.mybatis.spring.mapper.MapperScannerConfigurer">
<property name="basePackage" value="com.github.bjlhx15.mybatis.readwrite.split.repository" />
<property name="sqlSessionTemplate" ref="sqlSessionTemplate"></property>
</bean>
</beans>
方案四、AbstractRoutingDataSource和mybatis拦截器【推荐】
后台结构是spring+mybatis,可以通过spring的AbstractRoutingDataSource和mybatis Plugin拦截器实现非常友好的读写分离,原有代码不需要任何改变。推荐第四种方案
实现的重点是下面这两个:
1、org.springframework.jdbc.datasource.lookup.AbstractRoutingDataSource
spring提供的这个类能够让我们实现运行时多数据源的动态切换,但是数据源是需要事先配置好的,无法动态的增加数据源。但是对于小项目来说已经足够了。
2、MyBatis提供的@Intercepts、@Signature注解和org.apache.ibatis.plugin.Interceptor接口。
注:另外还有一个就是ThreadLocal类,用于保存每个线程正在使用的数据源。ThreadLocal的原理之前已经分析过了。
运行流程:
1、我们自己写的MyBatis的Interceptor按照@Signature的规则拦截下Executor.class的update和query方法
2、判断是读还是写方法,然后在ThreadLocal里保存一个读或者写的变量
3、线程再根据这个变量作为key从全局静态的HashMap中取出当前要用的读或者写数据源
4、返回对应数据源的connection去做相应的数据库操作
实现方案
项目地址:https://github.com/bjlhx15/mybatis.git 中的mybatis-readwrite-split-004 基础项目
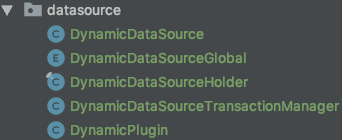
定义如下工具类

核心xml
<?xml version="1.0" encoding="UTF-8"?>
<beans xmlns="http://www.springframework.org/schema/beans"
xmlns:xsi="http://www.w3.org/2001/XMLSchema-instance" xmlns:tx="http://www.springframework.org/schema/tx"
xmlns:aop="http://www.springframework.org/schema/aop"
xsi:schemaLocation="
http://www.springframework.org/schema/beans http://www.springframework.org/schema/beans/spring-beans.xsd
http://www.springframework.org/schema/tx http://www.springframework.org/schema/tx/spring-tx.xsd
http://www.springframework.org/schema/aop http://www.springframework.org/schema/aop/spring-aop.xsd
"> <!-- 连接池基本 父类 -->
<bean id="abstractDataSource" abstract="true" class="com.alibaba.druid.pool.DruidDataSource" destroy-method="close">
<property name="driverClassName" value="com.mysql.jdbc.Driver"/>
<!-- 配置获取连接等待超时的时间 -->
<property name="maxWait" value="60000"/>
<!-- 配置间隔多久才进行一次检测,检测需要关闭的空闲连接,单位是毫秒 -->
<property name="timeBetweenEvictionRunsMillis" value="60000"/>
<!-- 配置一个连接在池中最小生存的时间,单位是毫秒 -->
<property name="minEvictableIdleTimeMillis" value="300000"/>
<property name="validationQuery" value="SELECT 'x'"/>
<property name="testWhileIdle" value="true"/>
<property name="testOnBorrow" value="false"/>
<property name="testOnReturn" value="false"/>
<!-- 打开PSCache,并且指定每个连接上PSCache的大小 -->
<property name="poolPreparedStatements" value="true"/>
<property name="maxPoolPreparedStatementPerConnectionSize" value="20"/> <!-- 配置初始化大小、最小、最大 -->
<property name="initialSize" value="10"/>
<property name="minIdle" value="10"/>
<property name="maxActive" value="10"/>
<!-- <property name="filters" value="config"/>-->
<!-- <property name="connectionProperties" value="config.decrypt=true"/>-->
</bean>
<!--写连接池-->
<bean id="autoSuperDataSourceWrite" parent="abstractDataSource">
<!-- 基本属性 url、user、password -->
<property name="url" value="jdbc:mysql://127.0.0.1:3358/test?useSSL=false&characterEncoding=utf8"/>
<property name="username" value="root"/>
<property name="password" value="123456"/>
</bean> <bean id="autoSuperDataSourceRead" parent="abstractDataSource">
<!-- 基本属性 url、user、password -->
<property name="url" value="jdbc:mysql://127.0.0.1:3358/test?useSSL=false&characterEncoding=utf8"/>
<property name="username" value="read"/>
<property name="password" value="read1"/>
</bean> <bean id="autoSuperDataSource" class="com.github.bjlhx15.mybatis.readwrite.split.datasource.DynamicDataSource">
<property name="writeDataSource" ref="autoSuperDataSourceWrite"></property>
<property name="readDataSource" ref="autoSuperDataSourceRead"></property>
</bean> <tx:annotation-driven transaction-manager="autoSuperTransactionManager"/> <bean id="autoSuperTransactionManager" class="com.github.bjlhx15.mybatis.readwrite.split.datasource.DynamicDataSourceTransactionManager">
<property name="dataSource" ref="autoSuperDataSource"/>
</bean> <!-- 针对myBatis的配置项 -->
<bean id="autoSuperSqlSessionFactory" class="org.mybatis.spring.SqlSessionFactoryBean">
<!-- 实例化sqlSessionFactory时需要使用上述配置好的数据源以及SQL映射文件 -->
<property name="dataSource" ref="autoSuperDataSource"/>
<property name="mapperLocations" value="classpath:mapper/auto/**/*.xml"/>
<!-- mybatis的全局配置文件 如没有特需 可以不配置 -->
<property name="configLocation" value="classpath:mybatis.xml"/>
<property name="typeAliasesPackage" value="com.github.bjlhx15.mybatis.readwrite.split.model"></property>
<!-- 配置分页插件 -->
<property name="plugins">
<array>
<bean class="com.github.pagehelper.PageInterceptor">
<property name="properties">
<value>
helperDialect=mysql
reasonable=true
</value>
</property>
</bean>
</array>
</property>
</bean> <!-- 配置扫描器 -->
<!-- 必须添加 mapper 得扫描 因为mybatis 生成的mapper没有注解-->
<bean class="org.mybatis.spring.mapper.MapperScannerConfigurer">
<property name="basePackage" value="com.github.bjlhx15.mybatis.readwrite.split.repository"/>
<property name="sqlSessionFactoryBeanName" value="autoSuperSqlSessionFactory"/>
</bean> </beans>
参看地址:https://www.jianshu.com/p/2222257f96d3
数据权限管理中心:https://my.oschina.net/gmarshal/blog/1797026
注事务配置
有两种方式,上述情况均可使用
上述是使用注解方式,下述是xml方式
测试一、配置txmethod中不成功
    <!--  tx:annotation-driven 注解事务  tx:advice配置事务 二选一 -->

    <!-- 支持  @Transactional 标记   -->

    <!--    <tx:annotation-driven transaction-manager="autoSuperTransactionManager"/>-->

    <tx:advice id="txAdvice" transaction-manager="autoSuperTransactionManager">

        <tx:attributes>

            <tx:method name="delete*" propagation="REQUIRED" rollback-for="Exception"/>

            <tx:method name="insert*" propagation="REQUIRED" rollback-for="Exception"/>

            <tx:method name="update*" propagation="REQUIRED" rollback-for="Exception"/>

            <tx:method name="execute*" propagation="REQUIRED" rollback-for="Exception"/>

            <tx:method name="doCreate*" propagation="REQUIRED" rollback-for="Exception"/>

            <tx:method name="find*" propagation="SUPPORTS" read-only="true"/>

            <tx:method name="get*" propagation="SUPPORTS" read-only="true"/>

            <tx:method name="select*" propagation="SUPPORTS" read-only="true"/>

            <tx:method name="selectByPrimaryKeyOne" propagation="NOT_SUPPORTED" read-only="true"/>

            <tx:method name="dynamicsSqlSkuTraceData" propagation="NOT_SUPPORTED" read-only="true"/>

            <tx:method name="query*" propagation="SUPPORTS" read-only="true"/>

        </tx:attributes>

    </tx:advice>

    <aop:config expose-proxy="true" proxy-target-class="true">

        <aop:pointcut id="pc" expression="execution(* com.jd.bt.middle.data.service..*.*(..))"/>

        <aop:advisor pointcut-ref="pc" advice-ref="txAdvice"/>

    </aop:config>
注意aop拦截的是 selectByPrimaryKeyOne, 没有加事务属性 propagation ,如果添加可能被事务传播影响变成 写数据源 没起到作用 注意需要关闭事务支持 从库不支持事务 propagation="NOT_SUPPORTED"
测试二、配置到aop切点中【成功】
    <tx:advice id="txAdvice" transaction-manager="autoSuperTransactionManager">

        <tx:attributes>

            <tx:method name="delete*" propagation="REQUIRED" rollback-for="Exception"/>

            <tx:method name="insert*" propagation="REQUIRED" rollback-for="Exception"/>

            <tx:method name="update*" propagation="REQUIRED" rollback-for="Exception"/>

            <tx:method name="execute*" propagation="REQUIRED" rollback-for="Exception"/>

            <tx:method name="doCreate*" propagation="REQUIRED" rollback-for="Exception"/>

            <tx:method name="find*" propagation="SUPPORTS" read-only="true"/>

            <tx:method name="get*" propagation="SUPPORTS" read-only="true"/>

            <!-- 下面aop排除即可,此处不用写-->

<!--            <tx:method name="selectByPrimaryKeyOne" propagation="NOT_SUPPORTED" read-only="true"/>-->

<!--            <tx:method name="dynamicsSqlSkuTraceData" propagation="NOT_SUPPORTED" read-only="true"/>-->

            <tx:method name="select*" propagation="SUPPORTS" read-only="true"/>

            <tx:method name="query*" propagation="SUPPORTS" read-only="true"/>

        </tx:attributes>

    </tx:advice>

    <aop:config expose-proxy="true" proxy-target-class="true">

        <aop:pointcut id="pc" expression="execution(* com.jd.bt.middle.data.service..*.*(..))

        and !execution(* com.jd.bt.middle.data.service..*.selectByPrimaryKeyOne(..))

        and !execution(* com.jd.bt.middle.data.service..*.dynamicsSqlSkuTraceData(..))"/>

        <aop:advisor pointcut-ref="pc" advice-ref="txAdvice"/>

    </aop:config>
java-mybaits-012-mybatis-Interceptor-拦截器读写分离四种实现方案的更多相关文章
- Mybatis Interceptor 拦截器原理 源码分析
Mybatis采用责任链模式,通过动态代理组织多个拦截器(插件),通过这些拦截器可以改变Mybatis的默认行为(诸如SQL重写之类的),由于插件会深入到Mybatis的核心,因此在编写自己的插件前最 ...
- mybatis Interceptor拦截器代码详解
mybatis官方定义:MyBatis 是一款优秀的持久层框架,它支持定制化 SQL.存储过程以及高级映射.MyBatis 避免了几乎所有的 JDBC 代码和手动设置参数以及获取结果集.MyBatis ...
- SpringBoot+SpringAOP+Java自定义注解+mybatis实现切库读写分离
一.定义我们自己的切库注解类 自定义注解有几点需要注意: 1)@Target 是作用的目标,接口.方法.类.字段.包等等,具体看:ElementType 2)@Retention 是注解存在的范围,R ...
- Mybatis之拦截器原理(jdk动态代理优化版本)
在介绍Mybatis拦截器代码之前,我们先研究下jdk自带的动态代理及优化 其实动态代理也是一种设计模式...优于静态代理,同时动态代理我知道的有两种,一种是面向接口的jdk的代理,第二种是基于第三方 ...
- Mybatis利用拦截器做统一分页
mybatis利用拦截器做统一分页 查询传递Page参数,或者传递继承Page的对象参数.拦截器查询记录之后,通过改造查询sql获取总记录数.赋值Page对象,返回. 示例项目:https://git ...
- mybatis定义拦截器
applicationContext.xml <bean id="sqlSessionFactory" class="org.mybatis.spring.SqlS ...
- MyBatis实现拦截器分页功能
1.原理 在mybatis使用拦截器(interceptor),截获所执行方法的sql语句与参数. (1)修改sql的查询结果:将原sql改为查询count(*) 也就是条数 (2)将语句sql进行拼 ...
- SpringMVC中使用Interceptor拦截器
SpringMVC 中的Interceptor 拦截器也是相当重要和相当有用的,它的主要作用是拦截用户的请求并进行相应的处理.比如通过它来进行权限验证,或者是来判断用户是否登陆,或者是像12306 那 ...
- SpringMVC 中的Interceptor 拦截器
1.配置拦截器 在springMVC.xml配置文件增加: <mvc:interceptors> <!-- 日志拦截器 --> <mvc:interceptor> ...
随机推荐
- grafana忘记登陆密码
找到grafana的数据文件grafana.db find / -name "grafana.db" ps:默认的安装路径为/var/lib/grafana/grafana.db ...
- python2.7 安装pycrypto库报错
windows + python2.7 先安装VC包 https://download.microsoft.com/download/7/9/6/796EF2E4-801B-4FC4-AB28-B59 ...
- python函数式编程-匿名函数
>>> map(lambda x: x * x, [, , , , , , , , ]) [, , , , , , , , ] 关键字lambda表示匿名函数,冒号前面的x表示函数参 ...
- 四舍五入toFoxed方法
四舍五入的方法: Number.prototype.toFixed = function (n) { if (n > 20 || n < 0) { throw new RangeError ...
- python-Redis cluster基础指标监控
#!/usr/local/python/shims/python from rediscluster import StrictRedisCluster ''' 需要在宿主机python中安装redi ...
- 第113题:路径总和II
一. 问题描述 给定一个二叉树和一个目标和,找到所有从根节点到叶子节点路径总和等于给定目标和的路径. 说明: 叶子节点是指没有子节点的节点. 示例: 给定如下二叉树,以及目标和 sum = 22, 5 ...
- Scrapy框架的八个扩展
一.proxies代理 首先需要在环境变量中设置 from scrapy.contrib.downloadermiddleware.httpproxy import HttpProxyMiddlewa ...
- GO 文件读取常用的方法
方式1: 一行一行的方式读取 其中常用的方法就有:ReadString,ReadLine,ReadBytes ReadLine 返回单个行,不包括行尾字节,就是说,返回的内容不包括\n或者\r\n,返 ...
- 肤浅的聊聊关联子查询,数据集连接,TiDB代码,关系代数,等等
本章涉及的内容是TiDB的计算层代码,就是我们编译完 TiDB 后在bin目录下生成的 tidb-server 的可执行文件,它是用 go 实现的,里面对 TiPD 和 TiKV实现了Mock,可以单 ...
- 作业调度系统PBS(Torque)的设置
1.修改/var/spool/torque/server_priv/目录下的nodes文件 Node1 np=16 gpus=4 Node2 np=16 gpus=4 ... 其中Node1为计算节点 ...
