[Linux]Redhat7配置CentOS7 YUM源
一、简介
安装Redhat7并配置了网卡之后,虽然可以直接ping www.baidu.com,但是执行yum install的命令时提示如下信息:
[root@ansible ~]# yum install -y vim

Loaded plugins: langpacks, product-id, search-disabled-repos, subscription-manager

This system is not registered with an entitlement server. You can use subscription-manager to register.

There are no enabled repos.

 Run "yum repolist all" to see the repos you have.

 To enable Red Hat Subscription Management repositories:

     subscription-manager repos --enable <repo>

 To enable custom repositories:

     yum-config-manager --enable <repo>
原因在于redhat 的更新包只对注册的用户生效,所以需要自己手动更改成CentOS 的更新包,CentOS几乎和redhat是一样的,所以无需担心软件包是否可安装,安装之后是否有问题,另外CentOS公司去年已经被Redhat 收购了,下面是安装步骤
二、配置Redhat7的YUM源
配置Redhat7的YUM源一般有2种方法:1-本地CD源 2-CentOS7源。第一种方式是挂载Redhat7的DVD镜像作为源,所有的安装都是在镜像文件中安装,这种方式比较简单,但是不方便。第二种是使用CentOS7的YUM源。下面讲的就是第二种方式:
1、首先查看redhat 7.0系统本身所安装的那些yum 软件包:
[root@linuxprobe ~]# rpm -qa | grep yum
yum-utils-1.1.31-24.el7.noarch
yum-langpacks-0.4.2-3.el7.noarch
yum-metadata-parser-1.1.4-10.el7.x86_64
yum-rhn-plugin-2.0.1-4.el7.noarch
PackageKit-yum-0.8.9-11.el7.x86_64
yum-3.4.3-118.el7.noarch
2、 删除redhat自带的yum包
卸载上面显示的所有yum包:
[root@localhost ~]# rpm -qa|grep yum|xargs rpm -e --nodeps
[root@localhost ~]# rpm -qa |grep yum
[root@localhost ~]#
3、保证本机电脑能上网
[root@linuxprobe ~]# ping www.baidu.com
PING www.a.shifen.com (61.135.169.121) 56(84) bytes of data.
64 bytes from 61.135.169.121: icmp_seq=1 ttl=53 time=31.8 ms
64 bytes from 61.135.169.121: icmp_seq=2 ttl=53 time=31.9 ms
64 bytes from 61.135.169.121: icmp_seq=3 ttl=53 time=32.0 ms
4、选择网络源
网易163网络源地址:http://mirrors.163.com/
CentOS网络源地址:http://centos.ustc.edu.cn/centos/
5、选择163源(最重要一步)
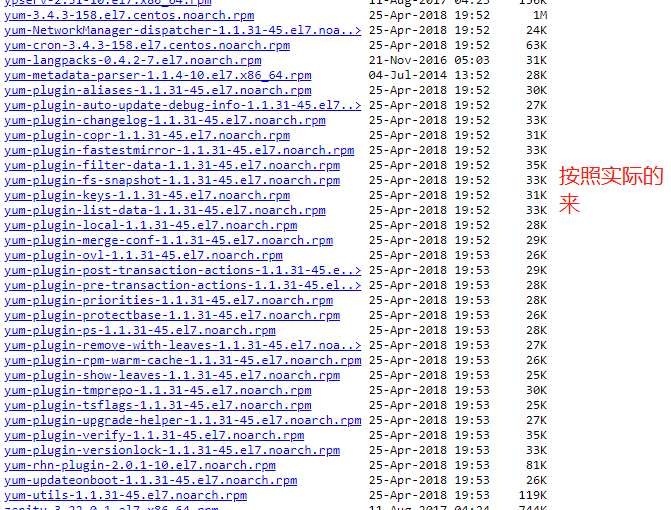
下载安装包rpm的地址:http://mirrors.163.com/centos/7/os/x86_64/Packages/

注意下面的链接可能会失效,打开上面WEB按照实际的版本下载这5个包即可。
[root@ansible ~]# wget http://mirrors.163.com/centos/7/os/x86_64/Packages/yum-3.4.3-158.el7.centos.noarch.rpm
[root@ansible ~]# wget http://mirrors.163.com/centos/7/os/x86_64/Packages/yum-metadata-parser-1.1.4-10.el7.x86_64.rpm
[root@ansible ~]# wget http://mirrors.163.com/centos/7/os/x86_64/Packages/yum-utils-1.1.31-45.el7.noarch.rpm
[root@ansible ~]# wget http://mirrors.163.com/centos/7/os/x86_64/Packages/yum-updateonboot-1.1.31-45.el7.noarch.rpm
[root@ansible ~]# wget http://mirrors.163.com/centos/7/os/x86_64/Packages/yum-plugin-fastestmirror-1.1.31-45.el7.noarch.rpm
6、查看下载完成结果
[root@ansible ~]# ls
anaconda-ks.cfg initial-setup-ks.cfg Templates yum-metadata-parser-1.1.4-10.el7.x86_64.rpm.1
Desktop Music Videos yum-plugin-fastestmirror-1.1.31-45.el7.noarch.rpm
Documents Pictures yum-3.4.3-158.el7.centos.noarch.rpm yum-updateonboot-1.1.31-45.el7.noarch.rpm
Downloads Public yum-metadata-parser-1.1.4-10.el7.x86_64.rpm yum-utils-1.1.31-45.el7.noarch.rpm
7、安装软件包:
[root@ansible ~]# rpm -ivh yum-*
warning: yum-3.4.3-158.el7.centos.noarch.rpm: Header V3 RSA/SHA256 Signature, key ID f4a80eb5: NOKEY
warning: package yum-metadata-parser-1.1.4-10.el7.x86_64 was already added, skipping yum-metadata-parser-1.1.4-10.el7.x86_64
Preparing... ################################# [100%]
Updating / installing...
1:yum-metadata-parser-1.1.4-10.el7 ################################# [ 20%]
2:yum-plugin-fastestmirror-1.1.31-4################################# [ 40%]
3:yum-3.4.3-158.el7.centos ################################# [ 60%]
4:yum-updateonboot-1.1.31-45.el7 ################################# [ 80%]
5:yum-utils-1.1.31-45.el7 ################################# [100%]
8、新建repo 配置文件,直接复制即可
[root@linuxprobe ~]# vim /etc/yum.repos.d/CentOS-Base.repo
#CentOS-Base.repo
#
# The mirror system uses the connecting IP address of the client and the
# update status of each mirror to pick mirrors that are updated to and
# geographically close to the client. You should use this for CentOS updates
# unless you are manually picking other mirrors.
#
# If the mirrorlist= does not work for you, as a fall back you can try the
# remarked out baseurl= line instead.
#
#
[base]
name=CentOS-$7 - Base - 163.com
#mirrorlist=http://mirrorlist.centos.org/?release=$7&arch=$basearch&repo=os
baseurl=http://mirrors.163.com/centos/7/os/$basearch/
gpgcheck=1
gpgkey=http://mirrors.163.com/centos/RPM-GPG-KEY-CentOS-7
#released updates
[updates]
name=CentOS-$7 - Updates - 163.com
#mirrorlist=http://mirrorlist.centos.org/?release=$7&arch=$basearch&repo=updates
baseurl=http://mirrors.163.com/centos/7/updates/$basearch/
gpgcheck=1
gpgkey=http://mirrors.163.com/centos/RPM-GPG-KEY-CentOS-7
#additional packages that may be useful
[extras]
name=CentOS-$7 - Extras - 163.com
#mirrorlist=http://mirrorlist.centos.org/?release=$7&arch=$basearch&repo=extras
baseurl=http://mirrors.163.com/centos/7/extras/$basearch/
gpgcheck=1
gpgkey=http://mirrors.163.com/centos/RPM-GPG-KEY-CentOS-7
#additional packages that extend functionality of existing packages
[centosplus]
name=CentOS-$7 - Plus - 163.com
baseurl=http://mirrors.163.com/centos/7/centosplus/$basearch/
gpgcheck=1
enabled=0
gpgkey=http://mirrors.163.com/centos/RPM-GPG-KEY-CentOS-7
9、至此YUM 网络源已经安装完成
[root@linuxprobe ~]# yum clean all
10、测试安装是否正常
[root@ansible ~]# yum -y install vim
Loaded plugins: fastestmirror, product-id, search-disabled-repos, subscription-manager
This system is not registered with an entitlement server. You can use subscription-manager to register.
Loading mirror speeds from cached hostfile
Resolving Dependencies
--> Running transaction check
[Linux]Redhat7配置CentOS7 YUM源的更多相关文章
- [Linux]Redhat7配置本地镜像源
一.Redhat7源 上一个文章介绍了如何配置的Redhat7的YUM网络源:[Linux]Redhat7配置CentOS7 YUM源 .如果在无法联网的情况下,可以使用镜像文件作为源安装需要的包. ...
- RedHat Linux RHEL6配置本地YUM源
YUM是Yellow dog Updater Modified的简称,起初是由yellow dog这一发行版的开发者Terra Soft研发,用python写成,那时还叫做yup(yellow dog ...
- Linux虚拟机配置本地yum源
刚开始使用Linux,自己构建了一个Linux虚拟机之后,在使用yum install的时候,经常是出错,提示连接不上. 一直以为是自己构建的虚拟机的问题,后来在网上查找了一些资料,才发现:需要配置本 ...
- 红帽系列linux自行配置本地yum源
yum是红帽系列的一种包管理工具,能方便的自动解决安装包的依赖关系.以前用rpm包管理安装gcc时,rpm -ivh gcc.rpm ,一般会提示要安装gcc需要安装某某lib库,等你找到那个库的rp ...
- redhat7配置本地yum源
1.首先是要有一个iso文件,并将这个文件挂载到某个目录 挂载: 配置: 检验: yum list 现在你就可以在没有网的情况下,安装软件了~~~
- Linux_配置本地YUM源(RHEL8)
[RHEL8] Linux-RHEL8配置本地YUM 源,按照之前传统的配置本地YUM的方法肯定不行,在RHEL8版本的软件源发生了变化,在RHEL8版本的软件仓库分成了两部分:[AppStream] ...
- linux 配置本地yum源,配置国内yum源,配置epel源
目录 一.配置本地yum源 二.配置国内yum源和epel源 一.配置本地yum源 1.挂载ISO镜像 mount -o loop /mnt/yum-iso/CentOS-7-x86_64-DVD-1 ...
- Linux挂载iso镜像、配置本地yum源
Linux挂载iso镜像.配置本地yum源 1.备份原yum源配置文件 [root@localhost ~]# ll /etc/yum.repos.d/ [root@localhost ~]# mkd ...
- Linux配置网络YUM源
配置网络yum源 RHEL6.5 [root@xuegod163 ~]# wget -O /etc/yum.repos.d/CentOS-Base.repo http://mirrors.aliyun ...
随机推荐
- windows10系统下安装pygame
1.安装python,选择版本3.7.1 下载地址:https://www.python.org/downloads/windows/选择安装版本 2.安装pip 下载地址:https://pypi. ...
- K8S的网络接口CNI及灵雀云的实践
K8S的网络模型 我们从底层网络来看,分为三个层面.首先是Pod之间的多个容器的网络互通.我们知道,K8S的Pod可以由多个容器组成,这个层面网络互通是比较简单的,因为所有的容器都是共享一个网卡,可以 ...
- Kali密码攻击之——离线攻击工具
在线密码攻击在渗透测试中很重要,但对于测试过程中得到的哈希,加密数据,又需要离线破解工具辅助解决 Creddump套件 kali下离线攻击工具中的Cache-dump,lsadump,pwdump,均 ...
- Future 示例
public static Object send(RequestClient request) future.channel().writeAndFlush(JSONObject.toJSONStr ...
- linux进程虚拟地址空间
转载源 在多任务操作系统中,每个进程都运行在属于自己的内存沙盘中.这个沙盘就是虚拟地址空间(Virtual Address Space),在32位模式下它是一个4GB的内存地址块.在Linux系统中, ...
- bzoj2880
打公式好麻烦 QAQ 为了节省时间去复习,原谅我引用一下别人的博客...http://blog.csdn.net/acdreamers/article/details/8542292 #include ...
- ps | grep排除grep这个进程
我们经常用ps | grep xxx来查询是否存在某进程,但默认情况下会将grep这个命令也作为结果返回,这样无论是否存在查询的进程,该命令的返回值都是0. 要避免这种情况可以使用grep的-v参数, ...
- ogg跳过某个RBA
1.从库复制进程报如下错误 ************************************************************************* ...
- Codeforces 932G Palindrome Partition - 回文树 - 动态规划
题目传送门 通往???的传送点 通往神秘地带的传送点 通往未知地带的传送点 题目大意 给定一个串$s$,要求将$s$划分为$t_{1}t_{2}\cdots t_{k}$,其中$2\mid k$,且$ ...
- Struts2 使用Jquery+ajax 文件上传
话不多说 直接上代码 前台js: var formData = new FormData(); formData.append("file1",$("#file1&quo ...
