Lab 9-1
Analyze the malware found in the file Lab09-01.exe using OllyDbg and IDA Pro to answer the following questions. This malware was initially analyzed in the Chapter 3 labs using basic static and dynamic analysis techniques.
Questions and Short Answers
How can you get this malware to install itself?
A: You can get the program to install itself by providing it with the
-inoption, along with the password. Alternatively, you can patch the binary to skip the password verification check.What are the command-line options for this program? What is the password requirement?
A: The command-line options for the program are one of four values and the password. The password is the string
abcdand is required for all actions except the default behavior. The-inoption instructs the malware to install itself. The-reoption instructs the malware to remove itself. The-coption instructs the malware to update its configuration, including its beacon IP address. The-ccoption instructs the malware to print its current configuration to the console. By default, this malware functions as a backdoor if installed.How can you use OllyDbg to permanently patch this malware, so that it doesn’t require the special command-line password?
A: You can patch the binary by changing the first bytes of the function at address 0x402510 to always return true. The assembly instruction for this behavior is
MOV EAX, 0x1; RETN;, which corresponds to the byte sequenceB8 01 00 00 00 C3.What are the host-based indicators of this malware?
A: The malware creates the registry key HKLM\Software\Microsoft \XPS\ Configuration (note the trailing space after Microsoft). The malware also creates the service XYZ Manager Service, where XYZ can be a parameter provided at install time or the name of the malware executable. Finally, when the malware copies itself into the Windows System directory, it may change the filename to match the service name.
What are the different actions this malware can be instructed to take via the network?
A: The malware can be instructed to execute one of five commands via the network: SLEEP, UPLOAD, DOWNLOAD, CMD, or NOTHING. The SLEEP command instructs the malware to perform no action for a given period of time. The UPLOAD command reads a file from the network and writes it to the local system at a specified path. The DOWNLOAD command instructs the malware to send the contents of a local file over the network to the remote host. The CMD command causes the malware to execute a shell command on the local system. The NOTHING command is a no-op command that causes the malware to do nothing.
Are there any useful network-based signatures for this malware?
A: By default, the malware beacons http://www.practicalmalwareanalysis.com/; however, this is configurable. The beacons are HTTP/1.0 GET requests for resources in the form xxxx/xxxx.xxx, where x is a random alphanumeric ASCII character. The malware does not provide any HTTP headers with its requests.
Detailed Analysis
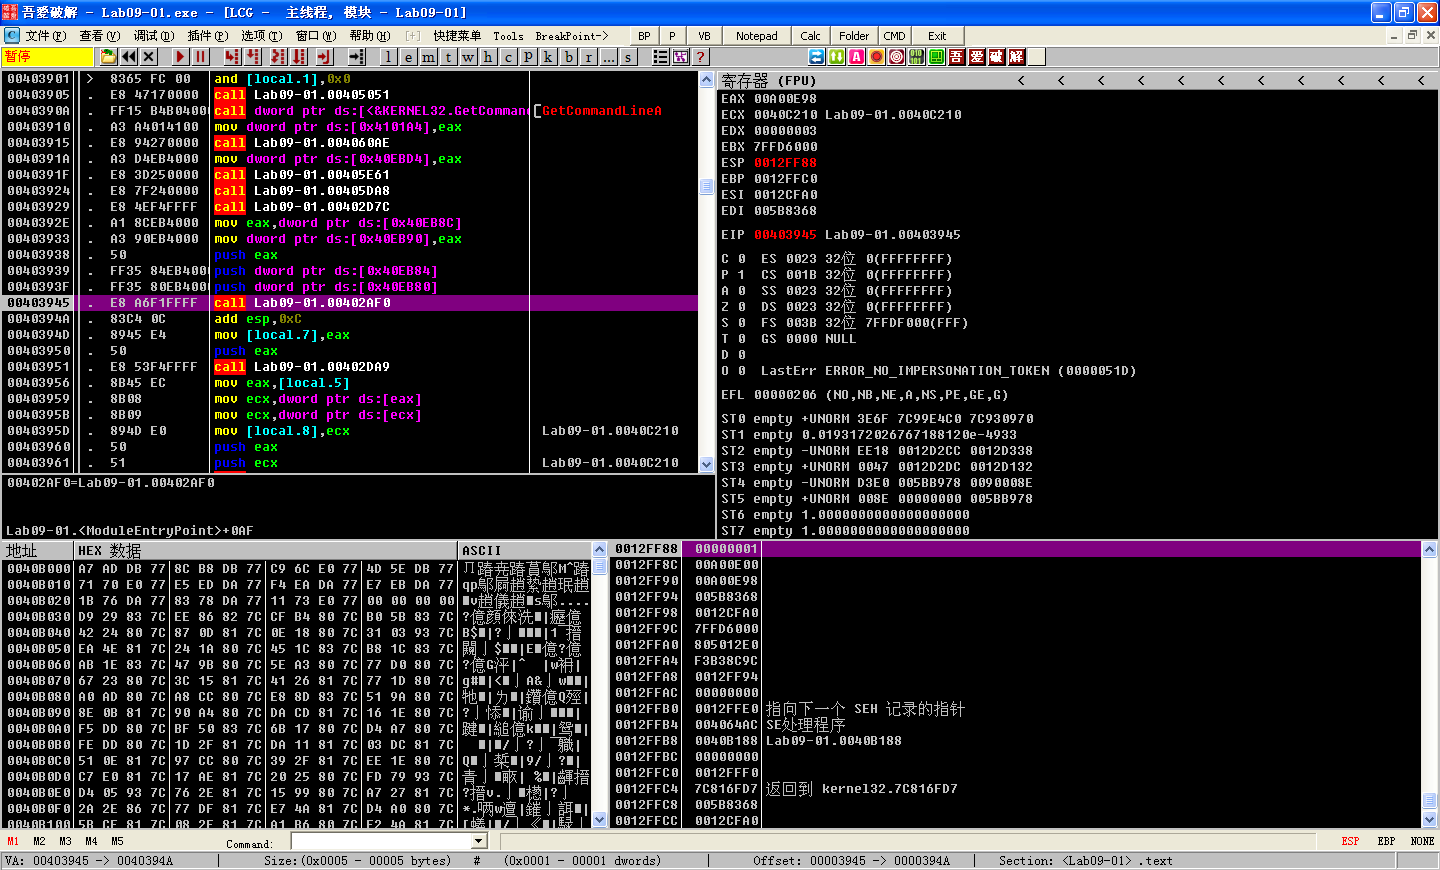
We start by debugging the malware with OllyDbg. We use the F8 key to step-over until we arrive at the address 0x403945, which is the call to the main function. (The easiest way to figure out that the main function starts at 0x402AF0 is by using IDA Pro.) Next, we use the F7 key to step-into the call to the main function. We continue to step forward using F7 and F8 while noting the behavior of the sample. (If you accidentally go too far, you can reset execution to the beginning by pressing CTRL-F2.)

First, the malware checks to see if the number of command-line arguments equals 1 at address 0x402AFD. We have not specified any parameters, so the check succeeds, and execution resumes at address 0x401000. Next, it attempts to open the registry key HKLM\SOFTWARE\Microsoft \XPS; however, since the registry key does not exist, the function returns zero, so execution calls into the function at 0x402410.
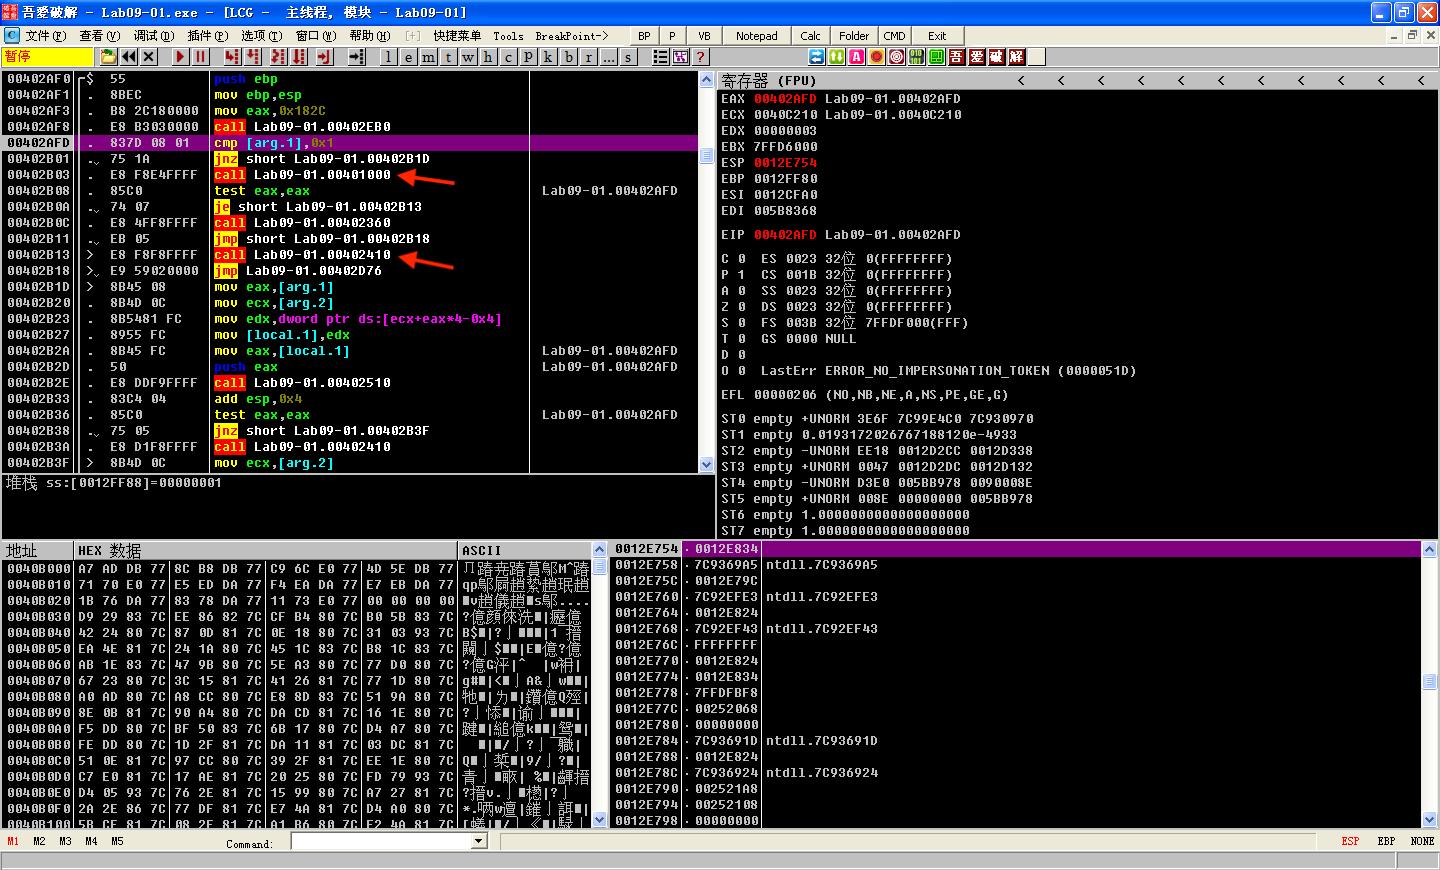
F7 step-into call Lab09-01.00401000:

The function at 0x402410 uses GetModuleFilenameA to get the path of the current executable and builds the ASCII string /c del path-to-executable >> NUL. Figure 9-1L shows an instance of the string in the registers window of OllyDbg. Note that the contents of EDX are 0x12E648, but OllyDbg correctly interprets this as a pointer to an ASCII string. The malware attempts to delete itself from the disk by combining the constructed string with program cmd.exe in a call to ShellExecuteA. Fortunately, we have the file open in OllyDbg, so Windows does not allow the file to be deleted. This behavior is consistent with what we saw during basic dynamic analysis of the sample in the Chapter 3 labs.
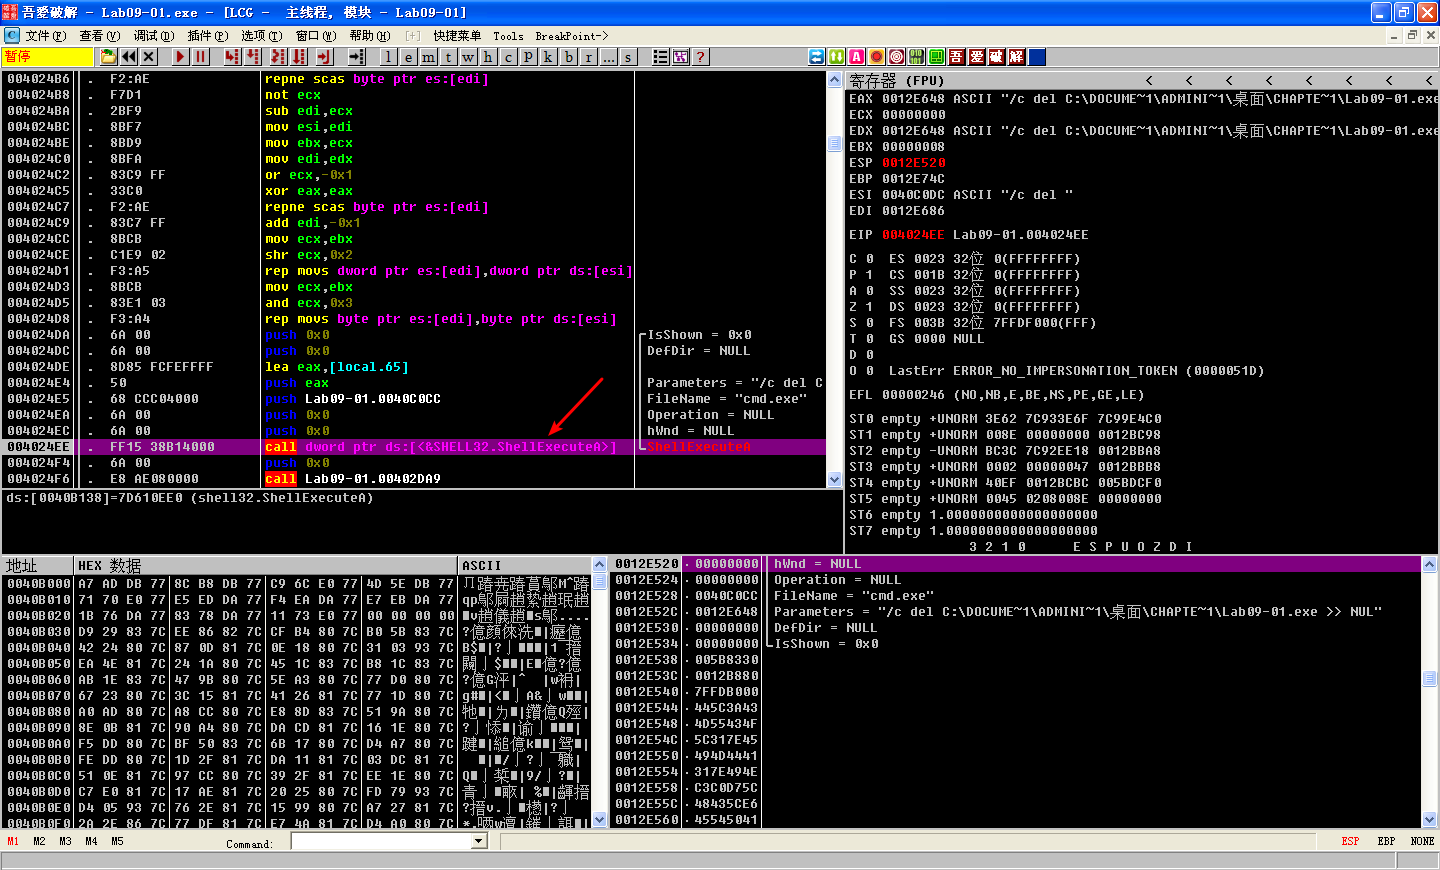

Figure 9-1L: The malware prepares to delete itself, as seen in the string pointer to EDX
Our next task is to coerce the malware to run properly. We have at least two options: we can provide more command-line arguments to satisfy the check at address 0x402AFD, or we can modify the code path that checks for the registry keys. Modifying the code path may have unintended effects. Later instructions can depend on information stored in these keys, and if that information is changed, the malware could fail to execute. Let’s try providing more command-line arguments first, to avoid potential issues.
Choose any entry from the strings listing, such as -in, and use it as a command-line argument to test whether the malware does something interesting. To do this, choose Debug -> Arguments, as shown in Figure 9-2L. Then add the -in argument in the OllyDbg arguments dialog, as shown in Figure 9-3L.
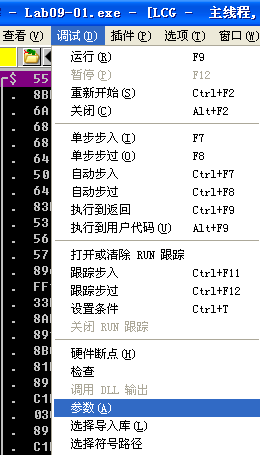
Figure 9-2L: Choosing to debug arguments
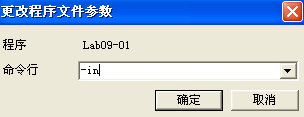
Figure 9-3L: Adding the -in argument
When the malware is executed with the argument -in, it still tries to delete itself, which tells us that the command-line arguments are not yet valid. Let’s use OllyDbg to step through the code flow when we give the malware a parameter to see what’s happening.

Listing 9-1L: Function setup and argc comparison
We see that after checking a command-line parameter, execution takes the jump at 0x402B01. argc, the number of string arguments passed to the program, is found 8 bytes above the frame pointer \({\color{red}1}\), since it is the first argument to the main function.
At 0x402B2E, the last command-line argument is passed into the function that starts at address 0x402510. We know it is the last argument because the main function of a standard C program takes two parameters: argc, the number of command-line parameters, and argv, an array of pointers to the command-line parameters. EAX contains argc, and ECX contains argv, as shown in Listing 9-2L at \({\color{red}1}\) and \({\color{red}2}\). The instruction at \({\color{red}3}\) performs pointer arithmetic to select the last element in the array of command-line parameters. This pointer ends up in EAX, and is pushed onto the top of the stack prior to the function call.

The basic disassembly view provided by OllyDbg gives a rough overview of the function that starts at address 0x402510. There are no function calls, but by scanning the instructions, we see the use of the arithmetic operations ADD, SUB, MUL, and XOR on byte-sized operands, such as at addresses 0x402532 through 0x402539. It looks like this routine does a sanity check of the input using a convoluted, hard-coded algorithm. Most likely the input is some type of password or code.

NOTE
If you perform a full analysis of 0x4025120, you can determine that the password is abcd. You will be equally successful using the password or the patch method we explain next.
Rather than reversing the algorithm, we patch the binary so that the password check function at 0x402510 will always return the value associated with a successful check. This will allow us to continue analyzing the meat of the malware. We note that there is an inline function call to strlen at addresses 0x40251B through 0x402521. If the argument fails this check, EAX is zeroed out, and execution resumes at the function cleanup at 0x4025A0. Further reversing reveals that only the correct argument will cause the function to return the value 1, but we’ll patch it so that it returns 1 in all cases, regardless of the argument. To do this, we insert the instructions shown in Listing 9-3L.
B8 01 00 00         MOV EAX, 0x1
C3                  RET
Listing 9-3L: Patch code for the password check
We assemble these instructions using the Assemble option in OllyDbg and get the 6-byte sequence: B8 01 00 00 00 C3. Because the CALL instruction prepares the stack, and the RET instruction cleans it up, we can overwrite the instructions at the very beginning of the password check function, at address 0x402510. Edit the instructions by right-clicking the start address you wish to edit and selecting Binary
Lab 9-1的更多相关文章
- MIT 6.828 JOS学习笔记18. Lab 3.2 Part B: Page Faults, Breakpoints Exceptions, and System Calls
现在你的操作系统内核已经具备一定的异常处理能力了,在这部分实验中,我们将会进一步完善它,使它能够处理不同类型的中断/异常. Handling Page Fault 缺页中断是一个非常重要的中断,因为我 ...
- MIT 6.828 JOS学习笔记17. Lab 3.1 Part A User Environments
Introduction 在这个实验中,我们将实现操作系统的一些基本功能,来实现用户环境下的进程的正常运行.你将会加强JOS内核的功能,为它增添一些重要的数据结构,用来记录用户进程环境的一些信息:创建 ...
- MIT 6.828 JOS学习笔记16. Lab 2.2
Part 3 Kernel Address Space JOS把32位线性地址虚拟空间划分成两个部分.其中用户环境(进程运行环境)通常占据低地址的那部分,叫用户地址空间.而操作系统内核总是占据高地址的 ...
- MIT 6.828 JOS学习笔记15. Lab 2.1
Lab 2: Memory Management lab2中多出来的几个文件: inc/memlayout.h kern/pmap.c kern/pmap.h kern/kclock.h kern/k ...
- MIT 6.828 JOS学习笔记10. Lab 1 Part 3: The kernel
Lab 1 Part 3: The kernel 现在我们将开始具体讨论一下JOS内核了.就像boot loader一样,内核开始的时候也是一些汇编语句,用于设置一些东西,来保证C语言的程序能够正确的 ...
- MIT 6.828 JOS学习笔记7. Lab 1 Part 2.2: The Boot Loader
Lab 1 Part 2 The Boot Loader Loading the Kernel 我们现在可以进一步的讨论一下boot loader中的C语言的部分,即boot/main.c.但是在我们 ...
- python opencv 利用Lab空间把春天的场景改为秋天
前一段时间实现了Reinhard颜色迁移算法,感觉挺有意思的,然后在代码上随意做了一些更改,有了一些发现,把Lab通道的a通道值改为127左右,可以将绿色改为黄色,而对其他颜色的改动非常小,因此可以将 ...
- Acadia Lab 228 + Lab 222
又是一对串烧实验,布好线后非常方便就可以一起完成. 连线方案一模一样: Lab 228 数码管骰子 核心代码如下: def loop() : global cnt global btn_read,se ...
- Acadia Lab 203 + Lab 231
在做完 Lab 6 之后,惊觉选做实验缺口很大,于是遍历了一遍夏任务,找到了一条最省力的路线. 做完 Lab 6 的连线不用拆,可以接下来做以下两个实验: Lab 203 网络时钟 核心代码如下: v ...
- GJM : 【技术干货】给The Lab Renderer for Unity中地形添加阴影
感谢您的阅读.喜欢的.有用的就请大哥大嫂们高抬贵手"推荐一下"吧!你的精神支持是博主强大的写作动力以及转载收藏动力.欢迎转载! 版权声明:本文原创发表于 [请点击连接前往] ,未经 ...
随机推荐
- [Day15]常用API(Object类、String类)
1.Java的API(API: Application(应用) Programming(程序) Interface(接口)) Java API是JDK中提供使用的类,类已经将底层代码进行封装 在JDK ...
- jdbc--取大量数据
最近使用jdbc方式查询数据,保存为csv文件中.当然你可以在pl/sql中直接查出来,copy to excel就好了.但我想通过程序实现 @Test public void test() thro ...
- sql server创建windows账户
--不要干坏事 sql server中使用xp_cmdshell --1.允许配置高级选项 GO RECONFIGURE GO --2.开启xp_cmdshell服务 RECONFIGURE GO - ...
- NLP:Gensim库之word2vec
Gensim是一款开源的第三方Python工具包,用于从原始的非结构化的文本中,无监督地学习到文本隐层的主题向量表达.它支持包括TF-IDF,LSA,LDA,和word2vec在内的多种主题模型算法, ...
- POJ 3080 Blue Jeans(Java暴力)
Blue Jeans [题目链接]Blue Jeans [题目类型]Java暴力 &题意: 就是求k个长度为60的字符串的最长连续公共子串,2<=k<=10 规定: 1. 最长公共 ...
- Tensorflow serving with Kubernetes
1.Build docker image 由于自己build镜像总是遇到问题,此处暂时借用dockerhub上的一个镜像 docker.io/mochin/tensorflow-serving 将此镜 ...
- SQL Server 2012安装时报错,错误 0x80070422怎么解决?解决方法。
步骤一: Win+R打开运行窗口,输入services.msc 打开服务窗口 步骤二: 找到并启用"Windows Update" 成功进入下一步!
- Linux-Centos7 安装图形界面
1.首先安装X(X Window System),命令为 :yum groupinstall "X Window System" 回车(注意有引号) 2.查看桌面列表 : yum ...
- spring mvc 的上传图片是怎么实现的?
spring mvc 的上传图片是怎么实现的? 导入jar包,commons-io.jar 及 commons-fileupload.jar 在springmvc的配置文件中配置Mutipart解析器 ...
- koa2 中 cookie 存在的中文问题
koa2 中的 cookie 没办法直接设置中文,会报错 ‘ argument value is invalid ’ 解决办法: 先将它转成 ‘ base64 ’ 编码来存储 new Buffer( ...
