Centosphp安装cassandra扩展
一、准备
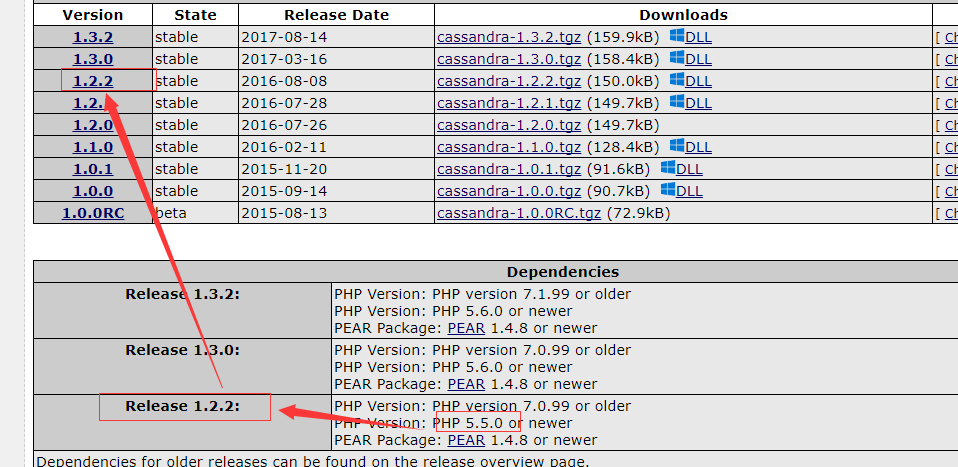
当前php版本PHP Version 5.5.10,首先去http://pecl.php.net/package/cassandra,找到对应的php版本

二、下载安装
# wget http://101.110.118.47/pecl.php.net/get/cassandra-1.2.1.tgz
# tar -zxvf cassandra-1.2..tgz
# cd cassandra-1.2.1
# /usr/local/php/bin/phpize
# ./configure
遇到的一系列报错
报错①:checking for supported DataStax C/C++ driver version... gawk: cmd. line:1: fatal: cannot open file `/include/cassandra.h' for reading (No such file or directory)
checking for supported DataStax C/C++ driver version... gawk: cmd. line:: fatal: cannot open file `/include/cassandra.h' for reading (No such file or directory)
解决:需要安装cpp的drive
当前所在目录/usr/local/src下执行以下命令
# git clone https://github.com/datastax/cpp-driver.git

# mkdir cpp-driver/build

# cd cpp-driver/build

# cmake ..

# make
报错②:configure: error: Unable to load libuv
configure: error: Unable to load libuv
解决:
# wget https://github.com/libuv/libuv/archive/ v1.4.2.tar.gz

# tar -zxvf v1.4.2.tar.gz

# cd /usr/local/src/libuv-1.4.

# sh autogen.sh

# ./configure

# make

# make install
报错③:/usr/include/gnu/stubs.h:7:27: error: gnu/stubs-32.h:No such file or directory
/usr/include/gnu/stubs.h::: error: gnu/stubs-.h:No such file or directory
解决:
# yum -y install glibc-devel.i686
报错④: WARNING: You will need re2c 0.13.4 or later if you want to regenerate PHP parsers.
WARNING: You will need re2c 0.13. or later if you want to regenerate PHP parsers.
解决:
https://blog.csdn.net/a454213722/article/details/51866100
报错⑤:/usr/local/src/cpp-driver/src/event_loop.cpp:63: error: ‘uv_print_all_handles’ was not declared in this scope
/usr/local/src/cpp-driver/src/event_loop.cpp:: error: ‘uv_print_all_handles’ was not declared in this scope
解决:百度、360、必应、谷歌都走了,出现类似错误的很多(was not declared in this scope),但是没有一个完全对应的解决方案,反正意思就是函数不存在。
简单粗暴,编辑/usr/local/src/cpp-driver/src/event_loop.cpp:63文件
# vim  /usr/local/src/cpp-driver/src/event_loop.cpp

//然后找到63行,把整行删掉    // uv_print_all_handles(loop(), stderr);

把一系列问题解决之后,在当前目录下/usr/local/src/cassandra-1.2.2
# make

# make install
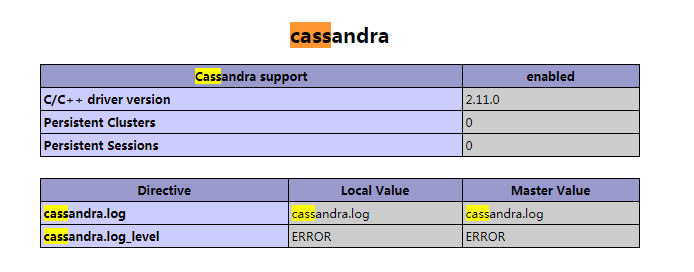
Installing shared extensions: /usr/local/php/lib/php/extensions/no-debug-non-zts-/ //ok,然后在php.ini里开启cassandra扩展就可以了
编辑php.ini文件
#vim /usr/local/php/etc/php.ini

//增加

extension=cassandra.so
然后重启php服务
意外!!!!意外!!!!TMD~~~
报错⑥:
NOTICE: PHP message: PHP Warning: PHP Startup: Unable to load dynamic library '/usr/local/php/lib/php/extensions/no-debug-non-zts-20121212/cassandra.so' - libcassandra.so.2: cannot open shared object file: No such file or directory in Unknown on line 0
NOTICE: PHP message: PHP Warning: PHP Startup: Unable to load dynamic library '/usr/local/php/lib/php/extensions/no-debug-non-zts-20121212/cassandra.so' - libcassandra.so.: cannot open shared object file: No such file or directory in Unknown on line
TMD明明目录下有cassandra.so文件,可TMD说没有。。。
解决:
百度到一个帖子说:这个问题是缺少/usr/local/lib64/libcassandra.so.2文件,经查找发现/usr/lib64/libcassandra.so.2存在,创建软件接至lib64中
ln -s /usr/local/lib64/libcassandra.so. /usr/lib64/libcassandra.so.
提示⑦:
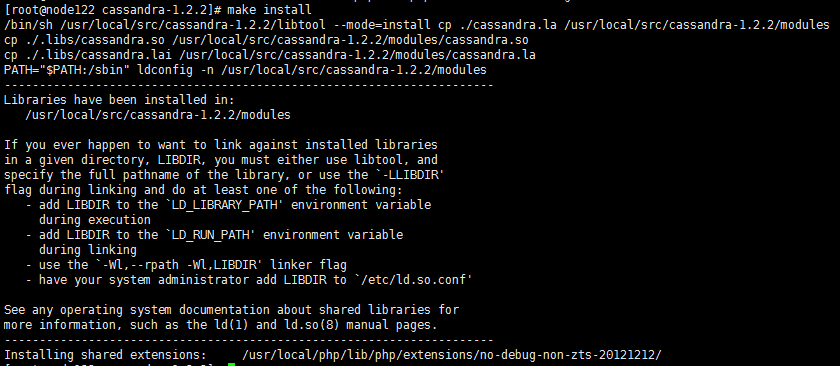
在make install的时候还报过这玩意儿?????
/bin/sh /usr/local/src/cassandra-1.2.2/libtool --mode=install cp ./cassandra.la /usr/local/src/cassandra-1.2.2/modules
cp ./.libs/cassandra.so /usr/local/src/cassandra-1.2.2/modules/cassandra.so
cp ./.libs/cassandra.lai /usr/local/src/cassandra-1.2.2/modules/cassandra.la
PATH="$PATH:/sbin" ldconfig -n /usr/local/src/cassandra-1.2.2/modules
----------------------------------------------------------------------
Libraries have been installed in:
/usr/local/src/cassandra-1.2.2/modules
If you ever happen to want to link against installed libraries
in a given directory, LIBDIR, you must either use libtool, and
specify the full pathname of the library, or use the `-LLIBDIR'
flag during linking and do at least one of the following:
- add LIBDIR to the `LD_LIBRARY_PATH' environment variable
during execution
- add LIBDIR to the `LD_RUN_PATH' environment variable
during linking
- use the `-Wl,--rpath -Wl,LIBDIR' linker flag
- have your system administrator add LIBDIR to `/etc/ld.so.conf'
See any operating system documentation about shared libraries for
more information, such as the ld(1) and ld.so(8) manual pages.
----------------------------------------------------------------------
Installing shared extensions: /usr/local/php/lib/php/extensions/no-debug-non-zts-20121212/

/bin/sh /usr/local/src/cassandra-1.2./libtool --mode=install cp ./cassandra.la /usr/local/src/cassandra-1.2./modules

cp ./.libs/cassandra.so /usr/local/src/cassandra-1.2./modules/cassandra.so

cp ./.libs/cassandra.lai /usr/local/src/cassandra-1.2./modules/cassandra.la

PATH="$PATH:/sbin" ldconfig -n /usr/local/src/cassandra-1.2./modules

----------------------------------------------------------------------

Libraries have been installed in:

   /usr/local/src/cassandra-1.2./modules

If you ever happen to want to link against installed libraries

in a given directory, LIBDIR, you must either use libtool, and

specify the full pathname of the library, or use the `-LLIBDIR'

flag during linking and do at least one of the following:

   - add LIBDIR to the `LD_LIBRARY_PATH' environment variable

     during execution

   - add LIBDIR to the `LD_RUN_PATH' environment variable

     during linking

   - use the `-Wl,--rpath -Wl,LIBDIR' linker flag

   - have your system administrator add LIBDIR to `/etc/ld.so.conf'

See any operating system documentation about shared libraries for

more information, such as the ld() and ld.so() manual pages.

----------------------------------------------------------------------

Installing shared extensions:     /usr/local/php/lib/php/extensions/no-debug-non-zts-/
在SF看到的答案:
这是告诉你接下来要怎么用。简单的办法是在 /etc/ld.so.conf.d 下新建一个文件 local.conf,里边写上 /usr/local/lib。然后以 root 权限执行 ldconfig。这样你的系统才会找得到安装到 /usr/local/lib 下的库文件
# echo "/usr/local/lib" >> /etc/ld.so.conf

# /usr/local/lib/ldconfig

Centosphp安装cassandra扩展的更多相关文章
- pecl 轻松安装php扩展
PECL 的全称是 The PHP Extension Community Library ,是一个开放的并通过 PEAR(PHP Extension and Application Reposito ...
- 编译安装PHP7并安装Redis扩展Swoole扩展
编译安装PHP7并安装Redis扩展Swoole扩展 在编译php7的机器上已经有编译安装过php5.3以上的版本,从而依赖库都有了 本php7是编译成fpm-php 使用的, 如果是apache那么 ...
- 使用phpize安装php扩展
环境: CentOs 6.3 php 7 nginx 举例: 安装ssh2扩展 1.登陆http://pecl.php.net,搜索ssh2,如下图所示,注意版本的选择要根据php的版本来 2.下载s ...
- centos下安装php扩展php-memcached
说来坎坷,为了安装这个php的扩展php-memcached,连操作系统都换了,从centos5.5升级到了centos6.8!! centos5.5中在安装php扩展php-memcached的依赖 ...
- 如何正确使用 Composer 安装 Laravel 扩展包
我们经常要往现有的项目中添加扩展包,有时候因为文档的错误引导,如下图来自 这个文档 的: composer update 这个命令在我们现在的逻辑中,可能会对项目造成巨大伤害. 因为 composer ...
- win10 64位安装memcache扩展和开启redis扩展
前面有关于win10下搭建wamp环境的介绍,在此不在赘述,php操作memcache有memcache库和memcached库,其中memcache是php内置的扩展库,支持面向对象和面向过程两种操 ...
- Linux下,如何给PHP安装pdo_mysql扩展
下载了一个免费开源的广告系统(openadserver),在Linux上安装时,提示要安装 pdo_mysql 扩展,先前有过编译安装 soap扩展 的经历,今天要编译安装 pdo_mysql 扩展, ...
- [Linux][PHP]安装swoole扩展
1.下载swoole 2.解压并配置 /usr/local/php/bin/phpize ./configure --enable-swoole-debug --enable-sockets --en ...
- lnmp---------------lnmp1.3-full安装包安装lnmp环境,如何安装PHP扩展
1. 如果已经安装LNMP套件,请按以下步骤处理 a. 跳转到fileinfo源代码目录` cd /root/downloads/lnmp1.2-full/src/php-7.0.7/ext/file ...
随机推荐
- 使用AS-REP Roasting和kerberoasting攻击kerberos
准备工作 ''' PowerView是PowerSploit框架的一个子集,里面继承了很多和渗透相关的powershell脚本下载地址:https://github.com/PowerShellMaf ...
- plsql中文乱码
一.关于PLSQL无法正确显示中文 刚才下载安装了PLSQL Developer 9.0.0.1601 汉化绿色版,执行SQL查询语句,发现显示的数据中只要有中文都会以?表示. 原因:客户端跟服务器的 ...
- 将 Entity Framework、LINQ 和 Model-First 用于 Oracle 数据库
目的 本教程介绍如何使用 Entity Framework.语言集成查询 (LINQ),以及如何对 Oracle 数据库使用 Model-First 以生成数据定义语言 (DDL) 脚本. 所需时间 ...
- Ubuntu 安装 JDK8
安装python-software-properties $sudo apt-get install python-software-properties $sudo apt-get install ...
- html table 固定表头和列
/**************************************************************** jQuery 插件. 功能: 固定表格标题行或列头 Version: ...
- java Api 读取HDFS文件内容
package dao; import org.apache.hadoop.conf.Configuration; import org.apache.hadoop.fs.*; import java ...
- 项目实战02:LVS 实现负载均衡
目录 实现基于LVS负载均衡集群的电商网站架构 实战一:LVS的NAT模式实现负载均衡 实战二:LVS的DR 模式实现负载均衡 实战三:实现80.443端口都可访问服务,且LVS实现持久连接 实验四: ...
- 全文索引&&地理空间索引
Ⅰ.全文索引 搜索引擎的实现核心技术,搜索类似where col like '%xxx%';关键字可以出现再某个列任何位置 这种查询条件,B+ tree索引是无法使用的.如果col上创建了索引,因为排 ...
- PHP计算年龄
<?php $birthday = strtotime('1992-10-03'); $time = time();//2019-03-14; function datediffage($bir ...
- Oracle对于敏感数据的处理,可以采用策略(dbms_rls.add_policy)
Oracle Policy的简单说明: Policy应用于数据行访问权限控制时,其作用简而言之,就是在查询数据表时,自动在查询结果上加上一个Where子句.假如该查询已有where子句,则在该Wher ...
