EntityFramework Code-First 简易教程(七)-------领域类配置之Fluent API
Fluent API配置:
前面我们已经了解到使用DataAnotations特性来覆写Code-First默认约定,现在我们来学习Fluent API。
Fluent API是另一种配置领域类的方法,它比DataAnnotations特性提供更多的配置方法,下表是Fluent API支持的类型映射。
| 映射种类 | 配置数据库 |
|---|---|
| 模型(Model-wide)映射 |
|
| 实体(Entity)映射 |
|
| 属性(Property)映射 |
|
下面,我们开始使用Fluent API来配置领域类。
我们首先创建Student和Standard两个领域类,同样也创建出DbContext类,DbContext类中有个OnModelCreating方法,这里我们在它的继承类中把它覆写出来。
代码如下:
public class SchoolContext: DbContext

{

    public SchoolDBContext(): base()

    {

    }

    public DbSet<Student> Students { get; set; }

    public DbSet<Standard> Standards { get; set; }

    protected override void OnModelCreating(DbModelBuilder modelBuilder)

    {

        //Configure domain classes using modelBuilder here

        base.OnModelCreating(modelBuilder);

    }

}
使用Fluent API配置领域类时,所有的配置代码都要写在OnModelCreating方法里面,所有的领域类都可以在这个方法里面写上他们的初始化代码。程序初始化的时候,DataAnnotation和Fluent API的优先级是:Fluent API > DataAnnotations > 默认约定。
DbModelBuilder类包含了重要的用于配置的属性和方法,更多详情请翻阅MSDN文档。
接下来我们详细讲一些常用的Fluent API配置方法。
一、EntityTypeConfiguration类:
EntityTypeConfiguration类在Fluent API中有着重要的作用,它提供了一系列重要的方法和属性来覆写默认约定。
EntityTypeConfiguration类可以运行DbModelBuilder类的Entity<TEntity>()方法获得,如下所示:

EntityTypeConfiguration有下面这些重要的方法:
| 方法名 | 返回类型 | 描述 |
|---|---|---|
| HasKey<TKey> | EntityTypeConfiguration | 为这个实体类型配置主键 |
| HasMany<TTargetEntity> | ManyNavigationPropertyConfiguration | 为实体类型配置多对多关系 |
| HasOptional<TTargetEntity> | OptionalNavigationPropertyConfiguration |
为实体类配置可选关系。没有指定关系的实体类型的实例会被存入数据库。数据库里外键可为空(nullable)。 |
| HasRequired<TTargetEntity> | RequiredNavigationPropertyConfiguration |
为实体类型配置必须关系。除非关系确定,否则实体类型的实例不能存入数据库。数据库中的外键将不能为空(non-nullable)。 |
| Ignore<TProperty> | Void |
从模型中排除一个属性,这个属性将不会映射到数据库。 |
| Map | EntityTypeConfiguration |
允许高级配置有关该实体类型映射到数据库模式。 |
| Property<T> | StructuralTypeConfiguration |
配置一个定义了这种类型的结构属性 |
| ToTable | Void |
配置实体类型映射的表名 |
可以访问MSDN查询更多关于 EntityTypeConfiguration 类的信息。
下面介绍怎么用Fluent API配置实体类
二、Entity Mappings:
我们继续使用在学校应用里面的Student和Standard两个领域类
代码如下:
public class Student

{

    public Student()

    {

    }

    public int StudentID { get; set; }

    public string StudentName { get; set; }

    public DateTime? DateOfBirth { get; set; }

    public byte[]  Photo { get; set; }

    public decimal Height { get; set; }

    public float Weight { get; set; }

    public Standard Standard { get; set; }

}

public class Standard

{

    public Standard()

    {

    }

    public int StandardId { get; set; }

    public string StandardName { get; set; }

    public ICollection<Student> Students { get; set; }

    }

}
配置默认架构:
当我们想为一组特殊的表设置一个不同的构架时,可以使用HasDefaultSchema方法:
public class SchoolContext: DbContext

{

    public SchoolDBContext(): base()

    {

    }

    public DbSet<Student> Students { get; set; }

    public DbSet<Standard> Standards { get; set; }

    protected override void OnModelCreating(DbModelBuilder modelBuilder)

    {

        //Configure default schema

        modelBuilder.HasDefaultSchema("Admin");

    }

}
映射实体到表:
Code-First将会为context类中的所有DbSet属性创建数据库表,表名就是属性名,比如上面的Students和Standards。我们也可以给表配置一个不同于DbSet属性名的表名,如下代码所示:
namespace CodeFirst_FluentAPI_Tutorials

{

    public class SchoolContext: DbContext

    {

        public SchoolDBContext(): base()

        {

        }

        public DbSet<Student> Students { get; set; }

        public DbSet<Standard> Standards { get; set; }

        protected override void OnModelCreating(DbModelBuilder modelBuilder)

        {

                //Configure default schema

            modelBuilder.HasDefaultSchema("Admin");

            //Map entity to table

            modelBuilder.Entity<Student>().ToTable("StudentInfo");

            modelBuilder.Entity<Standard>().ToTable("StandardInfo","dbo");

        }

    }

}
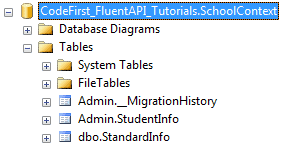
如上代码,我们配置表名的ToTable方法是接在Entity<TEntity>()方法后面,上面代码已经把映射Student实体的表名改成StudentInfo,把映射Standard实体的表名改成了StandardInfo,特别留意的是,虽然我们把默认的架构名改成了Admin,但是Standard实体又特别指定了dbo架构,所以生成的数据库如下所示:
映射实体到多张表:
下面的代码演示了怎样把Student实体映射到数据库的多张表:
namespace CodeFirst_FluentAPI_Tutorials

{

    public class SchoolContext: DbContext

    {

        public SchoolDBContext(): base()

        {

        }

        public DbSet<Student> Students { get; set; }

        public DbSet<Standard> Standards { get; set; }

        protected override void OnModelCreating(DbModelBuilder modelBuilder)

        {

            modelBuilder.Entity<Student>().Map(m =>

            {

                m.Properties(p => new { p.StudentId, p.StudentName});

                m.ToTable("StudentInfo");

            }).Map(m => {

                m.Properties(p => new { p.StudentId, p.Height, p.Weight, p.Photo, p.DateOfBirth});

                m.ToTable("StudentInfoDetail");

            });

            modelBuilder.Entity<Standard>().ToTable("StandardInfo");

        }

    }

}
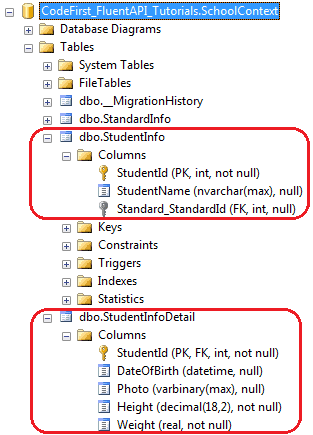
如上所示,使用Map()方法可以映射Student实体的一些属性到StudentInfo表中,另一些属性到StudentInfoDetail表中,我们把Student实体分裂成了两张表,生成的数据库如下所示:
Map method need the delegate method as a parameter. You can pass or in Map method, as shown below.
Map方法的传入参数是一个委托,具体可以参考 Action delegate 和 lambda expression。
完成代码如下:
using System.Data.Entity.ModelConfiguration.Configuration;

namespace CodeFirst_FluentAPI_Tutorials

{

    public class SchoolContext: DbContext

    {

        public SchoolDBContext(): base()

        {

        }

        public DbSet<Student> Students { get; set; }

        public DbSet<Standard> Standards { get; set; }

        protected override void OnModelCreating(DbModelBuilder modelBuilder)

        {

            modelBuilder.Entity<Student>().Map(delegate(EntityMappingConfiguration<Student> studentConfig)

            {

                studentConfig.Properties(p => new { p.StudentId, p.StudentName });

                studentConfig.ToTable("StudentInfo");

            });

            Action<EntityMappingConfiguration<Student>> studentMapping = m =>

            {

                m.Properties(p => new { p.StudentId, p.Height, p.Weight, p.Photo, p.DateOfBirth });

                m.ToTable("StudentInfoDetail");

            };

            modelBuilder.Entity<Student>().Map(studentMapping);

            modelBuilder.Entity<Standard>().ToTable("StandardInfo");

        }

    }

}
三、Property Mappings:
下面我们来介绍怎样用Fluent API配置实体类的属性
我们仍然使用学校的例子,如下两个Student和Standard领域类:
public class Student

{

    public Student()

    {

    }

    public int StudentKey { get; set; }

    public string StudentName { get; set; }

    public DateTime DateOfBirth { get; set; }

    public byte[]  Photo { get; set; }

    public decimal Height { get; set; }

    public float Weight { get; set; }

    public Standard Standard { get; set; }

}

public class Standard

{

    public Standard()

    {

    }

    public int StandardKey { get; set; }

    public string StandardName { get; set; }

    public ICollection<Student> Students { get; set; }

    }

}
配置主键和混合主键:
上面的两个领域类,不能依据Code-First默认约定生成主键,因为它们没有Id或者{类名}+Id的属性,所以这里使用EntityTypeConfiguration类里的HasHey()方法来创建主键。
注意,modelBuilder.Entity<TEntity>()返回的是EntityTypeConfiguration对象。
public class SchoolContext: DbContext

{

    public SchoolDBContext(): base()

    {

    }

    public DbSet<Student> Students { get; set; }

    public DbSet<Standard> Standards { get; set; }

    protected override void OnModelCreating(DbModelBuilder modelBuilder)

    {

        //Configure primary key

        modelBuilder.Entity<Student>().HasKey<int>(s => s.StudentKey);

        modelBuilder.Entity<Standard>().HasKey<int>(s => s.StandardKey);

        //Configure composite primary key

        modelBuilder.Entity<Student>().HasKey<int>(s => new { s.StudentKey, s.StudentName });

    }

}
配置列名、数据类型和排序:
Code-First默认约定以属性名为列名,下面的代码覆写了这一约定:
public class SchoolContext: DbContext

{

    public SchoolDBContext(): base()

    {

    }

    public DbSet<Student> Students { get; set; }

    public DbSet<Standard> Standards { get; set; }

    protected override void OnModelCreating(DbModelBuilder modelBuilder)

    {

        //Configure Column

        modelBuilder.Entity<Student>()

                    .Property(p => p.DateOfBirth)

                    .HasColumnName("DoB")

                    .HasColumnOrder()

                    .HasColumnType("datetime2");

    }

}
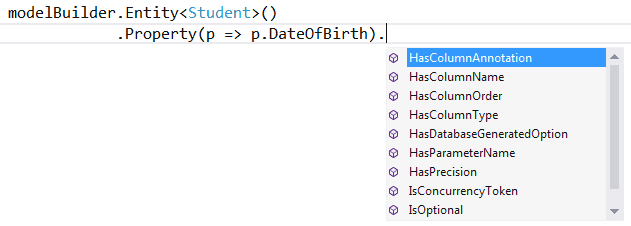
如上所示,我们使用一个实体的Property()方法来配置列名、排序和数据类型
modelBuilder.Entity<TEntity>().Property(expression) 可以使用不同的方法来配置特别的属性,如下图所示:
为属性配置可空或不为空的列:
Code-First将为主键的数据类型创建一个不为空的值,因为主键本身就不能为空,除非它的属性上使用了?号或者标记了Nullable<T>。
使用IsOptional方法可以创建一个可为空的列,同样,使用IsRequired也可以创建一个不为空的列。
namespace CodeFirst_FluentAPI_Tutorials

{

    public class SchoolContext: DbContext

    {

        public SchoolDBContext(): base()

        {

        }

        public DbSet<Student> Students { get; set; }

        public DbSet<Standard> Standards { get; set; }

        protected override void OnModelCreating(DbModelBuilder modelBuilder)

        {

                //Configure Null Column

            modelBuilder.Entity<Student>()

                    .Property(p => p.Heigth)

                    .IsOptional();

                //Configure NotNull Column

                modelBuilder.Entity<Student>()

                    .Property(p => p.Weight)

                    .IsRequired();

        }

    }

}
配置列的大小:
Code-First默认约定是给列创建最大的数据类型大小,用HasMaxLength()方法覆写之。
namespace CodeFirst_FluentAPI_Tutorials

{

    public class SchoolContext: DbContext

    {

        public SchoolDBContext(): base()

        {

        }

        public DbSet<Student> Students { get; set; }

        public DbSet<Standard> Standards { get; set; }

        protected override void OnModelCreating(DbModelBuilder modelBuilder)

        {

            //Set StudentName column size to 50

            modelBuilder.Entity<Student>()

                    .Property(p => p.StudentName)

                    .HasMaxLength();

            //Set StudentName column size to 50 and change datatype to nchar

            //IsFixedLength() change datatype from nvarchar to nchar

            modelBuilder.Entity<Student>()

                    .Property(p => p.StudentName)

                    .HasMaxLength().IsFixedLength();

            //Set size decimal(2,2)

                modelBuilder.Entity<Student>()

                    .Property(p => p.Height)

                    .HasPrecision(, );

        }

    }

}
IsFixedLength方法把列的类型从nvarchar转变为nchar,HasPrecision方法改变了数据类型为decimal列的精度。
配置并发列:
使用ConcurrencyToken方法把一个属性设置为并发列,代码如下:
namespace CodeFirst_FluentAPI_Tutorials

{

    public class SchoolContext: DbContext

    {

        public SchoolDBContext(): base()

        {

        }

        public DbSet<Student> Students { get; set; }

        public DbSet<Standard> Standards { get; set; }

        protected override void OnModelCreating(DbModelBuilder modelBuilder)

        {

            //Set StudentName as concurrency column

            modelBuilder.Entity<Student>()

                    .Property(p => p.StudentName)

                    .IsConcurrencyToken();

        }

    }

}
如上代码所示,StudentName被设置成为了并发列,每当update和delete操作的时候都会把StudentName中的值加入到SQL语句中的"where"子句中。
对于byte[]类型的属性,我们也可以用IsRowVersion()方法来将其配置成并发列。
到此,Fluent API的主要内容就讲的差不多了,下面开始会讲一对一,一对多,多对多的领域类配置,和数据库迁移等。
EntityFramework Code-First 简易教程(七)-------领域类配置之Fluent API的更多相关文章
- EntityFramework Code-First 简易教程(六)-------领域类配置之DataAnnotations
EF Code-First提供了一个可以用在领域类或其属性上的DataAnnotation特性集合,DataAnnotation特性会覆盖默认的EF约定. DataAnnotation存在于两个命名空 ...
- EntityFramework Code-First 简易教程(五)-------领域类配置
前言:在前篇中,总是把领域类(Domain Class)翻译成模型类,因为我的理解它就是一个现实对象的抽象模型,不知道对不对.以防止将来可能的歧义,这篇开始还是直接对Domain Class直译. 前 ...
- Entity Frame Code First 简易教程
简介 什么是ORM 搭建Entity FrameWork CodeFirst应用 数据库迁移 表属性常见配置 Entity FrameWork 一对多.多对多 一.简介 Entity Framewor ...
- EntityFramework Code-First—领域类配置之DataAnnotations
本文出自:https://www.cnblogs.com/tang-tang/p/5510574.html 一.摘要 EF Code-First提供了一个可以用在领域类或其属性上的DataAnnota ...
- WebGL简易教程(七):绘制一个矩形体
目录 1. 概述 2. 示例 2.1. 顶点索引绘制 2.2. MVP矩阵设置 2.2.1. 模型矩阵 2.2.2. 投影矩阵 2.2.3. 视图矩阵 2.2.4. MVP矩阵 3. 结果 4. 参考 ...
- Spring Boot2 系列教程(七)理解自动化配置的原理
Spring Boot 中的自动化配置确实够吸引人,甚至有人说 Spring Boot 让 Java 又一次焕发了生机,这话虽然听着有点夸张,但是不可否认的是,曾经臃肿繁琐的 Spring 配置确实让 ...
- EntityFramework Code-First 简易教程(十一)-------从已存在的数据库中映射出表
怎样从一个已存在的数据库中映射表到 entity 实体? Entity Framework 提供了一个简便方法,可以为已存在的数据库里的所有表和视图创建实体类(entity class),并且可以用 ...
- Dart 语言简易教程系列
google Fuchsia系统 及 dart语言简介 在 InteIIiJ IDEA 中搭建 Dart 的开发环境 Dart Linux 开发环境搭建 Dart 语言简易教程(一) Dart 语言简 ...
- EntityFramework 系列:实体类配置-根据依赖配置关系和关联
EF实体类的配置可以使用数据注释或Fluent API两种方式配置,Fluent API配置的关键在于搞清实体类的依赖关系,按此方法配置,快速高效合理.为了方便理解,我们使用简化的实体A和B以及A.B ...
随机推荐
- [EXP]McAfee ePO 5.9.1 - Registered Executable Local Access Bypass
# Exploit Title: McAfee ePO 5.9.1 Registered Executable Local Access Bypass # Date: 2019-03-07 # Exp ...
- java中String类型与Date日期类型的互相转换
//String格式的数据转化成Date格式,Date格式转化成String格式 SimpleDateFormat formatter= new SimpleDateFormat("yyyy ...
- Python -- queue队列模块
一 简单使用 --内置模块哦 import Queuemyqueue = Queue.Queue(maxsize = 10) Queue.Queue类即是一个队列的同步实现.队列长度可为无限或者有限. ...
- aliyun阿里云Maven仓库配置
maven仓库用过的人都知道,国内有多么的悲催.还好有比较好用的镜像可以使用,尽快记录下来.速度提升100倍. http://maven.aliyun.com/nexus/#view-reposito ...
- Docz 用 MDX 写 React UI 组件文档
Docz 用 MDX 写 React UI 组件文档 前言 为了提升开发效率,创建一套 UI 组件库是一种较为有效的方式之一:可以减少重复工作.提高可复用,所以现在越来越多团队开始创建自己的 UI 组 ...
- 从零开始学 Web 之 Ajax(七)跨域
大家好,这里是「 从零开始学 Web 系列教程 」,并在下列地址同步更新...... github:https://github.com/Daotin/Web 微信公众号:Web前端之巅 博客园:ht ...
- ElasticSearch实战-编码实践
1.概述 前面在<ElasticSearch实战-入门>中给大家分享如何搭建这样一个集群,在完成集群的搭建后,今天给大家分享如何实现对应的业务功能模块,下面是今天的分享内容,目录如下所示: ...
- javascript中 Function.prototype.apply()与Function.prototype.call() 对比详解
Function.prototype.apply()|Function.prototype.call() apply()方法可以在使用一个指定的 this 值和一个参数数组(或类数组对象)的前提下调用 ...
- Spark新手入门——2.Hadoop集群(伪分布模式)安装
主要包括以下三部分,本文为第二部分: 一. Scala环境准备 查看 二. Hadoop集群(伪分布模式)安装 三. Spark集群(standalone模式)安装 查看 Hadoop集群(伪分布模式 ...
- C#生成ZIP压缩包
生成ZIP压缩包C#代码如下: using System; using System.Collections.Generic; using System.Text; using ICSharpCode ...