源码解析之AQS源码解析
要理解Lock首先要理解AQS,而要理解并发类最好的方法是先理解其并发控制量不同值的含义以及该类运作流程,然后配合一步步看源码。
该类有一个重要的控制量是WaitStates,节点的状态值。
/** waitStatus value to indicate thread has cancelled */

static final int CANCELLED =  1;   //该节点被取消了

/** waitStatus value to indicate successor's thread needs unparking */

static final int SIGNAL    = -1;   //该节点后续节点需要被唤醒

/** waitStatus value to indicate thread is waiting on condition */

static final int CONDITION = -2;  //该节点进入了等待队列,即Condition的队列里

/**

 * waitStatus value to indicate the next acquireShared should

 * unconditionally propagate

 */

static final int PROPAGATE = -3;  //共享节点,该节点进锁后会释放锁,。
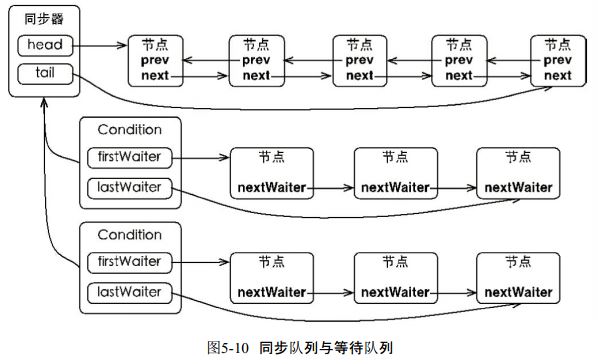
AQS流程图:


Condition与Lock配合:

源码分析:核心方法 aquaire和release及他们方法体里使用到的方法。
public final void acquire(int arg) {

        if (!tryAcquire(arg) &&  //如果tryacquire失败 且 队列里获取节点成功 且被中断过

                acquireQueued(addWaiter(Node.EXCLUSIVE), arg))

            selfInterrupt();//当前线程中断 interrupt()

        //说下中断的事,1、如果在acquireQueued过程线程被interrupt,如果线程没进入等待状态,并不会中断线程。只是改变interrupt变量

        // 且被传回到这里(因为是用interrupted,所以返回true之后又把线程的interrupt变量设为false)。然后selfinterrupt,将interrupt变量设为true。

        // 2、如果线程被park了然后被interrupt,则被唤醒,循环一次发现还是阻塞又进入park等待状态。直到被unpark,interrupt参数为true传回到这里。

        //然后interrupt参数又变回false(受interrupted影响),selfinterrupt则又把它设为true。

    }
private Node addWaiter(Node mode) {//mode表示该节点的共享/排他性,null为排他,不为null为共享

    Node node = new Node(Thread.currentThread(), mode);//将线程加入创建一个新节点

    // Try the fast path of enq; backup to full enq on failure

    Node pred = tail;

    if (pred != null) {//尾节点不为空,新节点连到队列尾部

        node.prev = pred;

        if (compareAndSetTail(pred, node)) {

            pred.next = node;

            return node;

        }

    }

    enq(node);//上一步失败通过enq入队

    return node;

}
    final boolean acquireQueued(final Node node, int arg) {//从队列里尝试获取锁

        boolean failed = true;

        try {

            boolean interrupted = false;

            for (;;) {

                final Node p = node.predecessor();//前节点

                if (p == head && tryAcquire(arg)) {//前节点为头节点,且尝试获取锁获取到了。则清理前节点,

                    setHead(node);                  //head指向现节点

                    p.next = null; // help GC

                    failed = false;

                    return interrupted;

                }

                //shouldParkAfterFailedAcquire如果前节点为-1则返回true,如果0(初始),-3(共享)则设为-1,如果1则

                //  找到前面<-0的节点连他后面

                //parkAndCheckInterrupt 阻塞当前线程,并返回interrupted状态(阻塞则设置失败),并清除中断状态

                if (shouldParkAfterFailedAcquire(p, node) &&//前节点状态为-1 return true

                        parkAndCheckInterrupt()) //中断状态为true  return true

                    interrupted = true;

            }

        } finally {

            if (failed)

                cancelAcquire(node);//节点取消获取,队列中删除节点,

        }

    }
    private static boolean shouldParkAfterFailedAcquire(Node pred, Node node) {//获取失败后判断是否暂停该线程

        int ws = pred.waitStatus;

        if (ws == Node.SIGNAL)//前节点处于当前节点后面的节点需要被唤醒状态

            /*

             * This node has already set status asking a release

             * to signal it, so it can safely park.

             */

            return true;

        if (ws > 0) {//前节点处于取消状态

            /*

             * Predecessor was cancelled. Skip over predecessors and

             * indicate retry.

             */

            do {//当前节点找到前面状态<=0的节点连他后面。

                node.prev = pred = pred.prev;

            } while (pred.waitStatus > 0);

            pred.next = node;

        } else {//如果前节点不处于取消状态,则设为signal -1.(0或-3设为-1)

            /*

             * waitStatus must be 0 or PROPAGATE.  Indicate that we

             * need a signal, but don't park yet.  Caller will need to

             * retry to make sure it cannot acquire before parking.

             */

            compareAndSetWaitStatus(pred, ws, Node.SIGNAL);

        }

        return false;

    }
private final boolean parkAndCheckInterrupt() {

        LockSupport.park(this);//阻塞该线程,至此该线程进入等待状态,等着unpark和interrupt叫醒他

        return Thread.interrupted();//叫醒之后返回该线程是否在中断状态, 并会清除中断记号。

    }
private void cancelAcquire(Node node) {

        // Ignore if node doesn't exist

        if (node == null)

            return;

        node.thread = null;//thread指向null

        // Skip cancelled predecessors

        Node pred = node.prev;//当前节点找到前面status<=0的节点连它后面

        while (pred.waitStatus > 0)

            node.prev = pred = pred.prev;

        // predNext is the apparent node to unsplice. CASes below will

        // fail if not, in which case, we lost race vs another cancel

        // or signal, so no further action is necessary.

        Node predNext = pred.next;

        // Can use unconditional write instead of CAS here.

        // After this atomic step, other Nodes can skip past us.

        // Before, we are free of interference from other threads.

        node.waitStatus = Node.CANCELLED;//status状态设为1 取消状态

        // If we are the tail, remove ourselves.

        if (node == tail && compareAndSetTail(node, pred)) {//节点为末尾,把找到的status<0节点后面节点都切掉

            compareAndSetNext(pred, predNext, null);

        } else {//节点不为末尾,前节点连上当前节点后节点

            // If successor needs signal, try to set pred's next-link

            // so it will get one. Otherwise wake it up to propagate.

            int ws;

            //节点不为末尾,找到status<=0的前节点不是头节点且该节点线程不是null、且status为<=0的前节点状态为-1(不是(-3,0)则设为-1)

            if (pred != head &&

                    ((ws = pred.waitStatus) == Node.SIGNAL ||

                            (ws <= 0 && compareAndSetWaitStatus(pred, ws, Node.SIGNAL))) &&

                    pred.thread != null) {

                Node next = node.next;

                if (next != null && next.waitStatus <= 0)

                    compareAndSetNext(pred, predNext, next);

            } else {//节点不为末尾,status<=0的前节点是头节点 或status<=0的前节点线程为null,

                unparkSuccessor(node);//专门给头节点用的启动继任者函数,只有前status<=0节点是头节点,且

                //现节点后有节点才需unpark后续节点。(因为前节点可能唤醒的是当前线程,如果你删除当前节点

                //不unpark后面节点可能就停止工作。如果你是尾节点,那无所谓,反正你后面也没线程需要unpark)

            }

            node.next = node; // help GC

        }

    }
public final boolean release(int arg) {

    if (tryRelease(arg)) {

        Node h = head;

        if (h != null && h.waitStatus != 0)

            unparkSuccessor(h);//释放操作,启动继任者

        return true;

    }

    return false;

}
    private void unparkSuccessor(Node node) {//启动继任者线程

        /*

         * If status is negative (i.e., possibly needing signal) try

         * to clear in anticipation of signalling.  It is OK if this

         * fails or if status is changed by waiting thread.

         */

        int ws = node.waitStatus;

        if (ws < 0)//-2,-3等待队列或共享锁线程改为0 空白状态

            compareAndSetWaitStatus(node, ws, 0);

        /*

         * Thread to unpark is held in successor, which is normally

         * just the next node.  But if cancelled or apparently null,

         * traverse backwards from tail to find the actual

         * non-cancelled successor.

         */

        Node s = node.next;

        if (s == null || s.waitStatus > 0) {//如果后节点为null或waitstatus>0(线程取消状态)

            s = null;

            for (Node t = tail; t != null && t != node; t = t.prev)//找到节点后面status<=0的节点启动它

                if (t.waitStatus <= 0)

                    s = t;

        }

        if (s != null)

            LockSupport.unpark(s.thread);

    }
源码解析之AQS源码解析的更多相关文章
- 并发编程之:AQS源码解析
大家好,我是小黑,一个在互联网苟且偷生的农民工. 在Java并发编程中,经常会用到锁,除了Synchronized这个JDK关键字以外,还有Lock接口下面的各种锁实现,如重入锁ReentrantLo ...
- 浩哥解析MyBatis源码(十一)——Parsing解析模块之通用标记解析器(GenericTokenParser)与标记处理器(TokenHandler)
原创作品,可以转载,但是请标注出处地址:http://www.cnblogs.com/V1haoge/p/6724223.html 1.回顾 上面的几篇解析了类型模块,在MyBatis中类型模块包含的 ...
- JAVA常用集合源码解析系列-ArrayList源码解析(基于JDK8)
文章系作者原创,如有转载请注明出处,如有雷同,那就雷同吧~(who care!) 一.写在前面 这是源码分析计划的第一篇,博主准备把一些常用的集合源码过一遍,比如:ArrayList.HashMap及 ...
- Spring源码情操陶冶-自定义节点的解析
本文承接前文Spring源码情操陶冶-DefaultBeanDefinitionDocumentReader#parseBeanDefinitions,特开辟出一块新地来啃啃这块有意思的骨头 自定义节 ...
- Spring源码情操陶冶-ComponentScanBeanDefinitionParser文件扫描解析器
承接前文Spring源码情操陶冶-自定义节点的解析,本文讲述spring通过context:component-scan节点干了什么事 ComponentScanBeanDefinitionParse ...
- Spring源码情操陶冶-AnnotationConfigBeanDefinitionParser注解配置解析器
本文承接前文Spring源码情操陶冶-自定义节点的解析,分析spring中的context:annotation-config节点如何被解析 源码概览 对BeanDefinitionParser接口的 ...
- Spring源码情操陶冶-PropertyPlaceholderBeanDefinitionParser注解配置解析器
本文针对spring配置的context:property-placeholder作下简单的分析,承接前文Spring源码情操陶冶-自定义节点的解析 spring配置文件应用 <context: ...
- SpringMVC源码情操陶冶-InterceptorsBeanDefinitionParser拦截器解析器
解析mvc:interceptors节点 观察下InterceptorsBeanDefinitionParser的源码备注 /** * {@link org.springframework.beans ...
- JDK源码及其他框架源码解析随笔地址导航
置顶一篇文章,主要是整理一下写过的JDK中各个类的源码及其他框架源码解析的文章,方便自己随时阅读也方便网友朋友们阅读与指正 基础篇 从为什么String=String谈到StringBuilder和S ...
随机推荐
- js实现表单
<html> <head> <title>表单页面</title> <meta http-equiv="Content- ...
- jQuery基础(二)DOM
DOM节点的创建 jQuery节点创建与属性的处理 创建元素节点: $("<div></div>") 创建为文本节点: $("<div> ...
- dubbo 熔断,限流,降级
1 写在前面 1.1 名词解释 consumer表示服务调用方 provider标示服务提供方,dubbo里面一般就这么讲. 下面的A调用B服务,一般是泛指调用B服务里面的一个接口. 1.2 拓扑图 ...
- SQL 第一范式、第二范式、第三范式、BCNF范式
一.第一范式 1NF 要求:每一个分量必须是不可分的数据项. 特点: 1)有主键,且主键不能为空. 2)字段不能再分. 示例:(以下例子 不满足 第一范式) /*学号 年龄 信 ...
- QThread的一些使用心得
qthread这个类主要用于解决pyqt中多线程的问题,常见用法是将后台代码封装在该类的run()方法中,再对qthread对象执行start()函数来启动线程. 但往往一个业务会有粒度划分,多个粒度 ...
- WPF 选项卡
1.引用 xmlns:xcad="http://schemas.xceed.com/wpf/xaml/avalondock" 2.xaml代码 <xcad:DockingMa ...
- java中拼接两个对象集合
目标: 根据两个list中每条记录的某个属性是否相同来拼接. 1.首先定义一个字符串 String str = "[{\"ITEMID\":2,\"ITEMN ...
- ProxySQL Cluster的搭建
环境: proxysql-1.4.10-1-centos7.x86_64 db210 192.168.99.210 老节点,已经做成mysql配置和读写分离设置db211 192.168.99.211 ...
- Windows和Linux查看端口占用
Windows方法 TCP netstat -aon|findstr "TCP"|findstr "LISTENING"|findstr ":135[ ...
- 模拟实现简单ATM功能
