企业模式之Unit Of Work模式
在开始UnitOfWork模式之前有必要回顾下我们耳熟能详的Data Access Object(DAO)模式,即数据访问对象。DAO是一种简单的模式,我们构建应用的时候经常会使用到它,它的功能就是将DAL元素从应用程序中分离出来,在经典的三层架构中,我们会将数据持久化工作单独分离出来,封装成DAL层。但是,DAO并没有隐藏它面对是一张张数据表,而且通常情况我们会为数据库中的每一张表创建一个DAO类,想必大家对这种方式的极度的不爽了,。
由于DAO模式与数据表是一对一匹配的关系,因此DAO模式很好的配合了Active Record和Transaction Script业务模式,尤其是Table Module。正因为这种与数据表一对一匹配关系,使我对DAO模式深恶痛绝。
Unit Of Work模式,即工作单元,它是一种数据访问模式。它是用来维护一个由已经被业务修改(如增加、删除和更新等)的业务对象组成的列表。它负责协调这些业务对象的持久化工作及并发问题。那它是怎么来维护的一系列业务对象组成的列表持久化工作的呢?通过事务。Unit Of Work模式会记录所有对象模型修改过的信息,在提交的时候,一次性修改,并把结果同步到数据库。 这个过程通常被封装在事务中。所以在DAL中采用Unit Of Work模式好处就在于能够确保数据的完整性,如果在持有一系列业务对象(同属于一个事务)的过程中出现问题,就可以将所有的修改回滚,以确保数据始终处于有效状态,不会出现脏数据。
在这里我们,使用一个简单的银行领域对两个帐号之间的转账进行举例
首先如图进行分层搭建基础框架
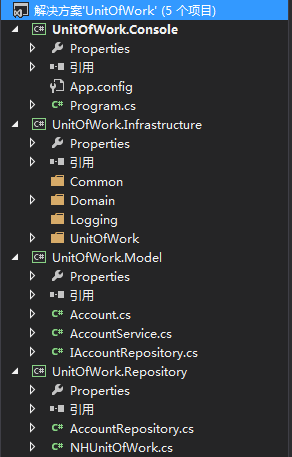
总共分为四层依次是: ---> 引用关系
UnitOfWork.Console --->UnitOfWork.Infrastructure、UnitOfWork.Model、UnitOfWork.Repository
UnitOfWork.Infrastructure
UnitOfWork.Model --->UnitOfWork.Infrastructure
UnitOfWork.Repository --->UnitOfWork.Model、UnitOfWork.Infrastructure
这不是经典的领域驱动架构,因为业务简单就进行简单搭建。
UnitOfWork.Infrastructure:
首先,在UnitOfWork.Infrastructure建了一个Domain文件夹,里面只建了一个IAggregateRoot接口,Unit Of Work操作的实体必须是实现IAggregateRoot接口的。

    /// <summary>

    /// 标识接口,定义聚合根

    /// </summary>

    public class IAggregateRoot

    {

    }
建立UnitOfWork文件夹,在里面添加一个IUnitOfWorkRepository接口
    public interface IUnitOfWorkRepository

    {

        //新增

        void PersistCreationOf(IAggregateRoot entity);

        //更新

        void PersistUpdateOf(IAggregateRoot entity);

        //删除

        void PersistDeletionOf(IAggregateRoot entity);

    }
我们再向UnitOfWork文件夹中添加一个IUnitOfWork接口,IUnitOfWork接口在注册更新、新增和删除时,需要IUnitOfWorkRepository,这样再提交Commit,UnitOfWork可以将真正持久化的工作委托给适合的具体实现对象,其实就是将持久化工作交给了IUnitOfWorkRepository的实现类,我们稍后看看IUnitOfWork的实现类你就清楚了。
  public interface IUnitOfWork

    {

        /// <summary>

        /// 更新

        /// </summary>

        /// <param name="entity"></param>

        /// <param name="unitofWorkRepository"></param>

        void RegisterUpdate(IAggregateRoot entity, IUnitOfWorkRepository unitofWorkRepository);

        /// <summary>

        /// 新增

        /// </summary>

        /// <param name="entity"></param>

        /// <param name="unitofWorkRepository"></param>

        void RegisterAdd(IAggregateRoot entity, IUnitOfWorkRepository unitofWorkRepository);

        /// <summary>

        /// 删除

        /// </summary>

        /// <param name="entity"></param>

        /// <param name="unitofWorkRepository"></param>

        void RegisterRemoved(IAggregateRoot entity, IUnitOfWorkRepository unitofWorkRepository);

        /// <summary>

        /// 提交

        /// </summary>

        void Commit();

    }
顺便说一句,在UnitOfWork.Infrastructure,我还建立的Common文件夹,Logging文件夹,所要表达的意思是Infrastructure意为基础设施层,我们可以将通用的组件放到这里面,比如日志组件,邮件组件等。
好了,回顾下,我们在UnitOfWork.Infrastructure中其实什么业务都没有处理,只定义了三个接口。
UnitOfWork.Model
接下来,说说这层干了什么事吧!这一层主要是处理两个账户之间转账的业务。
向UnitOfWork.Model中添加一个Account类,实现IAggregateRoot接口,表示它是一个聚合根,可以被Unit Of Work操作。
    /// <summary>

    /// 账户类,表示Account是集合根

    /// </summary>

    public class Account : IAggregateRoot

    {

        public Account(decimal balance)

        {

            Balance = balance;

        }

        /// <summary>

        /// 账户余额

        /// </summary>

        public decimal Balance { get; set; }

    }
为了持久化Account类,我们添加的一个仅包含了示例有关的的Repository接口,即IAccountRepository,只是简单的示例。
    /// <summary>

    /// 定义持久化操作

    /// </summary>

    public interface IAccountRepository

    {

        /// <summary>

        /// 更新

        /// </summary>

        /// <param name="account"></param>

        void Save(Account account);

        /// <summary>

        /// 新增

        /// </summary>

        /// <param name="account"></param>

        void Add(Account account);

        /// <summary>

        /// 删除

        /// </summary>

        /// <param name="account"></param>

        void Remove(Account account);

    }
为了完成转账的业务,我们需要创建一个服务类来协调两个账户之间的转账工作,如AccountService类,在AccountService类中,通过构造函数初始化了IAccountRepository和IUnitOfWork。在完成转账后,它们都调用了账户Repository进行持久化。最后,通过Unit Of Work的Commit来确保该笔交易的完成。
    public class AccountService

    {

        private IAccountRepository _accountRepository;

        private IUnitOfWork _unitOfWork;

        public AccountService(IAccountRepository accountRepository,

                              IUnitOfWork unitOfWork)

        {

            _accountRepository = accountRepository;

            _unitOfWork = unitOfWork;

        }

        /// <summary>

        /// 转账

        /// </summary>

        /// <param name="from"></param>

        /// <param name="to"></param>

        /// <param name="amount"></param>

        public void Transfer(Account from, Account to, decimal amount)

        {

            if (from.Balance >= amount)

            {

                from.Balance -= amount;

                to.Balance += amount;

                _accountRepository.Save(from);

                _accountRepository.Save(to);

                _unitOfWork.Commit();

            }

        }

    }
总结下,在UnitOfWork.Model中我们定义的一个Account类,定义了一个持久化Account类的接口,以及转账业务的完成。下面我们要进入UnitOfWork.Repository探究Repository和Unit Of Work之间是怎么交互的?
UnitOfWork.Repository:
在UnitOfWork.Repository,添加了一个NHUnitOfWork类,实现了UnitOfWork.Infrastructure.UnitOfWork中的IUnitOfWork接口,为什么定义到这里。因为在项目开发中你可能有NHbernator的Repository和EF的Repository。还记得我在讲解IUnitOfWork接口时,曾说过这样一句话“IUnitOfWork将持久化工作交给了IUnitOfWorkRepository的实现类”,在这里你就会找到答案了。
    public class NHUnitOfWork : IUnitOfWork

    {

        private Dictionary<IAggregateRoot, IUnitOfWorkRepository> addedEntities;

        private Dictionary<IAggregateRoot, IUnitOfWorkRepository> changedEntities;

        private Dictionary<IAggregateRoot, IUnitOfWorkRepository> deletedEntities;

        public NHUnitOfWork()

        {

            addedEntities = new Dictionary<IAggregateRoot, IUnitOfWorkRepository>();

            changedEntities = new Dictionary<IAggregateRoot, IUnitOfWorkRepository>();

            deletedEntities = new Dictionary<IAggregateRoot, IUnitOfWorkRepository>();

        }

        public void RegisterUpdate(IAggregateRoot entity, IUnitOfWorkRepository unitofWorkRepository)

        {

            if (!changedEntities.ContainsKey(entity))

            {

                changedEntities.Add(entity, unitofWorkRepository);

            }

        }

        public void RegisterAdd(IAggregateRoot entity, IUnitOfWorkRepository unitofWorkRepository)

        {

            if (!addedEntities.ContainsKey(entity))

            {

                addedEntities.Add(entity, unitofWorkRepository);

            };

        }

        public void RegisterRemoved(IAggregateRoot entity, IUnitOfWorkRepository unitofWorkRepository)

        {

            if (!deletedEntities.ContainsKey(entity))

            {

                deletedEntities.Add(entity, unitofWorkRepository);

            }

        }

        public void Commit()

        {

            using (TransactionScope scope = new TransactionScope())

            {

                foreach (IAggregateRoot entity in this.addedEntities.Keys)

                {

                    this.addedEntities[entity].PersistCreationOf(entity);

                }

                foreach (IAggregateRoot entity in this.changedEntities.Keys)

                {

                    this.changedEntities[entity].PersistUpdateOf(entity);

                }

                foreach (IAggregateRoot entity in this.deletedEntities.Keys)

                {

                    this.deletedEntities[entity].PersistDeletionOf(entity);

                }

                scope.Complete();

            }

        }
接下来,再添加一个AccountRepository类,这个类实现了两个接口,IAccountRepository和IUnitOfWorkRepository接口。IAccountRepository中的方法就是简单得将工作交给了Unit Of Work,传入待持久化的实体及Repository(实现了IUnitOfWorkRepository)引用。最后Unit Of Work 引用Repository的IUnitOfWorkRepository契约来完成真正的持久化工作。
    public class AccountRepository : IAccountRepository,IUnitOfWorkRepository

    {

        private IUnitOfWork _unitOfWork;

        public AccountRepository(IUnitOfWork unitOfWork)

        {

            _unitOfWork = unitOfWork;

        }

        public void Save(Account account)

        {

            _unitOfWork.RegisterUpdate(account, this);

        }

        public void Add(Account account)

        {

            _unitOfWork.RegisterAdd(account, this);

        }

        public void Remove(Account account)

        {

            _unitOfWork.RegisterRemoved(account, this);

        }

        public void PersistUpdateOf(IAggregateRoot entity)

        {

            // ADO.net code to update the entity...真正的SQL实现

        }

        public void PersistCreationOf(IAggregateRoot entity)

        {

            // ADO.net code to Add the entity...真正的SQL实现

        }

        public void PersistDeletionOf(IAggregateRoot entity)

        {

            // ADO.net code to delete the entity...真正的SQL实现

        }

    }
总结下,UnitOfWork.Repository这里才是真正纠结的地方。首先,Unit Of Work加载实体对象(Accont)和实体对应的Repository对象(AccountRepository);然后通过Unit Of Work的Commit方法,循环转调Repository对象(AccountRepository)的持久化方法,进行实体对象(Accont)的持久化工作。多调试就明白了。
UnitOfWork.Console:
接下来,就是最后的控制台程序了。
    class Program

    {

        static void Main(string[] args)

        {

            Account a = new Account(1000);

            System.Console.WriteLine("现在张三,存有{0}", a.Balance);

            Account b = new Account(200);

            System.Console.WriteLine("现在李四,存有{0}", b.Balance);

            System.Console.WriteLine("张三准备转500元给李四,转战开始了......");

            //声明要使用的UnitOfWork

            IUnitOfWork nhUnitOfWork = new NHUnitOfWork();

            //声明要使用的Repository

            IAccountRepository accountRepository = new AccountRepository(nhUnitOfWork);

            AccountService service = new AccountService(accountRepository, nhUnitOfWork);

            service.Transfer(a,b,500);

            System.Console.WriteLine("转账结束");

            System.Console.WriteLine("张三当前余额:{0}",a.Balance);

            System.Console.WriteLine("李四当前余额:{0}",b.Balance);

            System.Console.ReadKey();

        }

    }
企业模式之Unit Of Work模式的更多相关文章
- Entity Framework中的Identity map和Unit of Work模式
阅读目录: 一.什么是Identity map模式 二.关于Identity map模式的验证示例 三.Unit of Work 模式 四.总结和注意的问题 一,什么是Identity map模式 I ...
- 在Entity Framework 4.0中使用 Repository 和 Unit of Work 模式
[原文地址]Using Repository and Unit of Work patterns with Entity Framework 4.0 [原文发表日期] 16 June 09 04:08 ...
- Entity Framework中的Identity map和Unit of Work模式(转)
一,什么是Identity map模式 Identity map是EF获取和缓存数据的模式.Identity map模式指的是任何数据都只会被加载一次,以map的形式缓存,以唯一的identity来再 ...
- [转载]Linux运行模式及紧急、救援模式
运行模式 在Linux中,存在一个叫init(initialize)的进程,其进程号是1,该进程存在一个对应的配置文件inittab,叫做系统的运行级别配置文件,位置在/etc/inittab.(但是 ...
- MIT 6.828 JOS学习笔记6. Appendix 1: 实模式(real mode)与保护模式(protected mode)
在我们阅读boot loader代码时,遇到了两个非常重要的概念,实模式(real mode)和保护模式(protected mode). 首先我们要知道这两种模式都是CPU的工作模式,实模式是早期C ...
- 《JAVA与模式》之抽象工厂模式
场景问题 举个生活中常见的例子——组装电脑,我们在组装电脑的时候,通常需要选择一系列的配件,比如CPU.硬盘.内存.主板.电源.机箱等.为讨论使用简单点,只考虑选择CPU和主板的问题. 事实上,在选择 ...
- Windows Azure Cloud Service (41) 修改云服务IIS托管管道模式为4.0经典模式
<Windows Azure Platform 系列文章目录> 这是笔者在之前的项目中遇到的问题,做一下总结,给网友做参考. 在一般情况下,Visual Studio开发的Cloud Se ...
- php模式设计之 注册树模式
在前两篇单例模式和工厂模式后,终于迎来了最后一个基础的设计模式--注册树模式. 什么是注册树模式? 注册树模式当然也叫注册模式,注册器模式.之所以我在这里矫情一下它的名称,是因为我感觉注册树这个名称更 ...
- 《JAVA与模式》之享元模式
<JAVA与模式>之享元模式 在阎宏博士的<JAVA与模式>一书中开头是这样描述享元(Flyweight)模式的: Flyweight在拳击比赛中指最轻量级,即“蝇量级”或“雨 ...
随机推荐
- php创建多级目录的两种方法
1.使用递归的思想 function mkdirs_2($path){ if(!is_dir($path)){ mkdirs_2(dirname($path)); if(!mkdir($path, 0 ...
- org.springframework.web.HttpRequestMethodNotSupportedException: Request method 'PUT' not supported
1:先上控制台报错信息 org.springframework.web.HttpRequestMethodNotSupportedException: Request method 'PUT' not ...
- C# 将DataTable存储到DBF文件中
(准备)生成一个DataTable /// <summary> /// 生成一个数据表 /// </summary> /// <returns></retur ...
- entityframework 入门-来自微软
必备条件 要完成本演练,需要安装 Visual Studio 2010 或 Visual Studio 2012. 如果使用的是 Visual Studio 2010,还需要安装 NuGet. 1.创 ...
- C# 操作pem 文件
using Dscf.Bpl.InformationAuditBpl; using Dscf.Bpl.ProductBpl; using Dscf.Global.CommonAduit; using ...
- Python之路【第十七篇】:Django【进阶篇 】
Python之路[第十七篇]:Django[进阶篇 ] Model 到目前为止,当我们的程序涉及到数据库相关操作时,我们一般都会这么搞: 创建数据库,设计表结构和字段 使用 MySQLdb 来连接 ...
- php 连接mongodb 增查改删操作
查询 <?php $m=new MongoClient('mongodb://admin:admin@localhost:27017/admin'); $db=$m->hndb; $cc= ...
- 云主机不能外网ssh连接,只能内网ssh连接的问题处理
某台服务器外网无法ssh,内网可以ssh连接,ping值延时比较大 安装iftop查看流量 yum install -y iftop iftop界面含义如下 第一行:带宽显示 中间部分:外部连接列表, ...
- Excel的文件打开特别慢,xls文件特别大解决一例
Excel的文件打开特别慢,xls文件特别大解决一例 打开Excel的xls文件打开特别慢,而且操作也非常慢,动辄需要10几20分钟,很不正常.一个简单的Excel的xls文件有10几兆,甚至几百兆的 ...
- object-assign合并对象
1. Object.assign() 对于合并对象操作, ECMAScript 6 中提供了一个函数: Object.assign(target, source); 这个方法会将所有可枚举 [1] 的 ...