Python3学习之路~4.3 装饰器
定义:本质是函数,装饰其他函数就是为其他函数添加附加功能。
原则:
- 不能修改被装饰函数的源代码
- 不能修改被装饰函数的调用方式
实现装饰器知识储备:
- 函数即“变量”
- 高阶函数
- 把一个函数名当做实参传递给另一个函数(在不修改函数源代码的情况下为其添加功能)
- 返回值中包含函数名(不修改函数的调用方式)
- 嵌套函数
高阶函数+嵌套函数——>装饰器
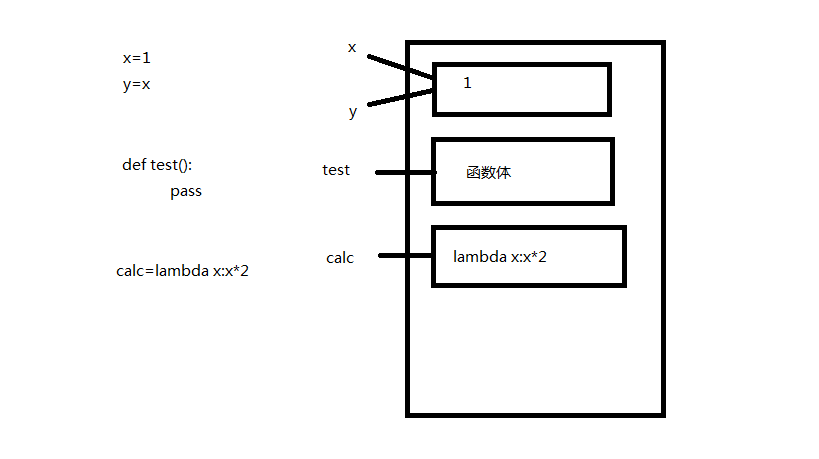
什么是函数即“变量”?如下图,x,y,test都可以看做是内存中的门牌号,一个值如果没有门牌号就会被回收。匿名函数没有函数名,它如果不显示地用一个变量存放,就会被立即回收。
根据上图理解下面几段代码:
# 1.foo函数调用bar函数,bar函数未定义

def foo():

    print('in the foo')

    bar()

foo() # 报错:name 'bar' is not defined

# 2.在foo函数调用之前,先定义bar函数,再定义foo函数

def bar():

    print('in the bar')

def foo():

    print('in the foo')

    bar()

foo() # 运行成功

# 3.在foo函数调用之前,先定义foo函数,再定义bar函数

def foo():

    print('in the foo')

    bar()

def bar():

    print('in the bar')

foo() # 运行成功

# 4.在foo函数调用bar函数之前未定义bar函数

def foo():

    print('in the foo')

    bar()

foo() # 报错:name 'bar' is not defined

def bar():

    print('in the bar')
假如有如下一段代码:
import time

def bar():

    time.sleep(3)

    print('in the bar')

bar()
现在你要在不修改源代码的前提下为其增加一个功能:计算它的运行时间。此时你需要运用高阶函数的第一个知识点:把一个函数名当做实参传递给另一个函数。
import time

def bar():

    time.sleep(3)

    print('in the bar')

def test1(func):

    start_time = time.time()

    func()

    stop_time = time.time()

    print('the func run time is %s'%(stop_time-start_time))

test1(bar)

# 输出:

# in the bar

# the func run time is 3.000171661376953
上述代码还有缺陷,那就是改变了函数的调用方式。因为在实际的项目中可能会有多处都调用了这个函数,如果改变了函数的调用方式,意味着要在多处修改,你会被骂死。
所以现在你要修改这段代码,使之不改变原来函数的调用方式。此时你需要运用高阶函数的第二个知识点:返回值中包含函数名。看如下的例子
import time

def bar():

    time.sleep(3)

    print('in the bar')

def test2(func):

    print(func) #假设这个是新功能

    return func #返回func函数的内存地址

bar=test2(bar) #覆盖原来的bar

bar()
将上述例子应用到你的代码中
import time

def bar():

    time.sleep(3)

    print('in the bar')

def test1(func):

    start_time = time.time()

    return func #函数结束,后面代码不再执行

    stop_time = time.time()

    print('the func run time is %s'%(stop_time-start_time))

bar=test1(bar)

bar() # 输出:in the bar,并没有增加功能
你会发现,上述代码并没有实现增加新的功能,但是思想是对的。那么我们该如何实现呢?此时需要使用嵌套函数。
import time

def bar():

    time.sleep(3)

    print('in the bar')

def test1(func):

    def deco():

        start_time = time.time()

        func()

        stop_time = time.time()

        print('the func run time is %s'%(stop_time-start_time))

    return deco

bar = test1(bar)

bar()

# 输出:

# in the bar

# the func run time is 3.0001718997955322
以上代码在同时满足不改变函数的源代码和不改变函数的调用方式两个前提条件的情况下,实现了为bar函数增加了一个新功能。
其实,这是开发中一个常用的玩法,叫语法糖,官方名称“装饰器”。上面的代码可以更简单
def timer(func):

    def deco():

        start_time = time.time()

        func()

        stop_time = time.time()

        print('the func run time is %s'%(stop_time-start_time))

    return deco

@timer #在被装饰函数前面加上这个

def bar():

    time.sleep(3)

    print('in the bar')

#bar = timmer(bar) #去掉这行代码

bar()

# 输出:

# in the bar

# the func run time is 3.0001718997955322
至此,我们利用高阶函数+嵌套函数实现了装饰器。
下面利用装饰器装饰一个带参数的函数
import time

def timer(func):

    def warpper(x):

        start_time =time.time()

        func(x)

        stop_time =time.time()

        print("the func run time is %s"%(stop_time-start_time))

    return warpper

@timer

def test1(x):

    time.sleep(3)

    print("in the test1,x=%s"%x)

test1(1)

# 输出:

# in the test1,x=1

# the func run time is 3.000171422958374
写一个既可以装饰带参数、又可以装饰不带参数的函数的装饰器
import time

def timer(func):

    def warpper(*args,**kwargs):

        start_time =time.time()

        func(*args,**kwargs)

        stop_time =time.time()

        print("the func run time is %s"%(stop_time-start_time))

    return warpper

@timer

def test1():

    time.sleep(3)

    print("in the test1")

@timer

def test2(x):

    time.sleep(3)

    print("in the test2,x=%s"%x)

test1()

test2(1)

# 输出:

# in the test1

# the func run time is 3.0001718997955322

# in the test2,x=1

# the func run time is 3.000171422958374
来一个更高级的,一个网站有3个页面,index page、home page和bbs page,现在要给home page和bbs page加上登录认证。如下
user,passwd='alex',''

def auth(func):

    def wrapper(*args,**kwargs):

        username=input('Username:').strip()

        password=input('Password:').strip()

        if user == username and passwd == password:

            print('\033[32;1mUser has passed authentication\033[0m')

            func(*args,**kwargs)

        else:

            exit('\033[31;1mInvalid username or password\033[0m')

    return wrapper

def index():

    print('Welcome to index page')

@auth

def home():

    print('Welcome to home page')

@auth

def bbs():

    print('Welcome to bbs page')

index()

home()

bbs()
现在要让home page和bbs page的认证方式不同,一个为本地认证,一个为远程认证
user,passwd='alex',''

def auth(auth_type):

    def out_wrapper(func):

        def wrapper(*args,**kwargs):

            if auth_type == 'local':

                username = input('Username:').strip()

                password = input('Password:').strip()

                if user == username and passwd == password:

                    print('\033[32;1mUser has passed authentication\033[0m')

                    func(*args,**kwargs)

                else:

                    exit('\033[31;1mInvalid username or password\033[0m')

            elif auth_type == 'ldap':

                print('此处代表ldap的认证方式,不会。。。假设认证成功。。。')

                func(*args, **kwargs)

        return wrapper

    return out_wrapper

def index():

    print('Welcome to index page')

@auth(auth_type='local')

def home():

    print('Welcome to home page')

@auth(auth_type='ldap')

def bbs():

    print('Welcome to bbs page')

index()

home()

bbs()
好了,现在你应该学会装饰器了。赶快操练一下吧。
Python3学习之路~4.3 装饰器的更多相关文章
- python学习之路 六 :装饰器
本节重点: 掌握装饰器相关知识 python装饰器就是用于拓展原来函数功能的一种函数,这个函数的特殊之处在于它的返回值也是一个函数,使用python装饰器的好处就是在不用更改原函数的代码前提下给函 ...
- Python3学习之路~0 目录
目录 Python3学习之路~2.1 列表.元组操作 Python3学习之路~2.2 简单的购物车程序 Python3学习之路~2.3 字符串操作 Python3学习之路~2.4 字典操作 Pytho ...
- python3.5-day5_迭代器_生成器_装饰器_模块
笔者QQ 360212316 迭代器&生成器 生成器: 一个函数调用返回一个迭代器,那这个函数叫做生成器,如果函数中包含yield语法,那么这个函数就会变成生成器 生成器的特点: 1.生成器必 ...
- python学习笔记-(八)装饰器、生成器&迭代器
本节课程内容概览: 1.装饰器 2.列表生成式&迭代器&生成器 3.json&pickle数据序列化 1. 装饰器 1.1 定义: 本质上是个函数,功能是装饰其他函数—就是为其 ...
- Python之路-python(装饰器、生成器、迭代器、Json & pickle 数据序列化、软件目录结构规范)
装饰器: 首先来认识一下python函数, 定义:本质是函数(功能是装饰其它函数),为其它函数添加附件功能 原则: 1.不能修改被装饰的函数的源代码. 2.不 ...
- Python全栈之路----函数进阶----装饰器
Python之路,Day4 - Python基础4 (new版) 装饰器 user_status = False #用户登录后改为True def login(func): #传入想调用的函数名 de ...
- python学习总结---函数使用 and 装饰器
# 函数使用 ### 零碎知识 - 灵活的if-else ```python a = 3 if False else 5 print(a) ''' if False: a = 3 else: a = ...
- Python自学之路——自定义简单装饰器
看了微信公众号推送的一道面试题,发现了闭包的问题,学习时间短,从来没有遇到过这种问题,研究一下. Python函数作用域 global:全局作用域 local:函数内部作用域 enclosing:函数 ...
- python学习笔记(5)--迭代器,生成器,装饰器,常用模块,序列化
生成器 在Python中,一边循环一边计算的机制,称为生成器:generator. 如: >>> g = (x * x for xin range(10)) >>> ...
随机推荐
- CentOS 6.7 配置 yum 安装 nginx
第一步,在/etc/yum.repos.d/目录下创建一个源配置文件nginx.repo: cd /etc/yum.repos.d/ vim nginx.repo 填写如下内容: [nginx] na ...
- Win10系统安装过程小记
1.网上下载ghost系统http://win10.jysmac.cn/win1064.html 2.使用系统自带的激活工具激活 3.到windows官网下载更新工具更新系统,重新安装https:// ...
- 试一下Markdown
Markdown 没想到博客园居然能够有markdown这样的写法了,以前觉得有自定义CSS已经非常不错了,现在居然加入Markdown,太值得称赞了.国内的博客系统,应该首屈一指了. 强调 你要走, ...
- Centos 安装 nload
第一种方法: wget http://mirrors.kernel.org/fedora-epel/6/i386/epel-release-6-8.noarch.rpm rpm -ivh epel-r ...
- GDI+绘制五星红旗
五星红旗是由红色背景,加5个黄色五角星组成.绘制一个五星红旗的思路,就是先定义一个五角星的自定义控件,然后通过设置五角星的大小.位置.旋转角度等属性,组合成一个五星红旗. 五角星自定义控件代码: pu ...
- linux如何安装多个jdk?
1 官网下载JDK版本 jdk-8u181-linux-x64.tar.gz 2 利用ssh工具上传安装包到Linux系统 传至:/usr/local 3 Linux用户安装的程序一般放在 /usr/ ...
- C# MVC+EF—结构搭建
近期做了MVC+EF的项目,现在项目完结了,抽个时间写个小DOM总结一下,顺便加深理解. 一.新建MVC项目,结构是这样的
- GEM5安装
转自:http://blog.sina.com.cn/s/blog_548b0a230101cagk.html GEM5在ubuntu13.10下安装过程,首先下载gem5_stable最新安装包,解 ...
- 通过Jenkins在IIS上布署站点
当需要在多台服务器的IIS上布署站点时,如果纯粹靠人工手动完成此任务的话,过于低效,而借助Jenkins之类的自动化工具,则可以极大提升工作效率. 以下便是Jenkins Pipeline所使用的脚本 ...
- 在ASP.NET Core中实现自定义验证特性(Custom Validation Attribute)
这是我们在实际ASP.NET Core项目中用到的,验证用户名中是否包含空格. 开始是这么实现的(继承ValidationAttribute,重写IsValid方法): public class No ...