CGContextRef&CGMutablePathRef&UIBezierPath简单学习
简单的四句介绍
Quartz是一个二维绘图引擎,使用的是CoreGraphics库,同时支持iOS和Mac系统
CGContextRef:获取图形上下文.或者叫作用域,即画布,他是专门用来保存绘画期间的各种数据的
UIBezierPath是对CGPathRef的封装。创建矢量图形时,拆解成一条或者多条线段,拼接起来,每条下端的终点都是下一条线段的起点
当我们绘制路径时,Path的信息就会被Graphics context重置。 如果我们想要保存path信息,并多次使用它,我们就可以用到CGPathCreatMutable申请路径,然后用CGPathAddLintToPoint等方法来添加路径。
一起学习,共同进步,可下载对应Demo
1.设置点和线
介绍属性
- 先设置一个起点
- 添加一个中间点
- 画一个矩形
- 画一个圆形
- 画一个扇形
- 二阶曲线
- 三阶曲线
| CGContextRef | UIBezierPath | CGMutablePathRef |
|---|---|---|
| CGContextMoveToPoint | moveToPoint | CGPathMoveToPoint |
| CGContextAddLineToPoint | addLineToPoint | CGPathAddRect |
| CGContextAddRect | bezierPathWithRect | CGPathAddRect |
| CGContextAddEllipseInRect | bezierPathWithOvalInRect | CGPathAddEllipseInRect |
| CGContextAddArc | addArcWithCenter | CGPathAddArcToPoint |
| CGContextAddQuadCurveToPoint | addQuadCurveToPoint | CGPathAddQuadCurveToPoint |
| CGContextAddCurveToPoint | addCurveToPoint | CGPathAddCurveToPoint |
2、设置线的属性
这些设置线属性的API都是通用的
- 线宽
CGContextSetLineWidth - 线的颜色
CGContextSetStrokeColorWithColor - 填充颜色
CGContextSetFillColorWithColor - line join
CGContextSetLineCap - line cap
CGContextSetLineJoin - 透明度
CGContextSetAlpha - 设置阴影
CGContextSetShadow - 设置阴影颜色
CGContextSetShadowWithColor - 切割操作
CGContextClip
思维导图
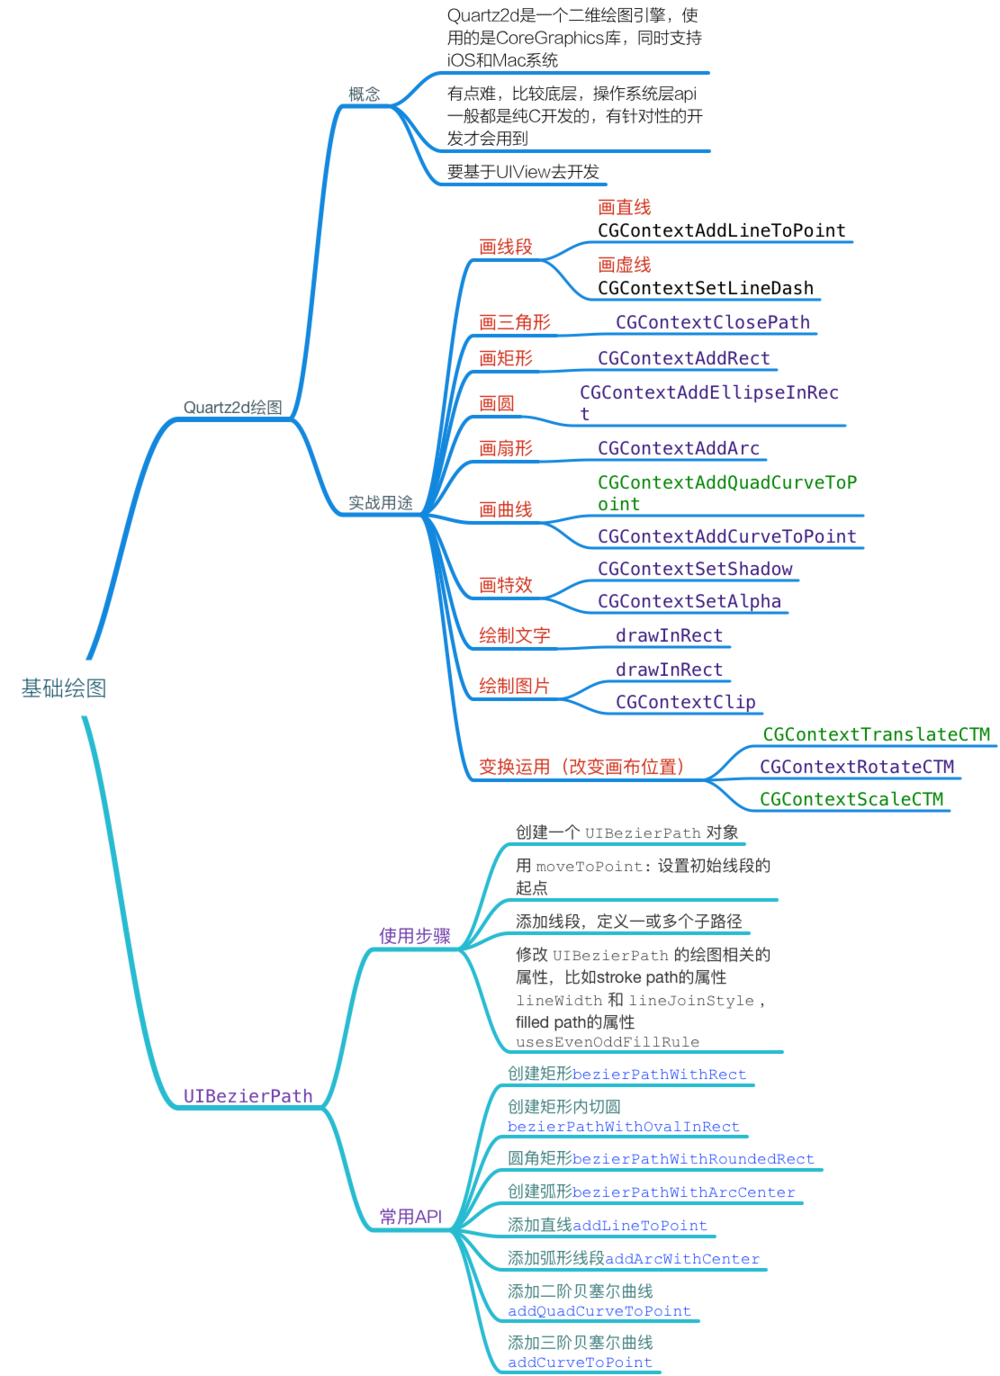
CGContextRef介绍
Quartz2d是一个二维绘图引擎,使用的是CoreGraphics库,同时支持iOS和Mac系统
有点难,比较底层,操作系统层api一般都是纯C开发的,有针对性的开发才会用到
要基于UIView去开发
实战用途
画线段
画直线CGContextAddLineToPoint
画虚线CGContextSetLineDash
画三角形
- CGContextClosePath
画矩形
- CGContextAddRect
画圆
- CGContextAddEllipseInRect
画扇形
- CGContextAddArc
画曲线
CGContextAddQuadCurveToPoint
CGContextAddCurveToPoint
画特效
CGContextSetShadow
CGContextSetAlpha
绘制文字
- drawInRect
绘制图片
drawInRect
CGContextClip
变换运用(改变画布位置)
CGContextTranslateCTM
CGContextRotateCTM
CGContextScaleCTM
1、CGContextRef之画线段
CGContextRef 具有贯穿全局的效果,我们设置一个全局变量创建 一次 就可以了
虚线
- (void)drawLine1{

    //获取图形上下文.或者叫作用域,即画布,他是专门用来保存绘画期间的各种数据的

    CGContextRef contextRef = UIGraphicsGetCurrentContext();

    //路径设置

    //先设置一个起点

    CGContextMoveToPoint(contextRef, 50, 100);

    //设置终点

    CGContextAddLineToPoint(contextRef, 100, 500);

    //设置样式

    //设置线宽

    CGContextSetLineWidth(contextRef, 5.0f);

    //设置线的颜色

    CGContextSetStrokeColorWithColor(contextRef, [UIColor redColor].CGColor);

    //风格  头部和尾部的处理

    CGContextSetLineCap(contextRef, kCGLineCapRound);

    /*

     画虚线

     参数1 作用域

     参数2 起点的偏移量

     参数3 指明虚线是如何交替绘制

     lengths的值{10,10}表示先绘制10个点,再跳过10个点

     如果把lengths值改为{10, 20, 10},则表示先绘制10个点,跳过20个点,绘制10个点,跳过10个点,再绘制20个点,

     参数4 实心部分和虚心部分的循环次数

     */

    CGFloat lenths[] = {10, 10};

    CGContextSetLineDash(contextRef, 0, lenths, 2);

    //渲染

    CGContextStrokePath(contextRef);

}
效果图
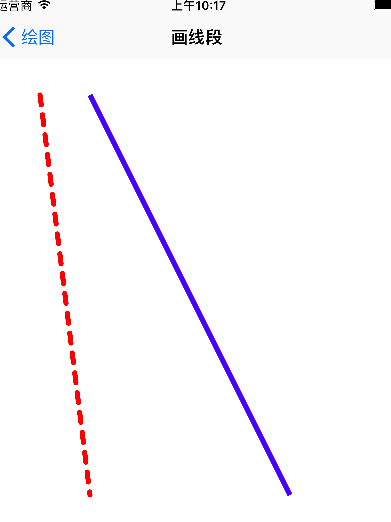
2、CGContextRef之画多边形
画三角形
- (void)drawTriangle{

    //获取图形上下文

    CGContextRef contextRef = UIGraphicsGetCurrentContext();

    //设置点

    CGContextMoveToPoint(contextRef, 100, 100);

    CGContextAddLineToPoint(contextRef, 200, 200);

    CGContextAddLineToPoint(contextRef, 100, 200);

    //把点封闭起来

    CGContextClosePath(contextRef);

    //设置线宽

    CGContextSetLineWidth(contextRef, 3.0f);

    //设置线的颜色

    CGContextSetStrokeColorWithColor(contextRef, [UIColor redColor].CGColor);

    //设置填充颜色

    CGContextSetFillColorWithColor(contextRef, [UIColor greenColor].CGColor);

    // 如果写了多种渲染方式,那么只执行第一种

//    CGContextStrokePath(contextRef);

//    CGContextFillPath(contextRef);

    CGContextDrawPath(contextRef, kCGPathFillStroke);

}
效果图

画正方形
//获取图形上下文

   CGContextRef contextRef = UIGraphicsGetCurrentContext();

   CGContextAddRect(contextRef, CGRectMake(100, 100, 100, 100));

   //颜色的填充

   CGContextSetFillColorWithColor(contextRef, [UIColor redColor].CGColor);

   //线宽

   CGContextSetLineWidth(contextRef, 4.0f);

   CGContextSetStrokeColorWithColor(contextRef, [UIColor blueColor].CGColor);

   //渲染

   CGContextDrawPath(contextRef, kCGPathFillStroke);
效果图
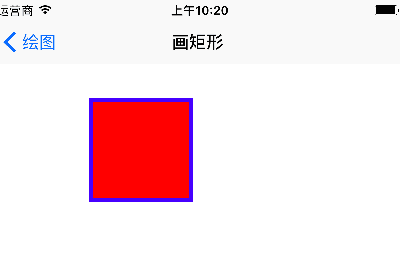
3、CGContextRef之画曲线
画圆
 // 绘制图形上下文

    CGContextRef contextRef = UIGraphicsGetCurrentContext();

    CGContextAddEllipseInRect(contextRef, CGRectMake(100, 100, 100, 100));

    CGContextDrawPath(contextRef, kCGPathFillStroke);
扇形
- (void)drawArc1{

    CGContextRef contextRef = UIGraphicsGetCurrentContext();

    /*

     参数1:作用域

     参数2:圆心x坐标

     参数3:圆心y坐标

     参数4:半径

     参数5:开始角度

     参数6:结束角度

     参数7:方向,0表示顺时针,1表示逆时针

     */

    CGContextAddArc(contextRef, 100, 200, 100, 0, M_PI_4, 0);

    CGContextSetLineWidth(contextRef, 5.0f);

    CGContextSetFillColorWithColor(contextRef, [UIColor greenColor].CGColor);

    CGContextSetStrokeColorWithColor(contextRef, [UIColor redColor].CGColor);

//    CGContextAddLineToPoint(contextRef, 100, 200);

    CGContextDrawPath(contextRef, kCGPathFillStroke);

}

- (void)drawArc2{

    CGContextRef contextRef = UIGraphicsGetCurrentContext();

    //第一部分

    CGContextMoveToPoint(contextRef, 250, 400);

    CGContextAddArc(contextRef, 250, 400, 100, 0, M_PI_2, 0);

    CGContextSetFillColorWithColor(contextRef, [UIColor blueColor].CGColor);

    CGContextFillPath(contextRef);

    //第二部分

    CGContextMoveToPoint(contextRef, 250, 400);

    CGContextAddArc(contextRef, 250, 400, 100, M_PI_2, M_PI_2/2*3, 0);

    CGContextSetFillColorWithColor(contextRef, [UIColor redColor].CGColor);

    CGContextFillPath(contextRef);

    // 第三部分

    CGContextMoveToPoint(contextRef, 250, 400);

    CGContextAddArc(contextRef, 250, 400, 100, 0, 225*M_PI/180.0, 1);

    CGContextSetFillColorWithColor(contextRef, [UIColor purpleColor].CGColor);

    CGContextFillPath(contextRef);

}
效果图

画曲线
    CGContextRef contextRef = UIGraphicsGetCurrentContext();

    //起点

    CGContextMoveToPoint(contextRef, 20, 300);

    /*

     三阶贝塞尔曲线

     参数1:作用域

     参数2:控制点x

     参数3:控制点y

     参数4:控制点x

     参数5:控制点y

     参数6:终点x

     参数7:终点y

     - `CGContextAddQuadCurveToPoint`  二阶贝塞尔曲线

     */

    CGContextAddCurveToPoint(contextRef, 100, -100, 200, 900, 300, 400);

     CGContextStrokePath(contextRef);
效果图
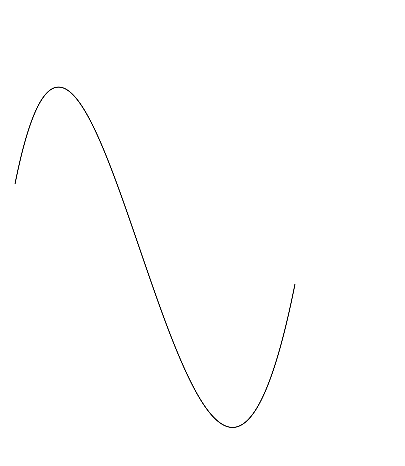
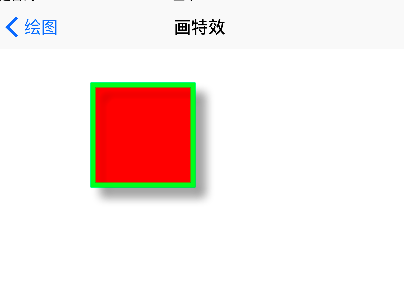
4、CGContextRef之画特效
 CGContextRef contextRef = UIGraphicsGetCurrentContext();

    CGContextAddRect(contextRef, CGRectMake(100, 100, 100, 100));

    CGContextSetFillColorWithColor(contextRef, [UIColor redColor].CGColor);

    CGContextSetStrokeColorWithColor(contextRef, [UIColor greenColor].CGColor);

    CGContextSetLineWidth(contextRef, 5.0f);

    //设置透明度

    //取值范围(0~1,0表示全透明,1是不透明)

     CGContextSetAlpha(contextRef, 1);

    /*

     设置阴影

     参数1:画布

     参数2:右偏移量

     参数3:下偏移量

     参数4:模糊度(0是不模糊,越大越模糊,10就差不多)

     */

    CGContextSetShadow(contextRef, CGSizeMake(10, 10), 10);

    CGContextDrawPath(contextRef, kCGPathFillStroke);
效果图
5、CGContextRef之绘制
绘制文字
 NSDictionary *dic = @{

                          NSFontAttributeName:[UIFont systemFontOfSize:15],

                           NSForegroundColorAttributeName : [UIColor redColor]

                          };

    // 两种的区别drawInRect会自动换行,drawAtPoint:CGPointZero不会自动换行

    [text drawInRect:CGRectMake(20, 100, self.bounds.size.width - 40, 100) withAttributes:dic];

//    [text drawAtPoint:CGPointMake(20, 200) withAttributes:dic];
绘制图片
- (void)drawImage{

    UIImage *image = [UIImage imageNamed:@"image.jpg"];

    [image drawInRect:CGRectMake(100, 100, 250, 250)];

    // 平铺图像,超出部分会自动剪裁

//    [image drawAsPatternInRect:self.bounds];

    // 如果实现文字和图片共存,需要将文字写在后面,防止被图片盖住

    NSDictionary *dic = @{

                          NSFontAttributeName:[UIFont systemFontOfSize:15],

                          NSForegroundColorAttributeName : [UIColor redColor]

                          };

    NSString *text = @"如果实现文字和图片共存,需要将文字写在后面,防止被图片盖住";

    [text drawInRect:CGRectMake(100, 300, 250, 100) withAttributes:dic];

}

-(void)clipImage{

    /*

     思路:先画一个圆,让图片显示在圆的内部,超出的部分不显示。

     注意:显示的范围只限于指定的剪切范围,无论往上下文中绘制什么东西,只要超出了这个范围的都不会显示。

     */

    CGContextRef contextRef = UIGraphicsGetCurrentContext();

    // 先画一个圆形

    CGContextAddEllipseInRect(contextRef, CGRectMake(100, 400, 200, 200));

    // 切割操作

    CGContextClip(contextRef);

    CGContextFillPath(contextRef);

    UIImage *image = [UIImage imageNamed:@"image.jpg"];

    [image drawInRect:CGRectMake(100, 400, 200, 200)];

}
效果图

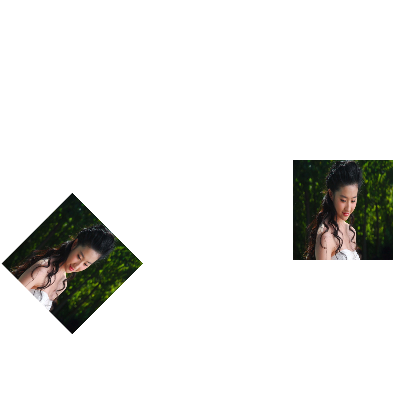
6、CGContextRef之图形变换
 UIImage *image0 = [UIImage imageNamed:@"image.jpg"];

    [image0 drawInRect:CGRectMake(300, 400, 100, 100)];

    CGContextRef contextRef = UIGraphicsGetCurrentContext();

    // 移动变换

    //    CGContextTranslateCTM(contextRef, -100, -100);

    /**

     *  对象沿着x轴移动-100单位,沿着y轴移动-100单位

     */

    // 多个变换会叠加

    // 缩放

    //    CGContextScaleCTM(contextRef, 0.5, 0.5);

    // 获取中心点

//    CGFloat cenX = CGRectGetMidX(self.bounds);

//    CGFloat cenY = CGRectGetMidY(self.bounds);

//

    // 先移动一下

    //    CGContextTranslateCTM(contextRef, cenX, cenY);

    CGContextTranslateCTM(contextRef, 100+100/2.0, 100+100/2.0);

    // 旋转变换

    CGContextRotateCTM(contextRef, M_PI_4);

    // 再移动回去

    CGContextTranslateCTM(contextRef, -(100+100/2.0), -(100+100/2.0));

    /**

     *  旋转可以认为实质是旋转坐标系,会绕着坐标原点旋转,可以先将坐标原点移动到要旋转的图形的中点,然后执行旋转,然后再移动回来,实现绕着图形中心旋转的目的

     */

    UIImage *image = [UIImage imageNamed:@"image.jpg"];

    [image drawInRect:CGRectMake(300, 400, 100, 100)];
效果图
UIBezierPath
使用步骤
创建一个 UIBezierPath 对象
用 moveToPoint: 设置初始线段的起点
添加线段,定义一或多个子路径
修改 UIBezierPath 的绘图相关的属性,比如stroke path的属性 lineWidth 和 lineJoinStyle , filled path的属性 usesEvenOddFillRule
常用API
创建矩形bezierPathWithRect
创建矩形内切圆bezierPathWithOvalInRect
圆角矩形bezierPathWithRoundedRect
创建弧形bezierPathWithArcCenter
添加直线addLineToPoint
添加弧形线段addArcWithCenter
添加二阶贝塞尔曲线addQuadCurveToPoint
添加三阶贝塞尔曲线addCurveToPoint
参考链接
Quartz 2D学习(一)简单绘制图形
iOS的UIBezierPath类和贝塞尔曲线
https://www.jianshu.com/p/5e39624efa26
CGContextRef&CGMutablePathRef&UIBezierPath简单学习的更多相关文章
- Log4j简单学习笔记
log4j结构图: 结构图展现出了log4j的主结构.logger:表示记录器,即数据来源:appender:输出源,即输出方式(如:控制台.文件...)layout:输出布局 Logger机滤器:常 ...
- shiro简单学习的简单总结
权限和我有很大渊源. 培训时候的最后一个项目是OA,权限那块却不知如何入手,最后以不是我写的那个模块应付面试. 最开始的是使用session装载用户登录信息,使用简单权限拦截器做到权限控制,利用资源文 ...
- CentOS 简单学习 firewalld的使用
1. centos7 开始 使用firewalld 代替了 iptables 命令工具为 firewall-cmd 帮助信息非常长,简单放到文末 2. 简单使用 首先开启 httpd 一般都自带安装了 ...
- Windows 下 Docker 的简单学习使用过程之一 dockertoolbox
1. Windows 下面运行 Docker 的两个主要工具1): Docker for Windows2): DockerToolbox区别:Docker For Windows 可以理解为是新一代 ...
- 在MVC中实现和网站不同服务器的批量文件下载以及NPOI下载数据到Excel的简单学习
嘿嘿,我来啦,最近忙啦几天,使用MVC把应该实现的一些功能实现了,说起来做项目,实属感觉蛮好的,即可以学习新的东西,又可以增加自己之前知道的知识的巩固,不得不说是双丰收啊,其实这周来就开始面对下载在挣 ...
- Linux——帮助命令简单学习笔记
Linux帮助命令简单学习笔记: 一: 命令名称:man 命令英文原意:manual 命令所在路径:/usr/bin/man 执行权限:所有用户 语法:man [命令或配置文件] 功能描述:获得帮助信 ...
- OI数学 简单学习笔记
基本上只是整理了一下框架,具体的学习给出了个人认为比较好的博客的链接. PART1 数论部分 最大公约数 对于正整数x,y,最大的能同时整除它们的数称为最大公约数 常用的:\(lcm(x,y)=xy\ ...
- mongodb,redis简单学习
2.mongodb安装配置简单学习 配置好数据库路径就可以mongo命令执行交互操作了:先将服务器开起来:在开个cmd执行交互操作 ...
- html css的简单学习(三)
html css的简单学习(三) 前端开发工具:Dreamweaver.Hbuilder.WebStorm.Sublime.PhpStorm...=========================== ...
随机推荐
- 第08组 Alpha冲刺(2/4)
队名 八组评分了吗 组长博客 小李的博客 作业博客 作业链接 组员1李昕晖(组长) 过去两天完成了哪些任务 文字/口头描述 11月17日了解各个小组的进度与难以攻破的地方,与隔壁第七组组长讨论进度发展 ...
- eclipse无法访问sun.misc.Unsafe类的解决办法
参考:https://www.cnblogs.com/duanxz/p/6090442.html
- Chrome调试工具Developer Tools——前端必备神器
本文链接:https://blog.csdn.net/u012542647/article/details/79401485 今天要给大家介绍一个神器,就是谷歌浏览器(Chorme)自带的前端调试工具 ...
- Oracle之clob字段不能union的问题
原因:由于clob类型字段不能使用group by函数,而union中需要使用group by过滤掉重复纪录: 解决方法:union可以改为union all.
- vs开启,Windows 10磁盘占用100%解决办法
https://www.cnblogs.com/time-is-life/p/8888441.html 最后把Home Group相关的服务都改成禁用. 注意: 即使这两个服务没有启动也不行, 一定要 ...
- Ubuntu 安装最新版 (1.12) Golang 并使用 go mod
wget https://dl.google.com/go/go1.12.4.linux-amd64.tar.gz sudo tar -zxvf go1.12.4.linux-amd64.tar.gz ...
- Eclipse中SpringBoot项目POM文件报UnKnown的解决方案
在项目中使用spring-boot-starter-parent的2.1.5.RELEASE版本时发现会出现POM错误(Unknown),其实这错误可以无视,但如果你实在看不下去可以在POM中添加如下 ...
- android ------ AndroidX的 Tablayout(com.google.android.material.tabs.TabLayout) 的使用
前面呢,有写过TabLayout的博客,最近开发用到了AndroidX来解决前面的问题,不要工具类设置下划线的问题了,来总结一下 Android--------TabLayout实现新闻客户端顶部导航 ...
- Python统计数据库中的数据量【含MySQL、Oracle】
Python程序文件如下: # -*- coding: utf-8 # File : start.py # Author : baoshan import json import pymysql im ...
- 解决SQL Server 阻止了对组件Ad Hoc Distributed Queries访问的方法
来源:http://www.htmer.com/article/922.htm 今天单位一ASP.NET网站,里面有个功能是导出数据,发现一导出就报错,报错内容是:SQL Server 阻止了对组件 ...
