gRPC编译教程
windows平台的编译
一.编译openssl
① 安装perl(可以使用ActivePerl),执行perl Configure VC-WIN64A no-asm 。在这里解释一下参数含义,VC-WIN64A是指amd64也就是我们常用的x64,还要一个VC-WIN64I是安腾Itanium,目前没有使用,no-asm是不使用汇编。
② 执行ms\do_win64a.bat 。
③ 使用vs的x86_x64命令行工具执行nmake -f ms\ntdll.mak 生成动态库。
④ 使用vs的x86_x64命令行工具执行nmake -f ms\nt.mak 生成静态库,这步可以不用执行一般生成动态库即可。
备注:遇到过的常见问题,比如ml64、rc等命令不存在以及x86和x64,这都是没有使用vs的x84_x64命令行工具导致的。
二.编译zlib
zlib的编译非常简单,在contrib\vstudio选择任意一个文件夹然后生成全部即可。
备注:最好生成Release x64的,ReleaseWithoutAsm可能会有某些project生成失败,这是因为它们的lib使用的是Release的。
三.编译gRPC
① 将下载的好的cares、protobuf、gflags、benchmark源码放到third_party文件夹下的对应文件夹中(cares需要放到cares\cares中)。
② 使用CMake打开,并将gRPC_ZLIB_PROVIDER、gRPC_SSL_PROVIDER由module改成package
③ 在CMake中配置好ZLIB_ROOT、ZLIB_BINARAY、LIB_EAY_DEBUG、LIB_EAY_RELEASE、SSL_EAY_DEBUG、SSL_EAY_RELEASE、OEPNSSL_INCLUDE_DIR这些变量
④ Configure,像ZLIB_ROOT CMake is ignoring the variable、 gRPC_INSTALL will be forced to FALSE等警告可以忽略
⑤ Generate,启动vs全部生成
测试案例:
HelloSerivce.proto
 syntax = "proto3";

 service HelloService{

     rpc SayHello(Request) returns(Response){}

 }

 message Request{

     int32 id = ;

     string req = ;

     bytes data = ;

 }

 message Response{

     int32 id = ;

     string resp = ;

     bytes data = ;

 }
执行protoc.exe HelloService.proto -I=. --cpp_out=. 和protoc.exe HelloService.proto -I=. --grpc_out=. --plugin=protoc-gen-grpc=grpc_cpp_plugin.exe生成编译产物
服务器:HelloService_server.cpp
 #include "HelloService.grpc.pb.h"

 #include <iostream>

 #include <grpc/grpc.h>

 #include <grpcpp/server.h>

 #include <grpcpp/server_builder.h>

 #include <grpcpp/server_context.h>

 #include <grpcpp/security/server_credentials.h>

 class HelloServiceImpl final :public HelloService::Service

 {

     grpc::Status SayHello(grpc::ServerContext* context, const ::Request* request, ::Response* response)

     {

         std::cout << request->data() << std::endl;

         response->set_data("hello from server");

         return grpc::Status::OK;

     }

 };

 void RunServer()

 {

     std::string server_address("127.0.0.1:57501");

     HelloServiceImpl service;

     grpc::ServerBuilder builder;

     builder.AddListeningPort(server_address, grpc::InsecureServerCredentials());

     builder.RegisterService(&service);

     std::unique_ptr<grpc::Server> server(builder.BuildAndStart());

     std::cout << "Server listening on " << server_address << std::endl;

     server->Wait();

 }

 int main(int argc, char ** argv)

 {

     RunServer();

     return ;

 }
客户端:HelloService_client.cpp
 #include "HelloService.grpc.pb.h"

 #include <iostream>

 #include <memory>

 #include <grpc/grpc.h>

 #include <grpcpp/channel.h>

 #include <grpcpp/client_context.h>

 #include <grpcpp/create_channel.h>

 #include <grpcpp/security/credentials.h>

 class HelloServiceClient

 {

 public:

     HelloServiceClient(std::shared_ptr<grpc::ChannelInterface> channel) :stub(HelloService::NewStub(channel))

     {

     }

     bool SayHello()

     {

         grpc::ClientContext context;

         Request req;

         req.set_data("send from client");

         Response resp;

         stub->SayHello(&context,req,&resp);

         std::cout << resp.data() << std::endl;

         return true;

     }

 private:

     std::unique_ptr<HelloService::Stub> stub;

 };

 int main(int argc,char ** argv)

 {

     HelloServiceClient client(grpc::CreateChannel("127.0.0.1:57501", grpc::InsecureChannelCredentials()));

     client.SayHello();

     return ;

 }
编译时需要注意设置_WIN32_WINNT大于等于0x600 ,添加address_sorting.lib、gpr.lib、grpc.lib、grpc++.lib、libprotobuf.lib、zlibstat.lib、libeay32.lib、ssleay32.lib、ws2_32.lib、cares.lib这些lib。
测试结果:
服务器: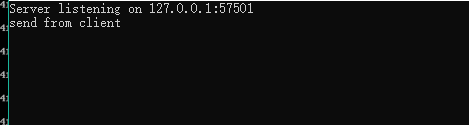
客户端: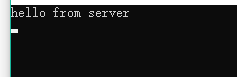
Fedora编译教程
直接执行sudo dnf install grpc grpc-devel protobuf-compiler grpc-plugins即可
测试案例:
代码同上
备注:执行protoc HelloService.proto -I=. --grpc_out=. --plugin=protoc-gen-grpc=grpc_cpp_plugin可能会出现下面的错误:
grpc_cpp_plugin: program not found or is not executable
--grpc_out: protoc-gen-grpc: Plugin failed with status code 1.
改成执行protoc HelloService.proto -I=. --grpc_out=. --plugin=protoc-gen-grpc=/usr/bin/grpc_cpp_plugin就行了
使用上面的代码执行g++ -o client HelloService_client.cpp HelloService.grpc.pb.cc HelloService.pb.cc -lgrpc++ -lprotobuf -std=c++17和 g++ -o server HelloService_server.cpp HelloService.grpc.pb.cc HelloService.pb.cc -lgrpc++ -lprotobuf -std=c++17编译
测试结果:

gRPC编译教程的更多相关文章
- CM12同步源码及编译教程
同时提供基于安卓5.0的MKL魔趣猪扒饭编译教程~[玩机组出品]魔趣猪扒饭MKL50.1编译教程http://www.oneplusbbs.com/forum.php?mod=viewthread&a ...
- Android反编译教程
本文摘自 http://blog.csdn.net/ithomer/article/details/6727581 本文Android反编译教程,测试环境: Win7 Ultimate x64 Ubu ...
- DevExpress Components16.2.6 Source Code 重编译教程
DevExpress 是一个比较有名的界面控件套件,提供了一系列优秀的界面控件.这篇文章将展示如何在拥有源代码的情况下,对 DevExpress 的程序集进行重新编译. 特别提示:重编译后,已安装好的 ...
- CM12.1/13.0编译教程
环境搭建 1.安装64位Ubuntu系统(实体安装.虚拟机安装均可) 注意:要求机器至少4G内存(虚拟机至少分配4G内存),硬盘至少100G空间(源码20G+,编译后整个目录约60~70G) 安装方法 ...
- Mysql 源码编译教程贴
题外话:这是一篇教程贴,不仅学的是mysql的编译,还是一些编译的知识.我也是一个菜鸟,写一些感悟和心得,有什么问题可以批评指正,谢谢! 如果只是为了安装请移到我的另一篇安装贴: Mysql安装贴 环 ...
- QT5静态编译教程,主要针对vs2012(渡世白玉)
QT5,VS2012静态编译,所有的库准备充分的话qwebkit也可以静态编译通过,但是我编译的版本使用中如果用了QWEBVIEW控件在连接时会出错. 注:我自己编译的环境是:win server 2 ...
- Ogre源码编译教程
最近突然发现Ogre引擎更新到2.1版本了,既然依旧是代码开源,本着学习的精神就下载下来弄弄.但是官网提供的SDK版本只有1.9的,考虑到学习的便利性,因此最好从Source版本开始弄,这样的话以后想 ...
- MicroPython-TPYBoard固件编译教程
本文主要介绍一下,在Linux环境下编译micropython固件的方法和流程. 首先,我们先来看一下MicroPython的源码结构. github地址:https://github.com/mic ...
- 深度学习-Windows平台下的Caffe编译教程
一.安装CUDA7.5 Cuda是英伟达推出的GPU加速运算平台 我这里安装的是cuda7.5,已经安装过的忽略,还没有安装过的这里有安装教程.windows下面安装还是非常简单的. https:// ...
随机推荐
- Android 一般动画animation和属性动画animator
1 2 3 4 5 6 7 8 9 10 11 12 13 14 15 16 17 18 19 20 21 22 23 24 25 26 27 28 29 30 31 32 33 34 35 36 3 ...
- Unity3D_(地形)创建基本场景
第一人称漫游场景 地形漫游系统: (自己绘制的GIF文件超过20MB放不上博客园.截取了几张图片)按键盘上的“上下左右”可以控制第一人称的漫游视角 资源包和项目源文件:传送门 自己做的项目可执行文件: ...
- HDU 5818 Joint Stacks (优先队列)
Joint Stacks 题目链接: http://acm.hdu.edu.cn/showproblem.php?pid=5818 Description A stack is a data stru ...
- vi 学习
1,光标移动 1)h:左:l:右:j:下:k:上:和方向键不同的是,不会造成折行 2)0:行首:$行尾:G:最后一行第一个字符;gg:第一行第一个字符:^:本行第一个非空白字符:H:移至屏幕第一个字符 ...
- Django日志的配置
做开发离不开日志,以下是我在工作中写Django项目常用的logging配置. BASE_LOG_DIR = os.path.join(BASE_DIR, "log") LOG ...
- 构建基于Electron开发的软件遇到的问题
构建pdman时,报了好些错. 主要还是网络问题和版本不一致导致的. 前提 npm设置淘宝源,自行搜索. 版本 上面是官方要求的node环境. 需要首先安装nvm, brew install nvm ...
- track-by的使用
<!DOCTYPE html><html lang="en"><head> <meta charset="UTF-8" ...
- leetcode 328 奇偶链表
更新代码: 开头检测是否需要调整(是否具有第三个节点) 使用三个ListNode* 变量记录奇偶链表的头尾headA,tailA为奇链表,headB为偶数链表,由于只需要最后令tailA->ne ...
- viewpager标签栏之PagerTab
import android.content.Context; import android.graphics.Canvas; import android.graphics.Paint; impor ...
- GO开发:链表
链表 type Student struct { Name string Next* Student } 每个节点包含下一个节点的地址,这样把所有的节点串起来了,通常把链表中的第一个节点叫做链表头 p ...