.28-浅析webpack源码之compiler.resolvers
原本该在过WebpackOptionsApply时讲解这个方法的,但是当时一不小心过掉了,所以在这里补上。
compiler.resolvers
该对象的三个方法均在WebpackOptionsApply中生成,代码如下:
compiler.resolvers.normal = ResolverFactory.createResolver(Object.assign({

    fileSystem: compiler.inputFileSystem

}, options.resolve));

compiler.resolvers.context = ResolverFactory.createResolver(Object.assign({

    fileSystem: compiler.inputFileSystem,

    resolveToContext: true

}, options.resolve));

compiler.resolvers.loader = ResolverFactory.createResolver(Object.assign({

    fileSystem: compiler.inputFileSystem

}, options.resolveLoader));
由于调用的是一个工厂函数,所以用normal作为示例讲解。
/*

    "resolve": {

        "unsafeCache": true,

        "modules": ["node_modules"],

        "extensions": [".js", ".json"],

        "mainFiles": ["index"],

        "aliasFields": ["browser"],

        "mainFields": ["browser", "module", "main"],

        "cacheWithContext": false

    },

*/

compiler.resolvers.normal = ResolverFactory.createResolver(Object.assign({

    fileSystem: compiler.inputFileSystem

}, options.resolve));
其中参数中的resolve取了默认值,如注释所示。
ResolveFactory.createResolver
这个方法比较有意思,一块一块的来看源码,所有注释保留英文原文更好理解:
exports.createResolver = function(options) {

    //// OPTIONS ////

    // A list of directories to resolve modules from, can be absolute path or folder name

    // 模块文件夹的目录或者文件夹名称

    var modules = options.modules || ["node_modules"];

    // A list of description files to read from

    // 描述配置文件名

    var descriptionFiles = options.descriptionFiles || ["package.json"];

    // A list of additional resolve plugins which should be applied

    // The slice is there to create a copy, because otherwise pushing into plugins

    // changes the original options.plugins array, causing duplicate plugins

    // 额外的插件

    var plugins = (options.plugins && options.plugins.slice()) || [];

    // A list of main fields in description files

    // 不知道干啥的

    var mainFields = options.mainFields || ["main"];

    // A list of alias fields in description files

    // 不知道干啥的

    var aliasFields = options.aliasFields || [];

    // A list of main files in directories

    // 模块主入口文件名

    var mainFiles = options.mainFiles || ["index"];

    // A list of extensions which should be tried for files

    // 默认的文件扩展名

    var extensions = options.extensions || [".js", ".json", ".node"];

    // Enforce that a extension from extensions must be used

    var enforceExtension = options.enforceExtension || false;

    // A list of module extensions which should be tried for modules

    var moduleExtensions = options.moduleExtensions || [];

    // Enforce that a extension from moduleExtensions must be used

    var enforceModuleExtension = options.enforceModuleExtension || false;

    // A list of module alias configurations or an object which maps key to value

    // 别名

    var alias = options.alias || [];

    // ...还有一些其他奇奇怪怪的属性

    //// options processing ////

    // ...第二部分

};
这一步是包装参数,主要看注释,基本上对resolve参数下的各个key都做了解释,有一些实在不知道干啥用的就省略了。
基本上可能会自定义的大概只有extensions、alias两个属性。
下面来看第二部分:
exports.createResolver = function(options) {

    //// OPTIONS ////

    // ...第一部分

    //// options processing ////

    if (!resolver) {

        // useSyncFileSystemCalls默认为undefined

        resolver = new Resolver(useSyncFileSystemCalls ? new SyncAsyncFileSystemDecorator(fileSystem) : fileSystem);

    }

    // 数组包装

    extensions = [].concat(extensions);

    moduleExtensions = [].concat(moduleExtensions);

    // 返回[['node_modules']]

    modules = mergeFilteredToArray([].concat(modules), function(item) {

        return !isAbsolutePath(item);

    });

    // 不懂这个参数干啥的

    // 返回一个对象数组

    mainFields = mainFields.map(function(item) {

        if (typeof item === "string") {

            item = {

                name: item,

                forceRelative: true

            };

        }

        return item;

    });

    // 处理别名

    if (typeof alias === "object" && !Array.isArray(alias)) { /**/ }

    // 不知道什么东西

    if (unsafeCache && typeof unsafeCache !== "object") {

        unsafeCache = {};

    }

    //// pipeline ////

    // ...第三部分

};
这一部分是处理参数,resolver是最后返回的对象,到调用的时候再细看。
几个参数由于不太懂什么作用,处理方法也很简单,就不做解释,这里看一下alias别名的处理:
/*

    alias: {

        'vue$': 'vue/dist/vue.esm.js',

        '@': '../src'

    }

*/

/*

    alias:[

        {

            name: 'vue',

            onlyModule: true,

            alias: 'vue/dist/vue.esm.js'

        },

        {

            name: '@',

            onlyModule: false,

            alias: '../src'

        }

    ]

*/

if (typeof alias === "object" && !Array.isArray(alias)) {

    alias = Object.keys(alias).map(function(key) {

        var onlyModule = false;

        var obj = alias[key];

        // 测试是否以$结尾

        if (/\$$/.test(key)) {

            onlyModule = true;

            key = key.substr(0, key.length - 1);

        }

        // alias的值是否为字符串

        if (typeof obj === "string") {

            obj = {

                alias: obj

            };

        }

        obj = Object.assign({

            name: key,

            onlyModule: onlyModule

        }, obj);

        return obj;

    });

}
这里以vue-cli为例,展示了转换后的alias,看注释就OK了。
第三部分有点恶心,源码大概是这样子的:
exports.createResolver = function(options) {

    //// OPTIONS ////

    // ...第一部分

    //// options processing ////

    // ...第二部分

    //// pipeline ////

    // resolve

    if (unsafeCache) {

        plugins.push(new UnsafeCachePlugin("resolve", cachePredicate, unsafeCache, cacheWithContext, "new-resolve"));

        plugins.push(new ParsePlugin("new-resolve", "parsed-resolve"));

    } else {

        plugins.push(new ParsePlugin("resolve", "parsed-resolve"));

    }

    // ...无穷多的if + plugins.push(...)

    //// RESOLVER ////

    plugins.forEach(function(plugin) {

        resolver.apply(plugin);

    });

    return resolver;

};
虽然有非常多的plugin,但是内部处理形式大同小异。所以就一个常用参数作为例子,比如说:
// described-resolve

alias.forEach(function(item) {

    plugins.push(new AliasPlugin("described-resolve", item, "resolve"));

});
简要的看一下内部,这里的alias就是上面转换后的对象数组。
class AliasPlugin {

    constructor(source, options, target) {

        this.source = source;

        this.name = options.name;

        this.alias = options.alias;

        this.onlyModule = options.onlyModule;

        this.target = target;

    }

    apply(resolver) {

        var target = this.target;

        var name = this.name;

        var alias = this.alias;

        var onlyModule = this.onlyModule;

        resolver.plugin(this.source, function(request, callback) { /**/ });

    }

}
第三部分所有的plugins都是这样的形式。
1、构造函数仅仅获取并初始化值
2、有一个apply方法,接受一个resolver参数
3、注入参数source的事件流
4、在source事件流最后,target参数会在resolver.doResolve方法中被调用,这里省略了代码
在函数的最后,可以看到有一个这样的调用:
plugins.forEach(function(plugin) {

    resolver.apply(plugin);

});
这里就是依次执行所有plugin的apply方法,传入resolver作为参数。
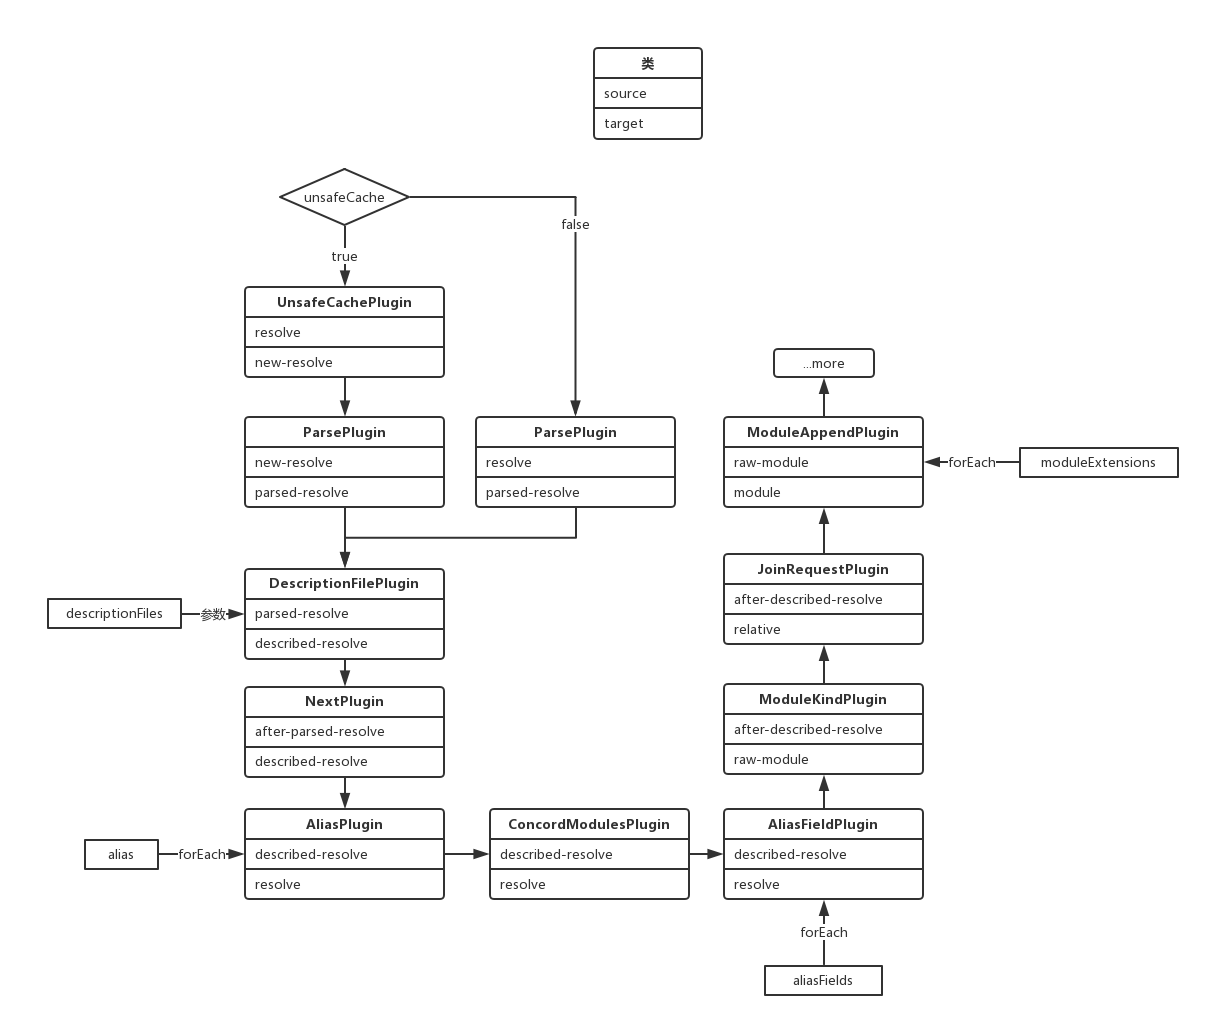
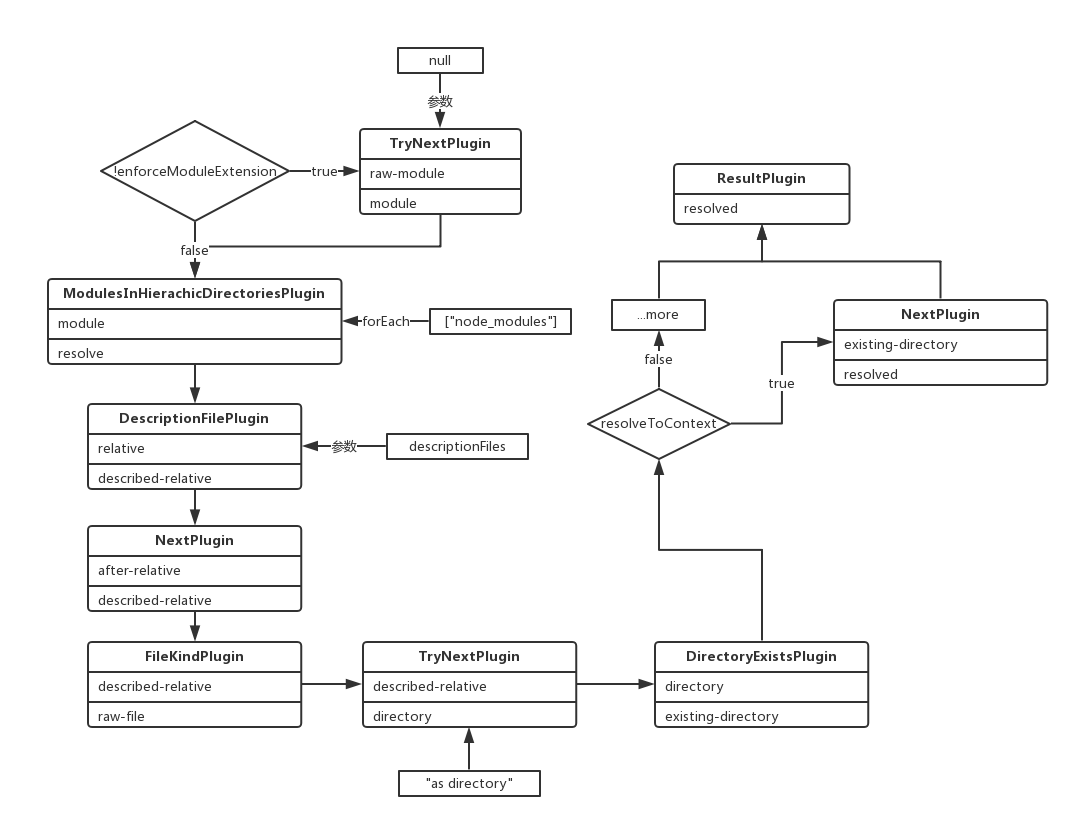
所有的插件plugin流程以示意图的形式给出,这里就不一一分析了。

注入完所有的事件流后,返回这个resolver对象,也就是compiler.resolvers.normal(loader、context)。
.28-浅析webpack源码之compiler.resolvers的更多相关文章
- .30-浅析webpack源码之doResolve事件流(1)
这里所有的插件都对应着一个小功能,画个图整理下目前流程: 上节是从ParsePlugin中出来,对'./input.js'入口文件的路径做了处理,返回如下: ParsePlugin.prototype ...
- .34-浅析webpack源码之事件流make(3)
新年好呀~过个年光打游戏,function都写不顺溜了. 上一节的代码到这里了: // NormalModuleFactory的resolver事件流 this.plugin("resolv ...
- .30-浅析webpack源码之doResolve事件流(2)
这里所有的插件都对应着一个小功能,画个图整理下目前流程: 上节是从ParsePlugin中出来,对'./input.js'入口文件的路径做了处理,返回如下: ParsePlugin.prototype ...
- .3-浅析webpack源码之预编译总览
写在前面: 本来一开始想沿用之前vue源码的标题:webpack源码之***,但是这个工具比较巨大,所以为防止有人觉得我装逼跑来喷我(或者随时鸽),加上浅析二字,以示怂. 既然是浅析,那么案例就不必太 ...
- .17-浅析webpack源码之compile流程-入口函数run
本节流程如图: 现在正式进入打包流程,起步方法为run: Compiler.prototype.run = (callback) => { const startTime = Date.now( ...
- 从Webpack源码探究打包流程,萌新也能看懂~
简介 上一篇讲述了如何理解tapable这个钩子机制,因为这个是webpack程序的灵魂.虽然钩子机制很灵活,而然却变成了我们读懂webpack道路上的阻碍.每当webpack运行起来的时候,我的心态 ...
- 浅析libuv源码-node事件轮询解析(3)
好像博客有观众,那每一篇都画个图吧! 本节简图如下. 上一篇其实啥也没讲,不过node本身就是这么复杂,走流程就要走全套.就像曾经看webpack源码,读了300行代码最后就为了取package.js ...
- webpack源码-依赖收集
webpack源码-依赖收集 version:3.12.0 程序主要流程: 触发make钩子 Compilation.js 执行EntryOptionPlugin 中注册的make钩子 执行compi ...
- .20-浅析webpack源码之compile流程-Template模块
这里的编译前指的是开始触发主要的事件流this-compilaiton.compilation之前,由于还有一些准备代码,这一节全部弄出来. 模块基本上只走构造函数,具体的方法调用的时候再具体讲解. ...
随机推荐
- scrapy框架第一章
操作环境:python2.7+scrapy 安装比较简单,网上教程也超多,就不在此赘述. 示例网站:https://www.cnblogs.com/cate/python/ (爬去关于博客园所有pyt ...
- 我的第一个python web开发框架(19)——产品发布相关事项
好不容易小白将系统开发完成,对于发布到服务器端并没有什么经验,于是在下班后又找到老菜. 小白:老大,不好意思又要麻烦你了,项目已经弄完,但要发布上线我还一头雾水,有空帮我讲解一下吗? 老菜:嗯,系统上 ...
- 跟我一起学JQuery插件开发教程
在逛codeproject网站的时候,突然看到一篇文章:How to write plugin in Jquery. 如果对E文好的同学 ,可以看上面的连接.现在我把上面网站的及结合自己的想法写这篇文 ...
- linux 下安装 sphinx 服务器
准备工作:安装需要的扩展文件 yum install make gcc g++ gcc-c++ libtool autoconf automake imake libxml2-devel expat- ...
- SQL重复记录查询的几种方法
http://www.jb51.net/article/34820.htm \ 1.查找表中多余的重复记录,重复记录是根据单个字段(peopleId)来判断 复制代码 代码如下: select * f ...
- Django学习日记06_视图_URLconf、View
URLconf Django通过URLconf来响应网页请求,在项目设置settings.py中,设定了ROOT_URLCONF值来指定默认的URLconf(即mysite.urls),当HTTPRe ...
- js 类数组arguments详解
arguments并不是一个真正的数组,而是一个"类似数组(array-like)"的对象: 就像下面的这段输出,就是典型的类数组对象: [, , callee: ƒ, Symbo ...
- vue2.0 配置build项目打包目录、资源文件(assets\static)打包目录
vue项目默认的打包路径:根目录下的dist文件夹下: 但是在项目开发中,我们肯定希望项目提交到svn目录或者git目录下,否则每次复制过去,太麻烦了: 那怎么配置打包路径呢?下面来看看: 我们找到打 ...
- iOS中的zxing集成步骤
参照网上各大神文章,自己总结了下如下,欢迎大家指正与交流!(主参照:http://blog.csdn.net/brokge/article/details/9045629) 1. 到 github下载 ...
- vscode运行前端代码
vscode 可安装静态web服务器 Live Server用于运行前端代码,方便调试.最新的 Live Server已支持php动态页面. 安装方法是,点击左侧第五个图标,打开"扩展&q ...