微信授权获取用户openId等信息
在我们开发小程序的时候,需要通过授权获取用户的信息。
第一种使用wx.getUserInfo直接获取微信头像,昵称
// 必须是在用户已经授权的情况下调用

wx.getUserInfo({

    success: function(res) {

        var userInfo = res.userInfo

        var nickName = userInfo.nickName

        var avatarUrl = userInfo.avatarUrl

        var gender = userInfo.gender //性别 0:未知、1:男、2:女

        var province = userInfo.province

        var city = userInfo.city

        var country = userInfo.country

    }

})
第二种方式使用wx.login()
这种方式即将被放弃,目前使用比较多的是的wx.login()。因为直接使用wx.getUserInfo是不能获取更多的信息的,如微信用户的openid。 官方提示,需要发送获取到的code进行请求到微信的后端API。根据文档,只需要进行一个get请求到如下地址即可:
https://api.weixin.qq.com/sns/jscode2session?appid=APPID&secret=SECRET&js_code=JSCODE&grant_type=authorization_codeappid和secret在微信小程序后台可以看到,
js_code为使用wx.login登录时获取到的code参数数据,grant_type这个不用改动。
官方推荐
在login获取到code,然后发送到开发者后端,后端再通过接口去微信后端换取到openid和sessionKey之后,然后把session返回给前端,就已经完成登录行为。而login行为是静默,不必授权的,不会对用户造成骚扰。getUserInfo只是为了提供更优质的服务而存在,比如展示头像昵称,判断性别,通过unionId和其他公众号上已有的用户画像结合起来提供历史数据。所以不必在刚刚进入小程序的时候就强制要求授权。相关代码如下所示。
JS代码

var userInfo= (wx.getStorageSync('userInfo'))

        if (userInfo) {

          wx.getUserInfo({

            success: function (res) {

              that.setData({

                nickName: res.userInfo.nickName,

                avatarUrl: res.userInfo.avatarUrl,

              })

            },

            fail: function () {

              console.log("获取失败!")

            },

            complete: function () {

              console.log("获取用户信息完成!")

            }

          })

        } else {

          wx.login({

            success: function (res) {

              console.log(res.code)

              if (res.code) {

                wx.getUserInfo({

                  withCredentials: true,

                  success: function (res_user) {

                    wx.request({

                     //后台接口地址

                      url: 'https://xxxx.com/wx/login',

                      data: {

                        code: res.code

                      },

                      method: 'GET',

                      header: {

                        'content-type': 'application/json'

                      },

                      success: function (res) {

                        that.setData({

                          userInfo: res.errMsg.userInfo

                        })

                        wx.setStorageSync('userInfo', res.data.userInfo);

                      }

                    })

                  }, fail: function () {

                    wx.showModal({

                      title: '警告通知',

                      content: '您点击了拒绝授权,将无法正常显示个人信息,点击确定重新获取授权。',

                      success: function (res) {

                        if (res.confirm) {

                          wx.openSetting({

                            success: (res) => {

                              if (res.authSetting["scope.userInfo"]) {////如果用户重新同意了授权登录

                                wx.login({

                                  success: function (res_login) {

                                    if (res_login.code) {

                                      wx.getUserInfo({

                                        withCredentials: true,

                                        success: function (res_user) {

                                          wx.request({

                                           url: 'https://xxxx.com/wx/login',

                                            data: {

                                              code: res_login.code

                                             },

                                            method: 'GET',

                                            header: {

                                              'content-type': 'application/json'

                                            },

                                            success: function (res) {

                                              that.setData({

                                                userInfo: res.errMsg.userInfo

                                              })

                                              wx.setStorageSync('userInfo', res.errMsg.userInfo);

                                            }

                                          })

                                        }

                                      })

                                    }

                                  }

                                });

                              }

                            }, fail: function (res) {

                            }

                          })

                        }

                      }

                    })

                  }, complete: function (res) {

                  }

                })

              }

            }

          })

        }

  },

//globalData建议放在app.js,方便统一管理

  globalData: {

    userInfo: null

  }
后端代码
由于我的后端是PHP写的,用的是thinkphp5框架,框架地址:https://www.kancloud.cn/manual/thinkphp5/118003
 /**

     * 小程序登录

     * @return array

     */

    public function login() {

        $code = input('post.code'); //这是从前端传过来的code

        $userInfo = input('post.userInfo');

        $info = json_decode($userInfo, true);

        $user = $info['userInfo'];

        $memberModel = model('Member');

        $appid = "小程序的appid"; //一定要是小程序的appid,不是微信公众号的appid

        $secret = "小程序的secret";

        $url = "https://api.weixin.qq.com/sns/jscode2session?appid=". $appid."&secret=".$secret."&js_code=" . $code . "&grant_type=authorization_code";

        //初始化curl

        $ch = curl_init($url);

        //3.设置参数

        curl_setopt($ch,CURLOPT_RETURNTRANSFER,1);

        curl_setopt($ch, CURLOPT_SSL_VERIFYPEER, false);//跳过证书验证

        curl_setopt($ch, CURLOPT_SSL_VERIFYHOST, false);  // 从证书中检查SSL加密算法是否存在

        $res = curl_exec($ch);

        if(curl_errno($ch)){

            var_dump(curl_error($ch));

        }

        $resArr = json_decode($res,1);

        $data = array();

        curl_close($ch);

        $mapData = array();

//这里我把用户的信息保存起来,方便下次调用,数据库结构我们在下面会介绍

        if (!empty($resArr['openid'])) {

            $res = $memberModel->checkMember($resArr['openid']);

            Log::write('用户信息:' . $memberModel->getLastSql());

            if ($res) {

                $mapData['userInfo'] = $res;

                $mapData['session_key'] = $resArr['session_key'];

                return $this->resMap(200, $mapData, $mapData);

            } else {

                $data['nickName'] = $user['nickName'];

                $data['avatarUrl'] = $user['avatarUrl'];

                $data['m_province'] = $user['province'];

                $data['m_city'] = $user['city'];

                $data['m_gender'] = $user['gender'];

                $data['m_language'] = $user['language'];

                $data['signature'] = $info['signature'];

                $data['iv'] = $info['iv'];

                $data['m_uuid'] = showUuid();

                $data['m_openid'] = $resArr['openid'];

                $data['m_country'] = $resArr['country'];

                $data['m_ip'] = GetIP();

                $data['m_createtime'] = getDateTime(1);

                $memberModel->addOne($data);

                $mapData['userInfo'] = $data;

                $mapData['session_key'] = $resArr['session_key'];

                return $this->resMap(200, $mapData, $mapData);

            }

        } else {

            return $this->resMap(4002, '登录失败', '登录失败');

        }

    }

 /**

     * 返回提示信息

     * @param $code string 错误码  4001 空值  4002 格式不正确  4003 长度  4004 提示  200正确放回 ,0失败

     * @param $msg string 错误描述

     * @param $data string 返回值

     * @return array

     */

    public function resMap($code, $msg, $data)

    {

        $map = array();

        $map['errMsg'] = $msg;

        $map['data'] = $data;

        $map['errCode'] = $code;

        return json($map);

    }
以上就是核心代码,希望对大家有用。在上面,我们需要保存用户的信息,因此我们需要数据库表,下面就谈到表的设计。
用户表的设计
SET FOREIGN_KEY_CHECKS=0;

-- ----------------------------

-- Table structure for `system_member`

-- ----------------------------

DROP TABLE IF EXISTS `system_member`;

CREATE TABLE `system_member` (

  `m_id` INT(11) NOT NULL AUTO_INCREMENT,

  `nickName` VARCHAR(50) DEFAULT NULL COMMENT '用户昵称',

  `avatarUrl` VARCHAR(255) DEFAULT NULL COMMENT '头像',

  `m_province` VARCHAR(40) DEFAULT NULL COMMENT '省份',

  `m_city` VARCHAR(50) DEFAULT NULL COMMENT '城市',

  `m_name` VARCHAR(30) DEFAULT NULL COMMENT '真实姓名',

  `m_gender` TINYINT(1) DEFAULT '3' COMMENT '用户性别(1、男 2、女 3、未知)',

  `m_createtime` DATETIME DEFAULT NULL COMMENT '创建时间',

  `m_country` VARCHAR(100) DEFAULT NULL COMMENT '国家',

  `m_language` VARCHAR(50) DEFAULT NULL COMMENT '语言',

  `m_openid` VARCHAR(50) DEFAULT NULL COMMENT 'openID',

  `m_ip` VARCHAR(15) DEFAULT NULL COMMENT 'IP',

  `m_mobile` VARCHAR(20) DEFAULT NULL COMMENT '手机号码',

  `m_uuid` VARCHAR(50) DEFAULT NULL,

  `m_username` VARCHAR(50) DEFAULT NULL COMMENT '用户名',

  `m_pwd` VARCHAR(50) DEFAULT NULL COMMENT '密码',

  `session_key` VARCHAR(255) DEFAULT NULL COMMENT '会话密钥',

  `unionid` VARCHAR(255) DEFAULT NULL COMMENT '用户在开放平台的唯一标识符',

  `signature` VARCHAR(255) DEFAULT NULL,

  `iv` VARCHAR(255) DEFAULT NULL,

  `k_id` VARCHAR(50) DEFAULT NULL,

  `k_openid` VARCHAR(80) DEFAULT NULL,

  PRIMARY KEY (`m_id`)

) ENGINE=INNODB AUTO_INCREMENT=9 DEFAULT CHARSET=utf8 COMMENT='获取用户小程序信息';
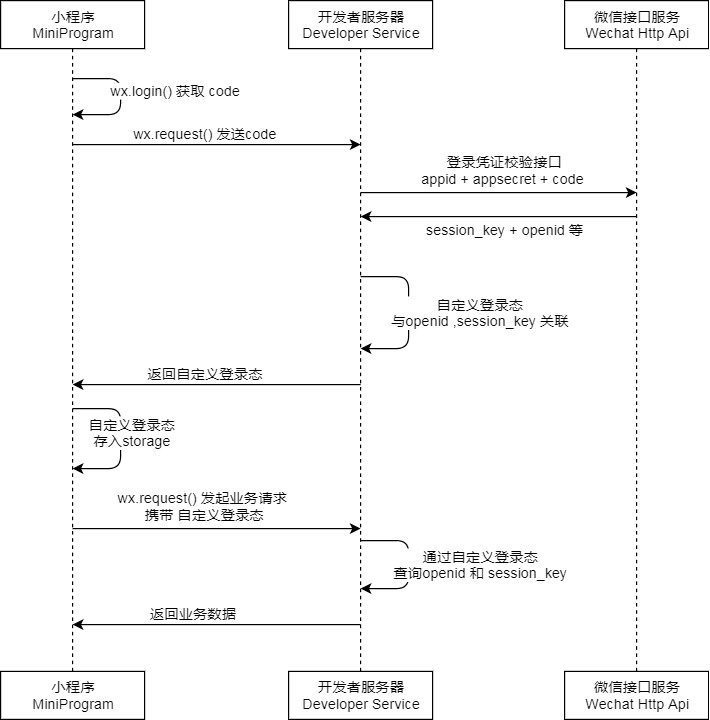
以上就是获取用户信息的完整流程,下面我们附上一张用户登录的流程图。
如果大家有什么不明白的地方,可以加入我们的微信交流群:731568857,里面有很多技术资源。或者关注我们的微信公众号。

JS代码var userInfo= (wx.getStorageSync('userInfo')) if (userInfo) { wx.getUserInfo({ success: function (res) { that.setData({ nickName: res.userInfo.nickName, avatarUrl: res.userInfo.avatarUrl, }) }, fail: function () { console.log("获取失败!") }, complete: function () { console.log("获取用户信息完成!") } }) } else { wx.login({ success: function (res) { console.log(res.code) if (res.code) { wx.getUserInfo({ withCredentials: true, success: function (res_user) { wx.request({ //后台接口地址 url: 'https://xxxx.com/wx/login', data: { code: res.code }, method: 'GET', header: { 'content-type': 'application/json' }, success: function (res) { that.setData({ userInfo: res.errMsg.userInfo }) wx.setStorageSync('userInfo', res.data.userInfo);
} }) }, fail: function () { wx.showModal({ title: '警告通知', content: '您点击了拒绝授权,将无法正常显示个人信息,点击确定重新获取授权。', success: function (res) { if (res.confirm) { wx.openSetting({ success: (res) => { if (res.authSetting["scope.userInfo"]) {////如果用户重新同意了授权登录 wx.login({ success: function (res_login) { if (res_login.code) { wx.getUserInfo({ withCredentials: true, success: function (res_user) { wx.request({ url: 'https://xxxx.com/wx/login', data: { code: res_login.code }, method: 'GET', header: { 'content-type': 'application/json' }, success: function (res) { that.setData({ userInfo: res.errMsg.userInfo
}) wx.setStorageSync('userInfo', res.errMsg.userInfo); } }) } }) } } }); } }, fail: function (res) {
} })
} } }) }, complete: function (res) {
} }) } } })
} },//globalData建议放在app.js,方便统一管理 globalData: { userInfo: null }
微信授权获取用户openId等信息的更多相关文章
- 微信授权获取用户openid前端实现
近来,倒霉的后台跟我说让我拿个openid做微信支付使用,寻思很简单,开始干活. 首先引导用户打开如下链接,只需要将appid修改为自己的就可以,redirect_url写你的重定向url h ...
- 微信公众号网页授权获取用户openid
最近一个项目是在微信公众号内二次开发,涉及到微信公众号支付,根据文档要求想要支付就必须要获取到用户的openid. 这是微信官方文档https://mp.weixin.qq.com/wiki?t=re ...
- 微信接口-获取用户openid基本信息
一.协助获取微信用户openid功能 https://open.weixin.qq.com/connect/oauth2/authorize?appid=APPID&redirect_uri= ...
- 微信授权获取code/openid
微信网页授权 如果用户在微信客户端中访问第三方网页,公众号可以通过微信网页授权机制,来获取用户基本信息,进而实现业务逻辑. 关于网页授权回调域名的说明 1.在微信公众号请求用户网页授权之前,开发者需要 ...
- 微信h5静默和非静默授权获取用户openId和用户信息的方法和步骤:
原文链接:https://blog.csdn.net/qq_35430000/article/details/79299529 一.openId是什么?openId是用户在当前公众号下的唯一标识('身 ...
- 微信网页授权获取用户openid及用户信息
$code = $_GET["code"];//获取code $appid=“xxxx”;//公众号appid $APPSECRET="xxx";//公众号ap ...
- 微信公众号订阅号以及服务号通过网页授权获取用户openid方法
微信官方文档:https://mp.weixin.qq.com/wiki?t=resource/res_main&id=mp1421140842 官方流程 网页授权流程分为四步: 1.引导用户 ...
- 微信开发获取用户OpenID
第一次开发微信版网页,对最重要的获取微信OpenId,特此记录下来 1.首先得有appid和appsecret . public class WeiXin { public static string ...
- MVC 微信开发获取用户OpenID
第一次开发微信版网页,对最重要的获取微信OpenId,特此记录下来 1.首先得有appid和appsecret . public class WeiXin { public static string ...
随机推荐
- sklearn learn preprocessing
train_test_split sklearn.model_selection.train_test_split(*arrays, test_size(float,int/None),#defaul ...
- 对只转发结果集的无效操作:provious()
原因:结果集没有设置为可滚动 解决方法: 将stat = conn.createStatement(); 改为 stmt=conn.createStatement(ResultSet.TYPE_SCR ...
- 芯灵思Sinlinx A64 Linux&qt编译安装
开发平台 芯灵思Sinlinx A64 内存: 1GB 存储: 4GB 详细参数 https://m.tb.cn/h.3wMaSKm 开发板交流群 641395230 前提条件搭建好CentOS环境 ...
- 网络请求 selenium
网络请求 selenium 部分流程: 第一:爬虫引擎生成requests请求,送往scheduler调度模块,进入等待队列,等待调度.第二:scheduler模块开始调度这些requests,出队, ...
- servlet_4
过滤器入门 过滤器的概念及执行基本流程 过滤器的使用场景 过滤器的实现及基本配置 过滤器链 过滤器链的配置 使用注解的方式无法保证过滤器链的执行顺序,所以只能使用web.xml的配置 按照出现在web ...
- security cookie 机制(2)--- 初始化___security_cookie
在 cookie 检查中,必定先要取出初始的 cookie 值: 0011392E A1 14 70 11 00 mov eax,dword ptr [___securit ...
- 【java】异常
异常体系:Throwable ---Error 通常出现重大问题:如类不存在或者内存溢出.停止运行,不对代码进行处理 ---Exception 在运行时出现的情况,可以进行针对性处理.可以通过try ...
- 转 一个oracle11g 使用exp导出空表丢失的问题分析及解决办法
用exp无法导出空表解决方法 最早的一次使用oracle 11g导出数据发现有的表丢失了,感觉莫名其妙的,后来终于找到原因了. 找到问题以后,再看看解决方案.11GR2中有个新特性,当表无数据时,不分 ...
- 简单的AOP标签
常用标签 1.1<aop:config> //作用 用于声明aop的配置 //配置:<aop:config></aop:config> 1.2 <aop:as ...
- 调整Eclipse中代码字体字号
Window-->preferences-->general-->appearence-->Colors and fonts中的Basic节点选text font,Edit一下