automake - 使用 autotools 工具集
建议阅读GNU Automake 官方文档,系统学习 automake 的用法。
---------------------------------------------------------------------------------------------(以下内容仅供参考)
一般而言,对于小项目或玩具程序,手动编写 Makefile 即可。但对于大型项目,手动编写维护 Makefile 成为一件费时费力的无聊工作。
本文介绍 autotools 工具集自动生成符合 Linux 规范的 Makefile 文件。
如果读者没有安装 autotools 工具集,安装命令如下,
$ sudo apt-get install automake
安装完成之后,会有如下工具可用,
aclocal
autoscan
autoconf
autoheader
automake
一般大型项目,代码组织结构分为两种,一种是所有文件都在同一个目录下的 flat 结构,另一种是按层次组织的多文件夹形式。先来看第一种,
flat 结构的项目使用 autotools 工具集
本篇测试代码如下,
入口代码 int_arithmetic.c
#include <stdio.h>

#include <stdlib.h>

#include <unistd.h>

#include "sum.h"

#include "sub.h"

#include "mul.h"

#include "div.h"

int main()

{

    printf("======== < Integer Arithmethic > ========\n");

    int x, y;

    printf("Enter two integer: ");

    scanf("%d%d", &x, &y);

    int sm = sum(x, y);

    printf("sum is: %d\n", sm);

    int sb = sub(x, y);

    printf("sub is: %d\n", sb);

    int ml = mul(x, y);

    printf("mul is: %d\n", ml);

    int dv = divide(x, y);

    printf("div is: %d\n", dv);

    return ;

}
辅助代码,头文件,
sum.h
#ifndef SUM_H_

#define SUM_H_

int sum(int x, int y);

#endif
sub.h
#ifndef SUB_H_

#define SUB_H_

int sub(int x, int y);

#endif
mul.h
#ifndef MUL_H_

#define MUL_H_

int mul(int x, int y);

#endif
div.h
#ifndef DIV_H_

#define DIV_H_

int divide(int x, int y);

#endif
辅助代码,实现文件,
sum.c
#include "sum.h"

int sum(int x, int y)

{

    return x + y;

}
sub.c
#include "sub.h"

int sub(int x, int y)

{

    return x - y;

}
mul.c
#include "mul.h"

int mul(int x, int y)

{

    return x * y;

}
div.c
#include "div.h"

#include <stdio.h>

int divide(int x, int y)

{

    if(x % y != )

        printf("\nWarning: Integer Division May Have Accuracy Loss.\n");

    return x / y;

}
1) 在项目目录下,运行 autoscan 命令,生成 configure.scan 文件,内容如下,
#                                               -*- Autoconf -*-

# Process this file with autoconf to produce a configure script.

AC_PREREQ([2.69])

AC_INIT([FULL-PACKAGE-NAME], [VERSION], [BUG-REPORT-ADDRESS])

AC_CONFIG_SRCDIR([int_arithmetic.c])

AC_CONFIG_HEADERS([config.h])

# Checks for programs.

AC_PROG_CC

# Checks for libraries.

# Checks for header files.

AC_CHECK_HEADERS([stdlib.h unistd.h])

# Checks for typedefs, structures, and compiler characteristics.

# Checks for library functions.

AC_OUTPUT
重命名 configure.scan 为 configure.ac ,并修改其内容为,
#                                               -*- Autoconf -*-

# Process this file with autoconf to produce a configure script.

AC_PREREQ([2.69])

#AC_INIT([FULL-PACKAGE-NAME], [VERSION], [BUG-REPORT-ADDRESS])

AC_INIT(int_arithmetic, 0.1, ggao@micron.com)

AM_INIT_AUTOMAKE(int_arithmetic, 0.1)

AC_CONFIG_SRCDIR([int_arithmetic.c])

AC_CONFIG_HEADERS([config.h])

# Checks for programs.

AC_PROG_CC

# Checks for libraries.

# Checks for header files.

AC_CHECK_HEADERS([stdlib.h unistd.h])

# Checks for typedefs, structures, and compiler characteristics.

# Checks for library functions.

AC_CONFIG_FILES([Makefile])

AC_OUTPUT
上述 configure.ac 中宏定义意义如下,
AC_PREREQ         : 声明 autoconf 的版本号
AC_INIT           : 声明软件名称,版本号及 bug report 地址
AM_INIT_AUTOMAKE  : automake 需要的信息,参数为软件名和版本号
AC_CONFIG_SRCDIR  : autoscan 侦测的源文件名,用来确定目录的有效性
AC_CONFIG_HEADERS : autoscan 定义要生成的头文件,后续 autoheader 要使用
AC_PROG_CC        : 指定编译器,默认为 gcc
AC_CHECK_HEADERS  : autoscan 侦测到的头文件
AC_CONFIG_FILES   : 指定生成 Makefile,如果是多目录结构,可指定生成多个Makefile,以空格分隔,例如,AC_CONFIG_FILES([Makefile src/Makefile])
AC_OUTPUT         : autoscan 输出
2) 运行 aclocal,根据 configure.ac 生成 aclocal.m4 文件,该文件主要处理各种宏定义
3) 运行 autoconf,将 configure.ac 中的宏展开,生成 configure 脚本,这过程中可能会用到 aclocal.m4
4) 执行 autoheader,生成 config.h.in 文件,该命令通常会从 "acconfig.h” 文件中复制用户附加的符号定义。该例子中没有附加的符号定义, 所以不需要创建 "acconfig.h” 文件
5) 创建 Makefile.am 文件,automake工具会根据 configure.in 中的参量把 Makefile.am 转换成 Makefile.in 文件,最终通过 Makefile.in 生成 Makefile
AUTOMAKE_OPTIONS=foreign

bin_PROGRAMS=int_arithmetic

int_arithmetic_SOURCES=int_arithmetic.c sum.c sub.c mul.c div.c
include_HEADERS=sum.h sub.h mul.h div.h
对上述 makefile.am 中各标签的解释,
AUTOMAKE_OPTIONS       : 由于 GNU 对自己发布的软件有严格的规范, 比如必须附带许可证声明文件 COPYING 等,否则 automake 执行时会报错。
                automake 提供了3中软件等级: foreign, gnu, gnits, 默认级别是gnu, 在本例中,使用 foreign 等级,它只检测必须的文件。
bin_PROGRAMS           : 要生成的可执行文件名称,如果要生成多个可执行文件,用空格隔开。
int_arithmetic_SOURCES : 可执行文件依赖的所有源文件。
6) 手动添加必要的文件 NEWS,README,AUTHORS,ChangeLog
7) 执行 automake --add-missing ,该命令生成 Makefile.in 文件。使用选项 "--add-missing" 可以让 automake 自动添加一些必需的脚本文件。
8) 执行 ./configure 生成 Makefile
====>>> 至此 Makefile 生成完毕。
如果要继续安装,
9) $ make
10) $ sudo make install 即可将可执行文件安装在 /usr/local/bin/ 目录下,以后就可以直接使用啦
11) $ sudo make uninstall 即可将安装的可执行文件从 /usr/local/bin 目录下移除
如果要发布你的软件,
12) $ make dist 即可打包生成 xxx-version.tar.gz 文件
如果要清理中间文件,
13) make clean
14) make distclean
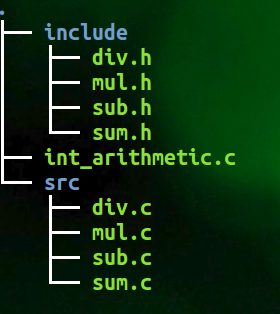
层次结构的项目使用 autotools 工具集
当前项目层次结构如下图,
主入口函数 int_arithmetic.c
#include <stdio.h>

#include <stdlib.h>

#include <unistd.h>

#include "include/sum.h"

#include "include/sub.h"

#include "include/mul.h"

#include "include/div.h"

int main()

{

    printf("======== < Integer Arithmethic > ========\n");

    int x, y;

    printf("Enter two integer: ");

    scanf("%d%d", &x, &y);

    int sm = sum(x, y);

    printf("sum is: %d\n", sm);

    int sb = sub(x, y);

    printf("sub is: %d\n", sb);

    int ml = mul(x, y);

    printf("mul is: %d\n", ml);

    int dv = divide(x, y);

    printf("div is: %d\n", dv);

    return ;

}
头文件,
sum.h
#ifndef SUM_H_

#define SUM_H_

int sum(int x, int y);

#endif
sub.h
#ifndef SUB_H_

#define SUB_H_

int sub(int x, int y);

#endif
mul.h
#ifndef MUL_H_

#define MUL_H_

int mul(int x, int y);

#endif
div.h
#ifndef DIV_H_

#define DIV_H_

int divide(int x, int y);

#endif
实现文件,
sum.c
#include "../include/sum.h"

int sum(int x, int y)

{

    return x + y;

}
sub.c
#include "../include/sub.h"

int sub(int x, int y)

{

    return x - y;

}
mul.c
#include "../include/mul.h"

int mul(int x, int y)

{

    return x * y;

}
div.c
#include "../include/div.h"

#include <stdio.h>

int divide(int x, int y)

{

    if(x % y != )

        printf("\nWarning: Integer Division May Have Accuracy Loss.\n");

    return x / y;

}
1) 在项目顶层目录,建立文件 Makefile.am, 内容如下,
AUTOMAKE_OPTIONS=foreign     		   # 软件等级

SUBDIRS=src  				   # 先扫描子目录

bin_PROGRAMS=int_arithmetic    		   # 软件生成后的可执行文件名称

int_arithmetic_SOURCES=int_arithmetic.c    # 当前目录源文件

int_arithmetic_LDADD=src/libsrc.a          # 静态连接方式,连接 src 下生成的 libsrc.a 文件

#LIBS = -l xxx -l xxx                      # 添加必要的库
在 src 目录,建立文件 Makefile.am,内容如下,
noinst_LIBRARIES=libsrc.a                  # 生成的静态库文件名称,noinst加上之后是只编译,不安装到系统中

libsrc_a_SOURCES=sum.c sub.c mul.c div.c   # 这个静态库文件需要用到的依赖

include_HEADERS=../include/sum.h ../include/sub.h ../include/mul.h ../include/div.h  # 导入需要依赖的头文件
2) 执行 autoscan 生成 configure.scan 文件, 如下,
#                                               -*- Autoconf -*-

# Process this file with autoconf to produce a configure script.

AC_PREREQ([2.69])

AC_INIT([FULL-PACKAGE-NAME], [VERSION], [BUG-REPORT-ADDRESS])

AC_CONFIG_SRCDIR([int_arithmetic.c])

AC_CONFIG_HEADERS([config.h])

# Checks for programs.

AC_PROG_CC

# Checks for libraries.

# Checks for header files.

AC_CHECK_HEADERS([stdlib.h unistd.h])

# Checks for typedefs, structures, and compiler characteristics.

# Checks for library functions.

AC_CONFIG_FILES([Makefile

                 src/Makefile])

AC_OUTPUT
重命名 configure.scan 为 configure.ac 并修改如下,
#                                               -*- Autoconf -*-

# Process this file with autoconf to produce a configure script.

AC_PREREQ([2.69])

#AC_INIT([FULL-PACKAGE-NAME], [VERSION], [BUG-REPORT-ADDRESS])

AC_INIT(int_arithmetic, 0.1, ggao@micron.com)

AM_INIT_AUTOMAKE(int_arithmetic, 0.1)

# Generate static lib

AC_PROG_RANLIB

AC_CONFIG_SRCDIR([int_arithmetic.c])

AC_CONFIG_HEADERS([config.h])

# Checks for programs.

AC_PROG_CC

# Checks for libraries.

# Checks for header files.

AC_CHECK_HEADERS([stdlib.h unistd.h])

# Checks for typedefs, structures, and compiler characteristics.

# Checks for library functions.

AC_CONFIG_FILES([Makefile

                 src/Makefile])

AC_OUTPUT
3) 执行 aclocal
4) 运行 autoconf
5) 运行 autoheader
6) 手动添加必要的文件 NEWS,README,AUTHORS,ChangeLog
7) 执行 automake --add-missing
8) 执行 ./configure 生存 Makefile
====>>> 至此 Makefile 生成完毕。
如果要继续安装,
9) $ make
10) $ sudo make install 即可将可执行文件安装在 /usr/local/bin/ 目录下,以后就可以直接使用啦
11) $ sudo make uninstall 即可将安装的可执行文件从 /usr/local/bin 目录下移除
如果要发布你的软件,
12) $ make dist 即可打包生成 xxx-version.tar.gz 文件
如果要清理中间文件,
13) make clean
14) make distclean
====>>> 感谢原创作者的分享 http://blog.csdn.net/initphp/article/details/43705765
完。
automake - 使用 autotools 工具集的更多相关文章
- Open Source 开发工具集
Open Source 开发工具集 转自:http://www.linuxforum.net原作者:gogoliu(Pooh-Bah) 编辑器: vi:老牌编辑器,在各个unix和unix-like平 ...
- (6)autotools工具的使用
autotools是专门用来生成Makefile的一系列工具,包括autoscan.aclocal.autoheader.autoconf.automake等. (1)autotools ...
- 使用autotools工具用configure、make、make install编译安装linux工程的详细步骤
使用autotools工具用configure.make.make install编译安装linux工程的详细步骤 转载tmxkwzy 最后发布于2016-11-24 10:20:15 阅读数 324 ...
- 价值1400美元的CEH(道德黑客)认证培训课程长啥样?(3)工具集
美元的CEH(道德黑客)认证培训课程长啥样?(3)工具集 这是我收到的CEH官方发来的邮件,参加CEH认证培训原价为1424.25刀,可以给我便宜到1282刀.只有一个感觉,心在流血.站在这价值120 ...
- Apache Commons 工具集
一.Commons BeanUtils http://jakarta.apache.org/commons/beanutils/index.html 说明:针对Bean的一个工具集.由于Bean往往是 ...
- kali linux 渗透测试视频教程 第五课 社会工程学工具集
第五课 社会工程学工具集 文/玄魂 教程地址:http://edu.51cto.com/course/course_id-1887.html 目录 第五课社会工程学工具集 SET SET的社会工程 ...
- 如何判断平台工具集去做条件编译(VC++目录、预处理器定义、$(PlatformToolsetVersion))
作者:zyl910 从VS2010开始,提供了一个平台工作集(Platform ToolSet)选项用于配制vc编译版本.到了VS2012,更是因为默认平台工具集不支持WindowsXP,导致经常需要 ...
- VS平台工具集版本
参考:http://blog.csdn.net/hillseas/article/details/47373313 VS从2010之后开始支持使用之前的版本进行编译,可以在工程属性->常规中进行 ...
- Android虚拟环境的工具集Genymotion完整安装教程
Genymotion提供Android虚拟环境的工具集.相信很多Android开发者一定受够了速度慢.体验差效率及其地下的官方模拟器了.如果你没有物理机器,又不想忍受官方模拟器的折磨,Genymoti ...
随机推荐
- C# Dev XtraReport 简单测试
using System; using System.Collections.Generic; using System.Linq; using System.Text; using DevExpre ...
- HTML浏览器标题栏如何设置
浏览器标题栏如何设置 只需要在HTML中的 <head></head> 内加入 “Link’’ 和 “Title” 标签即可.献上代码: <head> <me ...
- 用ajax对数据进行删除和查看
删除和查看详情操作的共同语句:就是怎么显示表? 1.在主体中写表的开头行,想要显示的内容,并且加载数据也要显示的地方也建张表 1 2 3 4 5 6 7 8 9 10 11 12 13 14 15 & ...
- Android开发三种第三方图片加载的框架
最近在项目中用到了大量图片加载,第三方优秀框架还不错,下面介绍三款榜首的框架用法和问题,做一个记录. 现在项目使用的是Android Studio开发的,现在也没有多少人使用Eclipse了吧. 一. ...
- Velodyne VLP-16 gmapping 建图
1. 测试环境 Ubuntu 16.04 x64.ROS Kinetic.Velodyne VLP-16.RoboWare Studio 2. 安装 ROS 功能包 sudo apt-get inst ...
- python 数据驱动ddt使用,需要调用下面的代码,请挨个方法调试,把不用的注释掉
#!/usr/bin/env/python # -*- coding: utf-8 -*- # @Time : 2018/12/15 15:27 # @Author : ChenAdong # @Em ...
- Python中类的定义及使用
类是一些有共同特征和行为事务事物的抽象概念的总和. 从中可以看出,方法只能使用实例直接调用(无需传self参数),而使用类调用必须传入实例对象: 属性可以使用实例调用,也可以使用类直接调用,因此可以看 ...
- SQL SERVER中LIKE使用变量类型不同输出结果不一致解惑
一同事在写脚本时,遇到一个关于LIKE里面使用不同的变量类型导致查询结果不一致的问题,因为这个问题被不同的人问过好几次,索性总结一下,免得每次都要解释一遍,直接丢一篇博客岂不是更方便!其实看似有点让人 ...
- MyBatis笔记----MyBatis查询表全部的两种方法:XML与注解
查询单条信息的在 http://www.cnblogs.com/tk55/p/6659285.html 已经有了 XML 修改UserMapper.xml <?xml version=&quo ...
- Python学习手记
1.Python大小敏感.print写作PRINT或Print是不对.2.注释符是“#”,而非“//”.3.语句结尾不必须分号.4.转义符为“/”+转义字母.这点与刀莱特一致.5.单引号输入使用“/' ...