Ros学习——导航
1.导航框架

在总体框架图中可以看到,move_base提供了ROS导航的配置、运行、交互接口,它主要包括两个部分:
(1) 全局路径规划(global planner):根据给定的目标位置进行总体路径的规划;
(2) 本地实时规划(local planner):根据附近的障碍物进行躲避路线规划。
- 全局路径规划(global planner)
在ROS的导航中,首先会通过全局路径规划,计算出机器人到目标位置的全局路线。这一功能是navfn这个包实现的。
navfn通过Dijkstra最优路径的算法,计算costmap上的最小花费路径,作为机器人的全局路线。将来在算法上应该还会加入A*算法。
- 本地实时规划(local planner)
本地的实时规划是利用base_local_planner包实现的。该包使用Trajectory Rollout 和Dynamic Window approaches算法计算机器人每个周期内应该行驶的速度和角度(dx,dy,dtheta velocities)。
base_local_planner这个包通过地图数据,通过算法搜索到达目标的多条路经,利用一些评价标准(是否会撞击障碍物,所需要的时间等等)选取最优的路径,并且计算所需要的实时速度和角度。
其中,Trajectory Rollout 和Dynamic Window approaches算法的主要思路如下:
(1) 采样机器人当前的状态(dx,dy,dtheta);
(2) 针对每个采样的速度,计算机器人以该速度行驶一段时间后的状态,得出一条行驶的路线。
(3) 利用一些评价标准为多条路线打分。
(4) 根据打分,选择最优路径。
(5) 重复上面过程。
2.安装rbx1 package
- 安装gmapping: 由激光雷达数据生成地图(或者深度相机数据)
git clone https://github.com/ros-perception/slam_gmapping.git
- 安装amcl:在已有的地图内定位机器人
git clone https://github.com/ros-planning/navigation.git
- 其他可能用到的包:提示没有哪个就装哪个
sudo apt-get install

ros-indigo-turtlebot-bringup \

ros-indigo-turtlebot-create-desktop ros-indigo-openni-* \

ros-indigo-openni2-* ros-indigo-freenect-* ros-indigo-usb-cam \

ros-indigo-laser-* ros-indigo-hokuyo-node \
ros-indigo-audio-common gstreamer0.-pocketsphinx \

ros-indigo-pocketsphinx ros-indigo-slam-gmapping \

ros-indigo-joystick-drivers python-rosinstall \

ros-indigo-orocos-kdl ros-indigo-python-orocos-kdl \
python-setuptools ros-indigo-dynamixel-motor-* \

libopencv-dev python-opencv ros-indigo-vision-opencv \

ros-indigo-depthimage-to-laserscan ros-indigo-arbotix-* \(我安装的过程中提示没有这个: ERROR:cannot launch node of type [arbotix_python/arbotix_driver]:arbotix_python)

ros-indigo-turtlebot-teleop ros-indigo-move-base \

ros-indigo-map-server ros-indigo-fake-localization \

ros-indigo-amcl git subversion mercurial
- 安装rbx1 package
cd ~/catkin_ws/src

git clone https://github.com/pirobot/rbx1.git cd rbx1

git checkout indigo-devel

cd ~/catkin_ws

catkin_make

source ~/catkin_ws/devel/setup.bash

rospack profile
- 测试
roslaunch rbx1_bringup fake_turtlebot.launch

rosrun rviz rviz -d `rospack find rbx1_nav`/sim.rviz
提示错误:Error: package 'rbx1_nav' not found。vmw_ioctl_command error Invalid argument.
解决:退出后,在终端中运行:
$ export SVGA_VGPU10=
3.运行正方形
- 运行机器人
.打开一个终端

cd ~/catkin_ws/

catkin_make

source ./devel/setup.bash

cd src

roslaunch rbx1_bringup fake_turtlebot.launch
- 运行rviz仿真环境
//新打开一个终端
cd ~/catkin_ws/

catkin_make

source ./devel/setup.bash

cd src

rosrun rviz rviz -d `rospack find rbx1_nav`/nav_fuerte.rviz
- 运行空地图
//新打开一个终端

cd ~/catkin_ws/

catkin_make

source ./devel/setup.bash

cd src

roslaunch rbx1_nav fake_move_base_blank_map.launch
- 运行正方形路径
//打开一个新终端,

cd ~/catkin_ws/

catkin_make

source ./devel/setup.bash

cd src

rosrun rbx1_nav move_base_square.py
代码解释 move_base_square.py
4.避障行走
- 找到空白地图的终端,ctrl+c退出这个地图,运行障碍地图
roslaunch rbx1_nav fake_move_base_map_with_obstacles.launch
- 运行正方形路径
rosrun rbx1_nav move_base_square.py
运行效果:
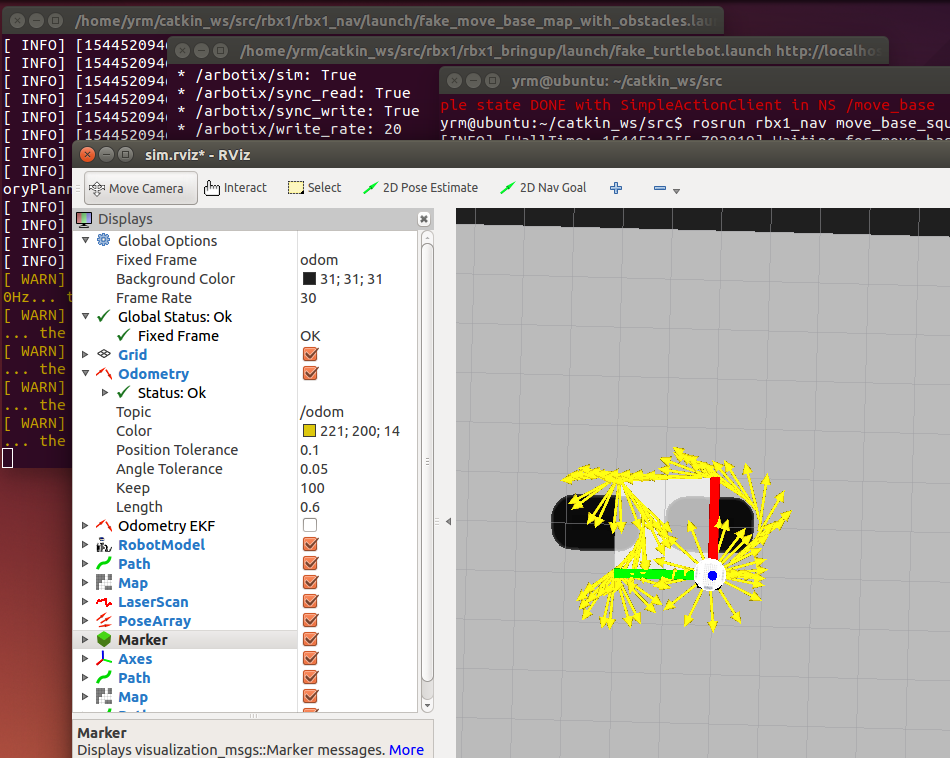
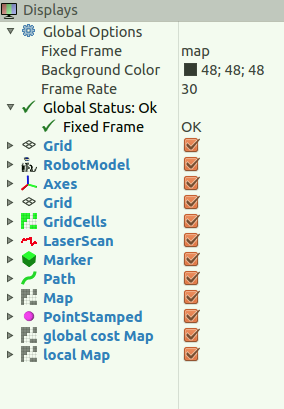
若没有显示障碍物,在rviz里加载了这几个display,其中global plan下的costmap,RobotModel,global plan下的Path,Axes是必须的。
5.amcl定位
- 先运行仿真机器人
//打开一个新终端
cd ~/catkin_ws/

catkin_make

source ./devel/setup.bash

cd src

roslaunch rbx1_bringup fake_turtlebot.launch
- 运行amcl节点
amcl是二维环境下的概率定位系统,之所以说是概率定位系统,是因为它用的是自适应的蒙特卡洛的定位方法,就是之前的粒子滤波,用这个粒子滤波去跟踪机器人当前的状态/
//打开一个新终端
cd ~/catkin_ws/

catkin_make

source ./devel/setup.bash

cd src

roslaunch rbx1_nav fake_amcl.launch map:=test_map.yaml
- 然后运行rviz
cd ~/catkin_ws/

catkin_make

source ./devel/setup.bash

cd src

rosrun rviz rviz -d `rospack find rbx1_nav`/nav_fuerte.rviz

6.关键文件解析
fake_nav_test.launch:
<launch>

  <param name="use_sim_time" value="false" />

  <!-- Start the ArbotiX controller -->

  <include file="$(find rbx1_bringup)/launch/fake_turtlebot.launch" />//加载机器人驱动

  <!-- Run the map server with the desired map -->

  <node name="map_server" pkg="map_server" type="map_server" args="$(find rbx1_nav)/maps/test_map.yaml"/>//这里的地图就是map_server,有时候可不需要

  <!-- The move_base node -->

  <node pkg="move_base" type="move_base" respawn="false" name="move_base" clear_params="true" output="screen">//加载了它的几个配置文件,分别是:

    <rosparam file="$(find rbx1_nav)/config/fake/costmap_common_params.yaml" command="load" ns="global_costmap" />

    <rosparam file="$(find rbx1_nav)/config/fake/costmap_common_params.yaml" command="load" ns="local_costmap" />

    <rosparam file="$(find rbx1_nav)/config/fake/local_costmap_params.yaml" command="load" />

    <rosparam file="$(find rbx1_nav)/config/fake/global_costmap_params.yaml" command="load" />

    <rosparam file="$(find rbx1_nav)/config/fake/base_local_planner_params.yaml" command="load" />

    <rosparam file="$(find rbx1_nav)/config/nav_test_params.yaml" command="load" />

  </node>

  <!-- Run fake localization compatible with AMCL output -->

  <node pkg="fake_localization" type="fake_localization" name="fake_localization" clear_params="true" output="screen">//调用之前的amcl节点

     <remap from="base_pose_ground_truth" to="odom" />

     <param name="global_frame_id" value="map" />

     <param name="base_frame_id" value="base_footprint" />

  </node>

  <!-- Start the navigation test -->

  <node pkg="rbx1_nav" type="nav_test.py" name="nav_test" output="screen">//加载nav_test.py程序,进行随机导航(这里的随机是指目标点位置随机)

    <param name="rest_time" value="" />

    <param name="fake_test" value="true" />

  </node>

</launch>
nav_test.py
#!/usr/bin/env python

""" nav_test.py - Version 1.1 2013-12-20

    Command a robot to move autonomously among a number of goal locations defined in the map frame.

    On each round, select a new random sequence of locations, then attempt to move to each location

    in succession.  Keep track of success rate, time elapsed, and total distance traveled.

    Created for the Pi Robot Project: http://www.pirobot.org

    Copyright (c) 2012 Patrick Goebel.  All rights reserved.

    This program is free software; you can redistribute it and/or modify

    it under the terms of the GNU General Public License as published by

    the Free Software Foundation; either version 2 of the License, or

    (at your option) any later version.5

    This program is distributed in the hope that it will be useful,

    but WITHOUT ANY WARRANTY; without even the implied warranty of

    MERCHANTABILITY or FITNESS FOR A PARTICULAR PURPOSE.  See the

    GNU General Public License for more details at:

    http://www.gnu.org/licenses/gpl.html

"""

import rospy

import actionlib

from actionlib_msgs.msg import *

from geometry_msgs.msg import Pose, PoseWithCovarianceStamped, Point, Quaternion, Twist

from move_base_msgs.msg import MoveBaseAction, MoveBaseGoal

from random import sample

from math import pow, sqrt

class NavTest():

    def __init__(self):

        rospy.init_node('nav_test', anonymous=True)

        rospy.on_shutdown(self.shutdown)

        # How long in seconds should the robot pause at each location?

        self.rest_time = rospy.get_param("~rest_time", 10)

        # Are we running in the fake simulator?

        self.fake_test = rospy.get_param("~fake_test", False)

        # Goal state return values

        goal_states = ['PENDING', 'ACTIVE', 'PREEMPTED',

                       'SUCCEEDED', 'ABORTED', 'REJECTED',

                       'PREEMPTING', 'RECALLING', 'RECALLED',

                       'LOST']

        # Set up the goal locations. Poses are defined in the map frame.

        # An easy way to find the pose coordinates is to point-and-click

        # Nav Goals in RViz when running in the simulator.

        # Pose coordinates are then displayed in the terminal

        # that was used to launch RViz.

        locations = dict()

        locations['hall_foyer'] = Pose(Point(0.643, 4.720, 0.000), Quaternion(0.000, 0.000, 0.223, 0.975))

        locations['hall_kitchen'] = Pose(Point(-1.994, 4.382, 0.000), Quaternion(0.000, 0.000, -0.670, 0.743))

        locations['hall_bedroom'] = Pose(Point(-3.719, 4.401, 0.000), Quaternion(0.000, 0.000, 0.733, 0.680))

        locations['living_room_1'] = Pose(Point(0.720, 2.229, 0.000), Quaternion(0.000, 0.000, 0.786, 0.618))

        locations['living_room_2'] = Pose(Point(1.471, 1.007, 0.000), Quaternion(0.000, 0.000, 0.480, 0.877))

        locations['dining_room_1'] = Pose(Point(-0.861, -0.019, 0.000), Quaternion(0.000, 0.000, 0.892, -0.451))

        # Publisher to manually control the robot (e.g. to stop it, queue_size=5)

        self.cmd_vel_pub = rospy.Publisher('cmd_vel', Twist, queue_size=5)

        # Subscribe to the move_base action server

        self.move_base = actionlib.SimpleActionClient("move_base", MoveBaseAction)

        rospy.loginfo("Waiting for move_base action server...")

        # Wait 60 seconds for the action server to become available

        self.move_base.wait_for_server(rospy.Duration(60))

        rospy.loginfo("Connected to move base server")

        # A variable to hold the initial pose of the robot to be set by

        # the user in RViz

        initial_pose = PoseWithCovarianceStamped()

        # Variables to keep track of success rate, running time,

        # and distance traveled

        n_locations = len(locations)

        n_goals = 0

        n_successes = 0

        i = n_locations

        distance_traveled = 0

        start_time = rospy.Time.now()

        running_time = 0

        location = ""

        last_location = ""

        # Get the initial pose from the user

        rospy.loginfo("*** Click the 2D Pose Estimate button in RViz to set the robot's initial pose...")

        rospy.wait_for_message('initialpose', PoseWithCovarianceStamped)

        self.last_location = Pose()

        rospy.Subscriber('initialpose', PoseWithCovarianceStamped, self.update_initial_pose)

        # Make sure we have the initial pose

        while initial_pose.header.stamp == "":

            rospy.sleep(1)

        rospy.loginfo("Starting navigation test")

        # Begin the main loop and run through a sequence of locations

        while not rospy.is_shutdown():

            # If we've gone through the current sequence,

            # start with a new random sequence

            if i == n_locations:

                i = 0

                sequence = sample(locations, n_locations)

                # Skip over first location if it is the same as

                # the last location

                if sequence[0] == last_location:

                    i = 1

            # Get the next location in the current sequence

            location = sequence[i]

            # Keep track of the distance traveled.

            # Use updated initial pose if available.

            if initial_pose.header.stamp == "":

                distance = sqrt(pow(locations[location].position.x -

                                    locations[last_location].position.x, 2) +

                                pow(locations[location].position.y -

                                    locations[last_location].position.y, 2))

            else:

                rospy.loginfo("Updating current pose.")

                distance = sqrt(pow(locations[location].position.x -

                                    initial_pose.pose.pose.position.x, 2) +

                                pow(locations[location].position.y -

                                    initial_pose.pose.pose.position.y, 2))

                initial_pose.header.stamp = ""

            # Store the last location for distance calculations

            last_location = location

            # Increment the counters

            i += 1

            n_goals += 1

            # Set up the next goal location

            self.goal = MoveBaseGoal()

            self.goal.target_pose.pose = locations[location]

            self.goal.target_pose.header.frame_id = 'map'

            self.goal.target_pose.header.stamp = rospy.Time.now()

            # Let the user know where the robot is going next

            rospy.loginfo("Going to: " + str(location))

            # Start the robot toward the next location

            self.move_base.send_goal(self.goal)

            # Allow 5 minutes to get there

            finished_within_time = self.move_base.wait_for_result(rospy.Duration(300))

            # Check for success or failure

            if not finished_within_time:

                self.move_base.cancel_goal()

                rospy.loginfo("Timed out achieving goal")

            else:

                state = self.move_base.get_state()

                if state == GoalStatus.SUCCEEDED:

                    rospy.loginfo("Goal succeeded!")

                    n_successes += 1

                    distance_traveled += distance

                    rospy.loginfo("State:" + str(state))

                else:

                  rospy.loginfo("Goal failed with error code: " + str(goal_states[state]))

            # How long have we been running?

            running_time = rospy.Time.now() - start_time

            running_time = running_time.secs / 60.0

            # Print a summary success/failure, distance traveled and time elapsed

            rospy.loginfo("Success so far: " + str(n_successes) + "/" +

                          str(n_goals) + " = " +

                          str(100 * n_successes/n_goals) + "%")

            rospy.loginfo("Running time: " + str(trunc(running_time, 1)) +

                          " min Distance: " + str(trunc(distance_traveled, 1)) + " m")

            rospy.sleep(self.rest_time)

    def update_initial_pose(self, initial_pose):

        self.initial_pose = initial_pose

    def shutdown(self):

        rospy.loginfo("Stopping the robot...")

        self.move_base.cancel_goal()

        rospy.sleep(2)

        self.cmd_vel_pub.publish(Twist())

        rospy.sleep(1)

def trunc(f, n):

    # Truncates/pads a float f to n decimal places without rounding

    slen = len('%.*f' % (n, f))

    return float(str(f)[:slen])

if __name__ == '__main__':

    try:

        NavTest()

        rospy.spin()

    except rospy.ROSInterruptException:

        rospy.loginfo("AMCL navigation test finished.")
7.执行步骤解析
- 执行fake_nav_test.launch
1.加载机器人驱动fake_turtlebot.launch
1.1 Load the URDF/Xacro model
1.2 加载arbotix节点(加载配置文件:fake_turtlebot_arbotix.yaml)
1.3 加载robot_state_publisher节点(设置频率publish_frequency:20)
2. 加载地图节点
3. 加载move_base节点(包含costmap_common_params.yaml;local_costmap_params.yaml;global_costmap_params.yaml;base_local_planner_params.yaml;nav_test_params.yaml四个配置文件)
4. 加载fake_localization节点(AMCL)
5. 加载rbx1_nav节点,调用nav_test.py程序进行导航
- 执行nav_test_fuerte.rviz
参考:
https://www.cnblogs.com/talugirl/p/5962806.html
https://blog.csdn.net/hcx25909/article/details/9470297
Ros学习——导航的更多相关文章
- ROS机器人导航一 : 从英雄联盟到ROS导航
写在前面: 这是这个系列的第一篇 本系列主要从零开始深入探索ROS(机器人操作系统)的导航和规划. 这个系列的目标,是让大家了解: 1.ROS的导航是怎么实现的 2.认识ROS里各种已有的导航算法,清 ...
- 关于ROS学习的一些反思
距离发布上一篇ROS的博客已经过去两年了,才发现原来自己已经这么久可没有写过关于ROS的文章,想来很是惭愧.这两年时间,自己怀着程序员的梦想,研究过RTOS,探索过Linux,编写过Android应用 ...
- ROS学习手记 - 2.1: Create and Build ROS Package 生成包(Python)
ROS学习手记 - 2.1: Create and Build ROS Package 生成包(Python) 时隔1年,再回来总结这个问题,因为它是ros+python开发中,太常用的一个操作,需要 ...
- ROS学习手记 - 8 编写ROS的Publisher and Subscriber
上一节我们完成了 message & srv 文件的创建和加入编译,这次我们要玩简单的Publisher 和 Subscriber 要玩 Publisher 和 Subscriber, 需要具 ...
- ROS学习(四)—— 创建ROS Package
一.caktin Package的组成 1.必须含有 package.xml文件,提供有关程序包的元信息 2.必须含有一个catkin版本的 CmakeLists.txt文件,如果是一个catkin元 ...
- ROS学习网址【原创】
ROS学习网址 http://www.ros.org/ http://www.ros.org/news/book/ http://wiki.ros.org/ http://blog.exbot.net ...
- ROS学习笔记七:在ROS中使用USB摄像头
下面是一些USB摄像头的驱动(大多数摄像头都支持uvc标准): 1 使用软件库里的uvc-camera功能包 1.1 检查摄像头 lsusb ----------------------------- ...
- Ros学习——移动机器人Ros导航详解及源码解析
1 执行过程 1.运行仿真机器人fake_turtlebot.launch:加载机器人模型——启动机器人仿真器——发布机器人状态 2.运行amcl节点fake_amcl.launch:加载地图节点ma ...
- 2017年7月ROS学习资料小结
<孙子兵法·谋攻篇>:"上兵伐谋,其次伐交,其次伐兵,其下攻城:攻城之法为不得已." 任何发生在自己国土上的战争,即便胜利,也饱含屈辱. ----~~~~----Gaz ...
随机推荐
- LeetCode OJ:Populating Next Right Pointers in Each Node II(指出每一个节点的下一个右侧节点II)
Follow up for problem "Populating Next Right Pointers in Each Node". What if the given tre ...
- C++结构体成员列表初始化
C++关于struct和class的区别,可以看上一篇文章:c ++ class和struct[转] 结构体成员列表初始化,来个例子: #include <iostream> #inclu ...
- Arc083_F Collecting Balls
传送门 题目大意 给定$N$,在$(1,0),(2,0)......(N,0)$和$(0,1),(0,2)...(0,N)$上都有$1$个机器人,同时给定$2N$个坐标$(x,y),x,y\in[1, ...
- LeetCode Beautiful Arrangement
原题链接在这里:https://leetcode.com/problems/beautiful-arrangement/description/ 题目: Suppose you have N inte ...
- karma
一个简单的工具,允许你在多个浏览器中执行JavaScript代码. Karma的主要目的是使您的测试驱动开发变得简单.快速和有趣. 我什么时候该用Karma? 您希望在真正的浏览器中测试代码. 您希望 ...
- [转]JavaScript之引用类型
Object类型 Object类型是JavaScript中使用最多的一种类型.虽然Object的实例不具备多少功能,但对于在应用程序中存储和传输数据而言,它确实是非常理想的选择. 创建Object实例 ...
- git之切换分支出现的问题
当在其他分支,如test分支开发的时候,新增了文件夹等目录结构.开发完成后,切换会master分支. 如果出现“Deletion of directory '***' failed. Should I ...
- xmind的使用及入门
初识 xmind是什么 比较 入门 下载 基本操作 主界面 美化 工具 导出 初识 xmind是什么 说白了就是传说中的思维导图,用它我们可以画出下面这些图: 额,这张图好丑. 好吧,换一张: 他就是 ...
- [调试日志]用php函数var_export把多维数组file_put_contents写入并打印到日志,以方便调试之多维数组,用php5中的var_export函数示例,顺带介绍http_build_query(转)
一行解决写入日志: file_put_contents("/tmp/jack.txt", var_export($layReturnArr,TRUE),FILE_APPEND); ...
- IHE 官方网址有用资源介绍
实现标准: http://www.ihe.net/Technical_Frameworks/ 各个实现框架文档, 比如XDS,XCA,PIX,PDQ等 测试工具:http://www.ihe.net/ ...