DevOps - 部署系统 - Cobbler
Cobbler简介
Cobbler由python语言开发,是对PXE和Kickstart以及DHCP的封装。融合很多特性,提供了CLI和Web的管理形式。更加方便的实行网络安装。适用场景:需要大批量的部署操作系统。
Collber 对象关系图
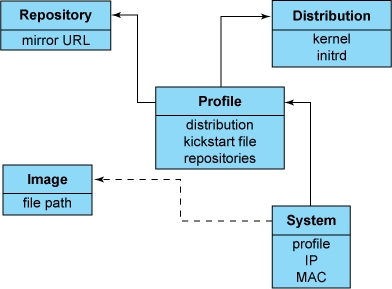
Distros(发行版):表示一个操作系统。它承载了内核和 initrd 的信息,以及内核参数等其他数据。
profile:定义Kickstart文件
repos:安装源
system:表示要配给的机器。它包含一个配置文件或一个镜像,还包含 IP 和 MAC 地址、电源管理(地址、凭据、类型)以及更为专业的数据等信息。
image:可替换一个包含不属于此类别的文件的发行版对象(例如,无法分为内核和 initrd 的对象)。
集成的服务
PXE 服务
DHCP服务管理
DNS服务管理
HTTP服务管理
TFTP服务管理
Kickstart服务
yum仓库管理
电源管理
工作流程
(1).需要安装系统的客户端主机的网卡支持网络安装,也就是支持以PXE模式启动。
(2).客户端主机需要有一个IP地址来与Cobbler Server进行通信,这时网络中必须要有一个主机能自动分配IP。DHCP就是一个能为客户端主机自动分配IP地址的服务,DHCP就是安装在Cobbler Server主机上。
(3).客户端得到IP地址后,需要提供一个引导程序pxelinux.0(类似于grub) 此文件由syslinux程序提供,所以需要安装syslinux并且能加载内核及内核镜像文件(vmlinuz与initrd.img),客户端可以通过TFTP协议到TFTP Server上下载内核及内核镜像文件(vmlinuz与initrd.img),所以需要一个TFTP 服务,TFTP也是安装在Cobbler Server主机上,客户端只是知道可以用TFTP协议下载文件,但是TFTP Server的IP是那个,这个还得需要DHCP服务器指名告诉客户端那个是TFTP Server(注,所以我们在配置DHCP模板时指定next-server,同时指定了filename,这里的filename就是指定的pxelinux.0引导程序),而TFTP服务需要超级进程进行管理,此进程是xinetd,因此需要在Cobbler Server上安装xinet服务。
(4).然后通过distro找到安装的发行版,通过设置的profile找到kickstart文件,完成自动安装。
安装cobbler
yum install cobbler httpd cobbler-web pykickstart debmirror dhcp -y
yum install -y ed patch perl perl-Compress-Zlib perl-Digest-SHA1 perl-LockFile-Simple perl-libwww-perl //Cobbler环境支持包
cobbler配置文件目录介绍:

/etc/cobbler/settings cobbler主配置文件
/etc/cobbler/iso/ iso模板配置文件
/etc/cobbler/pxe pxe模板文件
/etc/cobbler/power 电源的配置文件
/etc/cobbler/users.conf Web 服务授权配置文件
/etc/cobbler/users.digest 用于web访问的用户名密码配置文件
/etc/cobbler/dhcp.template DHCP服务的配置模板
/etc/cobbler/dnsmasq.template DNS服务的配置模板
/etc/cobbler/tftpd.template tftp服务的配置模板
/etc/cobbler/modules.conf Cobbler模块配置文件
开始配置
1、编辑/etc/cobbler/settings 定义server 指定提供服务的ip地址,不能使用localhost。
2、编辑/etc/cobbler/settings定义next_server 指定TFTP服务器地址。
3、运行cobbler get-loaders 下载需要的程序,需要访问互联网。 如果访问不了互联网可以自行安装,syslinux
自行复制文件pxelinux.0 menu.c32 到 /var/lib/cobbler/loaders
如:
#yum install syslinux -y
#cd /usr/share/syslinux/
#cp pxelinux.0 menu.c32 /var/lib/cobbler/loaders
4、启动rsync chkconfig rsync on
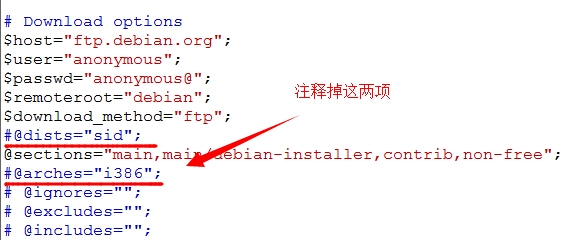
5、编辑/etc/debmirror.conf 注释 ’dists‘ 和 ‘arches’
6、修改默认密码,编辑文件/etc/cobbler/settings,找到字段default_password_crypted,将生成的密码串替换掉默认的。
openssl passwd -1 -salt `openssl rand -hex 5`
7、安装fencing 设备 cman fence-agents //这一项无关紧要,很少用上。
配置tftp-server
首先启用tftp,可以编辑配置文件/etc/xinetd.d/tftp修改disable那一项。 或者用命令。
chkconfig tftp on
service xinetd start
也可以在settings文件中启用manage_tftpd: 1 ,使用cobbler管理tftp。
配置DHCP服务
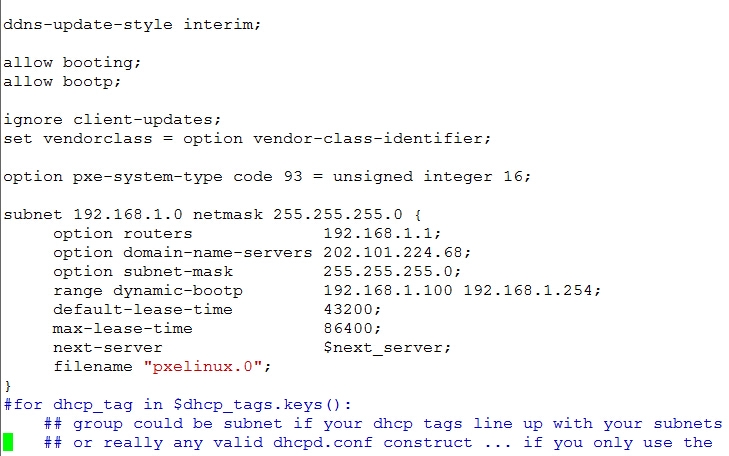
在settings文件中启用 manage_dhcp: 1
编辑cobbler管理dhcp服务的模版文件/etc/cobbler/dhcp.template
导入RHEL6.4镜像文件
cobbler import --name="rhel6.4-i386" --path=/mnt/dvd
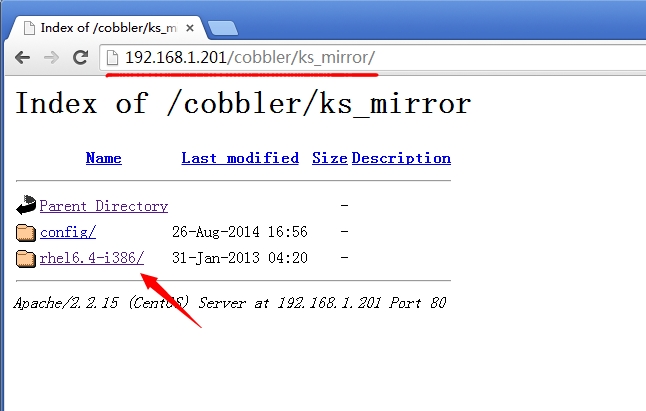
导入的文件保存在/var/www/cobbler/ks_mirror/
我们可以通过浏览器访问到
制作kickstart文件(略)
导入profile
cobbler profile add --name=rhel6.4-i386-basic --distro=rhel6.4-i386 --kickstart=/root/rhel6-basic.cfg
删除默认生成的profile
cobbler profile remove --name=rhel6.4-i386
配置完成后记得执行 cobbler sync 同步配置到数据目录。
cobbler会自动给/var/lib/tftpboot/pxelinux.cfg/default 添加lable
来看看里面的信息:
DEFAULT menu
PROMPT 0
MENU TITLE Cobbler | http://www.cobblerd.org/
TIMEOUT 200
TOTALTIMEOUT 6000
ONTIMEOUT local
LABEL local
MENU LABEL (local)
MENU DEFAULT
LOCALBOOT -1
LABEL rhel6.4-i386-basic
kernel /images/rhel6.4-i386/vmlinuz
MENU LABEL rhel6.4-i386-basic
append initrd=/images/rhel6.4-i386/initrd.img ksdevice=bootif lang= kssendmac text ks=http://192.168.1.201/cblr/svc/op/ks/profile/rhel6.4-i386-basic
ipappend 2
MENU end
这样我们的cobbler就配置完成了,开启另一台虚拟机,设置网卡启动。
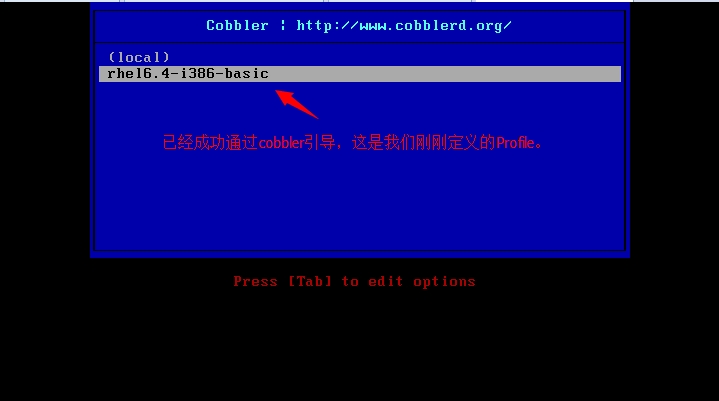
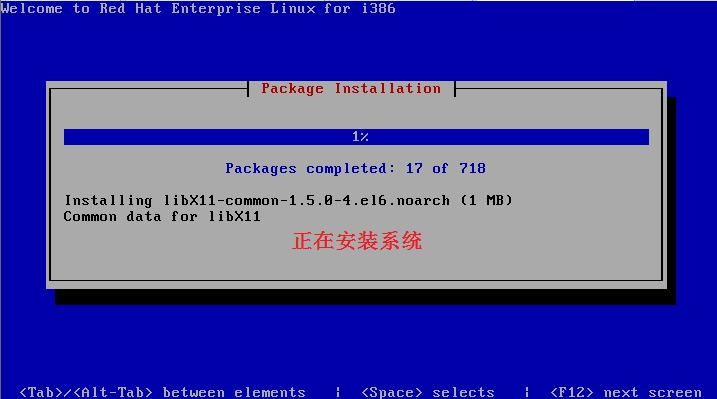
配置认证,通过Web接口导入centos6.5,实现一键安装。
编辑/etc/cobbler/modules.conf
[authentication]
module = authn_pam //设置使用系统用户认证机制。
创建一个用户。
useradd tuchao;echo 123456 |passwd --stdin tuchao
编辑/etc/cobbler/users.conf 设置cobbler认证用户。
[admins]
admin = "tuchao"
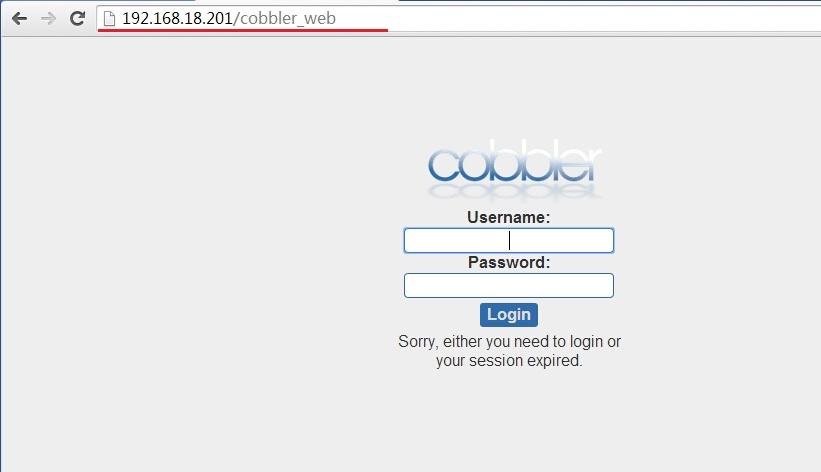
使用浏览器进入Web管理接口。
通过web接口导入镜像文件,生成distro。
填好后点击“Run”即可开始复制文件,系统会自动在/var/log/cobbler/tasks/目录下生成以当前时间命名的日志文件如:2014-08-28_165922_import.log。
相应的cobbler sync操作也会被记录日志。如 2014-08-28_171540_sync.log

然后我们可以通过cobbler distro 命令查看是否添加成功了。 通过web接口的distro按钮也可以。
创建ks文件:
#platform=x86, AMD64, or Intel EM64T
#version=DEVEL
# Firewall configuration
firewall --enabled --service=ssh
# Install OS instead of upgrade
install
# Use network installation
url --url="http://192.168.1.201/cobbler/ks_mirror/centos6.5-x86_64/"
# Root password
rootpw --iscrypted $1$hnJSXM6C$gt3.CTocsJz4Kg/tV3Udl0
# System authorization information
auth --useshadow --passalgo=sha512
# Use graphical install
graphical
firstboot --disable
# System keyboard
keyboard us
# System language
lang en_US
# SELinux configuration
selinux --enforcing
# Installation logging level
logging --level=info
# System timezone
timezone Asia/Shanghai
# Network information
#network --bootproto=dhcp --device=eth0 --onboot=on
# System bootloader configuration
bootloader --append="crashkernel=auto rhgb quiet" --location=mbr --driveorder="sda"
# Clear the Master Boot Record
zerombr
# Partition clearing information
clearpart --all --initlabel
part /boot --fstype=ext4 --size=500
part pv.008002 --grow --size=1
volgroup vg_server1 --pesize=4096 pv.008002
logvol / --fstype=ext4 --name=lv_root --vgname=vg_server1 --grow --size=1024 --maxsize=51200
logvol swap --name=lv_swap --vgname=vg_server1 --grow --size=2016 --maxsize=2016
%packages
@additional-devel
@base
@basic-desktop
@chinese-support
@core
@debugging
@desktop-debugging 后面的软件包由于太长,我就省略了,软件包大家可以自行定义。
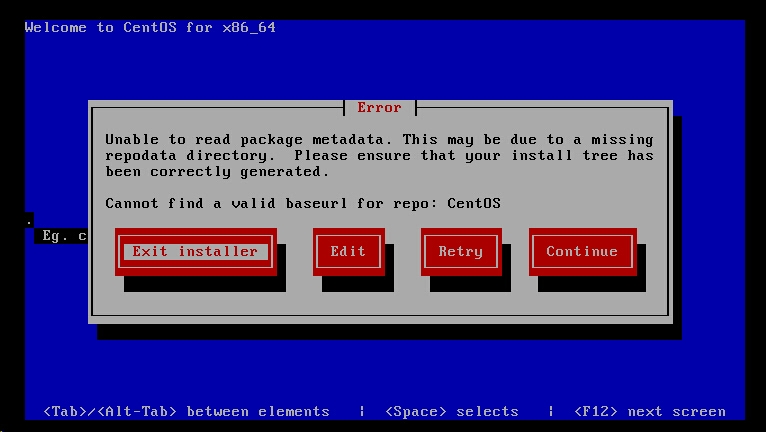
注意:如果是拿系统的ks文件来修改的,一定要删除下面一行:
repo --name="CentOS" --baseurl=cdrom:sr0 --cost=100
这是代表从光盘找安装源的意思
不然就会出现如下错误:
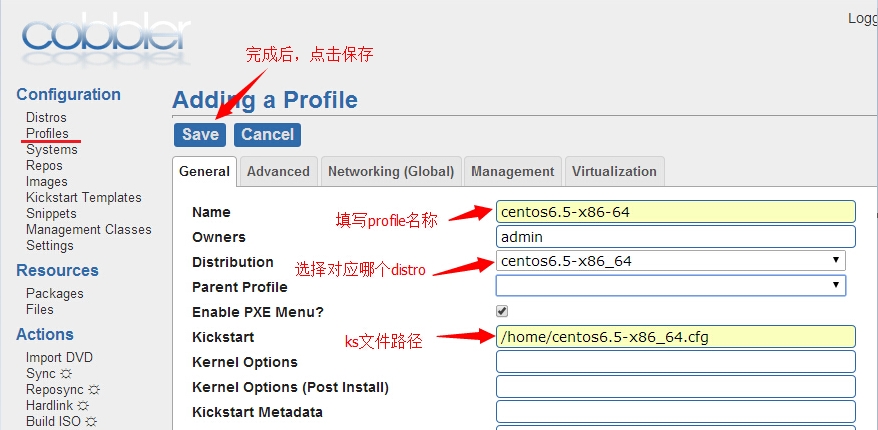
定义profile文件
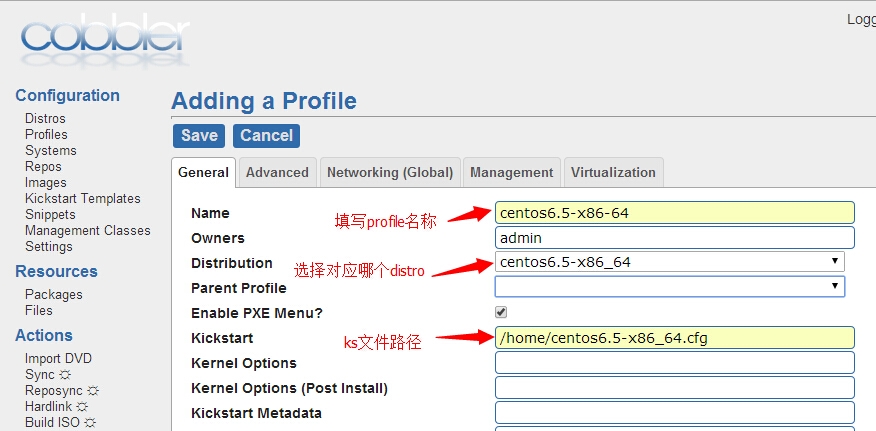
配置完成后记得sync,可以用命令cobbler sync,在web接口也有sync按钮。
导入Centos5.3镜像,配置一键安装。
挂载好光盘,这里我们用命令导入。
cobbler import --name=centos5.3-i386 --path=/mnt/dvd/
待命令行界面出现"*** TASK COMPLETE ***"表示导入完成了,也可以去查看日志确认。
创建Kickstart文件:
#platform=x86, AMD64, or Intel EM64T
# System authorization information
auth --useshadow --enablemd5
# System bootloader configuration
bootloader --append="rhgb quiet" --location=mbr --driveorder=sda
# Clear the Master Boot Record
zerombr
# Partition clearing information
clearpart --all --initlabel
part /boot --fstype ext3 --size=100 --ondisk=sda
part pv.2 --size=0 --grow --ondisk=sda
volgroup VolGroup00 --pesize=32768 pv.2
logvol / --fstype ext3 --name=LogVol00 --vgname=VolGroup00 --size=1024 --grow
logvol swap --fstype swap --name=LogVol01 --vgname=VolGroup00 --size=1024 --grow --maxsize=2048
# Use graphical install
graphical
# Firewall configuration
firewall --enabled --ssh
# Run the Setup Agent on first boot
firstboot --disable
# System keyboard
keyboard us
# System language
lang en_US
# Installation logging level
logging --level=info
# Use network installation
url --url=http://192.168.1.201/cobbler/ks_mirror/centos5.3-i386/
# Network information
network --bootproto=dhcp --device=eth0 --onboot=on
#Root password
rootpw --iscrypted $1$OKFwyttn$.BUnf8M4cA7aU8ffQDJx2.
# SELinux configuration
selinux --enforcing
# System timezone
timezone --isUtc Asia/Shanghai
# Install OS instead of upgrade
install
# X Window System configuration information
xconfig --defaultdesktop=GNOME --depth=8 --resolution=640x480 --startxonboot
%packages
@office
@development-libs
@editors
@gnome-software-development
@text-internet
@x-software-development
@gnome-desktop
定义profile过程和上面一样(略),执行cobbler sync。
我们再来查看 /var/lib/tftpboot/pxelinux.cfg/default 文件,cobbler会自动生成lable。
MENU TITLE Cobbler | http://www.cobblerd.org/
TIMEOUT 200
TOTALTIMEOUT 6000
ONTIMEOUT local
LABEL local
MENU LABEL (local)
MENU DEFAULT
LOCALBOOT -1
LABEL centos5.3-i386-common
kernel /images/centos5.3-i386/vmlinuz
MENU LABEL centos5.3-i386-common
append initrd=/images/centos5.3-i386/initrd.img ksdevice=bootif lang= kssendmac text ks=http://192.168.1.201/cblr/svc/op/ks/profile/centos5.3-i386-common
ipappend 2
LABEL centos6.5-x86-64
kernel /images/centos6.5-x86_64/vmlinuz
MENU LABEL centos6.5-x86-64
append initrd=/images/centos6.5-x86_64/initrd.img ksdevice=bootif lang= kssendmac text ks=http://192.168.1.201/cblr/svc/op/ks/profile/centos6.5-x86-64
ipappend 2
LABEL rhel6.4-i386-basic
kernel /images/rhel6.4-i386/vmlinuz
MENU LABEL rhel6.4-i386-basic
append initrd=/images/rhel6.4-i386/initrd.img ksdevice=bootif lang= kssendmac text ks=http://192.168.1.201/cblr/svc/op/ks/profile/rhel6.4-i386-basic
ipappend 2
MENU end
开启一台虚拟机配置网卡启动,测试效果。
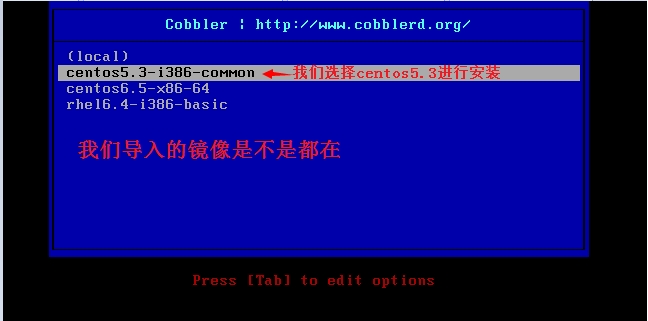
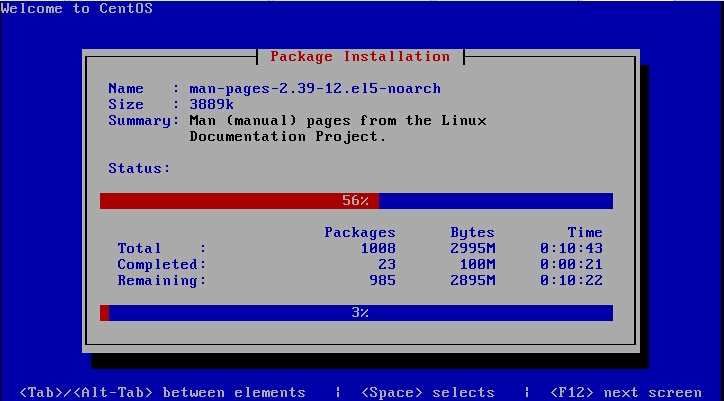
这篇写到这里也就完了,请大家多多指点,共同进步。
DevOps - 部署系统 - Cobbler的更多相关文章
- WinServer远程部署系统打包批处理文件
前言 工作中一直在使用一个部署系统WinServer远程部署系统(RDSystem),部署.回滚都很方便.我们一直都是增量发布或者只更新需要更新的文件,每次发布完之后要整理出一个增量更新包,压缩成zi ...
- Walle - 瓦力上线部署系统搭建攻略
背景知识:Walle - 瓦力是一个支持svn.git.多用户.多项目.多环境同时部署的上线部署系统,http://www.oschina.net/news/68610/walle-0-9-2 实验系 ...
- Walle 瓦力 web部署系统
Walle 一个web部署系统工具,可能也是个持续发布工具,配置简单.功能完善.界面流畅.开箱即用! 安装步骤: 1. git clone 首先配置成功(去百度找答案) 打开git bash命令窗口执 ...
- HP DL360 G7通过iLO部署系统
HPDL360 G7通过iLO部署系统 HP DL360 G7是没有光驱的服务器,可使用USB外置光驱.PXE网络安装.ILO方式的安装操作系统 一.HP iLO 简介 iLO 是一组芯片,内部是vx ...
- spring boot部署系统--morphling简介
Morphling 简介 Morphling是一套基于Spring Boot 1.5开发的部署系统,依赖简单,一套Mysql即可运行,操作简单明了,适用于百台规模几下机器的运维操作 功能概述 系统部署 ...
- .NET持续集成与自动化部署之路第一篇——半天搭建你的Jenkins持续集成与自动化部署系统
.NET持续集成与自动化部署之路第一篇(半天搭建你的Jenkins持续集成与自动化部署系统) 前言 相信每一位程序员都经历过深夜加班上线的痛苦!而作为一个加班上线如家常便饭的码农,更是深感其痛 ...
- centos7.2环境nginx+mysql+php-fpm+svn配置walle自动化部署系统详解
centos7.2环境nginx+mysql+php-fpm+svn配置walle自动化部署系统详解 操作系统:centos 7.2 x86_64 安装walle系统服务端 1.以下安装,均在宿主机( ...
- 有了Jenkins,为什么还需要一个独立的部署系统
需不需要一个独立的部署系统是很多企业用户在构建持续交付流程中经常困惑的一个问题.也经常有用户会问我们,现在已经有Jenkins,它自身提供了丰富的部署插件(如WebSphere部署插件.Tomcat部 ...
- Jenkins系统+独立部署系统
原文出自:http://os.51cto.com/art/201601/504846.htm 有了Jenkins,为什么还需要一个独立的部署系统? 现在已经有Jenkins,它自身提供了丰富的部署插件 ...
随机推荐
- Tree--lecture08
1.二叉树 完全二叉树(complete binary tree):除了最下面一层都是满的,最下面一层也是优先排列在左边.这样的话父亲节点和孩子节点就在序号上面有关系: 父亲节点为n,那么子节点的编号 ...
- Java面向对象_对象数组
今天学习了对象数组,写点东西总结一下.废话不多说,啥是对象数组呢? 对象数组的概念是这么讲的,对象数组就是数组里的每个元素都是类的对象,赋值时先定义对象,然后将对象直接赋给数组. 举个例子,使用对象数 ...
- Java面向对象_Object类
Object类 是类层次结构的根类,每个类都是用Object类作为超类,所有对象(包括数组)都实现这个类的方法.所有类都是Object类的子类. 下面先说两个方法toString()和equals(O ...
- 《C#高效编程》读书笔记03-推荐使用is或as操作符而不是强制类型转换
在日常编码中,很多时候都要编写接受object作为参数的方法,接下来是将这些object转型成特定类型,要么类,要么接口.这时我们有两种选择,使用as操作符,或者使用强制类型转换. 正确的做法是,尽可 ...
- java递归展示树形图代码实现以及遇到的问题
我最近写到了一个项目中用到了树形图,不得不说这个树形图是真的扯淡: 我用到的是layui中的树形图,再展示数据过程中遇到了很多的问题,废话不多说,直接贴代码. 一.调用排序接口,对数据进行排序. 二. ...
- 一个关于laravel部署的讲座
https://pusher.com/sessions/meetup/laravel-nigeria/deploying-your-laravel-application
- springboot 学习笔记(五)
(五)springboot整合thymeleaf模板,实现简单的登陆 1.修改上一节笔记中的user表,新增一个password字段,同时要求username为UNIQUE,以实现登陆校验,表结构如下 ...
- struts2的执行流程
在浏览器端输入相应的访问地址>>>>把请求发送给tomact>>>>tomact判断应该交给那个webApplication>>>&g ...
- AngularJS 整理学习
参考博客: https://blog.csdn.net/weixin_33178524/article/details/79179597 https://blog.csdn.net/qq_42128 ...
- VS功能扩展--扩展介绍
使用Eclipse的朋友都知道Eclipse是一个完全可扩展的IDE,那么在windows程序开发时,我们常使用的IDE(Visual studio)是否具有功能的扩展性呢?毫无疑问,回答是肯定的.我 ...
