IdentityServer4 学习笔记[2]-用户名密码验证
回顾
上一篇介绍了IdentityServer4客户端授权的方式,今天来看看IdentityServer4的基于密码验证的方式,与客户端验证相比,主要是配置文件调整一下,让我们来看一下
配置修改
public static class Config

    {

        public static List<TestUser> GetUsers()

        {

            return new List<TestUser>

            {

                new TestUser

                {

                    SubjectId = "1",

                    Username = "alice",

                    Password = "password"

                },

                new TestUser

                {

                    SubjectId = "2",

                    Username = "bob",

                    Password = "password"

                }

            };

        }

        public static IEnumerable<IdentityResource> GetIdentityResources()

        {

            return new IdentityResource[]

            {

                new IdentityResources.OpenId()

            };

        }

        public static IEnumerable<ApiResource> GetApis()

        {

            return new List<ApiResource>

            {

                new ApiResource("api1", "My API")

            };

        }

        public static IEnumerable<Client> GetClients()

        {

            return new List<Client>

            {

                new Client

                {

                    ClientId = "client",

                    // no interactive user, use the clientid/secret for authentication

                    AllowedGrantTypes = GrantTypes.ClientCredentials,

                    // secret for authentication

                    ClientSecrets =

                    {

                        new Secret("secret".Sha256())

                    },

                    // scopes that client has access to

                    AllowedScopes = { "api1" }

                },

                // resource owner password grant client

                new Client

                {

                    ClientId = "ro.client",

                    AllowedGrantTypes = GrantTypes.ResourceOwnerPassword,

                    ClientSecrets =

                    {

                        new Secret("secret".Sha256())

                    },

                    AllowedScopes = { "api1" }

                }

            };

        }

    }
通过上面的代码,与客户端授权方式相比,多了两个东西,一个是GetClients()方法中增加了一个Client,授权方式为资源拥有者密码的模式,另一个是增加了一个方法GetUsers(),真实场景中TestUser一般使用Asp.NetCore.Identity的用户,这里暂时使用TestUser来测试,IdentityServer4不是用户管理系统,它是授权框架(发放令牌的)
注册用户
在Startup中,把TestUser也添加上
public void ConfigureServices(IServiceCollection services)

{

    services.AddIdentityServer()

       .AddDeveloperSigningCredential()

       .AddInMemoryClients(Config.GetClients())

       .AddInMemoryApiResources(Config.GetApis())

       .AddInMemoryIdentityResources(Config.GetIdentityResources())

       .AddTestUsers(Config.GetUsers());

}
新建测试Api项目

可以选择删除IIS的设置,与前一篇文章的操作一致,并修改端口号为5001(Api资源服务地址)
并新增一个控制器IdentityController,继承自ControllerBase
[Route("identity")]

[Authorize]

public class IdentityController : ControllerBase

{

    public IActionResult Get()

    {

        return new JsonResult(from c in User.Claims select new { c.Type, c.Value });

    }

}
注意到IdentityController控制器类上有个特性[Authorize],这个代表这个控制器需要验证OK后才能访问,如果没有[Authorize]就说明访问不需要授权,在Get方法中这么写是为了获取到用户的身份信息,也就是Bearer Token中所包含的用户信息,当然也可以从Cookie中获取,我们使用Bearer Token的方式,以便照顾有移动客户端的场景
配置Api项目
public class Startup

{

    public void ConfigureServices(IServiceCollection services)

    {

        services.AddMvcCore()

            .AddAuthorization()

            .AddJsonFormatters();

            ///这里使用5000端口的授权服务端来验证

            services.AddAuthentication("Bearer")

            .AddJwtBearer("Bearer", options =>

            {

                options.Authority = "http://localhost:5000";

                options.RequireHttpsMetadata = false;

                options.Audience = "api1";

            });

        }

        public void Configure(IApplicationBuilder app)

        {

            ///这句别忘了,启用验证

            app.UseAuthentication();

            app.UseMvc();

        }

    }
启动
解决方案右键选择属性菜单并打开,设置启动方式,选择多个启动项目,启动,让两个服务都运行起来

验证测试
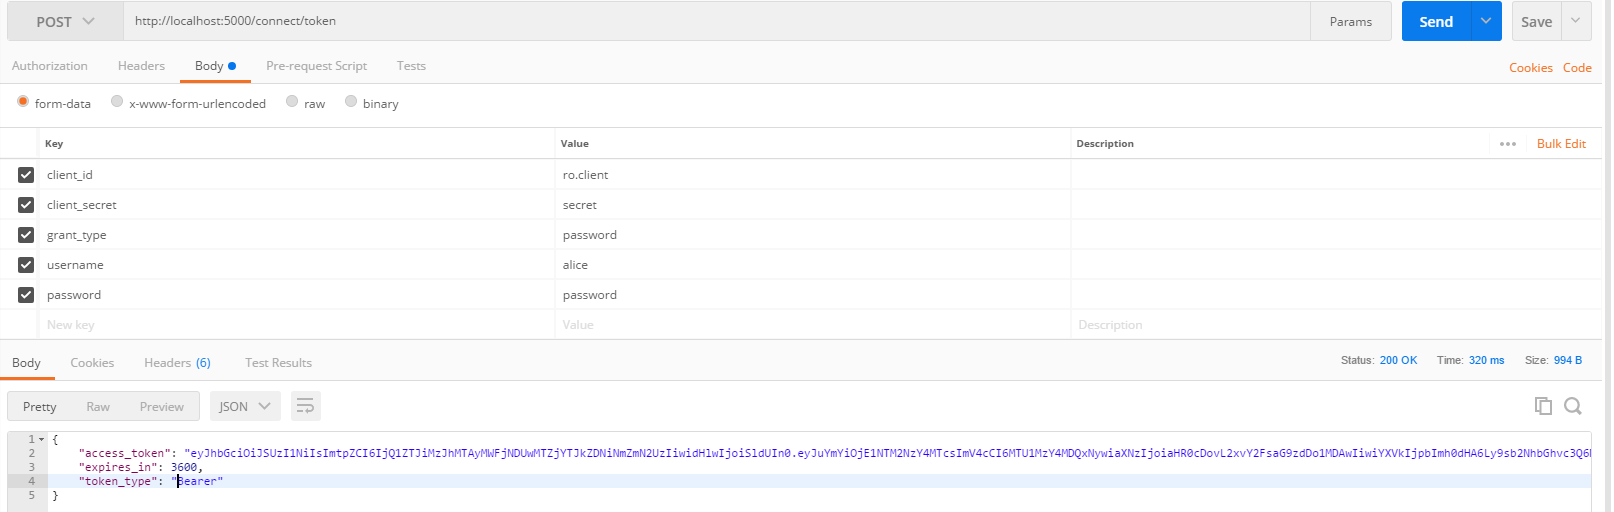
打开Postman,填入参数,提交,获取Token
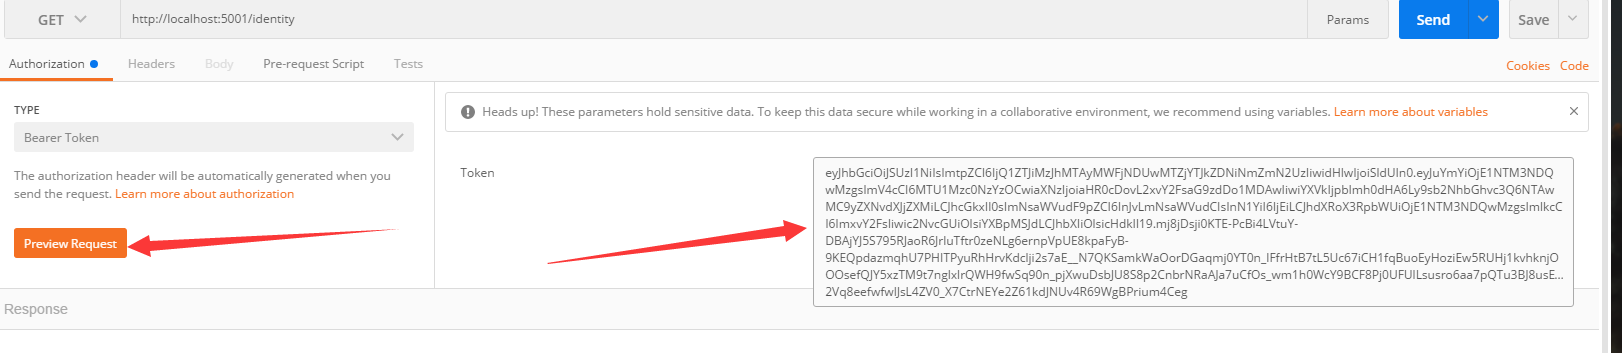
拿到Token后,到5001地址去执行http://localhost:5001/identity,选择Bearer Token,把刚才获取到的Token填入,并点击红色按钮
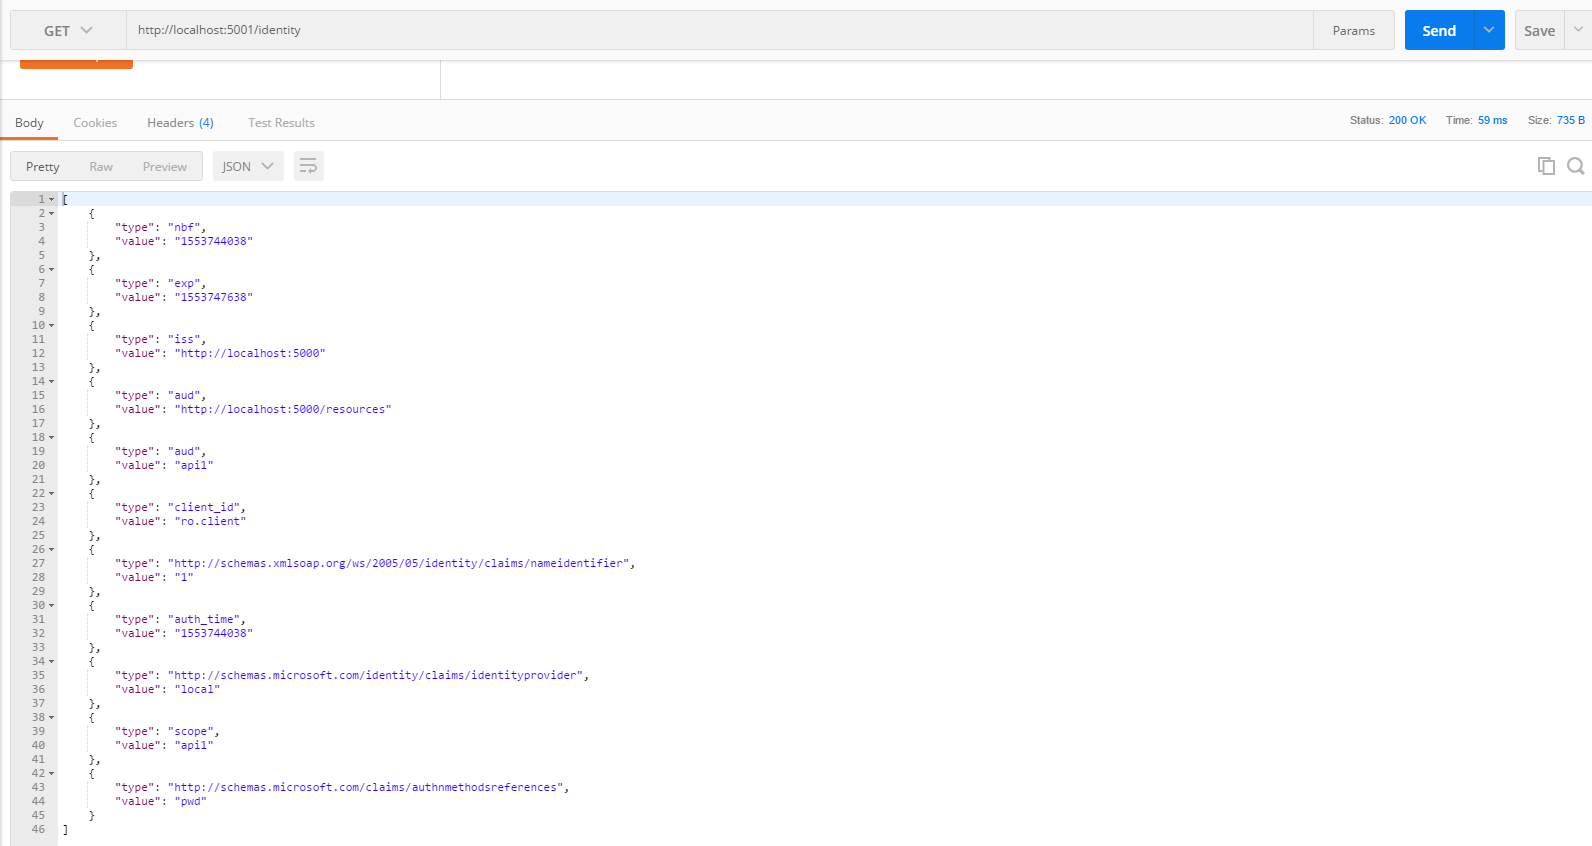
点击Send 按钮后,Api执行成功
如果不填写Token,或者故意将Token填错将返回401,未授权错误

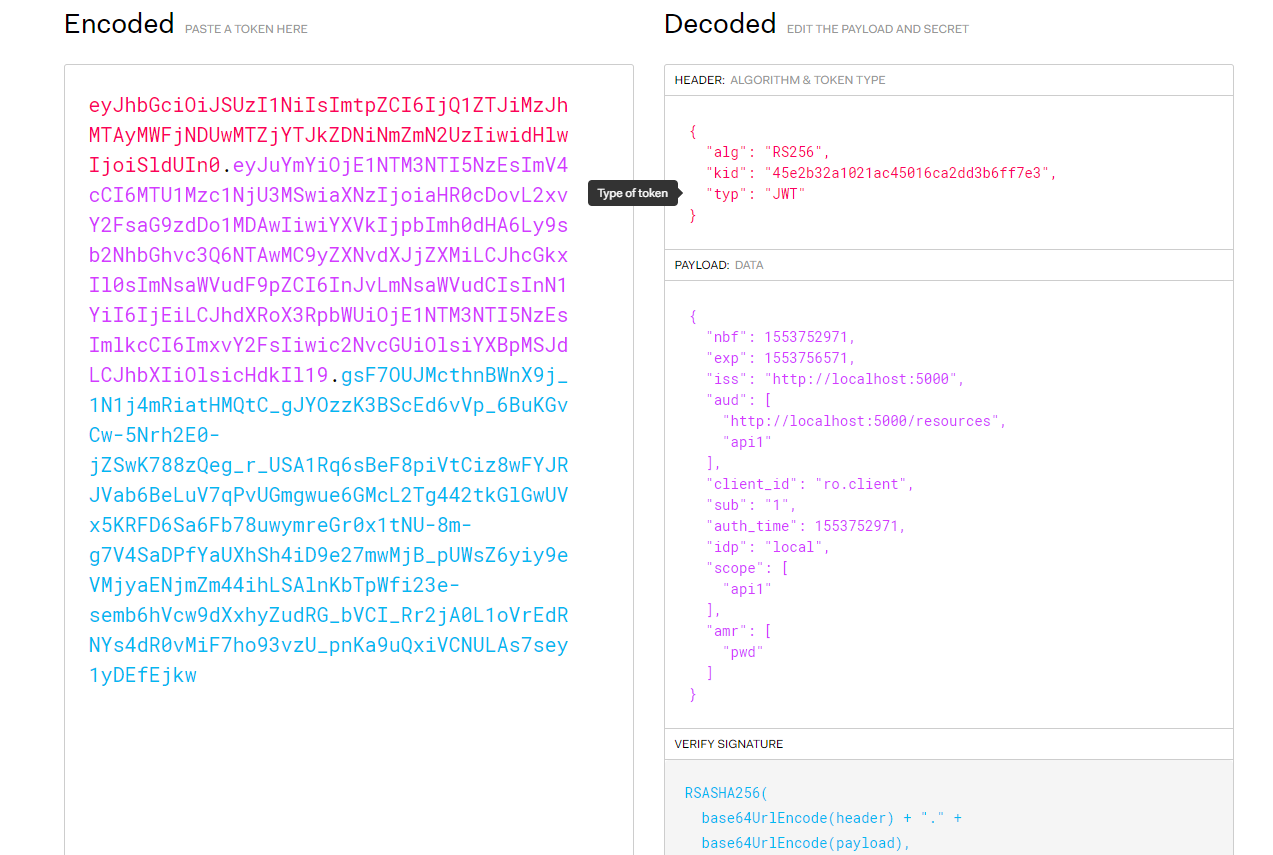
打开网址(https://jwt.io/),把Token复制进去,解析一下看看,与客户端授权方式相比,多了一个Sub
进一步思考
IdentityServer4应该有可以获取到用户信息的端口,我们从之前的发现端点里也能猜到一些,那我们拿着刚刚获取到的Token去这个端点获取下试试看

那我们就用Postman测试下,填写http://localhost:5000/connect/userinfo,使用Get
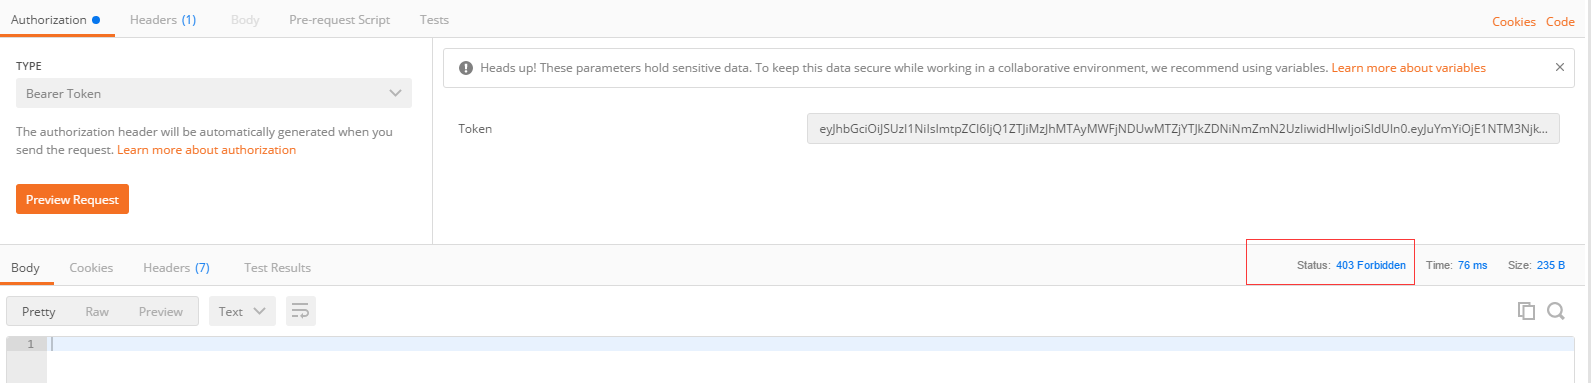
从上图可以看出,报403了,被拒绝访问了,可能哪里出了问题,经过一番搜索,授权服务端Config里GetClients()方法里ro.client这个用户,有个AllowedScopes = { "api1"},这里的权限可能不足
如下所示
 // resource owner password grant client

    new Client

    {

        ClientId = "ro.client",

        AllowedGrantTypes = GrantTypes.ResourceOwnerPassword,

        ClientSecrets =

        {

            new Secret("secret".Sha256())

        },

        AllowedScopes = { "api1"}

    }
调整后,允许的权限如下
AllowedScopes = { "api1",IdentityServerConstants.StandardScopes.OpenId}
...期间重复的步骤省略,再次获取一次看看
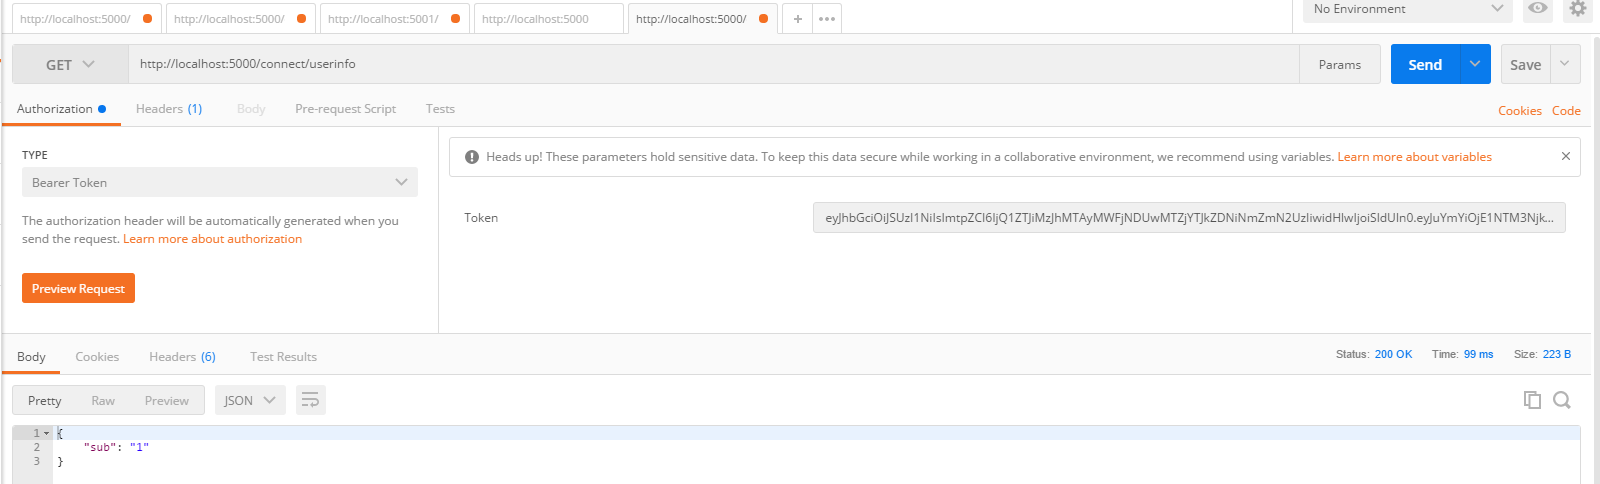
这次OK了,看到一个sub,这个也貌似对应着TestUser里的SubjectId,这个是用户的唯一编号
 new TestUser

                {

                    SubjectId = "1",

                    Username = "alice",

                    Password = "password",

                },
但是如果我想返回更多的用户信息怎么办呢,比如返回用户的电话号码,Email,以及自定义的类似组织等信息,应该如何处理呢,那我们给用户增加些身份(Claim)信息
public static List<TestUser> GetUsers()

{

    return new List<TestUser>

    {

        new TestUser

        {

            SubjectId = "1",

            Username = "alice",

            Password = "password",

            Claims = new Claim[]

            {

                new Claim(JwtClaimTypes.NickName,"Sarco"),

                new Claim(JwtClaimTypes.GivenName,"SarcoTest"),

                new Claim(JwtClaimTypes.PhoneNumber,"186221085730"),

                new Claim("org_code","3210")

            }

        },

        new TestUser

        {

            SubjectId = "2",

            Username = "bob",

            Password = "password"

        }

    };

}
我们增加了四项身份信息,NickName,GivenName,PhoneNumber和OrgCode,其中第四项是自定义的,
同时修改下Client的AllowedScopes
new Client

{

    ClientId = "ro.client",

    AllowedGrantTypes = GrantTypes.ResourceOwnerPassword,

    ClientSecrets =

    {

        new Secret("secret".Sha256())

    },

    AllowedScopes = { "api1",IdentityServerConstants.StandardScopes.OpenId,

    IdentityServerConstants.StandardScopes.Profile},

}
再次获取Token

会发现报错了,上面scope我没有填写,和之前的一样,但是报错了,如果填写上,如api 或者 openid,可以成功,那看看不填有没有办法呢,经过一番研究,Config里GetIdentityResources()方法增加一项new IdentityResources.Profile()就可以了。
public static IEnumerable<IdentityResource> GetIdentityResources()

        {

            return new IdentityResource[]

            {

                new IdentityResources.OpenId(),

                new IdentityResources.Profile()

            };

        }
再次获取下Token,并且根据Token再次获取用户信息
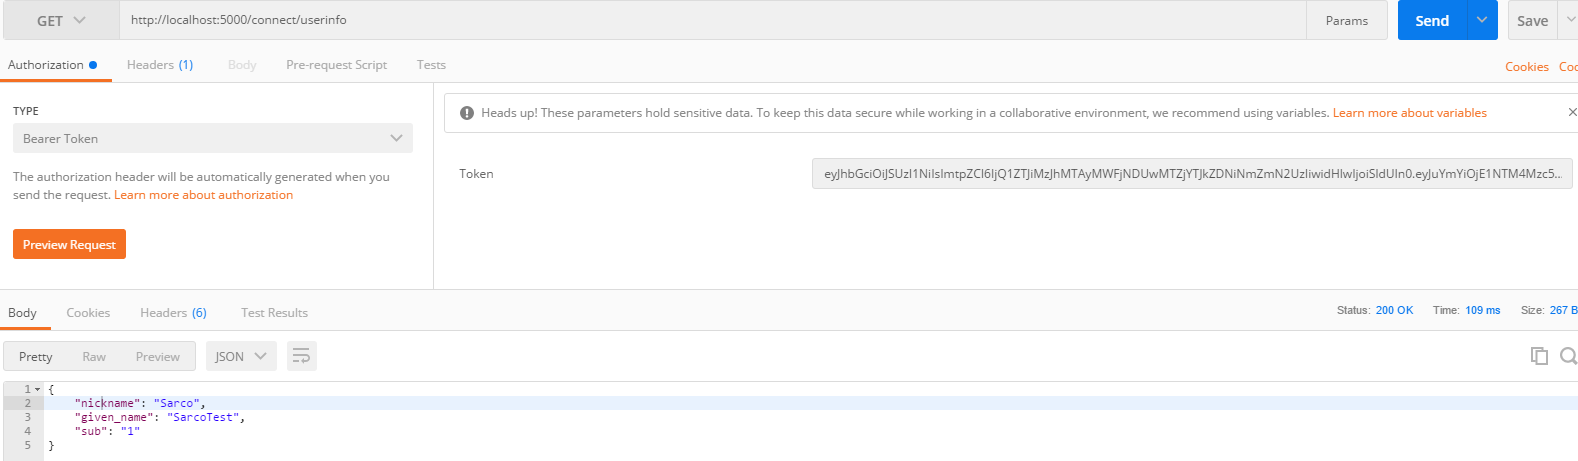
会发现,现在nickname和given_name有了,但是phone_number和org_code还是没有
报错原因:GetIdentityResources()方法添加后,只是说现在授权资源里包含Profile了,但是在GetClients()方法里的AllowedScopes里并不包含,所以报错
那么phone_number和org_code怎么没有出现呢?

我们看下Profile的范围,根据说明,它包含终端用户的默认身份信息有name,family_name,given_name,family_name,middle_name,nick_name,preferred_username,profile,picture,website,gender,birthdate,zoneinfo,locate and updated_at,也就是可以这么说,这么多的身份信息都属于Profile这个组里面,因为之前的用户信息里,我只添加了四项
new Claim(JwtClaimTypes.NickName,"Sarco"),

new Claim(JwtClaimTypes.GivenName,"SarcoTest"),

new Claim(JwtClaimTypes.PhoneNumber,"186221085730"),

new Claim("org_code","3210")
其中NickName和GivenName是属于Profile组的,所以,当客户的AllowedScopes里包含IdentityServerConstants.StandardScopes.Profile时,nick_name和given_name会显示出来,而PhoneNumber不属于Profile里,所以不会返回显示,自定义的组织信息肯定也无法获取到,还记得我前面说的
经过一番研究,Config里GetIdentityResources()方法增加一项new IdentityResources.Profile()就可以了,这是为什么呢?
记得之前获取Token的时候,Scope不填写的时候会报错,而填api或者openid就不会报错,是因为如果不填写,授权服务端就会从CliendId为"ro.client"的客户端拥有的Scope里全找一次,而我们一开始AllowedScopes里面包含了
IdentityServerConstants.StandardScopes.Profile,但是在GetIdentityResources()方法里没有添加new IdentityResources.Profile(),所以执行到获取Scope为IdentityServerConstants.StandardScopes.Profile时,由于找不到这项的IdentityResources,所以失败了,但是获取Token的时候填写api或者openid时,精确查找,由于AllowScopes和GetIdentityResources()都有,所以可以成功,这里可以这么说,AllowedScopes里的项必须在GetIdentityResources()或者GetApis()里里面要有
理解了这一点后,那我们调整下代码让自定义的org_code返回
public static IEnumerable<IdentityResource> GetIdentityResources()

{

    return new IdentityResource[]

    {

        new IdentityResources.OpenId(),

        new IdentityResources.Profile(),

        new IdentityResources.Phone(),

        new IdentityResource("org","组织代码",new string[]{"org_code" })

    };

}

public static IEnumerable<Client> GetClients()

        {

            return new List<Client>

            {

                new Client

                {

                    ClientId = "client",

                    // no interactive user, use the clientid/secret for authentication

                    AllowedGrantTypes = GrantTypes.ClientCredentials,

                    // secret for authentication

                    ClientSecrets =

                    {

                        new Secret("secret".Sha256())

                    },

                    // scopes that client has access to

                    AllowedScopes = { "api1" }

                },

                // resource owner password grant client

                new Client

                {

                    ClientId = "ro.client",

                    AllowedGrantTypes = GrantTypes.ResourceOwnerPassword,

                    ClientSecrets =

                    {

                        new Secret("secret".Sha256())

                    },

                    ///org代表GetIdentityResources()里的自定义new IdentityResource("org","组织代码",new string[]{"org_code" }),而org_code代表用户Claims里的new Claim("org_code","3210")

                    AllowedScopes = { "api1",IdentityServerConstants.StandardScopes.OpenId,

                        IdentityServerConstants.StandardScopes.Profile,"org"},

                }

            };

        }
调整后,再用postman获取Token,然后从http://localhost:5000/connect/userinfo里获取下用户信息
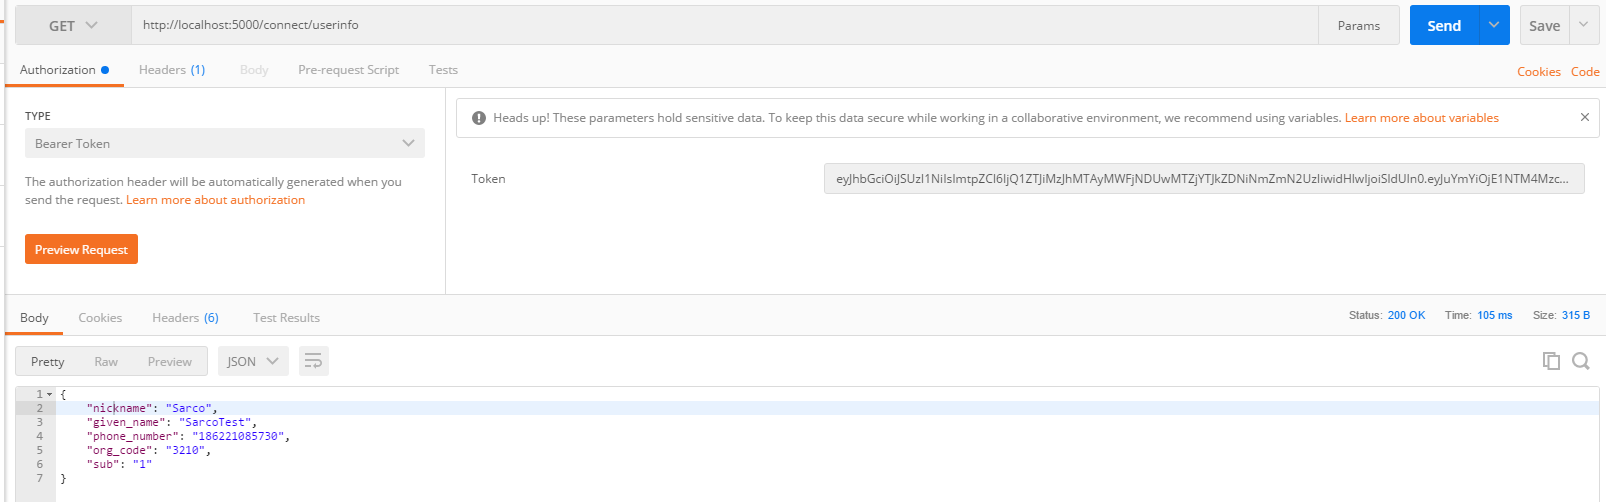
顺利的获取到了phone_number,org_code等信息
总结
IdentityResource与TestUser中的Claims的关系
TestUser中的多项Claim可以成为一个IdentityResource的一个项,也就是可以创建一个IdentityResource,包含User中的一个和多个Claim信息,类似于教师证里面包含工号和职位等多个相关信息
Client的AllowedScopes与IdentityResource以及ApiResource的关系
Client的AllowedScopes中的项必须在IdentityResource或者ApiResource中能找到,否则也会报错,ApiResource代表Api资源,IdentityResource项代表能访问用户身份信息包含哪些信息
IdentityServer4 学习笔记[2]-用户名密码验证的更多相关文章
- SQL反模式学习笔记20 明文密码
目标:恢复或重置密码 反模式:使用明文存储密码 1.存储密码 使用明文存储密码或者在网络上传递密码是不安全的. 如果攻击者截取到你用来插入(或者修改)密码的sql语句,就可以获得密码. 黑客获 ...
- 【WCF】使用“用户名/密码”验证的合理方法
我不敢说俺的方法是最佳方案,反正这世界上很多东西都是变动的,正像老子所说的——“反(返)者,道之动”.以往看到有些文章中说,为每个客户端安装证书嫌麻烦,就直接采用把用户名和密码塞在SOAP头中发送,然 ...
- WCF 安全性之 自定义用户名密码验证
案例下载 http://download.csdn.net/detail/woxpp/4113172 客户端调用代码 通过代理类 代理生成 参见 http://www.cnblogs.com/woxp ...
- OpenVPN使用用户名/密码验证方式
OpenVPN推荐使用证书进行认证,安全性很高,但是配置起来很麻烦.还好它也能像pptp等vpn一样使用用户名/密码进行认证. 不管何种认证方式,服务端的ca.crt, server.crt, ser ...
- 【WCF】Silverlight+wcf+自定义用户名密码验证
本文摘自 http://www.cnblogs.com/virusswb/archive/2010/01/26/1656543.html 在昨天的博文Silverlight3+wcf+在不使用证书的情 ...
- WebService 用户名密码验证
原文:WebService 用户名密码验证 在项目开发的过程中,WebService是经常要用的,当调用WebService方法时,需要经过服务的验证才可以调用,一般就是用户名/密码验证,还有一个就是 ...
- WCF服务安全控制之netTcpBinding的用户名密码验证【转】
选择netTcpBinding WCF的绑定方式比较多,常用的大体有四种: wsHttpBinding basicHttpBinding netTcpBinding wsDualHttpBinding ...
- WCF用户名密码验证方式
WCF使用用户名密码验证 服务契约 namespace WCFUserNameConstract { [ServiceContract] public interface IWcfContract { ...
- 自定义实现wcf的用户名密码验证
目前wcf分为[传输层安全][消息层安全]两种,本身也自带的用户名密码验证的功能,但是ms为了防止用户名密码明文在网络上传输,所以,强制要求一旦使用[用户名密码]校验功能,则必须使用证书,按照常理讲, ...
随机推荐
- c#在sql中存取图片image示例
这篇文章主要介绍了c#在sql中存取图片image示例,需要的朋友可以参考下 (1)控制台应用程序下演示插入图片 复制代码 代码如下: public void InsertIMG() { //将需要存 ...
- 使用jmx4perl和j4psh接管Jolokia
在ActiveMQ的API中,内置了Jolokia . 可以使用jmx4perl来安装: $ perl -MCPAN -e shell Terminal does not support AddHis ...
- 类型:.net;问题:iis注册;结果:.net4.0注册到IIS ,重新注册IIS ,iis注册
.net4.0注册到IIS ,重新注册IIS ,iis注册 IIS和.netfw4.0安装顺序是从前到后,如果不小心颠倒了,无所谓. 打开程序-运行-cmd:输入一下命令重新注册IIS C:\WI ...
- C++深度解析教程学习笔记(2)C++中的引用
1.C++中的引用 (1)变量名的回顾 ①变量是一段实际连续存储空间的别名,程序中通过变量来申请并命名存储空间 ②通过变量的名字可以使用存储空间.(变量的名字就是变量的值,&变量名是取地址操作 ...
- python之模块(在命令行当中使用pip install 模块来进行模块的安装)
模块:在程序设计中,为完成某一功能所需的一段程序或子程序:或指能由编译程序.装配程序等处理的独立程序单位. 在我们编程的时候我们如果将所有的文件都放在那个py文件中,我们的py文件会很大,这样也很不好 ...
- scp命令 跨服务器传输
scp命令用于在Linux下进行远程拷贝文件的命令,和它类似的命令有cp,不过cp只是在本机进行拷贝不能跨服务器,而且scp传输是加密的.可能会稍微影响一下速度.当你服务器硬盘变为只读read onl ...
- JavaScript toLowerCase() 方法
定义和用法 toLowerCase() 方法用于把字符串转换为小写. 语法 stringObject.toLowerCase() 返回值 一个新的字符串,在其中 stringObject 的所有大写字 ...
- [转]CSS块级元素和行内元素
原地址:http://www.studyofnet.com/news/398.html 本文导读:HTML中的元素可分为两种类型:块级元素和行级元素.这些元素的类型是通过文档类型定义(DTD)来指明. ...
- c语言学习笔记 scanf和printf格式的问题
int a =0; int b =0; scanf("%d %d",&,&b); 上面这种和下面这种哪种对? int a =0; int b =0; scanf(& ...
- R语言输出pdf时,中文乱码处理
本文转载自:https://blog.csdn.net/hongweigg/article/details/47907555 1.使用基础包,使用函数pdf()输出 在使用pdf()函数时,要输出中文 ...