Zookeeper+Dubbo+SpringMVC环境搭建
项目码云GIT地址:https://gitee.com/xshuai/dubbo/
| 开发工具 | MyEclipse 10.7 |
| JDK | 1.7 |
| 容器 | Tomcat 8(运行dubbo) |
| zookeeper版本 | zookeeper-3.4.6 |
| dubbo | dubbo-admin-2.5.3 |
dubbo-admin-2.5.3下载地址:http://pan.baidu.com/s/1bozCMzP
zookeeper下载地址:http://www-eu.apache.org/dist/zookeeper/zookeeper-3.4.6/
Dubbo+Zookeeper 的下载安装配置启动
1.dubbo-admin-2.5.3下载完成后。放在webapps文件夹下面。先把默认的tomcat的ROOT项目备份后移除。将dubbo-admin-2.5.3.war改成ROOT.war 备用
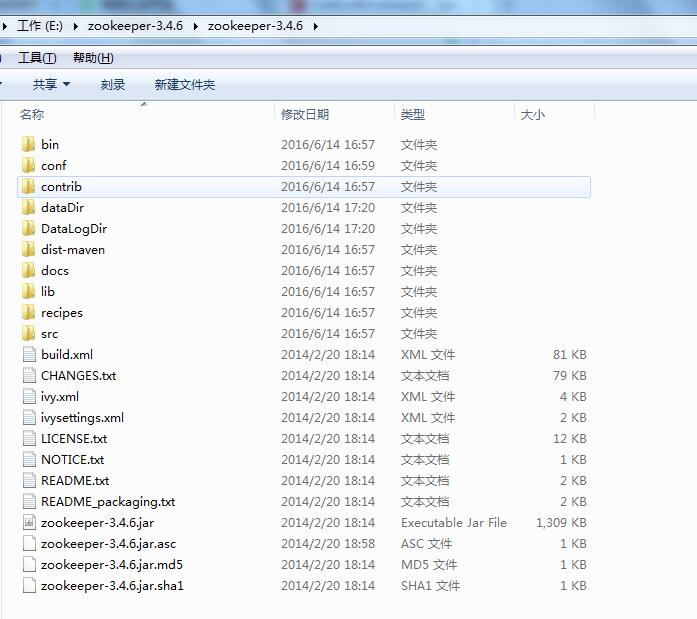
2.zookeeper下载后解压安装即可。windows安装完成后如下图
进入到conf里面,会看到zoo_sample.cfg文件。复制一个修改为zoo.cfg,修改相关配置内容
# The number of milliseconds of each tick

tickTime=2000

# The number of ticks that the initial

# synchronization phase can take

initLimit=10

# The number of ticks that can pass between

# sending a request and getting an acknowledgement

syncLimit=5

# the directory where the snapshot is stored.

# do not use /tmp for storage, /tmp here is just

# example sakes.

dataDir=/tmp/zookeeper

# the port at which the clients will connect

#这块是设置zookeeper的端口。默认2181

clientPort=2181

# the maximum number of client connections.

# increase this if you need to handle more clients

#maxClientCnxns=60

#

# Be sure to read the maintenance section of the

# administrator guide before turning on autopurge.

#

# http://zookeeper.apache.org/doc/current/zookeeperAdmin.html#sc_maintenance

#

# The number of snapshots to retain in dataDir

#autopurge.snapRetainCount=3

# Purge task interval in hours

# Set to "0" to disable auto purge feature

#autopurge.purgeInterval=1
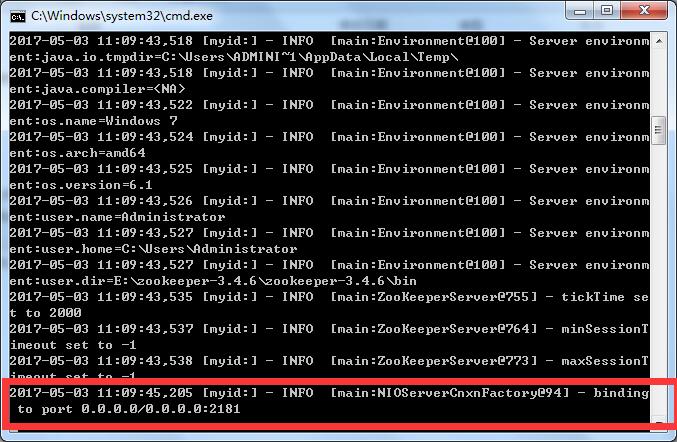
到bin文件夹下面。启动zookeeper,windows 点击zkServer.cmd即可,启动成功如下图
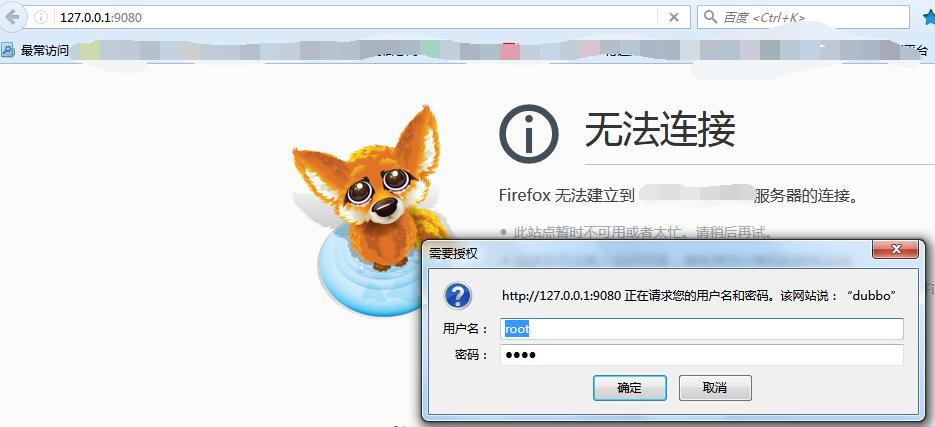
3.可以启动tomcat了。这样直接访问 就能看到dubbo的页面。要不然dubbo启动会报错。第一次入门的话建议就用默认的端口配置即可。默认用户 root 密码 root
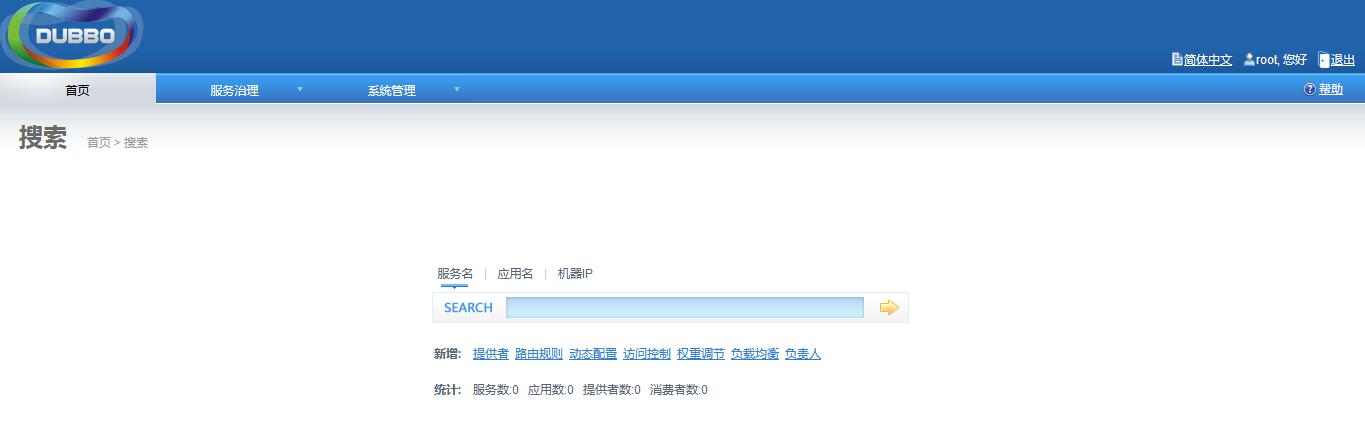
登录成功以后看到如下页面
以上就是dubbo+zookeeper的配置和启动。下面开始Java代码的编写
整合Dubbo+Zookeeper+SpringMVC
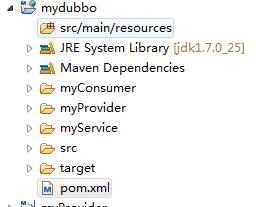
1.创建myDubbo项目为主项目,结构图如下 myC P S后续才创建,刚开始是没有的。
POM.XML配置如下
<project xmlns="http://maven.apache.org/POM/4.0.0" xmlns:xsi="http://www.w3.org/2001/XMLSchema-instance"
xsi:schemaLocation="http://maven.apache.org/POM/4.0.0 http://maven.apache.org/maven-v4_0_0.xsd">
<modelVersion>4.0.0</modelVersion>
<groupId>com</groupId>
<artifactId>mydubbo</artifactId>
注意这里。打包为POM,分布式系统的第一步
<packaging>pom</packaging>
<version>0.0.1-SNAPSHOT</version>
<name>mydubbo</name>
<url>http://maven.apache.org</url>
<properties>
<spring.version>3.2.4.RELEASE</spring.version>
</properties>
<dependencies>
<dependency>
<groupId>com.alibaba</groupId>
<artifactId>dubbo</artifactId>
<version>2.5.3</version>
<exclusions>
<exclusion>
<groupId>org.springframework</groupId>
<artifactId>spring</artifactId>
</exclusion>
</exclusions>
</dependency>
<!--dubbo注册中心-->
<dependency>
<groupId>org.apache.zookeeper</groupId>
<artifactId>zookeeper</artifactId>
<version>3.4.6</version>
</dependency>
<!--zookeeper客户端-->
<dependency>
<groupId>com.github.sgroschupf</groupId><artifactId>zkclient</artifactId><version>0.1</version></dependency><dependency><groupId>org.springframework</groupId><artifactId>spring-core</artifactId><version>${spring.version}</version></dependency><dependency><groupId>org.springframework</groupId><artifactId>spring-context</artifactId><version>${spring.version}</version></dependency></dependencies><build><finalName>mydubbo</finalName></build>
创建子项目后自动会加载。刚开始是没有的
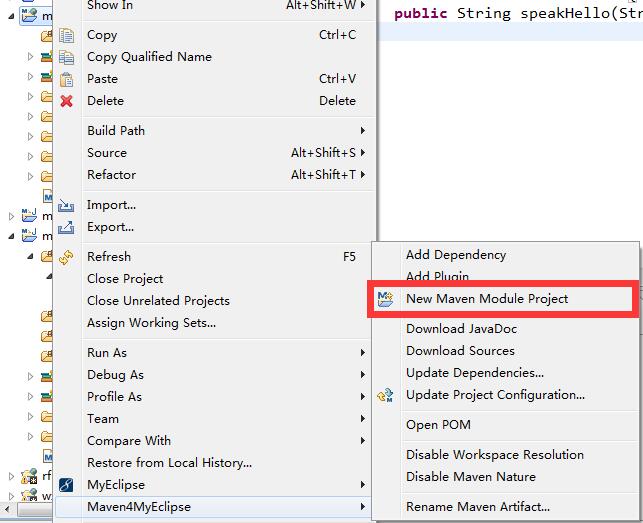
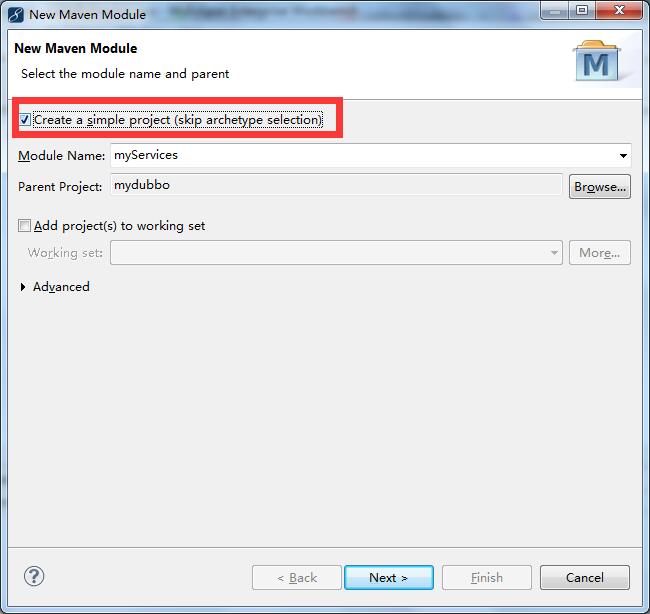
<modules><module>myService</module><module>myProvider</module><module>myConsumer</module></modules></project>2.创建服务提供商子项目,MyEclipse操作如下图示意 对mydubbo项目鼠标右键new或者maven插件直接创建maven module项目,填写子项目名称。有的如果不选种Create a simple project 自定义创建会报错。选择则不会。根据实际情况来确定是否选择
3.创建3个子项目分别为 myService(服务商(接口),模块提供方) myProvider(供应者,给dubbo zookeeper注册暴露接口) myConsumer
myService 项目相关配置
pom配置
<project xmlns="http://maven.apache.org/POM/4.0.0" xmlns:xsi="http://www.w3.org/2001/XMLSchema-instance" xsi:schemaLocation="http://maven.apache.org/POM/4.0.0 http://maven.apache.org/xsd/maven-4.0.0.xsd">

  <modelVersion>4.0.0</modelVersion>

  <parent>

    <artifactId>mydubbo</artifactId>

    <groupId>com</groupId>

    <version>0.0.1-SNAPSHOT</version>

  </parent>

  <name>myService</name>

  <artifactId>myService</artifactId>

  <packaging>jar</packaging>

</project>
新建一个接口类
package com.xiaoshuai;

public interface HelloService {

	public String speakHello(String name);

}以上工作完成后,进行maven install
myProvider项目相关配置
pom配置
<project xmlns="http://maven.apache.org/POM/4.0.0" xmlns:xsi="http://www.w3.org/2001/XMLSchema-instance" xsi:schemaLocation="http://maven.apache.org/POM/4.0.0 http://maven.apache.org/xsd/maven-4.0.0.xsd">

  <modelVersion>4.0.0</modelVersion>

  <parent>

    <artifactId>mydubbo</artifactId>

    <groupId>com</groupId>

    <version>0.0.1-SNAPSHOT</version>

  </parent>

  <artifactId>myProvider</artifactId>

引用接口服务项目 子项目maven install 为jar

	<dependencies>

		<dependency>

			<groupId>com</groupId>

			<artifactId>myService</artifactId>

			<version>0.0.1-SNAPSHOT</version>

		</dependency>

	</dependencies>

</project>
实现接口服务者
package com.xiaoshuai.impl;

import com.xiaoshuai.HelloService;

public class HelloServiceImpl implements HelloService{

	public String speakHello(String name) {

		return "你好:"+name+"欢迎查阅小帅丶博客";

	}

}
将实现类接口类暴露给dubbo+zookeeper 在myProvider创建provider.xml 内容如下
<?xml version="1.0" encoding="UTF-8"?>

<beans xmlns="http://www.springframework.org/schema/beans"

       xmlns:xsi="http://www.w3.org/2001/XMLSchema-instance"

       xmlns:dubbo="http://code.alibabatech.com/schema/dubbo"

       xsi:schemaLocation="http://www.springframework.org/schema/beans

       http://www.springframework.org/schema/beans/spring-beans.xsd        http://code.alibabatech.com/schema/dubbo        http://code.alibabatech.com/schema/dubbo/dubbo.xsd">

    <!-- 提供方应用信息,用于计算依赖关系 -->

    <dubbo:application name="hello-provider"  />

    <!-- 使用multicast广播注册中心暴露服务地址 -->

    <dubbo:registry address="zookeeper://127.0.0.1:2181" />

    <!-- 用dubbo协议在20880端口暴露服务 -->

    <dubbo:protocol name="dubbo" port="20880" />

    <!-- 声明需要暴露的服务接口 -->

    <dubbo:service interface="com.xiaoshuai.HelloService" ref="helloService" />

    <!-- 和本地bean一样实现服务 -->

    <bean id="helloService" class="com.xiaoshuai.impl.HelloServiceImpl" />

</beans>
需要创建一个Java类写个方法 去 加载provider.xml 注册到dubbo + zookeeper
package com.xiaoshuai.impl;

import org.springframework.context.support.ClassPathXmlApplicationContext;

public class ProviderServer {

	public static void main(String[] args){

		try {

			ClassPathXmlApplicationContext context = new ClassPathXmlApplicationContext("provider.xml");

			context.start();

			System.in.read();

		} catch (Exception e) {

			e.printStackTrace();

		}

	}

}
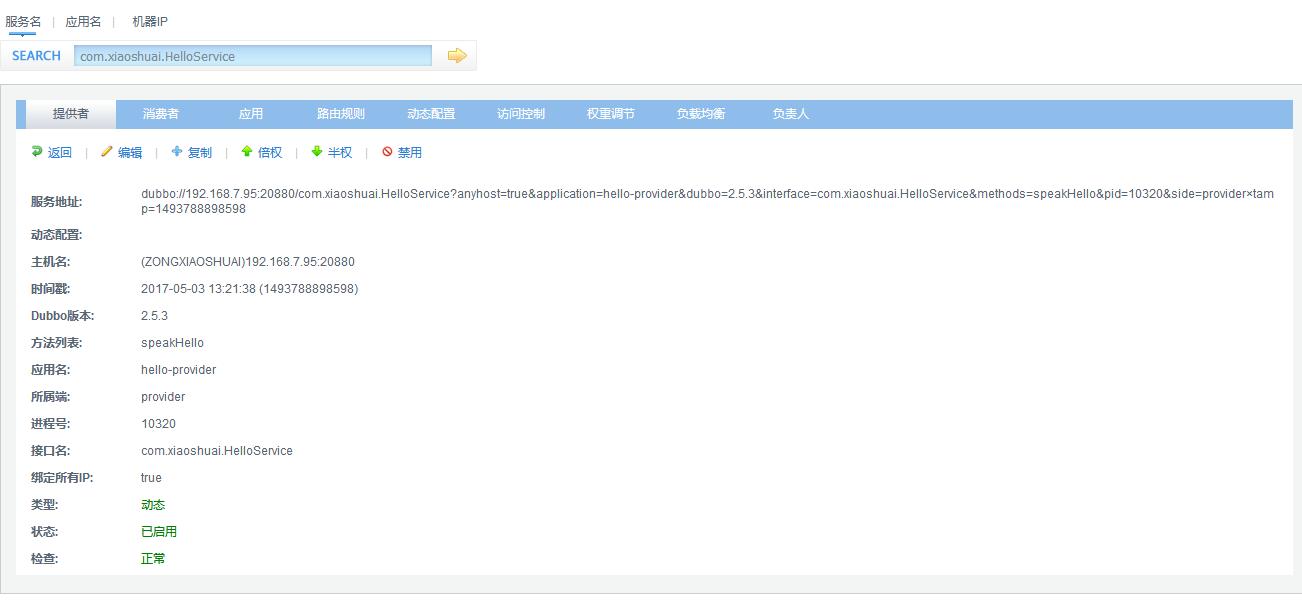
可以运行。启动该提供者服务,编写消费者。
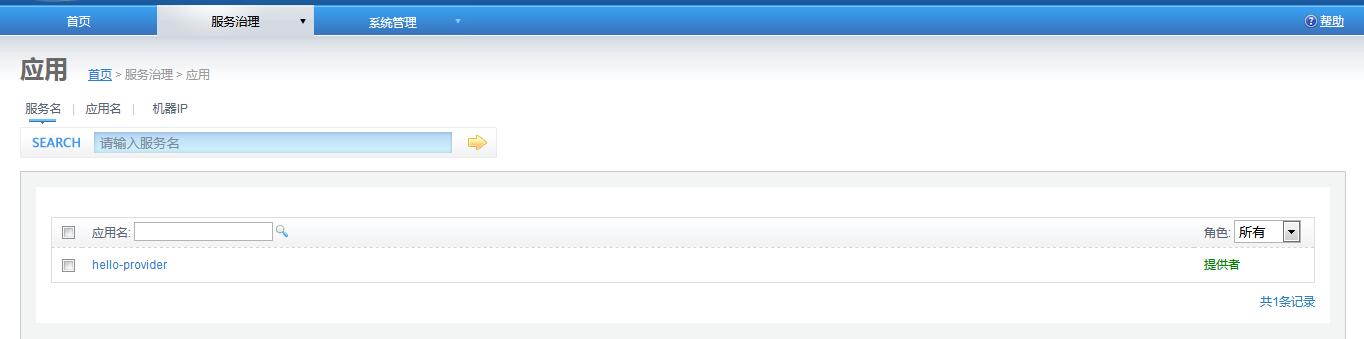
可以看到dubbo 提供者服务已经注册
myConsumer 项目相关配置
pom配置
<project xmlns="http://maven.apache.org/POM/4.0.0" xmlns:xsi="http://www.w3.org/2001/XMLSchema-instance" xsi:schemaLocation="http://maven.apache.org/POM/4.0.0 http://maven.apache.org/xsd/maven-4.0.0.xsd">

  <modelVersion>4.0.0</modelVersion>

  <parent>

    <artifactId>mydubbo</artifactId>

    <groupId>com</groupId>

    <version>0.0.1-SNAPSHOT</version>

  </parent>

  <artifactId>myConsumer</artifactId>

	<dependencies>

		<dependency>

			<groupId>com</groupId>

			<artifactId>myService</artifactId>

			<version>0.0.1-SNAPSHOT</version>

		</dependency>

	</dependencies>

</project>
消费者进行订阅provider的服务,也就是需要去zookeeper读取加载服务,那就需要创建一个consumer.xml去加载zookeeper
<?xml version="1.0" encoding="UTF-8"?>

<beans xmlns="http://www.springframework.org/schema/beans"

	xmlns:xsi="http://www.w3.org/2001/XMLSchema-instance" xmlns:dubbo="http://code.alibabatech.com/schema/dubbo"

	xsi:schemaLocation="http://www.springframework.org/schema/beans

       http://www.springframework.org/schema/beans/spring-beans.xsd        http://code.alibabatech.com/schema/dubbo        http://code.alibabatech.com/schema/dubbo/dubbo.xsd">

	<!-- 消费方应用名,用于计算依赖关系,不是匹配条件,不要与提供方一样 -->

	<dubbo:application name="hello-consumer" />

	<!-- 使用multicast广播注册中心暴露发现服务地址 -->

	<dubbo:registry address="zookeeper://127.0.0.1:2181" />

	<!-- 生成远程服务代理,可以和本地bean一样使用demoService -->

	<dubbo:reference id="helloService" interface="com.xiaoshuai.HelloService" />

</beans>
创建一个消费者方法,进行调用ConsumerClient
package com.xiaoshuai;

import org.springframework.context.support.ClassPathXmlApplicationContext;

public class ConsumerClient {

	public static void main(String[] args) {

		ClassPathXmlApplicationContext context = new ClassPathXmlApplicationContext("consumer.xml");

		HelloService helloService = (HelloService) context.getBean("helloService");

		String result = helloService.speakHello("xiaoshuai");

		System.out.println(result);

	}

}
运行该方法输出一下内容

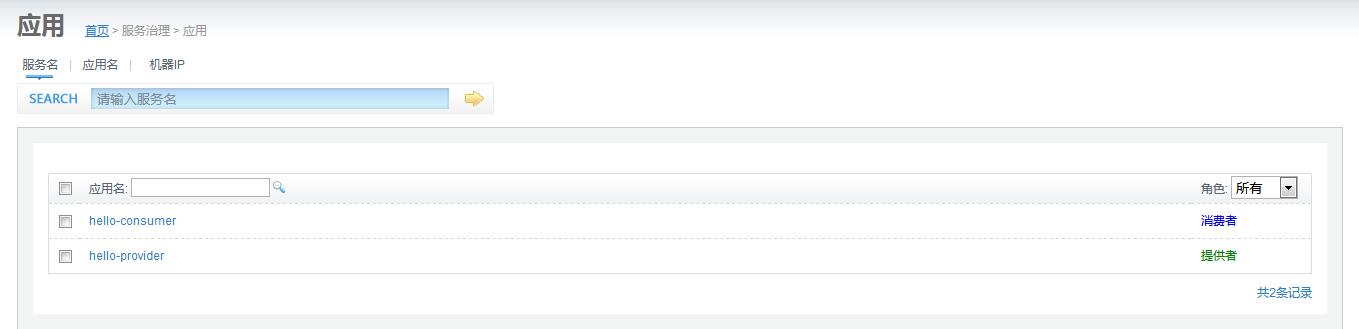
接下来看dubbo中心有什么内容。
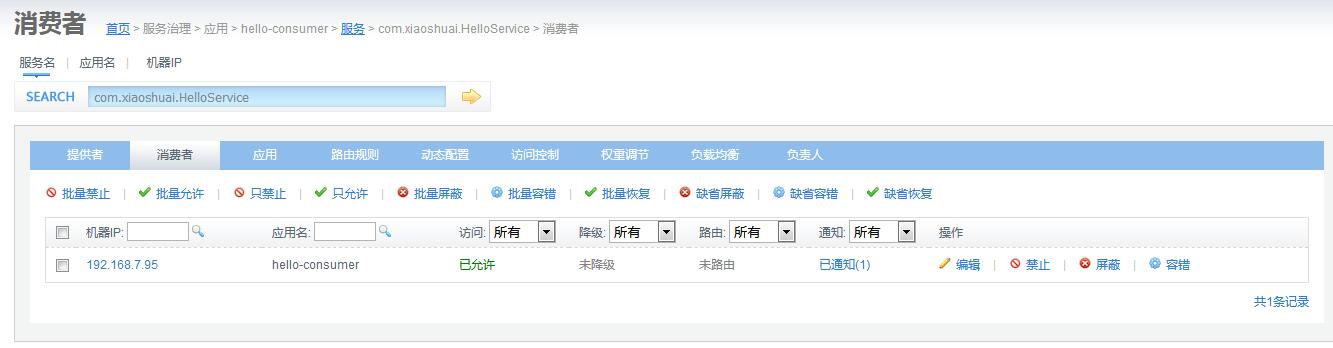
看看消费者里面显示些什么内容
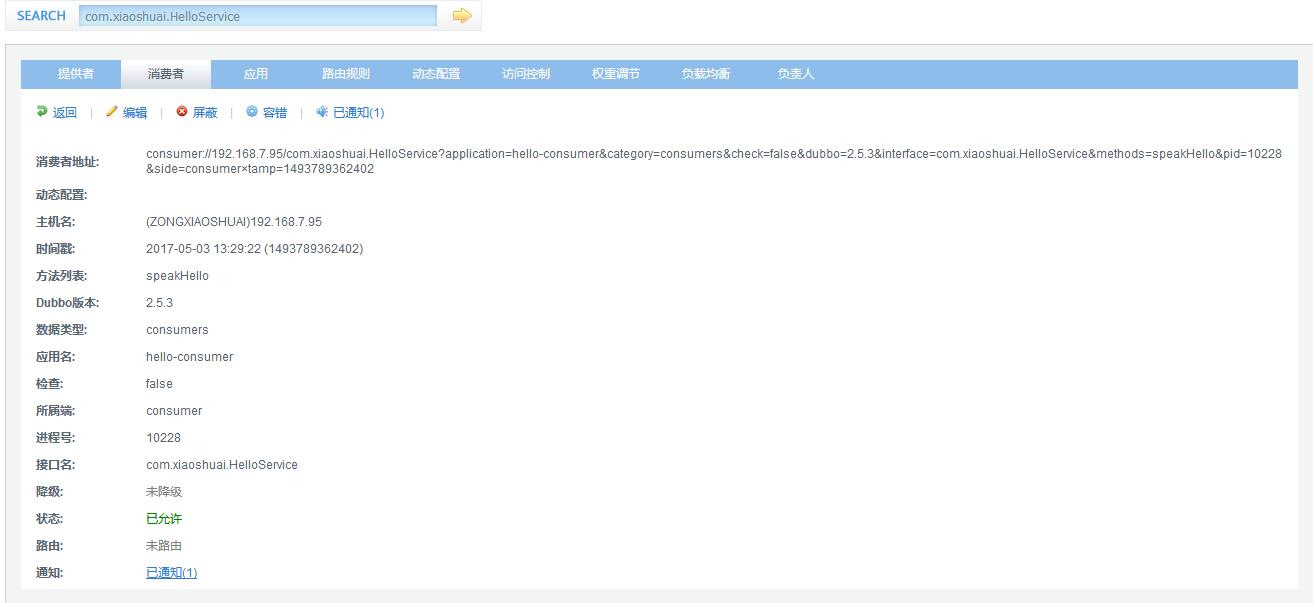
详细消费者信息如图所示
以上一个简单的分布式的Demo就已经完结
Zookeeper+Dubbo+SpringMVC环境搭建的更多相关文章
- 【转载】Maven+druid+MyBatis+Spring+Oracle+Dubbo开发环境搭建
原地址:http://blog.csdn.net/wp1603710463/article/details/48247817#t16 Maven+druid+MyBatis+spring+Oracle ...
- [转]ZooKeeper 集群环境搭建 (本机3个节点)
ZooKeeper 集群环境搭建 (本机3个节点) 是一个简单的分布式同步数据库(或者是小文件系统) ------------------------------------------------- ...
- SpringMVC环境搭建和详解
1.Spring容器和SpringMVC容器是父子容器 1.1 SpringMVC容器可以调用Spring容器中的所有内容 1.2 图示 2.SpringMVC环境搭建 1.导入jar包 2.在web ...
- zookeeper集群环境搭建详细图文教程
zookeeper集群环境搭建详细图文教程 zhoubang @ 2018-01-02 [文档大纲] 友情介绍 软件环境 注意点 环境安装 1. 新建用于存储安装包以及软件安装的目录 2. 下载安装z ...
- springmvc环境搭建及实例
一. 软件环境 eclipse-jee-mars-R-win32-x86_64 jdk1.7.0_79 apache-tomcat-7.0.52 spring-framework-3.2.0.RELE ...
- Linux环境下ZooKeeper集群环境搭建关键步骤
ZooKeeper版本:zookeeper-3.4.9 ZooKeeper节点:3个节点 以下为Linux环境下ZooKeeper集群环境搭建关键步骤: 前提条件:已完成在Linux环境中安装JDK并 ...
- Dubbo简单环境搭建
Dubbo服务的发展和作用: 首先,看下一般网站架构随着业务的发展,逻辑越来越复杂,数据量越来越大,交互越来越多之后的常规方案演进历程. 其次,当服务越来越多之后,我们需要做哪些服务治理? 最后,是d ...
- Dubbo系列(二)dubbo的环境搭建
dubbo是一个分布式服务框架,提供一个SOA的解决方案.简单的说,dubbo就像在生产者和消费者中间架起了一座桥梁,使之能透明交互.本文旨在搭建一个可供使用和测试的dubbo环境,使用了spring ...
- 【2020-03-21】Dubbo本地环境搭建-实现服务注册和消费
前言 本周主题:加班工作.本周内忙于CRUD不能自拔,基本每天都是九点半下班,下周上线,明天还要加班推进进度.今天是休息日,于是重拾起了dubbo,打算近期深入了解一下其使用和原理.之所以说是重拾,是 ...
随机推荐
- unity 屏幕适配的问题
首先是AB的加载时,会出现localscale的改变,需要在初始化时将其调节为1.0并且 offmax和min都设置为0,此时方才会出现在自己臆想之中(尤其是需要设置父节点时)
- Clipboard---将文本复制到剪切板上
第一步:链接 Clipboard 的js文件 < script src = “ https://cdn.jsdelivr.net/npm/clipboard@2/dist/clipboard.m ...
- 关于Integer比较问题
public class Test { public static void main(String[] args) { Integer a=127; Integer b=127; System.ou ...
- 宏定义define和const的区别
define和const都可以用来定义常量,define的格式为:#define 标识符 字符串,const在定义常量前面,const类型定以后不能被修改,区别主要有如下几点: 1.编译器处理方式不同 ...
- GCJ-02火星坐标系和WGS-84坐标系转换关系
GCJ-02火星坐标系和WGS-84坐标系转换关系 WGS-84:GPS坐标系 GCJ-02:火星坐标系,国测局02年发布的坐标体系,高德,腾讯等使用. BD-09:百度坐标系,百度自研,百度地图使用 ...
- RESTful-1概述
一种软件架构风格.设计风格,而不是标准,只是提供了一组设计原则和约束条件.它主要用于客户端和服务器交互类的软件.基于这个风格设计的软件可以更简洁,更有层次,更易于实现缓存等机制. 概述 编辑 REST ...
- *CTF——shellcode
一看题目是利用shellcode解决问题 伪代码: checksec:开启了NX exp: from pwn import* context(os='linux',arch='amd64',log ...
- 第二次作业-熟悉git
GIT地址 https://github.com/gentlemanzq/yunsuanhomework GIT用户名 gentlemanzq 学号后五位 62320 博客地址 https://w ...
- python 日常错误整理
1.NameError: name 'raw_input' is not defined 问题原因:python 3 中raw_input已经被input 替代
- json格式的数据及遍历:
代码: <!DOCTYPE html> <html lang="en"> <head> <meta charset="UTF-8 ...