【转载】阻塞队列之三:SynchronousQueue同步队列 阻塞算法的3种实现
一、SynchronousQueue简介
Java 6的并发编程包中的SynchronousQueue是一个没有数据缓冲的BlockingQueue,生产者线程对其的插入操作put必须等待消费者的移除操作take,反过来也一样。
不像ArrayBlockingQueue或LinkedListBlockingQueue,SynchronousQueue内部并没有数据缓存空间,你不能调用peek()方法来看队列中是否有数据元素,因为数据元素只有当你试着取走的时候才可能存在,不取走而只想偷窥一下是不行的,当然遍历这个队列的操作也是不允许的。队列头元素是第一个排队要插入数据的线程,而不是要交换的数据。数据是在配对的生产者和消费者线程之间直接传递的,并不会将数据缓冲数据到队列中。可以这样来理解:生产者和消费者互相等待对方,握手,然后一起离开。
特点:
1、不能在同步队列上进行 peek,因为仅在试图要取得元素时,该元素才存在;
2、除非另一个线程试图移除某个元素,否则也不能(使用任何方法)添加元素;也不能迭代队列,因为其中没有元素可用于迭代。队列的头是尝试添加到队列中的首个已排队线程元素; 如果没有已排队线程,则不添加元素并且头为 null。
3、对于其他 Collection 方法(例如 contains),SynchronousQueue 作为一个空集合。此队列不允许 null 元素。
4、它非常适合于传递性设计,在这种设计中,在一个线程中运行的对象要将某些信息、事件或任务传递给在另一个线程中运行的对象,它就必须与该对象同步。
5、对于正在等待的生产者和使用者线程而言,此类支持可选的公平排序策略。默认情况下不保证这种排序。 但是,使用公平设置为 true 所构造的队列可保证线程以 FIFO 的顺序进行访问。 公平通常会降低吞吐量,但是可以减小可变性并避免得不到服务。
6、SynchronousQueue的以下方法:
* iterator() 永远返回空,因为里面没东西。
* peek() 永远返回null。
* put() 往queue放进去一个element以后就一直wait直到有其他thread进来把这个element取走。
* offer() 往queue里放一个element后立即返回,如果碰巧这个element被另一个thread取走了,offer方法返回true,认为offer成功;否则返回false。
* offer(2000, TimeUnit.SECONDS) 往queue里放一个element但是等待指定的时间后才返回,返回的逻辑和offer()方法一样。
* take() 取出并且remove掉queue里的element(认为是在queue里的。。。),取不到东西他会一直等。
* poll() 取出并且remove掉queue里的element(认为是在queue里的。。。),只有到碰巧另外一个线程正在往queue里offer数据或者put数据的时候,该方法才会取到东西。否则立即返回null。
* poll(2000, TimeUnit.SECONDS) 等待指定的时间然后取出并且remove掉queue里的element,其实就是再等其他的thread来往里塞。
* isEmpty()永远是true。
* remainingCapacity() 永远是0。
* remove()和removeAll() 永远是false。
SynchronousQueue 内部没有容量,但是由于一个插入操作总是对应一个移除操作,反过来同样需要满足。那么一个元素就不会再SynchronousQueue 里面长时间停留,一旦有了插入线程和移除线程,元素很快就从插入线程移交给移除线程。也就是说这更像是一种信道(管道),资源从一个方向快速传递到另一方 向。显然这是一种快速传递元素的方式,也就是说在这种情况下元素总是以最快的方式从插入着(生产者)传递给移除着(消费者),这在多任务队列中是最快处理任务的方式。在线程池里的一个典型应用是Executors.newCachedThreadPool()就使用了SynchronousQueue,这个线程池根据需要(新任务到来时)创建新的线程,如果有空闲线程则会重复使用,线程空闲了60秒后会被回收。
二、 使用示例
package com.dxz.queue.block;

import java.util.concurrent.SynchronousQueue;

public class SynchronousQueueDemo {

    public static void main(String[] args) throws InterruptedException {

        final SynchronousQueue<Integer> queue = new SynchronousQueue<Integer>();

        Thread putThread = new Thread(new Runnable() {

            @Override

            public void run() {

                System.out.println("put thread start");

                try {

                    queue.put(1);

                } catch (InterruptedException e) {

                }

                System.out.println("put thread end");

            }

        });

        Thread takeThread = new Thread(new Runnable() {

            @Override

            public void run() {

                System.out.println("take thread start");

                try {

                    System.out.println("take from putThread: " + queue.take());

                } catch (InterruptedException e) {

                }

                System.out.println("take thread end");

            }

        });

        putThread.start();

        Thread.sleep(1000);

        takeThread.start();

    }

}
结果:
put thread start

take thread start

take from putThread: 1

take thread end

put thread end
三、实现原理
3.1、阻塞算法实现
3.1.1、使用wait和notify实现
阻塞算法实现通常在内部采用一个锁来保证多个线程中的put()和take()方法是串行执行的。采用锁的开销是比较大的,还会存在一种情况是线程A持有线程B需要的锁,B必须一直等待A释放锁,即使A可能一段时间内因为B的优先级比较高而得不到时间片运行。所以在高性能的应用中我们常常希望规避锁的使用。
package com.dxz.queue.block;

public class NativeSynchronousQueue<E> {

    boolean putting = false;

    E item = null;

    public synchronized E take() throws InterruptedException {

        while (item == null)

            wait();

        E e = item;

        item = null;

        notifyAll();

        return e;

    }

    public synchronized void put(E e) throws InterruptedException {

        if (e == null)

            return;

        while (putting)

            wait();

        putting = true;

        item = e;

        notifyAll();

        while (item != null)

            wait();

        putting = false;

        notifyAll();

    }

}

package com.dxz.queue.block;

public class NativeSynchronousQueueTest {

    public static void main(String[] args) throws InterruptedException {

        final NativeSynchronousQueue<String> queue = new NativeSynchronousQueue<String>();

        Thread putThread = new Thread(new Runnable() {

            @Override

            public void run() {

                System.out.println("put thread start");

                try {

                    queue.put("1");

                } catch (InterruptedException e) {

                }

                System.out.println("put thread end");

            }

        });

        Thread takeThread = new Thread(new Runnable() {

            @Override

            public void run() {

                System.out.println("take thread start");

                try {

                    System.out.println("take from putThread: " + queue.take());

                } catch (InterruptedException e) {

                }

                System.out.println("take thread end");

            }

        });

        putThread.start();

        Thread.sleep(1000);

        takeThread.start();

    }

}
结果:
put thread start
take thread start
put thread end
take from putThread: 1
take thread end
3.1.2、信号量实现
经典同步队列实现采用了三个信号量,代码很简单,比较容易理解:
package com.dxz.queue.block;

import java.util.concurrent.Semaphore;

public class SemaphoreSynchronousQueue<E> {

    E item = null;

    Semaphore sync = new Semaphore(0);

    Semaphore send = new Semaphore(1);

    Semaphore recv = new Semaphore(0);

    public E take() throws InterruptedException {

        recv.acquire();

        E x = item;

        sync.release();

        send.release();

        return x;

    }

    public void put (E x) throws InterruptedException{

        send.acquire();

        item = x;

        recv.release();

        sync.acquire();

    }

}

package com.dxz.queue.block;

public class SemaphoreSynchronousQueueTest {

    public static void main(String[] args) throws InterruptedException {

        final SemaphoreSynchronousQueue<String> queue = new SemaphoreSynchronousQueue<String>();

        Thread putThread = new Thread(new Runnable() {

            @Override

            public void run() {

                System.out.println("put thread start");

                try {

                    queue.put("1");

                } catch (InterruptedException e) {

                }

                System.out.println("put thread end");

            }

        });

        Thread takeThread = new Thread(new Runnable() {

            @Override

            public void run() {

                System.out.println("take thread start");

                try {

                    System.out.println("take from putThread: " + queue.take());

                } catch (InterruptedException e) {

                }

                System.out.println("take thread end");

            }

        });

        putThread.start();

        Thread.sleep(1000);

        takeThread.start();

    }

}
结果:

put thread start

take thread start

take from putThread: 1

take thread end

put thread end
在多核机器上,上面方法的同步代价仍然较高,操作系统调度器需要上千个时间片来阻塞或唤醒线程,而上面的实现即使在生产者put()时已经有一个消费者在等待的情况下,阻塞和唤醒的调用仍然需要。
3.1.3、Java 5实现
package com.dxz.queue.block;

import java.util.Queue;

import java.util.concurrent.locks.AbstractQueuedSynchronizer;

import java.util.concurrent.locks.ReentrantLock;

public class Java5SynchronousQueue<E> {

    ReentrantLock qlock = new ReentrantLock();

    Queue waitingProducers = new Queue();

    Queue waitingConsumers = new Queue();

    static class Node extends AbstractQueuedSynchronizer {

        E item;

        Node next;

        Node(Object x) { item = x; }

        void waitForTake() { /* (uses AQS) */ }

           E waitForPut() { /* (uses AQS) */ }

    }

    public E take() {

        Node node;

        boolean mustWait;

        qlock.lock();

        node = waitingProducers.pop();

        if(mustWait = (node == null))

           node = waitingConsumers.push(null);

         qlock.unlock();

        if (mustWait)

           return node.waitForPut();

        else

            return node.item;

    }

    public void put(E e) {

         Node node;

         boolean mustWait;

         qlock.lock();

         node = waitingConsumers.pop();

         if (mustWait = (node == null))

             node = waitingProducers.push(e);

         qlock.unlock();

         if (mustWait)

             node.waitForTake();

         else

            node.item = e;

    }

}
Java 5的实现相对来说做了一些优化,只使用了一个锁,使用队列代替信号量也可以允许发布者直接发布数据,而不是要首先从阻塞在信号量处被唤醒。
3.1.4、Java6实现
Java 6的SynchronousQueue的实现采用了一种性能更好的无锁算法 — 扩展的“Dual stack and Dual queue”算法。性能比Java5的实现有较大提升。竞争机制支持公平和非公平两种:非公平竞争模式使用的数据结构是后进先出栈(Lifo Stack);公平竞争模式则使用先进先出队列(Fifo Queue),性能上两者是相当的,一般情况下,Fifo通常可以支持更大的吞吐量,但Lifo可以更大程度的保持线程的本地化。
代码实现里的Dual Queue或Stack内部是用链表(LinkedList)来实现的,其节点状态为以下三种情况:
- 持有数据 – put()方法的元素
- 持有请求 – take()方法
- 空
这个算法的特点就是任何操作都可以根据节点的状态判断执行,而不需要用到锁。
其核心接口是Transfer,生产者的put或消费者的take都使用这个接口,根据第一个参数来区别是入列(栈)还是出列(栈)。
/**

     * Shared internal API for dual stacks and queues.

     */

    static abstract class Transferer {

        /**

         * Performs a put or take.

         *

         * @param e if non-null, the item to be handed to a consumer;

         *          if null, requests that transfer return an item

         *          offered by producer.

         * @param timed if this operation should timeout

         * @param nanos the timeout, in nanoseconds

         * @return if non-null, the item provided or received; if null,

         *         the operation failed due to timeout or interrupt --

         *         the caller can distinguish which of these occurred

         *         by checking Thread.interrupted.

         */

        abstract Object transfer(Object e, boolean timed, long nanos);

    }
TransferQueue实现如下(摘自Java 6源代码),入列和出列都基于Spin和CAS方法:
  /**

         * Puts or takes an item.

         */

        Object transfer(Object e, boolean timed, long nanos) {

            /* Basic algorithm is to loop trying to take either of

             * two actions:

             *

             * 1. If queue apparently empty or holding same-mode nodes,

             *    try to add node to queue of waiters, wait to be

             *    fulfilled (or cancelled) and return matching item.

             *

             * 2. If queue apparently contains waiting items, and this

             *    call is of complementary mode, try to fulfill by CAS'ing

             *    item field of waiting node and dequeuing it, and then

             *    returning matching item.

             *

             * In each case, along the way, check for and try to help

             * advance head and tail on behalf of other stalled/slow

             * threads.

             *

             * The loop starts off with a null check guarding against

             * seeing uninitialized head or tail values. This never

             * happens in current SynchronousQueue, but could if

             * callers held non-volatile/final ref to the

             * transferer. The check is here anyway because it places

             * null checks at top of loop, which is usually faster

             * than having them implicitly interspersed.

             */

            QNode s = null; // constructed/reused as needed

            boolean isData = (e != null);

            for (;;) {

                QNode t = tail;

                QNode h = head;

                if (t == null || h == null)         // saw uninitialized value

                    continue;                       // spin

                if (h == t || t.isData == isData) { // empty or same-mode

                    QNode tn = t.next;

                    if (t != tail)                  // inconsistent read

                        continue;

                    if (tn != null) {               // lagging tail

                        advanceTail(t, tn);

                        continue;

                    }

                    if (timed && nanos <= 0)        // can't wait

                        return null;

                    if (s == null)

                        s = new QNode(e, isData);

                    if (!t.casNext(null, s))        // failed to link in

                        continue;

                    advanceTail(t, s);              // swing tail and wait

                    Object x = awaitFulfill(s, e, timed, nanos);

                    if (x == s) {                   // wait was cancelled

                        clean(t, s);

                        return null;

                    }

                    if (!s.isOffList()) {           // not already unlinked

                        advanceHead(t, s);          // unlink if head

                        if (x != null)              // and forget fields

                            s.item = s;

                        s.waiter = null;

                    }

                    return (x != null)? x : e;

                } else {                            // complementary-mode

                    QNode m = h.next;               // node to fulfill

                    if (t != tail || m == null || h != head)

                        continue;                   // inconsistent read

                    Object x = m.item;

                    if (isData == (x != null) ||    // m already fulfilled

                        x == m ||                   // m cancelled

                        !m.casItem(x, e)) {         // lost CAS

                        advanceHead(h, m);          // dequeue and retry

                        continue;

                    }

                    advanceHead(h, m);              // successfully fulfilled

                    LockSupport.unpark(m.waiter);

                    return (x != null)? x : e;

                }

            }

        }
3.2、SynchronousQueue实现原理
不像ArrayBlockingQueue、LinkedBlockingDeque之类的阻塞队列依赖AQS实现并发操作,SynchronousQueue直接使用CAS实现线程的安全访问。由于源码中充斥着大量的CAS代码,不易于理解,所以按照笔者的风格,接下来会使用简单的示例来描述背后的实现模型。
队列的实现策略通常分为公平模式和非公平模式,接下来将分别进行说明。
3.2.1、公平模式下的模型:
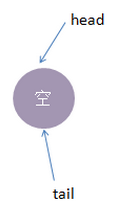
公平模式下,底层实现使用的是TransferQueue这个内部队列,它有一个head和tail指针,用于指向当前正在等待匹配的线程节点。
初始化时,TransferQueue的状态如下:
接着我们进行一些操作:
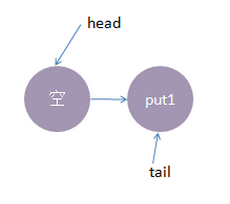
1、线程put1执行 put(1)操作,由于当前没有配对的消费线程,所以put1线程入队列,自旋一小会后睡眠等待,这时队列状态如下:
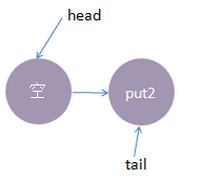
2、接着,线程put2执行了put(2)操作,跟前面一样,put2线程入队列,自旋一小会后睡眠等待,这时队列状态如下:

3、这时候,来了一个线程take1,执行了 take操作,由于tail指向put2线程,put2线程跟take1线程配对了(一put一take),这时take1线程不需要入队,但是请注意了,这时候,要唤醒的线程并不是put2,而是put1。为何? 大家应该知道我们现在讲的是公平策略,所谓公平就是谁先入队了,谁就优先被唤醒,我们的例子明显是put1应该优先被唤醒。至于读者可能会有一个疑问,明明是take1线程跟put2线程匹配上了,结果是put1线程被唤醒消费,怎么确保take1线程一定可以和次首节点(head.next)也是匹配的呢?其实大家可以拿个纸画一画,就会发现真的就是这样的。
公平策略总结下来就是:队尾匹配队头出队。
执行后put1线程被唤醒,take1线程的 take()方法返回了1(put1线程的数据),这样就实现了线程间的一对一通信,这时候内部状态如下:
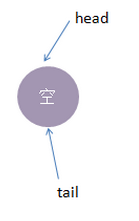
4、最后,再来一个线程take2,执行take操作,这时候只有put2线程在等候,而且两个线程匹配上了,线程put2被唤醒,
take2线程take操作返回了2(线程put2的数据),这时候队列又回到了起点,如下所示:
以上便是公平模式下,SynchronousQueue的实现模型。总结下来就是:队尾匹配队头出队,先进先出,体现公平原则。
非公平模式下的模型:
我们还是使用跟公平模式下一样的操作流程,对比两种策略下有何不同。非公平模式底层的实现使用的是TransferStack,
一个栈,实现中用head指针指向栈顶,接着我们看看它的实现模型:
1、线程put1执行 put(1)操作,由于当前没有配对的消费线程,所以put1线程入栈,自旋一小会后睡眠等待,这时栈状态如下:

2、接着,线程put2再次执行了put(2)操作,跟前面一样,put2线程入栈,自旋一小会后睡眠等待,这时栈状态如下:

3、这时候,来了一个线程take1,执行了take操作,这时候发现栈顶为put2线程,匹配成功,但是实现会先把take1线程入栈,然后take1线程循环执行匹配put2线程逻辑,一旦发现没有并发冲突,就会把栈顶指针直接指向 put1线程

4、最后,再来一个线程take2,执行take操作,这跟步骤3的逻辑基本是一致的,take2线程入栈,然后在循环中匹配put1线程,最终全部匹配完毕,栈变为空,恢复初始状态,如下图所示:

可以从上面流程看出,虽然put1线程先入栈了,但是却是后匹配,这就是非公平的由来。
总结
SynchronousQueue由于其独有的线程一一配对通信机制,在大部分平常开发中,可能都不太会用到,但线程池技术中会有所使用,由于内部没有使用AQS,而是直接使用CAS,所以代码理解起来会比较困难,但这并不妨碍我们理解底层的实现模型,在理解了模型的基础上,有兴趣的话再查阅源码,就会有方向感,看起来也会比较容易,希望本文有所借鉴意义。
转自:Java并发包中的同步队列SynchronousQueue实现原理
【转载】阻塞队列之三:SynchronousQueue同步队列 阻塞算法的3种实现的更多相关文章
- 阻塞队列之三:SynchronousQueue同步队列 阻塞算法的3种实现
一.SynchronousQueue简介 Java 6的并发编程包中的SynchronousQueue是一个没有数据缓冲的BlockingQueue,生产者线程对其的插入操作put必须等待消费者的移除 ...
- 【转载】迄今为止把同步/异步/阻塞/非阻塞/BIO/NIO/AIO讲的这么清楚的好文章(快快珍藏)
原文链接:https://www.cnblogs.com/lixinjie/p/10811219.html 常规的误区 假设有一个展示用户详情的需求,分两步,先调用一个HTTP接口拿到详情数据,然后使 ...
- AbstractQueuedSynchronizer同步队列与Condition等待队列协同机制
概要: AQS维护了一个同步队列 Condition是JUC的一个接口,AQS的ConditionObject实现了这个接口,维护了一个等待队列(等待signal信号的队列) 线程调用reentran ...
- CLH同步队列
原文链接:https://blog.csdn.net/chenssy/article/details/60781148 AQS内部维护着一个FIFO队列,该队列就是CLH同步队列. CLH同步队列是一 ...
- J.U.C之AQS:CLH同步队列
此篇博客所有源码均来自JDK 1.8 在上篇博客[死磕Java并发]—–J.U.C之AQS:AQS简介中提到了AQS内部维护着一个FIFO队列,该队列就是CLH同步队列. CLH同步队列是一个FIFO ...
- 【死磕Java并发】-----J.U.C之AQS:CLH同步队列
此篇博客全部源代码均来自JDK 1.8 在上篇博客[死磕Java并发]-–J.U.C之AQS:AQS简单介绍中提到了AQS内部维护着一个FIFO队列,该队列就是CLH同步队列. CLH同步队列是一个F ...
- 【面试】迄今为止把同步/异步/阻塞/非阻塞/BIO/NIO/AIO讲的这么清楚的好文章(快快珍藏)
常规的误区 假设有一个展示用户详情的需求,分两步,先调用一个HTTP接口拿到详情数据,然后使用适合的视图展示详情数据. 如果网速很慢,代码发起一个HTTP请求后,就卡住不动了,直到十几秒后才拿到HTT ...
- 同步/异步/阻塞/非阻塞/BIO/NIO/AIO
转摘自:https://www.cnblogs.com/lixinjie/p/a-post-about-io-clearly.html 常规的误区 假设有一个展示用户详情的需求,分两步,先调用一个HT ...
- IO同步阻塞与同步非阻塞
BIO.NIO.AIO IO(BIO)和NIO区别:其本质就是阻塞和非阻塞的区别 阻塞概念:应用程序在获取网络数据的时候,如果网络传输数据很慢,就会一直等待,直到传输完毕为止. 非阻塞概念:应用程序直 ...
随机推荐
- SpringMVC和Struts2的区别及优势
1.SpringMVC和Struts2的区别比较 1.Struts2是类级别的拦截, 一个类对应一个request上下文,SpringMVC是方法级别的拦截,一个方法对应一个request上下文,而方 ...
- FB面经Prepare: Email User
有一些账号,账号里面有一个或多个email, 如果两个账号有共同的email,则认为这两个账号是同一个人,找出哪些账号是同一个人 输入是这样的:数字是用户,字母是邮箱,有很多人有多个邮箱,找出相同的用 ...
- BeyondCompare使用一段时间后会因“许可证密钥已被撤销:3281-0350“而无法使用
解决方式: 1.用任意文本编辑软件打开“C:\Users\[Your User Name]\AppData\Roaming\Scooter Software\Beyond Compare 3\BCSt ...
- Lists.newArrayListWithExpectedSize( int estimatedSize)
Lists.newArrayListWithExpectedSize( int estimatedSize) 构造一个期望长度为estimatedSize的ArrayList实例. 源码: publ ...
- C#通过Ado.net对连接数据库并进行添加删除等常规操作的代码
如下资料是关于C#通过Ado.net对连接数据库并进行添加删除等常规操作的内容. static string sqlcon = "server=.;database=;Integrated ...
- Linux SPI初始化及接口函数代码细究
2012-01-08 22:11:38 目的:我需要掌握spi驱动相关数据结构关系,及在哪部分函数中把这些数值进行底层寄存器赋值的.结合应用层函数完成spi驱动的代码测试.已达到灵活修改的目的. 按顺 ...
- C博客作业03--函数
1. 本章学习总结 1.1 思维导图 1.2 本章学习体会及代码量学习体会 1.2.1 学习体会 这几周学习了函数,题目还是原样只是多了种做题的方法.一开始看书感觉声明,定义啊,还有全局变量那些,文绉 ...
- 使用 lsyncd 同步文件
https://unix.stackexchange.com/questions/307046/real-time-file-synchronization https://github.com/ax ...
- python接口自动化-接口重定向和编码格式
1.如果测试的接口重定向,那么只需添加allow_redirects=False禁止重定向就可: 2.如果请求的结果,中文出现没有解码 \xe9\x83\xad\xe7\xbf\xa0\xe6\x99 ...
- JS 页面表格的操作
var showObj = null;var arr = [ ['编号','姓名','性别','年龄','备注','操作'], ['1','lisi','nan','12','66666'], ['2 ...