WCF - 序列化
ASP.NET MVC - 安全、身份认证、角色授权和ASP.NET Identity
ASP.NET MVC内置的认证特性
AuthorizeAttribute特性(System.Web.Mvc)(身份过滤器)
禁止匿名用户的访问
//当用户点击购买某一张专辑时,进入Buy方法,此方法执行前会运行Authorize身份过滤,如果是匿名用户则会自动重定向到登录页面

[Authorize]

public ActionResult Buy(int albumId)

{

    //……

}
禁止非指定用户、角色的访问
[Authorize(Roles = "Admin,GenderMen"] //指定哪些角色可以访问

[Authorize(Users = "sam,leo,korn")] //指定哪些用户可以访问

[Authorize(Roles = "Admin,GenderMen", Users = "sam,leo,korn")]
注册身份认证的全局过滤器
可以将Authorize身份认证过滤器注册为全局过滤器,这样可以免去在手动将Authorize应用在控制器或Action方法上。具体做法是打开App_Start目录下的FilterConfig.cs文件,在RegisterGlobalFilters方法中将一个Authorize实例添加到过滤器集合中。
public class FilterConfig

{

    public static void RegisterGlobalFilters(GlobalFilterCollection filters)

    {

        //……

        filters.Add(new AuthorizeAttribute());

    }

}
自定义认证逻辑(从Authorize派生)
public class MyAuthorize:AuthorizeAttribute

{

    public string xx { get; set; }

    public string xxxx { get; set; }

    public string xxxxx { get; set; }

    protected override bool AuthorizeCore( HttpContextBase httpContext )

    {

        //此处编写认证逻辑,如果为true则通过认证

    }

}
AllowAnonymousAttribute特性(System.Web.Mvc)(跳过认证)
此特性将允许应用了Authorize的控制器或Action方法跳过认证机制,主要是针对将Authorize注册到全局过滤器中后,应用程序的所有控制器都将禁止匿名用户的访问,这当然包括了处理登录的控制器,而应用了AllowAnonymous的控制器或Action方法可以忽略Authorize进而可以被访问。对于自定义的身份过滤器,AllowAnonymous将变得失效,除非进行重写。如果某控制器应用了Authorize,而其Action使用了AllowAnonymous,则该Action可以跳过认证。
[AllowAnonymous]

public ActionResult Login(string returnUrl)

{

    //……

}
检测用户的认证
Authorize类是通过HttpContext.User来获取用户的认证信息的,通过HttpContext.User可以获取一个表示安全信息的IPrincipal实例,而通过IPrincipal.Identity,可以获取一个表示当前发起请求的用户的一些信息的IIdentity实例。Authorize认证特性会检测HttpContext.User.Identity.IsAuthenticated,如果返回false,则将Http状态码设置为401(未授权),并终止该请求。注意HttpContext.User永远不可能为null,因为只要有用户发起请求,HttpContext.User就总是会有一个值。通过调用HttpContext.User.Identity就可以获取该用户的标识信息。
IPrincipal接口的属性
Identity

//获取发起请求的用户的信息,返回一个Identity实例

IsInRole(string role)

//是否是参数指定的角色
IIdentity接口的属性
AuthenticationType

//获取用于认证用户的方式

IsAuthenticated

//当前用户是否已经过认证

Name

//获取当前用户的用户名
什么是OWIN(OWIN(Open Web Interface for .NET)(.NET开放式Web接口) )
通常,Web应用程序总是部署在windows的IIS上,但IIS有以下几点不足
1.难以实现跨平台。
2.IIS与Web应用程序(其核心就是System.Web.dll程序集)之间紧密的结合很难实现轻量级的业务。比如现在的Web移动服务,我只需要服务端返回简单的Json数据,但是IIS复杂的asp.net生命周期和请求处理的管道却过于复杂臃肿,IIS的反应速度不够理想,而我们需要的仅仅是简单、轻量、高效、快速、易于修改的处理程序。
OWIN的出现解决了以上问题,OWIN是一套规范,它解耦了Web应用程序与IIS的关系。它是一个将Web应用程序从托管它的环境中独立出来的抽象层,这个独立出来的抽象层能够使Web应用程序的宿主具备更好的灵活度、使ASP.NET的技术更易于创新。
OWIN规范
OWIN定义了四个层,通过OWIN提供的接口在这四个管道之间进行通信。
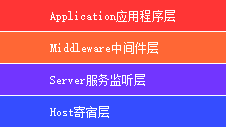
Host寄宿层
承载服务监听的宿主,配置Web应用程序、初始化请求处理管道、启动运行Web程序
Server服务监听层
监听的HTTP请求、将接收到的请求和回发的信息封装成符合OWIN规范的字典数据,然后将这些数据发送给Middleware处理。
Middleware中间件层
处理发送到此管道的请求,这个中间件可以是:Logger、Web程序、Web API、SignalR等。中间件用于在Server与Application之间进行解耦。
Application应用程序层
具体的应用程序代码
ASP.NET Katana Project
微软的Katana是OWIN规范的具体实现,它的作用如下:
1.提供N种方式支持Web应用程序的寄宿
* IIS 将你的应用程序寄宿到IIS上,继续使用System.Web那套东西,但可以向owin注册中间件,请求进入owin后由你注册的中间件进行处理从而绕过了System.Web的那套处理逻辑。
* Custom Host :干掉System.Web的那一套臃肿的处理请求的逻辑,彻底将你的应用程序从IIS中独立出来,找一个窝,自立门户。将你的应用程序寄宿到Windows Service、控制台应用程序(CUI)、Winform上。
* OwinHost :干掉System.Web的那一套臃肿的处理请求的逻辑,彻底将你的应用程序从IIS中独立出来,找一个窝,自立门户。将你的应用程序寄宿到命令行工具OwinHost.exe上。
2.提供N种方式支持对请求的监听服务
* System.Web:利用System.Web作为监听服务,Katana会在System.Web中将自身注册为HttpModule和HttpHandler,它将请求的数据封装成字典再传递给Middleware
* HttpListener:宿主为Custom Host或OwinHost时,使用HttpListener作为监听服务
* WebListener:暂时无法在Katana中使用
3.提供API支持Web应用程序所需的功能
* Katana支持System.Web.dll提供的API,但它也提供轻量级的API来帮助我们开发Web应用程序。
ASP.NET Identity(管理用户数据、执行认证和授权的API)
在.NET Framework 4.5 之前,Web应用程序的用户管理和授权的功能一直由Membership提供支持,但Membership的数据结构难以扩展和维护,已经严重过时,为此微软根基OWIN规范重新设计了用户管理模式,推出了ASP.NET Identity,它是Katana的一个中间件(ASP.NET组件),可以在任何ASP.NET程序中使用。
配置OWIN
使用前需要从NuGet获取三个程序包:
Microsoft.AspNet.Identity.EntityFramework

Microsoft.AspNet.Identity.EntityFramework.zh-Hans //中文语言包

Microsoft.AspNet.Identity.Owin

Microsoft.AspNet.Identity.Owin.zh-Hans

Microsoft.Owin.Host.SystemWeb

Microsoft.Owin.Host.SystemWeb.zh-Hans
首先需要知道OWIN环境是如何启动
[assembly: PreApplicationStartMethod(typeof(PreApplicationStart), "Initialize")]

//此特性描述了Microsoft.Owin.Host.SystemWeb程序集,它指示当应用程序运行前应调用PreApplicationStart类的Initialize方法

//Initialize方法内部通过HttpApplication的RegisterModule方法将OWIN的组件注册为一个名叫OwinHttpModule的Http模块,这个模块用于拦截Http请求

//在OwinHttpModule初始化的时候会查找项目根下的应用了[assembly: OwinStartup(typeof(Users.StartUp))]特性的StartUp类,然后调用StartUp的Configuration(IAppBuilder app)方法,这样,owin环境就启动了
与管理用户有关的类型
IdentityUser

//用户管理基类,内建了诸如角色名、用户名、密码、Emai等基础的属性

UserManager<T>

//用户管理器基类

IUserStore<T>

//用户存储器接口

UserStore<T>

//实现了IUserStore<T>的用户存储器

IOwinContext

//类似于我们熟悉的HttpContext,表示OWIN环境中的Http请求上下文对象

IAppBuilder

//提供应用程序所需中间件的设置,所有的中间件应通过接口提供的CreatePerOwinContext方法进行注册

PasswordValidator

//密码规则类
ASP.NET Identity使用Entity Framework的Code First方式创建与用户有关的数据库,接下来我们要创建自定义的用户类、用户管理器类和ASP.NET Identity基于EF的数据库操作上下文类
AppUser;//用户

AppUserManager;//用户管理器

AppIdentityDbContext;//ASP.NET Identity基于EF的数据库上下文
自定义用户类
用户类从IdentityUser派生,注意,IdentityUser.UserName默认不能使用中文作为账户名。可以为从IdentityUser派生的自定义用户类添加一些属性,这些属性会自动成为用户表的字段。
namespace Users.Models
{
//IdentityUser:ASP.NET Identity已经内建了表示用户的基类
//自定义的用户类应从IdentityUser派生,以便得到IdentityUser的一些默认的属性
public class AppUser : IdentityUser
{
}
}
IdentityUser是ASP.NET Identity内建的类型,因为没有源码而无法为其应用模型验证,而从IdentityUser派生的自定义类型AppUser的N多关于用户信息的属性是从继承得来,所以也无法应用模型验证,而最佳解决方法就是新建一个类型专门用来表示呈现给客户端的可浏览、可编辑的用户模型,插入数据的时候再提取这个类型的数据映射给AppUser即可。
namespace Users.Models
{
public class UserView
{
public string Id { get; set; }
[Required]
public string Name { get; set; }
[Required]
public string Email { get; set; }
[Required]
[MaxLength(,ErrorMessage ="字符太长")]
public string Password { get; set; }
}
}
自定义ASP.NET Identity基于EF的数据库上下文
这个数据库上下文注册在启动类中被实例化,我们不直接调用这个类型来操作数据,而是依靠ASP.NET Identity暴露的API去执行插入删除和更新,而这些API方法跟下面定义的ASP.NET Identity基于EF的数据库上下文已经关联在了一起。
using Microsoft.AspNet.Identity;
using Microsoft.Owin;
using Microsoft.AspNet.Identity.Owin;
using Microsoft.AspNet.Identity.EntityFramework;
using Users.Models;
namespace Users.Infrastructure
{
//EF数据库上下文
public class AppIdentityDbContext : IdentityDbContext<AppUser>
{
//基类构造函数接收一个数据库名称以便创建出EF数据库上下文对象
public AppIdentityDbContext( ) : base( "IdentityDb" ) { }
//利用静态构造函数,在代码块里使用System.Data.Entity.DataBase类初始化数据库,通过DbInit指定数据库的创建模式
static AppIdentityDbContext( )
{
Database.SetInitializer<AppIdentityDbContext>( new DbInit( ) );
}
//获取一个EF数据库上下文对象
public static AppIdentityDbContext Create( )
{
return new AppIdentityDbContext( );
}
}
//为了能在创建数据库的同时能插入一个超级管理员以便于超级管理员可以访问本站的任何资源(比如可以为用户分配角色)
//为此,创建了一个DbInit从DropCreateDatabaseIfModelChanges的派生
public class DbInit : DropCreateDatabaseIfModelChanges<AppIdentityDbContext>
{
private void InsertData( AppIdentityDbContext context )
{
//创建一个用户存储器和角色管理器,这两个对象需要存储器,而存储器需要ASP.NET Identity基于EF的数据库上下文作为参数
//我们会频繁使用用户管理器和角色管理器,增删改查到数据库就靠这两个类型
AppUserManager userManager = new AppUserManager( new UserStore<AppUser>( context ) );
AppRoleManager roleManager = new AppRoleManager( new RoleStore<AppRole>( context ) );
string roleName = "超级无敌管理员";
string userName = "hanshi";
string email = "admin@example.com";
string password = "111111";
IdentityResult roleResult= roleManager.Create( new AppRole( roleName ) ); //向数据库插入一个角色
IdentityResult userResult = userManager.Create( new AppUser { UserName = userName,Email=email }, password );//向数据库插入一个用户
if (roleResult.Succeeded && userResult.Succeeded) //如果数据库操作是成功的
{
AppUser user = userManager.FindByName( userName ); //获得刚才插入数据库的用户以便得到其ID
userManager.AddToRole( user.Id, roleName ); //为该用户分配一个角色
}
}
//向数据库插入数据
protected override void Seed( AppIdentityDbContext context )
{
InsertData( context );
base.Seed( context );
}
}
}
数据库连接字符串
<connectionStrings>

          <add name="IdentityDb" providerName="System.Data.SqlClient" connectionString="Data Source=.; Initial Catalog=IdentityDb; Integrated Security=True; Connect Timeout=15; Encrypt=False;TrustServerCertificate=False; MultipleActiveResultSets=True" />

</connectionStrings>
自定义用户管理器
using Microsoft.AspNet.Identity.EntityFramework;
using Microsoft.AspNet.Identity.Owin;
using Microsoft.Owin;
using Users.Models;
namespace Users.Infrastructure
{
//UserManager<T>:ASP.NET Identity已经内建了表示管理用户的基类
//自定义的用户管理类应从UserManager<T>派生,以便得到UserManager<T>提供的方法
public class AppUserManager : UserManager<AppUser>
{
//用户管理器基类需要一个用户存储器以便提供管理用户的API方法,要实例化自定义的用户管理器则必须向户管理器基类传递一个用户存储器
public AppUserManager(IUserStore<AppUser> store) : base(store) { }
//获取一个用户管理器
public static AppUserManager Create(IdentityFactoryOptions<AppUserManager> options, IOwinContext context)
{
AppIdentityDbContext db = context.Get<AppIdentityDbContext>();//获取已经注册在owin环境下的ASP.NET Identity基于EF的数据库操作上下文对象
AppUserManager manager = new AppUserManager(new UserStore<AppUser>(db));//创建用户管理类的实例
return manager;
}
}
}
定义启动类
默认这个类的名称应该是StartUp,应用程序启动后会查找应用程序的app_start目录下的应用了[assembly: OwinStartup(typeof(Users.StartUp))]特性的类型,然后调用这个类的Configuration方法将中间件(处理Http请求的类型)创建出来。我们知道Authorize是在任何请求被Action执行前运行,也即它会拦截请求以便检查用户是否是认证用户,而ASP.NET Identity与Authorize之间的关系则是:只有请求被Authorize检测之后,这个请求才会被ASP.NET Identity拦截,也即,如果某个控制器或Action并未引用Authorize特性,那么一个http请求并不会进入ASP.NET Identity模块。ASP.NET Identity模块的启动就是在StartUp这个类中完成的。
using Microsoft.Owin;
using Microsoft.Owin.Security.Cookies;
using Owin;
using Users.Infrastructure;
using Users.Models;
[assembly: OwinStartup(typeof(Users.StartUp))]
namespace Users
{
//启动类
public class StartUp
{
public void Configuration(IAppBuilder appBuilder)
{
appBuilder.CreatePerOwinContext< AppIdentityDbContext>(AppIdentityDbContext.Create);
appBuilder.CreatePerOwinContext<AppUserManager>(AppUserManager.Create);
//指示ASP.NET Identity如何用Cookie去标识已认证的用户
appBuilder.UseCookieAuthentication(new CookieAuthenticationOptions
{
AuthenticationType = DefaultAuthenticationTypes.ApplicationCookie,
//未认证用户发起请求时应重定向的地址
LoginPath = new PathString("/Account/Login"),
});
}
}
}
管理用户需要用到的类型及其属性与方法
IdentityUser(Microsoft.AspNet.Identity.EntityFramework)表示用户的基类
Claims
//获取用户的声明(Claims)集合
//获取用户的E-mail地址
Id
//获取用户的唯一ID
Logins
//获取用户的登录集合
PasswordHash
//获取哈希格式的用户密码
Roles
//获取用户所属的角色集合
PhoneNumber
//获取用户的电话号码
SecurityStamp
//获取变更用户标识时被修改的值,例如被密码修改的值
UserName
//获取用户名
UserManager<T>类(Microsoft.AspNet.Identity)管理用户的基类
此类提供了管理用户的异步API,但实际上它也具备同步的API,但同步API是定义在Microsoft.AspNet.Identity命名空间下的扩展方法,需要引入才可以使用。
Users

//获取用户集合


CreateIdentity(user)

//创建一个基于声明式的用户信息对象

ChangePasswordAsync( userId, oldPwd, newPwd)

//为指定用户修改密码,返回一个Task<IdentityResult>

CreateAsync( user)

//创建一个不含密码的新用户,返回一个Task<IdentityResult>

CreateAsync( user, pass)

//创建一个带有指定密码的新用户,此方法会自动调用PasswordHasher.HashPassword方法将密码转换为哈希码,返回一个Task<IdentityResult>

DeleteAsync( user)

//删除指定用户,返回一个Task<IdentityResult>

FindAsync( user, pass)

//根据用户名和密码查询用户,返回一个Task<T>,T是用户类

FindByIdAsync( id)

//根据ID查询用户,,返回一个Task<T>,T是用户类

FindByNameAsync( name)

//查找与指定名称相关联的用户,返回一个Task<T>,T是用户类

UpdateAsync( user)

//更新用户数据,返回一个Task<IdentityResult>

PasswordHasher

//获取一个IPasswordHasher接口实例,该实例的HashPassword(string passwordString)方法可以将密码转换为哈希码

IsInRole( userId, roleName )

//参数指定的用户是否隶属于参数指定的角色
PasswordValidator类(Microsoft.AspNet.Identity)
提供密码规则,应在自定义的用户管理器的Create方法中注册密码规则,下面的示例演示了如何创建密码规则,当然,也可以不使用PasswordValidator,直接在用户模型上应用模型验证也行。
RequiredLength

//指定密码的最小长度

RequireNonLetterOrDigit

//密码是否必须含有非字母和数字的字符

RequireDigit

//密码是否必须含有数字

RequireLowercase

//密码是否必须含有小写字母

RequireUppercase

//密码是否必须含有大写字母
示例:自定义密码验证规则
using Microsoft.AspNet.Identity.EntityFramework;
using Microsoft.AspNet.Identity.Owin;
using Microsoft.Owin;
using Users.Models;
namespace Users.Infrastructure
{
public class AppUserManager : UserManager<AppUser>
{
public AppUserManager( IUserStore<AppUser> store ) : base( store ) { }
//获取一个用户管理器
public static AppUserManager Create( IdentityFactoryOptions<AppUserManager> options, IOwinContext context )
{
AppIdentityDbContext db = context.Get<AppIdentityDbContext>( );
//密码规则
PasswordValidator pwdValidator = new Microsoft.AspNet.Identity.PasswordValidator
{
RequireDigit = true,
RequiredLength = ,
RequireLowercase = true,
RequireNonLetterOrDigit = true,
RequireUppercase = true
};
AppUserManager manager = new AppUserManager( new UserStore<AppUser>( db ) );
//附加到用户管理器中
manager.PasswordValidator = pwdValidator;
return manager;
}
}
}
IdentityResult类(Microsoft.AspNet.Identity)
执行管理用户或管理角色的操作后返回的结果类
Succeeded

//是否没有发生错误

Errors

//错误信息集合,一个IEnumerable<string>
使用ASP.NET Identity管理用户(增删改查)
以上配置完ASP.NET Identity后,现在可以对用户进行增删改查了,因为我们不直接使用EF数据库上下文而是使用Identity提供的API方法,所以使用代码生成器创建控制器时不要选择使用Entityframework。 暴露给客户端的模型是一个UserView的类型,通过UserView映射AppUser用户类,
using System.Collections.Generic;
using System.Linq;
using System.Web;
using System.Web.Mvc;
using Users.Models;
using Microsoft.Owin;
using Users.Infrastructure;
using System.Threading.Tasks;
using Microsoft.AspNet.Identity;
using Microsoft.AspNet.Identity.Owin;
using Microsoft.AspNet.Identity.EntityFramework;
namespace Users.Controllers
{
public class AdminController : Controller
{
//获取一个用户管理器的实例
private AppUserManager UserManager
{
get
{
//HttpContext是System.Web.Mvc提供的表示Http请求的上下文对象
//而Microsoft.Owin.Host.SystemWeb程序集中的Microsoft.AspNet.Identity.Owin命名空间下的HttpContextBaseExtensions为HttpContext扩展了一个叫做GetOwinContext的方法
//GetOwinContext方法作用是:当Http请求到达后,获取Http请求的owin执行环境的上下文对象,
//我们会经常用到IOwinContext,因为它直接替代了HttpContext的工作
IOwinContext owinContext = HttpContext.GetOwinContext();
//利用owin执行环境的上下文对象的GetUserManager方法(在Microsoft.AspNet.Identity.Owin命名空间下的扩展方法)可以通过指定泛型参数获取自定义的用户管理器或角色管理器
AppUserManager userManager = owinContext.GetUserManager<AppUserManager>();
return userManager;
}
}
//显示用户列表
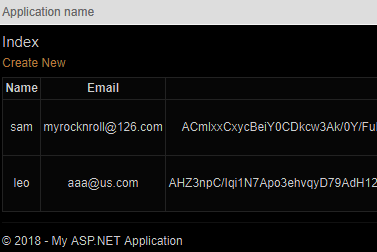
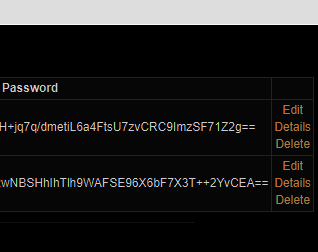
public ActionResult Index()
{
List<UserView> users = new List<UserView>();
foreach (AppUser user in UserManager.Users)
{
users.Add(new UserView { Id = user.Id, Name = user.UserName, Email = user.Email, Password = user.PasswordHash });
}
return View(users);
}
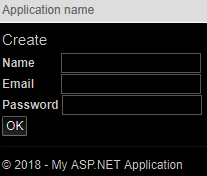
//添加新用户
public ActionResult Create()
{
return View();
}
[HttpPost]
public async Task<ActionResult> Create(UserView user)
{
if (!ModelState.IsValid) return View(user);
AppUser appUser = new AppUser
{
UserName = user.Name,
Email = user.Email
};
IdentityResult result = await UserManager.CreateAsync(appUser, user.Password);
if (!result.Succeeded)
{
AddErrorsIntoModelState(result);
return View(user);
}
return RedirectToAction("index");
}
//删除用户
public async Task<ActionResult> Delete(string id)
{
if (id != null)
{
AppUser user = await UserManager.FindByIdAsync(id);
if (user != null)
{
IdentityResult result = await UserManager.DeleteAsync(user);
if (!result.Succeeded)
{
AddErrorsIntoModelState(result);
}
}
}
return RedirectToAction("index");
}
//编辑用户
public async Task<ActionResult> Edit(string id)
{
if (id != null)
{
AppUser user = await UserManager.FindByIdAsync(id);
if (user == null) return RedirectToAction("index");
UserView userView = new UserView
{
Name = user.UserName,
Email = user.Email,
Password = user.PasswordHash
};
return View(userView);
}
return RedirectToAction("index");
}
[HttpPost]
public async Task<ActionResult> Edit(UserView userView)
{
if (!ModelState.IsValid) return View();
AppUser user = await UserManager.FindByNameAsync(userView.Name);
if (user == null)
{
ModelState.AddModelError("", "无此用户,无法修改");
}
else
{
user.Email = userView.Email;
user.PasswordHash = UserManager.PasswordHasher.HashPassword(userView.Password);//转换密码为哈希码
IdentityResult result = await UserManager.UpdateAsync(user);
if (!result.Succeeded) AddErrorsIntoModelState(result);
}
return RedirectToAction("index");
}
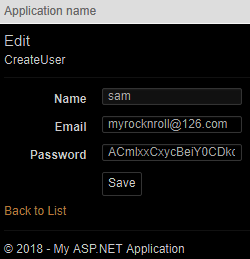
//执行增删改查任务出现错误后,调用此方法将错误信息写入ModelSate
private void AddErrorsIntoModelState(IdentityResult result)
{
foreach (string error in result.Errors)
{
ModelState.AddModelError("", error);
}
}
}
}
取当前用户的用户名:
<h2>Index</h2>

欢迎 @HttpContext.Current.User.Identity.Name
使用ASP.NET Identity认证用户(认证并写入Cookie)
利用Authorize特性将某些Action操作设为必须经过认证的用户才能访问,而认证是通过查询当前用户名和密码是否在数据库中有记录做到的,如果当前用户是本站的注册会员则利用ASP.NET Identity提供的IAuthenticationManager(身份认证管理器)将当前用户的身份认证信息写入客户端cookie进行持久化存储,以便下次用户发起请求时只需要读取这个认证cookie即可知道此用户是否是本站会员。
using Microsoft.Owin;
using Users.Infrastructure;
using Microsoft.Owin.Security;
using System.Security.Claims;
using System.Threading.Tasks;
using Microsoft.AspNet.Identity;
using Microsoft.AspNet.Identity.Owin;
using Microsoft.AspNet.Identity.EntityFramework;
namespace Users.Controllers
{
public class AccountController : Controller
{
//获取用户管理器
private AppUserManager userManager
{
get { return HttpContext.GetOwinContext().GetUserManager<AppUserManager>(); }
}
//获取身份认证管理器
private IAuthenticationManager AuthorManager
{
get { return HttpContext.GetOwinContext( ).Authentication; }
}
//用户请求的Url被OWIN模块的中间件ASP.NET Identity拦截后被重定向到此Action,同时用户请求的Url会作为查询字符串自动附加
public ActionResult Login(string returnUrl)
{
//如果当前用户是已经登录认证过的用户
//但他试图去访问一个Authorize指定为特定角色才能访问的Controller或Action方法,
//但因为它是非特定角色的用户,所以他会被Authorize导向到Login方法里面来
//此时应检测他是否是登录用户,如果是则导向error页
if (HttpContext.User.Identity.IsAuthenticated) return RedirectToAction( "Error", "Message" );
ViewBag.ReturnUrl = returnUrl;
return View();
}
[HttpPost]
public async Task<ActionResult> Login(LoginView loginView,string returnUrl)
{
//如果当前用户还未登录则测试其输入的数据能否模型绑定,如果能则执行以下逻辑
if (ModelState.IsValid)
{
AppUser xUser = await userManager.FindAsync(loginView.name, loginView.Password);
if (xUser == null)
{
ModelState.AddModelError("name", "无此用户");
}
else
{
//ClaimsIdentity:类似于HttpContext.User.Identity,是一个存储发起请求的用户的信息的标识,
ClaimsIdentity identity = await userManager.CreateIdentityAsync(xUser, DefaultAuthenticationTypes.ApplicationCookie);
//不管是否具备本站的身份认证cookie,目前先将其签出(移除),使其无效
AuthorManager.SignOut();
//将用户的认证cookie签入,使其生效
AuthorManager.SignIn(new AuthenticationProperties
{
//使当前用户的认证cookie持久化,也即当前用户发起的任何请求都不再需要认证,这个读取cookie的操作由Identity自动完成,无需你手动编写逻辑
IsPersistent = true
}, identity);
return Redirect(string.IsNullOrEmpty( returnUrl )==true?"/Home/index": returnUrl );
}
}
ViewBag.ReturnUrl = returnUrl;
return View("Login");
}
//注销
public ActionResult Logout()
{
AuthorManager.SignOut( );
return RedirectToAction( "login" );
}
}
}
使用ASP.NET Identity管理角色(角色的增删查改)
没有角色,你只能在已认证用户和未认证用户之间加以区分。而大多数应用程序均有不同角色的用户,针对不同角色的用户会有不同的资源供其访问,做到更细粒度的控制站点的资源,授权的意思就是说授予已认证用户某个角色,角色是会员的抽象,它比会员高级,多个会员可以隶属于一个或多个角色。利用ASP.NET Identity提供的API可以授予认证用户某个角色,以便他可以访问某些需要特定角色才能访问的资源。
管理角色需要用到的类型及其属性与方法
IRole;

//角色接口

IdentityRole;

//实现了IRole接口的角色

RoleManager<IRole>;

//角色管理器,提供了方法对角色的增删改查

//我们应该创建一个从IdentityRole派生的X类,然后就可以使用角色管理器了,RoleManager<X>

RoleStore<T>

//角色存储器,T是角色类
应不暴露IdentityRole,自定义一个AppRole从其派生。
Id

//角色的唯一标识

name

//角色名

Users;

//获取当前角色下的成员集合,这个成员集合并非就是用户,而是返回一个IdentityUserRole集合

//如果你把这个集合看成一张表,它就应该类似下面这样:

//RoleId       UserId

//   6              9

//   6              7

//id为6的角色下包含了9和7两个用户

//迭代这个表集合,每迭代一行,可以获得一个IdentityUserRole,IdentityUserRole提供RoleId和UserId,RoleId=6,而UserId=9,下次迭代时则RoleId=6,而UserId=7
RoleManager<IRole>(Microsoft.AspNet.Identity)
应不暴露RoleManager<IRole>,自定义一个AppRoleManager从其派生。此类提供了管理角色的异步API,但实际上它也具备同步的API,但同步API是定义在Microsoft.AspNet.Identity命名空间下的扩展方法,需要引入才可以使用。
Roles

//从数据库获取所有角色的列表

CreateAsync( IdentityRole Role )

//在数据库创建一个新角色

DeleteAsync( IdentityRole Role )

//从数据库删除参数指定的角色

FindByIdAsync( string roleID )

//根据参数指定的角色ID从数据库获取角色

FindByNameAsync( string RoleName )

//根据参数指定的角色名称从数据库获取角色

RoleExistsAsync( IdentityRole Role )

//测试数据库是否存在参数指定的角色

UpdateAsync( IdentityRole Role )

//在数据库更新参数指定的角色

RoleExists( string roleName )

//是否含有指定的角色
创建自定义的角色类
namespace Users.Models
{
//自定义一个角色类,使其从IdentityRole派生
public class AppRole:IdentityRole
{
public AppRole() : base() { }
public AppRole(string roleName) : base(roleName) { }
}
}
创建自定义的角色管理器
using Microsoft.AspNet.Identity.EntityFramework;
using Microsoft.AspNet.Identity.Owin;
using Microsoft.Owin;
using Users.Models;
namespace Users.Infrastructure
{
public class AppRoleManager:RoleManager<AppRole>
{
public AppRoleManager(RoleStore<AppRole> store) : base(store) { }
//获取一个角色管理器
public static AppRoleManager Create(IdentityFactoryOptions<AppRoleManager> options, IOwinContext context)
{
//获取已经注册在owin环境下的ASP.NET Identity基于EF的数据库操作上下文对象
AppIdentityDbContext db =context.Get<AppIdentityDbContext>();
return new AppRoleManager(new RoleStore<AppRole>(db));//创建角色管理类的实例
}
}
}
在StartUp中注册角色管理器
namespace Users
{
//OWIN环境的启动类
public class StartUp
{
public void Configuration(IAppBuilder appBuilder)
{
appBuilder.CreatePerOwinContext<AppIdentityDbContext>(AppIdentityDbContext.Create);
appBuilder.CreatePerOwinContext<AppUserManager>(AppUserManager.Create);
appBuilder.CreatePerOwinContext<AppRoleManager>(AppRoleManager.Create);//注册角色管理器
appBuilder.UseCookieAuthentication(new CookieAuthenticationOptions
{
AuthenticationType = DefaultAuthenticationTypes.ApplicationCookie,
LoginPath = new PathString("/Account/Login"),
});
}
}
}
创建角色控制器
在这个控制器中将实现对角色的创建、删除和修改,同时还要完成给用户分配用户(授权)、移除用户的角色等功能。
using Microsoft.Owin;
using Users.Infrastructure;
using System.Threading.Tasks;
using Microsoft.AspNet.Identity;
using Microsoft.AspNet.Identity.Owin;
using Microsoft.AspNet.Identity.EntityFramework;
namespace Users.Controllers
{
[Authorize( Roles = "超级无敌管理员" )]
public class RoleAdminController : Controller
{
//获取用户管理器
//获取一个用户管理器的实例
private AppUserManager UserManager
{
get
{
IOwinContext owinContext = HttpContext.GetOwinContext ( );
AppUserManager userManager = owinContext.GetUserManager<AppUserManager> ( );
return userManager;
}
}
//获取角色管理器
private AppRoleManager RoleManager { get { return HttpContext.GetOwinContext ( ).GetUserManager<AppRoleManager> ( ); } }
//显示角色列表
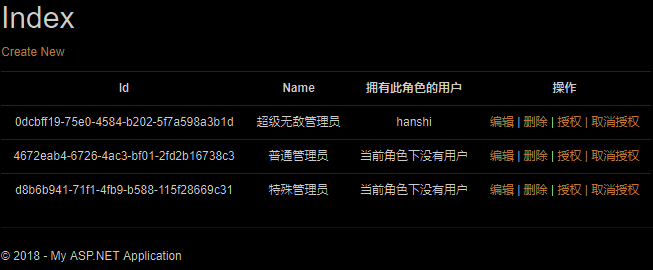
public ActionResult Index ( )
{
return View ( RoleManager.Roles );
}
@using Users.Models
@using Users.Infrastructure
@using Microsoft.AspNet.Identity.Owin
@using System.Threading.Tasks
@{
ViewBag.Title = "Index";
}
<h2>Index</h2>
<p>
@Html.ActionLink("Create New", "Create")
</p>
<table class="table" style="font-size:12px !important;width:650px !important;" >
<tr>
<th>@Html.DisplayNameFor(model => model.Id)</th>
<th>
@Html.DisplayNameFor(model => model.Name)
</th>
<th>
拥有此角色的用户
</th>
<th>操作</th>
</tr>
@foreach (var item in Model) {
<tr>
<td>@Html.DisplayFor(modelItem => item.Id)</td>
<td>
@Html.DisplayFor(modelItem => item.Name)
</td>
<td>
@{
AppUserManager usrtManager = HttpContext.Current.GetOwinContext ( ).GetUserManager<AppUserManager> ( );
var nameList= item.Users.Select ( inRoleUser => Html.GetUserName ( inRoleUser.UserId, usrtManager ) );
string names= !nameList.Any ( ) ? "当前角色下没有用户" : string.Join ( " | ", nameList );
@names
}
</td>
<td>
@Html.ActionLink("编辑", "Edit", new { id=item.Id }) |
@Html.ActionLink("删除", "Delete", new { id=item.Id }) |
@Html.ActionLink("授权 | 取消授权", "Warrant",new { id=item.Id})
</td>
</tr>
}
</table>
Index视图
using Microsoft.AspNet.Identity;
namespace Users.Infrastructure
{
public static class IdentityForHtmlHelper
{
public static MvcHtmlString GetUserName(this HtmlHelper htmlHelper, string userId ,AppUserManager userManager)
{
var result = userManager.FindByIdAsync ( userId ).Result;
string name = result == null?"": result.UserName;
return new MvcHtmlString ( name );
}
}
}
HemlHelper
public ActionResult Create ( )
{
return View ( );
}
[HttpPost]
public async Task<ActionResult> Create ( AppRole role )
{
if (!ModelState.IsValid) return View ( );
AppRole xRole = await RoleManager.FindByNameAsync ( role.Name );
if (xRole != null)
{
ModelState.AddModelError ( "Name", "角色名已存在" );
return View ( );
}
IdentityResult result = await RoleManager.CreateAsync ( role );
if (!result.Succeeded) AddErrorIntoModeState ( result );
else return RedirectToAction ( "index" );
return View ( );
}
//编辑角色
public async Task<ActionResult> Edit ( string id )
{
if (id == null) return RedirectToAction ( "index" );
AppRole role = await RoleManager.FindByIdAsync ( id );
if (role == null) return RedirectToAction ( "index" );
return View ( role );
}
[HttpPost]
public async Task<ActionResult> Edit ( AppRole role )
{
if (!ModelState.IsValid) return View ( );
IdentityResult result = await RoleManager.UpdateAsync ( role );
if (!result.Succeeded) AddErrorIntoModeState ( result );
else { return RedirectToAction ( "index" ); }
return View ( );
}
//删除角色
public async Task<ActionResult> Delete ( string id )
{
if (id == null) RedirectToAction ( "index" );
AppRole role = await RoleManager.FindByIdAsync ( id );
if (role != null)
{
IdentityResult result = await RoleManager.DeleteAsync ( role );
}
return RedirectToAction ( "index" );
}
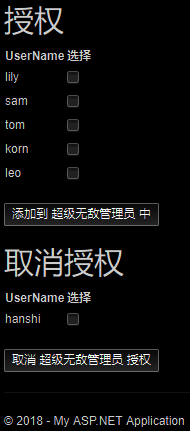
//分配角色(授权)的视图
//显示一个授权视图,授权视图将显示当前角色下的用户列表和不属于当前角色的用户列表
public async Task<ActionResult> Warrant ( string id )
{
if (string.IsNullOrEmpty ( id )) return RedirectToAction ( "index" );
//获取角色
AppRole role=await RoleManager.FindByIdAsync ( id );
if(role==null) return RedirectToAction ( "index" );
//当前角色下的用户id
var inRoleUserID= role.Users.Select ( identityUserRole => identityUserRole.UserId );
//当前角色下的用户集合
IEnumerable<AppUser> appUsers= UserManager.Users.Where ( user => inRoleUserID.Contains ( user.Id ) );
//linq差集,不属于当前角色的用户
IEnumerable<AppUser> noneAppUsers= UserManager.Users.Except ( appUsers );
ViewBag.appUsers = appUsers;
ViewBag.roleName = role.Name;
return View ( noneAppUsers );
}
//授权
[HttpPost]
public ActionResult Warrant ( string[] userIDList, string roleName )
{
if (userIDList==null || string.IsNullOrEmpty ( roleName )) return RedirectToAction ( "index" );
foreach (string userID in userIDList)
{
//将选中的用户添加到指定的角色中
IdentityResult result= UserManager.AddToRole ( userID, roleName );
if(!result.Succeeded)
{
AddErrorIntoModeState ( result );
return View ( );
}
}
return RedirectToAction ( "index" );
}
//取消授权
[HttpPost]
public ActionResult WarrantNone( string[] userIDList, string roleName )
{
if (userIDList == null || string.IsNullOrEmpty( roleName )) return RedirectToAction( "index" );
foreach (string userID in userIDList)
{
//将选中的用户从角色中移除
IdentityResult result = UserManager.RemoveFromRole( userID, roleName );
if(!result.Succeeded)
{
AddErrorIntoModeState( result );
return View( );
}
}
return RedirectToAction( "index" );
}
//执行增删改查任务出现错误后,调用此方法将错误信息写入ModelSate
private void AddErrorIntoModeState ( IdentityResult result )
{
foreach (string error in result.Errors)
{
ModelState.AddModelError ( "", error );
}
}
}
}
基于Claims(声明)的授权
Claims是对登录用户身份信息的一份详尽的描述,在ASP.NET中用ClaimsIdentity类予以表示
//将当前用户的身份信息转换为基于声明式的用户身份信息,以下两种方式都可以把用户信息转换为基于声明式的用户信息

//如果当前用户已经登录,则以ASP.NET的方式进行转换:

ClaimsIdentity identity = HttpContext.User.Identity as ClaimsIdentity;

//正在登录的用户,则以ASP.NET Identity的方式进行转换:

AppUser user = new AppUser { UserName = "coldfood", Email = "xx@xx.com" };

ClaimsIdentity identity = userManager.CreateIdentity( user, DefaultAuthenticationTypes.ApplicationCookie );
Claims

//获取当前用户的所有声明,返回一个IEnumerable<Claim>

 Name

//获取当前用户的用户名

AddClaim( Claim claim )

//添加声明

AddClaims( IEnumerable<Claim> claimList )

//添加多个声明

RemoveClaim( Claim claim )

//移除参数指定的声明

HasClaim( Predicate<Claim> match );

//当前用户的声明中是否有与指定谓词匹配的声明,参数是一个泛型委托,委托用于迭代当前用户所具有的每一个声明并返回一个bool值
Claim类(System.Security.Claims) 表示具体的某一个声明
Subject

//获取声明所隶属的"声明式用户信息对象“,返回一个ClaimsIdentity

Issuer

//获取声明的发布者

Type

//获取声明的类型,返回一个string

Value

//获取当前声明的值,返回一个string
ClaimTypes(System.Security.Claims) 表示具体某一个声明的类型
请忽略下面关于声明的常量值,常量值是声明类型的规范。这个规范是基于全球通用的Claims-based认证和授权,在国外被广泛使用,包括微软的ADFS、Google和Facebook等。我们只需要了解ClaimTypes是干嘛的即可,它就是用来表示声明的类型而已。比如,中国地区的用户登录到站点时,我们需要测试该用户是否是本站已注册会员,如果是,再测试其所在的地区是否属于中国,如果是则为其附加一个地区的声明(ClaimTypes.Country),有了这个声明,他就可以访问被Authorize标注为只允许声明中包含ClaimTypes.Country且该声明的值="中国"的资源。声明类型大概有50多个,下面仅列出几个看看是什么鬼:
Role
//http://schemas.microsoft.com/ws/2008/06/identity/claims/role
//http://schemas.xmlsoap.org/ws/2005/05/identity/claims/emailaddress
Gender
//http://schemas.xmlsoap.org/ws/2005/05/identity/claims/gender
Country
//http://schemas.xmlsoap.org/ws/2005/05/identity/claims/country
Boolean

//http://www.w3.org/2001/XMLSchema#boolean

Integer32

//http://www.w3.org/2001/XMLSchema#integer32

String

//http://www.w3.org/2001/XMLSchema#string

Time

//http://www.w3.org/2001/XMLSchema#time
下面是一个实际的例子,实现这样一个逻辑:在用户登录成功时为其添加ClaimTypes.Country地区声明,只有具备声明类型为ClaimTypes.Country&&值为中国&&声明的发布者是xxx的用户才可以访问/Claims/Index的资源。
{
public class AuthorizeClaim:AuthorizeAttribute
{
public string Issuer { get; set; }
public string ClaimType { get; set; }
public string ClaimValue { get; set; }
protected override bool AuthorizeCore( HttpContextBase httpContext )
{
var iden = httpContext.User.Identity;
ClaimsIdentity claimIden = iden as ClaimsIdentity;
return claimIden != null && claimIden.HasClaim( claim => claim.Issuer == Issuer && claim.Value == ClaimValue && claim.Type == ClaimType );
}
}
}
在验证登录的Action中添加两行代码
AuthorManager.SignOut( );

ClaimsIdentity identity = await userManager.CreateIdentityAsync( xUser, DefaultAuthenticationTypes.ApplicationCookie );

//为其添加一个地区声明

Claim claim = new Claim( ClaimTypes.Country, "中国", ClaimValueTypes.String, "xxx" );

identity.AddClaim( claim );

AuthorManager.SignIn( new AuthenticationProperties

{

    IsPersistent = true

}, identity );
新建一个控制器,只允许拥有地区声明的用户可以访问Index视图
using System.Security.Claims;
using Microsoft.AspNet.Identity.Owin;
namespace Users.Controllers
{
public class ClaimsController : Controller
{
private AppUserManager userManager
{
get { return HttpContext.GetOwinContext( ).GetUserManager<AppUserManager>( ); }
}
[AuthorizeClaim(ClaimType =ClaimTypes.Country, Issuer ="xxx",ClaimValue ="中国")]
public ActionResult Index()
{
//将当前用户的身份信息转换为基于声明式的用户身份信息
ClaimsIdentity identity = HttpContext.User.Identity as ClaimsIdentity;
return View( identity.Claims );
}
}
}
@using System.Security.Claims

@model IEnumerable<Claim>

<h2>Index</h2>

<table class="table table-bordered table-condensed table-striped">

    <tr>

        <th>主题</th>

        <th>发布者</th>

        <th>声明的类型</th>

        <th>声明的值</th>

    </tr>

    @foreach (Claim item in Model)

    {

        <tbody>

            <tr>

                <td>@item.Subject.Name</td>

                <td>@item.Issuer</td>

                <td>@{@item.Type.Split( '/' ).Last( )  }</td>

                <td>@item.Value</td>

            </tr>

        </tbody>

    }

</table>
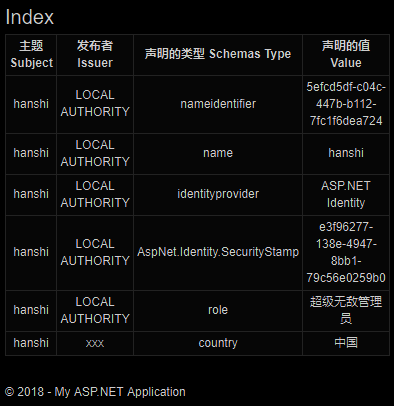
移除地区声明后则无法访问

数据迁移(Data Migration)
当数据库已经存在数据,而后来你可能想要修改模型,比如为自定义的用户类增加了一些新的属性,那么数据库就需要重新创建以便能更改数据库结构,但是重新创建数据库会删除旧数据库的数据,所以此时必须使用数据库迁移以便把旧数据移出来,等新数据库创建完成再把旧数据插进去。这个工作可以使用NuGet控制台命令去完成。为了测试数据迁移的效果,首先为自定义的用户类添加一个属性City:
using System.ComponentModel.DataAnnotations;
namespace Users.Models
{
public enum Citys
{
北京,
重庆,
上海,
深圳
}
//IdentityUser:ASP.NET Identity已经内建了表示用户的基类
//自定义的用户类应从IdentityUser派生,以便得到IdentityUser的一些默认的属性
public class AppUser : IdentityUser
{
public Citys City { get; set; } //添加一个新的属性
}
public class UserView
{
public string Id { get; set; }
[Required]
public string Name { get; set; }
[Required]
public string Email { get; set; }
[Required]
[MaxLength( , ErrorMessage = "字符太长" )]
public string Password { get; set; }
[Required]
public Citys City { get; set; } //对应于AppUser,添加一个新的属性
}
}
在AdminController中修改Edit方法,此方法处理用户信息的编辑操作,增加一个修改用户所在城市的处理逻辑
public async Task<ActionResult> Edit(string id)
{
if (id != null)
{
AppUser user = await UserManager.FindByIdAsync(id);
if (user == null) return RedirectToAction("index");
UserView userView = new UserView
{
Name = user.UserName,
Email = user.Email,
Password = user.PasswordHash,
City = user.City
};
return View(userView);
}
return RedirectToAction("index");
}
[HttpPost]
public async Task<ActionResult> Edit(UserView userView)
{
if (!ModelState.IsValid) return View();
AppUser user = await UserManager.FindByNameAsync(userView.Name);
if (user == null)
{
ModelState.AddModelError("", "无此用户,无法修改");
}
else
{
user.Email = userView.Email;
user.City =userView.City;
user.PasswordHash = UserManager.PasswordHasher.HashPassword(userView.Password);//转换密码为哈希码
IdentityResult result = await UserManager.UpdateAsync(user);
if (!result.Succeeded) AddErrorsIntoModelState(result);
}
return RedirectToAction("index");
}
接下来在NuGet包管理控制台要用到三个命令
Enable-Migrations –EnableAutomaticMigrations //将在项目创建一个Migrations目录,该目录有一个关于迁移的Configuration配置类

Add-Migration CityProperty //生成迁移指令

Update-Database –TargetMigration CityProperty //执行迁移
先执行Enable-Migrations –EnableAutomaticMigrations
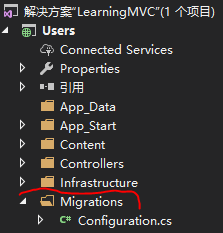
打开配置文件,如下:
using Microsoft.AspNet.Identity.EntityFramework;
using Users.Infrastructure;
using Users.Models;
namespace Users.Migrations
{
//Configuration类的作用:配置数据迁移
internal sealed class Configuration : DbMigrationsConfiguration<Users.Infrastructure.AppIdentityDbContext>
{
public Configuration()
{
AutomaticMigrationsEnabled = true;
ContextKey = "Users.Infrastructure.AppIdentityDbContext";
}
//向数据库播种数据
protected override void Seed(Users.Infrastructure.AppIdentityDbContext context)
{
//数据库迁移:意思是把旧数据库中的数据迁移到新数据库中
//这个迁移的过程是使用NuGet控制台命令完成的
//命令会将旧数据库的数据迁移出旧数据库,然后将这些旧数据保存在(保存在哪里哥也不晓得,总之是保存在了我们不知道是哪里的哪里)
//然后旧数据库会被干掉,干掉后再重新创建数据库,新数据库创建好后,旧数据会插入进去,然后Seed方法才会被调用
//注意,以上全部过程由NuGet控制台命令自动完成,与Seed方法无关
//为了能在创建数据库的同时能插入一个超级管理员以便于超级管理员可以访问本站的任何资源,
//所以下面的代码在插入超级无敌管理员这个角色和hanshi这个用户时,得先做出判断,如果存在这样的记录则不做任何操作,否则种植一个用户并为其分配一个角色
//创建一个用户存储器和角色管理器,这两个对象需要存储器,而存储器需要ASP.NET Identity基于EF的数据库上下文作为参数
//我们会频繁使用用户管理器和角色管理器,增删改查到数据库就靠这两个类型
AppUserManager userManager = new AppUserManager( new UserStore<AppUser>( context ) );
AppRoleManager roleManager = new AppRoleManager( new RoleStore<AppRole>( context ) );
string roleName = "超级无敌管理员";
string userName = "hanshi";
string email = "admin@example.com";
string password = "111111";
if (!roleManager.RoleExists( roleName )&& userManager.FindByName( userName ) == null)
{
IdentityResult roleResult = roleManager.Create( new AppRole( roleName ) ); //向数据库插入一个角色
IdentityResult userResult = userManager.Create( new AppUser { UserName = userName, Email = email }, password );//向数据库插入一个用户
if (roleResult.Succeeded && userResult.Succeeded) //如果数据库操作是成功的
{
AppUser user = userManager.FindByName( userName ); //获得刚才插入数据库的用户以便得到其ID
userManager.AddToRole( user.Id, roleName ); //为该用户分配一个角色
}
}
context.SaveChanges( );
}
}
}
再打开基于EF的数据库上下文类,把初始化数据库时的数据库创建模式改为不做任何操作,这样一切就交给了控制台命令去完成数据库的创建。
using Microsoft.AspNet.Identity;
using Microsoft.Owin;
using Microsoft.AspNet.Identity.Owin;
using Microsoft.AspNet.Identity.EntityFramework;
using Users.Models;
namespace Users.Infrastructure
{
//EF数据库上下文
public class AppIdentityDbContext : IdentityDbContext<AppUser>
{
//基类构造函数接收一个数据库名称以便创建出EF数据库上下文对象
public AppIdentityDbContext( ) : base( "IdentityDb" ) { }
//利用静态构造函数,在代码块里使用System.Data.Entity.DataBase类初始化数据库,通过DbInit指定数据库的创建模式
static AppIdentityDbContext( )
{
Database.SetInitializer<AppIdentityDbContext>( new DbInit( ) );
}
//获取一个EF数据库上下文对象
public static AppIdentityDbContext Create( )
{
return new AppIdentityDbContext( );
}
}
//NullDatabaseInitializer:通知Database类的SetInitializer方法不要创建数据库
public class DbInit : NullDatabaseInitializer<AppIdentityDbContext> { }
}
接着执行Add-Migration CityProperty 生成迁移命令的文件,文件放在Migrations目录中,最后执行Update-Database –TargetMigration CityProperty 开始迁移旧数据到数据库。
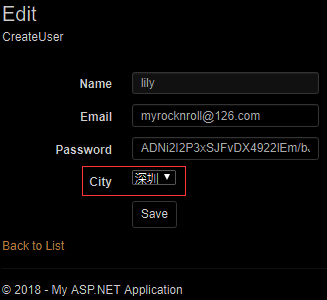

关于迁移数据的更多操作参看:略
关于第三方认证参看:使用第三方认证(Using Third-Party Authentication)
XSS和XSRF和跨权限提交()
XSS(跨站脚本攻击):如果暴露给客户端的输入框被用户利用来输入一些js、css、html代码,比如用户把输入的恶意js代码包装在一个<img src="此处是js死循环弹窗">标签中并提交到服务端,同时服务端未做Html检测就把数据存进了数据库,则下一次当任何用户请求某个页面时,服务端再把这个恶意提交的数据输出到客户端,那么每个用户都会被弹窗骚扰。应对XSS攻击的最佳方式即是过滤掉用户输入的数据中的Html尖括号标签,不过ASP.NET MVC框架可以自动过滤这种数据,它会将尖括号替换为对应的转义字符使提交的恶意数据不会作为Html标签输出。
XSRF(和跨站请求伪造):在假设A写了一个网站,通过广告诱惑B去访问,B按照网站提示点击了一个链接,这个链接指向了某个银行的站点,这个链接带有向A打款的逻辑(A事先就知道打款的链接的Url参数格式),如果恰好B用户最近刚登陆过某银行站点,其cookie或session并未过期,那么这个请求到达银行站点的服务端后,可能服务端只是测试其是否是经过验证的用户,因为B已经登录过,所以这个链接所表达的想要执行的操作就有可能被触发,导致B不明就里地向A打款。在ASP.NET MVC中可通过如下设置阻止跨站请求伪造。
//客户端视图

@Html.AntiForgeryToken( )

@{

    //服务端

    [ValidateAntiForgeryToken]

    public ActionResult Test( ) { return View( ); }

}
跨权限提交:这是与MVC模型绑定有关的一个容易被利用的情况,假设我们只提供Person类的name和password属性供客户修改,但是模型绑定并不知道它需要绑定从客户端提交过来的哪些字段,假如客户自行伪造一个money字段并输入了数据,而Person恰好具有money属性,这样,模型绑定会把money也绑定上,money的值会被成功修改,而这个修改已经超出了服务端允许用户的修改权限。有三种方式可以避免这个情况,使用Bind特性指明模型绑定只能绑定哪些字段、为UpdateModel或TryUpdateModel方法指定第二个参数,参数是一个列表,提供可绑定的字段,这样,不在列表范围内的字段不会被绑定、使用一个新的模型专用于提供给客户,这个模型只有name和password属性。参看:过滤模型绑定
WCF - 序列化的更多相关文章
- [转载]WCF序列化65536大小限制的问题
错误: The formatter threw an exception while trying to deserialize the message: There was an error whi ...
- wcf序列化嵌套类(如TreeNode)异常原因
循环引用类在WCF中的传递 循环引用类在WCF中的传递问题,例如: [DataContract] public class AB { public string name { ...
- WCF序列化
在WCF中,提供了专门用来序列化和反序列操作的类,该类就是DataContractSerializer类.一般而言,WCF会自动选择使用DataContractSerializer来对可序列话数据契约 ...
- WCF初探-24:WCF序列化和反序列化
前言 WCF包含很多封装的内部机制,这些是我们在编写程序时不会经常看到的.比如上一篇讲解的Message.这一篇我将讲解WCF的另一种内部机制,WCF的序列化和反序列化.通常我们在编写WCF服务程序的 ...
- WCF序列化与反序列化问题
转自:http://www.cnblogs.com/wangweimutou/p/4505447.html WCF包含很多封装的内部机制,这些是我们在编写程序时不会经常看到的.比如上一篇讲解的Mess ...
- Wcf序列化的循环引用问题1
1.Wcf数据契约序列化,使用的类DataContractSerializer 默认如果类不指定[DataContract],则序列化类的所有字段,并且在出现循环引用的时候回抛出异常,服务终止 msd ...
- Web重温系列(一):利用寄宿于IIS的WCF序列化文件
这两年一直在做WinForm,对于Web已经比较生疏了,其实之前做的也不是很多. 这两天做了一个小工具,功能很简单,就是想有个地方存放办公室同事的机器名和IP的信息,包括附加的用户名和更新时间.比较之 ...
- wcf序列化大对象时报错:读取 XML 数据时,超出最大
错误为: 访问服务异常:格式化程序尝试对消息反序列化时引发异常: 尝试对参数 http://tempuri.org/ 进行反序列化时出 错: request.InnerException 消息是“反序 ...
- 在 WCF 中使用高效的 BinaryFormatter 序列化
本文将定义一个 WCF 终结点行为扩展,以在 WCF 中使用更高效的 BinaryFormatter 进行二进制序列化,并实现对是否使用传统二进制序列化功能的可配置. 介绍 实现步骤 使用方法 效果 ...
随机推荐
- 鸟哥的linux私房菜——第20章 启动流程、模块管理与loader
20.1 Linux启动流程分析 Linux启动过程: 按下开机电源后计算机硬件主动读取BIOS来加载硬件信息以及硬件系统的自我测试,之后系统会主动读取第一个可启动的设备(由BIOS设置),此时就可以 ...
- 移动端meta标签整理-备
分类 在介绍移动端特有 meta 标签之前,先简单说一下 HTML meta 标签的一些知识. meta 标签包含了 HTTP 标题信息 (http-equiv) 和 页面描述信息 (name). h ...
- 运行从别处复制过来的linux可执行程序
1, 首先ldd看看缺不缺so文件,如果不缺可忽略下面的文字,直接执行 2, 先看看缺的这些库在系统上有没有,这些库可通过安装开发包,第三方软件进行安装 3, 找到可能会包含这些库的可执行程序,ldd ...
- Python3.x和Python2.x的区别-转
这个星期开始学习Python了,因为看的书都是基于Python2.x,而且我安装的是Python3.1,所以书上写的地方好多都不适用于Python3.1,特意在Google上search了一下3.x和 ...
- activiti入门2流程引擎的API和服务基础
RepositoryService : 管理和控制发布包和流程定义(包含了一个流程每个环节的结构和行为)的操作 除此之外,服务可以 查询引擎中的发布包和流程定义. 暂停或激活发布包,对应全部和特定 ...
- css的定位机制
牛腩新闻发不系统中遇到了CSS(Cascading style sheets),第一次接触,比较陌生还!因为CSS很多关于元素定位的问题,并且很多情况下元素的位置以像素精度计.一个不小心就很头疼,为此 ...
- IN改写关联注意事项!
SQL> select * from a1; ID NAME ---------- ---------- 1 a 2 a SQL> select * from a2; ID NAME -- ...
- 【POJ】2503 Babelfish
字典树简单题. #include <cstdio> #include <cstring> #include <cstdlib> typedef struct Tri ...
- jquery.lazyload的使用
1.引入 <script src="jquery.js" type="text/javascript"></script> <sc ...
- BZOJ1666: [Usaco2006 Oct]Another Cow Number Game 奶牛的数字游戏
1666: [Usaco2006 Oct]Another Cow Number Game 奶牛的数字游戏 Time Limit: 5 Sec Memory Limit: 64 MBSubmit: 5 ...
