Springboot整合Elastic-Job(二)
上文我们讲到Springboot整合Elastic-Job整合的demo,只是简单的实现了主要功能。本文在上文基础上,进行新的调整。
事件追踪
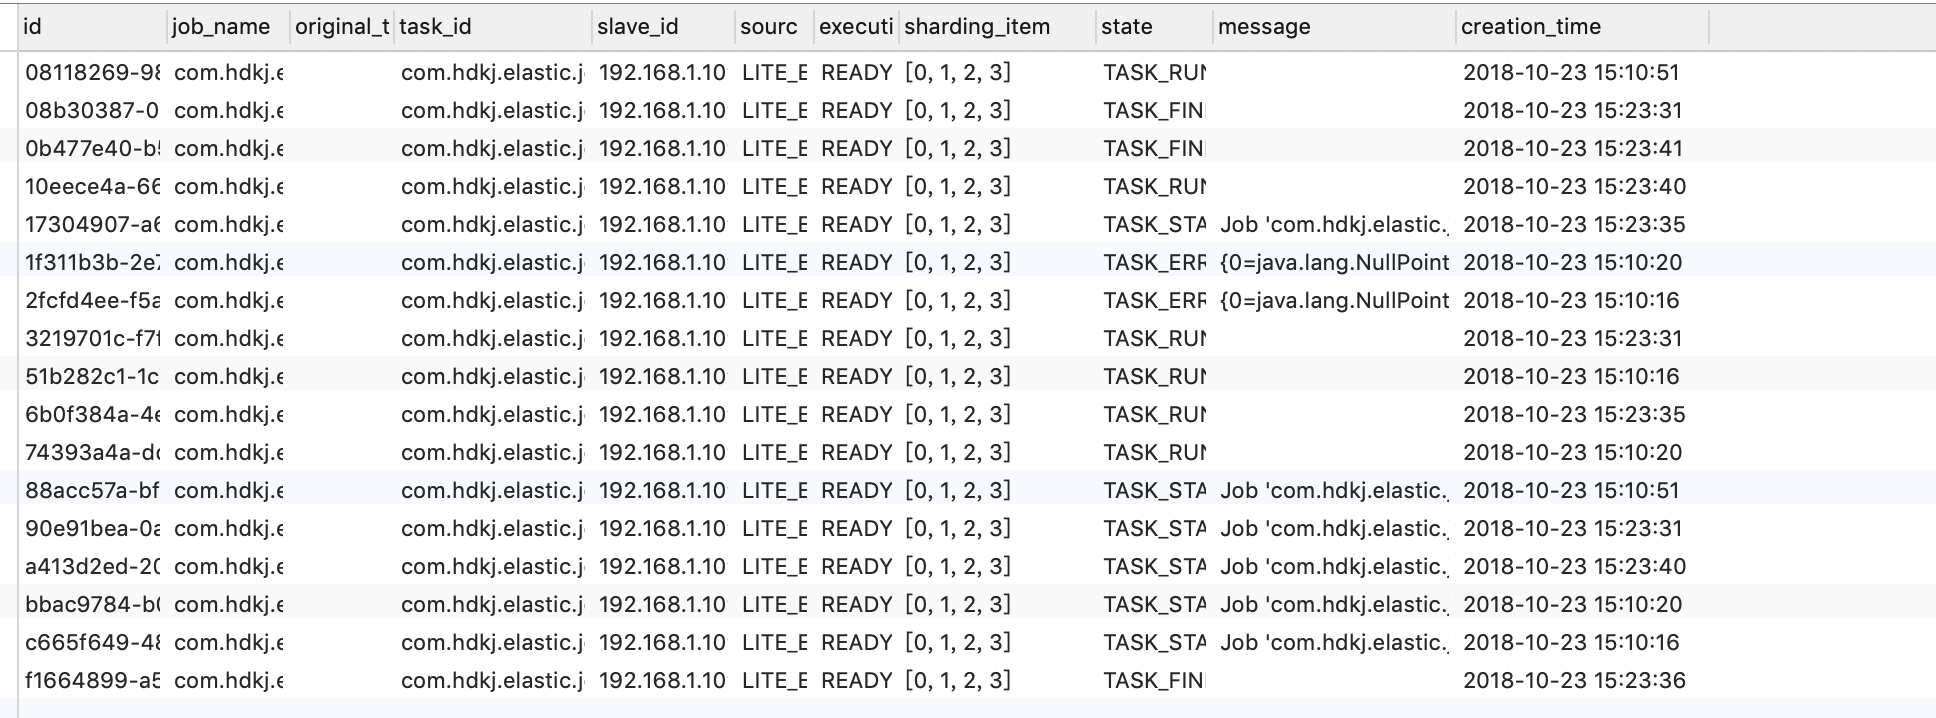
Elastic-Job提供了事件追踪功能,可通过事件订阅的方式处理调度过程的重要事件,用于查询、统计和监控。Elastic-Job目前提供了基于关系型数据库两种事件订阅方式记录事件。我们只需要将添加如下配置即可
/**

     * 将作业运行的痕迹进行持久化到DB

     */

    @Bean

    public JobEventConfiguration jobEventConfiguration(){

        return new JobEventRdbConfiguration(dataSource);

    }
项目运行后,Elastic-Job会自动创建JOB_EXECUTION_LOG和JOB_STATUS_TRACE_LOG两张表以及若干索引。
使用注解
上文我们添加一个任务的步骤是,定义一个任务类,再在配置类中定义任务属性,并加入到SpringJobScheduler。如果我们有几百个任务,配置类基本就无法维护了。那怎么优化呢,我们可以参考@Schedual注解,在job上定义一个注解,每次启动的时候扫描注解自动将job加入到SpringJobScheduler中。
1.抽象添加job方法
@Component

public class ElasticJobHandler {

    @Autowired

    private ZookeeperRegistryCenter regCenter;

    @Resource

    private JobEventConfiguration jobEventConfiguration;

    @Resource

    private ElasticJobListener elasticJobListener;

    /**

     * @Description 任務配置類

     */

    private LiteJobConfiguration getLiteJobConfiguration(final Class<? extends SimpleJob> jobClass,

                                                         final String cron,

                                                         final int shardingTotalCount,

                                                         final String shardingItemParameters) {

        return LiteJobConfiguration.newBuilder(new SimpleJobConfiguration(

                JobCoreConfiguration.newBuilder(jobClass.getName(), cron, shardingTotalCount)

                        .shardingItemParameters(shardingItemParameters).build()

                        , jobClass.getCanonicalName())

        ).overwrite(true).build();

    }

    public void addJob(final SimpleJob simpleJob,

                       final String cron,

                       final Integer shardingTotalCount,

                       final String shardingItemParameters)

            throws IllegalAccessException, InstantiationException {

        LiteJobConfiguration jobConfig =

                getLiteJobConfiguration(simpleJob.getClass(), cron, shardingTotalCount, shardingItemParameters);

         new SpringJobScheduler(simpleJob, regCenter, jobConfig, jobEventConfiguration, elasticJobListener).init();

    }

}
2.添加ElasticScheduler注解
@Component

@Target({ ElementType.TYPE })

@Retention(RetentionPolicy.RUNTIME)

public @interface ElasticScheduler {

    /**

     * 任务名称

     * @return

     */

    String name();

    /**

     * cron表达式,用于控制作业触发时间

     * @return

     */

    String cron() default "";

    /**

     * 分片参数

     * @return

     */

    String shardingItemParameters() default "";

    /**

     * 总分片数

     * @return

     */

    int shardingTotalCount();

    /**

     * 任务描述信息

     * @return

     */

    String description() default "";

}
3.定义扫描方法
@Component

public class ElasticSchedulerAspect implements ApplicationContextAware, InitializingBean {

    private ApplicationContext applicationContext;

    @Autowired

    private ElasticJobHandler elasticJobHandler;

    @Override

    public void afterPropertiesSet() throws Exception {

        registrJob(applicationContext);

    }

    /**

     * 解析context信息,开始注册

     * @param applicationContext

     */

    private void registrJob(ApplicationContext applicationContext) {

        String[] beanNamesForAnnotation = applicationContext.getBeanNamesForAnnotation(ElasticScheduler.class);

        for (String beanName : beanNamesForAnnotation) {

            Class<?> handlerType = applicationContext.getType(beanName);

            Object bean = applicationContext.getBean(beanName);

            ElasticScheduler annotation = AnnotationUtils.findAnnotation(handlerType, ElasticScheduler.class);

            addJobToContext(annotation,bean);

        }

    }

    /**

     * 将任务添加到容器中

     * @param elasticScheduler

     * @param bean

     */

    private void addJobToContext(ElasticScheduler elasticScheduler, Object bean) {

        String cron = elasticScheduler.cron();

        String name = elasticScheduler.name();

        String description = elasticScheduler.description();

        String shardingItemParameters = elasticScheduler.shardingItemParameters();

        Integer shardingTotalCount = elasticScheduler.shardingTotalCount();

        try {

            elasticJobHandler.addJob((SimpleJob) bean,cron,shardingTotalCount,shardingItemParameters);

        } catch (IllegalAccessException e) {

            e.printStackTrace();

        } catch (InstantiationException e) {

            e.printStackTrace();

        }

    }

    @Override

    public void setApplicationContext(ApplicationContext applicationContext) throws BeansException {

        this.applicationContext=applicationContext;

    }

}
4.使用注解
@Component

@ElasticScheduler(cron = "0/5 * * * * ?",shardingTotalCount = 4,name = "测试注解",shardingItemParameters = "0=0,1=0,2=1,3=1")

public class StockSimpleJob implements SimpleJob {

    @Override

    public void execute(ShardingContext shardingContext) {

        System.out.println(String.format("------Thread ID: %s, 任務總片數: %s, " +

                        "當前分片項: %s.當前參數: %s," +

                        "當前任務名稱: %s.當前任務參數: %s"

                ,

                Thread.currentThread().getId(),

                shardingContext.getShardingTotalCount(),

                shardingContext.getShardingItem(),

                shardingContext.getShardingParameter(),

                shardingContext.getJobName(),

                shardingContext.getJobParameter()

        ));

    }

}
注意,该注解只为了不想引入太多外部依赖自己随手写的,只为给大家提供思路。git上已经有人对用注解整合Elastic-Job了,大家可自行搜索。
Springboot整合Elastic-Job(二)的更多相关文章
- springboot整合netty(二)
目录 前言 正文 代码 1. 新建一个springboot项目,在pom文件中添加netty依赖: 2.新建netty服务 3.netty调用所需的服务类 4 springboot启动类 5.测试 我 ...
- SpringBoot 整合 Elastic Stack 最新版本(7.14.1)分布式日志解决方案,开源微服务全栈项目【有来商城】的日志落地实践
一. 前言 日志对于一个程序的重要程度不用过多的言语修饰,本篇将以实战的方式讲述开源微服务全栈项目 有来商城 是如何整合当下主流日志解决方案 ELK +Filebeat . 话不多说,先看实现的效果图 ...
- springboot 整合 Redis 方法二
方法一请参考之前博文 spring boot 整合 redis 自己的版本 java8 + redis3.0 + springboot 2.0.0 1 spring boot已经支持集成 redis ...
- 十六、springboot整合Spring-data-jpa(二)之通用DAO接口与添加自定义方法
@NoRepositoryBean:Spring Data Jpa在启动时就不会去实例化BaseRepository这个接口 1.通用接口: import org.springframework.da ...
- SpringBoot整合JavaWeb
一.SpringBoot整合Servlet的两种方式 1.通过注解扫描完成Servlet组件的注册 编写Servlet package com.example.demo.servlet; import ...
- springBoot整合Listener
新建项目 这个是pom文件 <properties> <java.version>1.8</java.version> </properties> &l ...
- springboot整合filter
新建一个项目 新建Firstfilter类 Firstfliter.java package com.example.filter; import java.io.IOException; impor ...
- springboot整合servlet
在idea新建项目 这个是pom.xml文件需要添加的依赖包 <properties> <java.version>1.8</java.version> </ ...
- SpringBoot整合Lintener
1.通过扫描完成Lintener组件的注册 1.1编写Listener /** * springboot整合Lintener 方式一 * 在web.xml中如何配置Listener * <lis ...
- springboot整合mybatis,redis,代码(二)
一 说明: springboot整合mybatis,redis,代码(一) 这个开发代码的复制粘贴,可以让一些初学者直接拿过去使用,且没有什么bug 二 对上篇的说明 可以查看上图中文件: 整个工程包 ...
随机推荐
- 比较集合List<T>集合,前后多了哪些数据,少了哪些数据Except
1.少了哪些数据 private List<int> GetRoleIdListReduce(List<int> roleIdListOld, List<int> ...
- MFC中List box的用法
首先在头文件中创建对象,CSGrid m_proViewList;//创建表头#pragma region 建立grid表的标题 m_proViewList.AppendColumn(_T(" ...
- BZOJ_1408_[Noi2002]Robot_数学
Description Input Output Sample Input 3 2 1 3 2 5 1 Sample Output 8 6 75 HINT 90号机器人有10个老师,加上它自己共11个 ...
- linux 挂载共享文件夹
1.背景 通常会有这样的场景,开发人员在Windows编写代码,然后放在linux环境编译,我们通过mount命令就可以实现将代码直接挂到linux环境上去,使Windows上的共享文件夹就像linu ...
- Word2Vec总结
摘要: 1.算法概述 2.算法要点与推导 3.算法特性及优缺点 4.注意事项 5.实现和具体例子 6.适用场合 内容: 1.算法概述 Word2Vec是一个可以将语言中的字词转换为向量表达(Vecto ...
- MIP 技术交流分享(3月15日)
3月15日下午,MIP 团队工程师与58赶集的 Web 前端工程师进行了一次面对面的技术交流. 在这次交流中,MIP 工程师主要分享了 MIP 技术原理,MIP 加速原理,以及 MIP 为开发者提供的 ...
- 深入解读Service Mesh的数据面Envoy
在前面的一篇文章中,详细解读了Service Mesh中的技术细节,深入解读Service Mesh背后的技术细节. 但是对于数据面的关键组件Envoy没有详细解读,这篇文章补上. 一.Envoy的工 ...
- mysql怎样配置ODBC数据源
一个基于ODBC的应用程序对数据库的操作不依赖任何DBMS,不直接与DBMS打交道,所有的数据库操作由对应的DBMS的ODBC驱动程序完成.所以说mysql配置ODBC数据源也很重要. 工具/原料 ...
- 从壹开始前后端分离 40 || 完美基于AOP的接口性能分析
旁白音:本文是不定时更新的.net core,当前主线任务的Nuxt+VueAdmin教程的 nuxt.js 之 tibug项目已上线,大家可以玩一玩:http://123.206.33.109:70 ...
- WebWorker 简单使用方式
WebWorker 一定程度上可以算得上是浏览器中的多线程技术了,在项目中适当使用 Worker 来做一些耗时的操作能大大提高页面整体流畅度. Worker的使用也是非常简单的,通过向 Worker ...