吴裕雄--天生自然JAVA SPRING框架开发学习笔记:Spring使用AspectJ开发AOP基于XML和基于Annotation
AspectJ 是一个基于 Java 语言的 AOP 框架,它扩展了 Java 语言。Spring 2.0 以后,新增了对 AspectJ 方式的支持,新版本的 Spring 框架,建议使用 AspectJ 方式开发 AOP。

使用 AspectJ 开发 AOP 通常有两种方式:

基于 XML 的声明式。

基于 Annotation 的声明式。
基于XML的声明式

基于 XML 的声明式是指通过 Spring 配置文件的方式定义切面、切入点及声明通知,而所有的切面和通知都必须定义在 <aop:config> 元素中。

下面通过案例演示 Spring 中如何使用基于 XML 的声明式实现 AOP 的开发。

1. 导入 JAR 包

使用 AspectJ 除了需要导入 Spring AOP 的 JAR 包以外,还需要导入与 AspectJ 相关的 JAR 包,具体如下。

spring-aspects-3.2.13.RELEASE.jar:Spring 为 AspectJ 提供的实现,在 Spring 的包中已经提供。

com.springsource.org.aspectj.weaver-1.6.8.RELEASE.jar:是 AspectJ 提供的规范,可以在官方网址 https://repo.spring.io/webapp/#/search/quick/ 中搜索并下载。

2. 创建切面类 MyAspect

在 src 目录下创建一个名为 com.mengma.aspectj.xml 的包,在该包下创建切面类 MyAspect,编辑后如下所示。

package com.mengma.aspectj.xml;

import org.aspectj.lang.JoinPoint;

import org.aspectj.lang.ProceedingJoinPoint;

//切面类

public class MyAspect {

    // 前置通知

    public void myBefore(JoinPoint joinPoint) {

        System.out.print("前置通知,目标:");

        System.out.print(joinPoint.getTarget() + "方法名称:");

        System.out.println(joinPoint.getSignature().getName());

    }

    // 后置通知

    public void myAfterReturning(JoinPoint joinPoint) {

        System.out.print("后置通知,方法名称:" + joinPoint.getSignature().getName());

    }

    // 环绕通知

    public Object myAround(ProceedingJoinPoint proceedingJoinPoint)

            throws Throwable {

        System.out.println("环绕开始"); // 开始

        Object obj = proceedingJoinPoint.proceed(); // 执行当前目标方法

        System.out.println("环绕结束"); // 结束

        return obj;

    }

    // 异常通知

    public void myAfterThrowing(JoinPoint joinPoint, Throwable e) {

        System.out.println("异常通知" + "出错了" + e.getMessage());

    }

    // 最终通知

    public void myAfter() {

        System.out.println("最终通知");

    }

}

上述代码中,分别定义了几种不同的通知类型方法,在这些方法中,通过 JoinPoint 参数可以获得目标对象的类名、目标方法名和目标方法参数等。需要注意的是,环绕通知必须接收一个类型为 ProceedingJoinPoint 的参数,返回值必须是 Object 类型,且必须抛出异常。异常通知中可以传入 Throwable 类型的参数,用于输出异常信息。

3. 创建 Spring 配置文件

在 com.mengma.aspectj.xml 包下创建 applicationContext.xml 的配置文件,如下所示。

<?xml version="1.0" encoding="UTF-8"?>

<beans xmlns="http://www.springframework.org/schema/beans"

    xmlns:xsi="http://www.w3.org/2001/XMLSchema-instance" xmlns:aop="http://www.springframework.org/schema/aop"

    xsi:schemaLocation="

            http://www.springframework.org/schema/beans

            http://www.springframework.org/schema/beans/spring-beans-2.5.xsd

            http://www.springframework.org/schema/aop

            http://www.springframework.org/schema/aop/spring-aop-2.5.xsd">

    <!--目标类 -->

    <bean id="customerDao" class="com.mengma.dao.CustomerDaoImpl" />

    <!--切面类 -->

    <bean id="myAspect" class="com.mengma.aspectj.xml.MyAspect"></bean>

    <!--AOP 编程 -->

    <aop:config>

        <aop:aspect ref="myAspect">

            <!-- 配置切入点,通知最后增强哪些方法 -->

            <aop:pointcut expression="execution ( * com.mengma.dao.*.* (..))"

                id="myPointCut" />

            <!--前置通知,关联通知 Advice和切入点PointCut -->

            <aop:before method="myBefore" pointeut-ref="myPointCut" />

            <!--后置通知,在方法返回之后执行,就可以获得返回值returning 属性 -->

            <aop:after-returning method="myAfterReturning"

                pointcut-ref="myPointCut" returning="returnVal" />

            <!--环绕通知 -->

            <aop:around method="myAround" pointcut-ref="myPointCut" />

            <!--抛出通知:用于处理程序发生异常,可以接收当前方法产生的异常 -->

            <!-- *注意:如果程序没有异常,则不会执行增强 -->

            <!-- * throwing属性:用于设置通知第二个参数的名称,类型Throwable -->

            <aop:after-throwing method="myAfterThrowing"

                pointcut-ref="myPointCut" throwing="e" />

            <!--最终通知:无论程序发生任何事情,都将执行 -->

            <aop:after method="myAfter" pointcut-ref="myPointCut" />

        </aop:aspect>

    </aop:config>

</beans>

上述代码中,首先在第 4、7、8 行代码中分别导入了 AOP 的命名空间。第 12 行代码指定了切面类。

第 17、18 行代码配置了切入点,通知需要增强哪些方法,expression="execution(*com.mengma.dao.*.*(..))的意思是增强 com.mengma.dao 包下所有的方法。

第 20~32 行代码用于关联通知(Advice)和切入点(PointCut)。以第 20 行代码前置通知为例,<aop:before> 标签的 method 属性用于指定通知,pointcut-ref 属性用于指定切入点,也就是要增强的方法,其他几种通知的配置可以参考代码注释。

4. 创建测试类

在 com.mengma.aspectj.xml 包下创建测试类 XMLTest,如下所示。

package com.mengma.aspectj.xml;

import org.junit.Test;

import org.springframework.context.ApplicationContext;

import org.springframework.context.support.ClassPathXmlApplicationContext;

import com.mengma.dao.CustomerDao;

public class XMLTest {

    @Test

    public void test() {

        String xmlPath = "com/mengma/aspectj/xml/applicationContext.xml";

        ApplicationContext applicationContext = new ClassPathXmlApplicationContext(

                xmlPath);

        // 从spring容器获取实例

        CustomerDao customerDao = (CustomerDao) applicationContext

                .getBean("customerDao");

        // 执行方法

        customerDao.add();

    }

}

5. 运行项目并查看结果

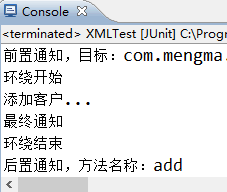
使用 JUnit 测试运行 test() 方法,运行成功后,控制台的输出结果

基于 Annotation 的声明式

在 Spring 中,尽管使用 XML 配置文件可以实现 AOP 开发,但是如果所有的相关的配置都集中在配置文件中,势必会导致 XML 配置文件过于臃肿,从而给维护和升级带来一定的困难。

为此,AspectJ 框架为 AOP 开发提供了另一种开发方式——基于 Annotation 的声明式。AspectJ 允许使用注解定义切面、切入点和增强处理,而 Spring 框架则可以识别并根据这些注解生成 AOP 代理。

关于 Annotation 注解的介绍

@Aspect    用于定义一个切面。

@Before    用于定义前置通知,相当于 BeforeAdvice。

@AfterReturning    用于定义后置通知,相当于 AfterReturningAdvice。

@Around    用于定义环绕通知,相当于MethodInterceptor。

@AfterThrowing    用于定义抛出通知,相当于ThrowAdvice。

@After    用于定义最终final通知,不管是否异常,该通知都会执行。

@DeclareParents    用于定义引介通知,相当于IntroductionInterceptor(不要求掌握)。
1. 创建切面类 MyAspect

在 src 目录下创建一个名为 com.mengma.aspectj.annotation 的包,在该包下创建一个切面类 MyAspect,如下所示。

package com.mengma.aspectj.annotation;

import org.aspectj.lang.JoinPoint;

import org.aspectj.lang.ProceedingJoinPoint;

import org.aspectj.lang.annotation.After;

import org.aspectj.lang.annotation.AfterReturning;

import org.aspectj.lang.annotation.AfterThrowing;

import org.aspectj.lang.annotation.Around;

import org.aspectj.lang.annotation.Aspect;

import org.aspectj.lang.annotation.Before;

import org.aspectj.lang.annotation.Pointcut;

import org.springframework.stereotype.Component;

//切面类

@Aspect

@Component

public class MyAspect {

    // 用于取代:<aop:pointcut

    // expression="execution(*com.mengma.dao..*.*(..))" id="myPointCut"/>

    // 要求:方法必须是private,没有值,名称自定义,没有参数

    @Pointcut("execution(*com.mengma.dao..*.*(..))")

    private void myPointCut() {

    }

    // 前置通知

    @Before("myPointCut()")

    public void myBefore(JoinPoint joinPoint) {

        System.out.print("前置通知,目标:");

        System.out.print(joinPoint.getTarget() + "方法名称:");

        System.out.println(joinPoint.getSignature().getName());

    }

    // 后置通知

    @AfterReturning(value = "myPointCut()")

    public void myAfterReturning(JoinPoint joinPoint) {

        System.out.print("后置通知,方法名称:" + joinPoint.getSignature().getName());

    }

    // 环绕通知

    @Around("myPointCut()")

    public Object myAround(ProceedingJoinPoint proceedingJoinPoint)

            throws Throwable {

        System.out.println("环绕开始"); // 开始

        Object obj = proceedingJoinPoint.proceed(); // 执行当前目标方法

        System.out.println("环绕结束"); // 结束

        return obj;

    }

    // 异常通知

    @AfterThrowing(value = "myPointCut()", throwing = "e")

    public void myAfterThrowing(JoinPoint joinPoint, Throwable e) {

        System.out.println("异常通知" + "出错了" + e.getMessage());

    }

    // 最终通知

    @After("myPointCut()")

    public void myAfter() {

        System.out.println("最终通知");

    }

}

上述代码中,第 13 行 @Aspect 注解用于声明这是一个切面类,该类作为组件使用,所以要添加 @Component 注解才能生效。第 19 行中 @Poincut 注解用于配置切入点,取代 XML 文件中配置切入点的代码。

在每个通知相应的方法上都添加了注解声明,并且将切入点方法名“myPointCut”作为参数传递给要执行的方法,如需其他参数(如异常通知的异常参数),可以根据代码提示传递相应的属性值。

2. 为目标类添加注解

在 com.mengma.dao.CustomerDaoImpl 目标类中添加注解 @Repository("customerDao")。

3. 创建Spring配置文件

在 com.mengma.aspectj.annotation 包下创建 applicationContext.xml 配置文件,如下所示。

<?xml version="1.0" encoding="UTF-8"?>

<beans xmlns="http://www.springframework.org/schema/beans"

    xmlns:xsi="http://www.w3.org/2001/XMLSchema-instance"

    xmlns:aop="http://www.springframework.org/schema/aop"

    xmlns:context="http://www.springframework.org/schema/context"

    xsi:schemaLocation="http://www.springframework.org/schema/beans

            http://www.springframework.org/schema/beans/spring-beans-2.5.xsd

            http://www.springframework.org/schema/aop

            http://www.springframework.org/schema/aop/spring-aop-2.5.xsd

            http://www.springframework.org/schema/context

            http://www.springframework.org/schema/context/spring-context.xsd">

    <!--扫描含com.mengma包下的所有注解-->

    <context:component-scan base-package="com.mengma"/>

    <!-- 使切面开启自动代理 -->

    <aop:aspectj-autoproxy></aop:aspectj-autoproxy>

</beans>

上述代码中,首先导入了 AOP 命名空间及其配套的约束,使切面类中的 @AspectJ 注解能够正常工作;第 13 行代码添加了扫描包,使注解生效。需要注意的是,这里还包括目标类 com.mengma.dao.CustomerDaoImpl 的注解,所以 base-package 的值为 com.mengma;第 15 行代码的作用是切面开启自动代理。

4. 创建测试类

在 com.mengma.aspectj.annotation 包下创建一个名为 AnnotationTest 的测试类,如下所示。

package com.mengma.aspectj.annotation;

import org.junit.Test;

import org.springframework.context.ApplicationContext;

import org.springframework.context.support.ClassPathXmlApplicationContext;

import com.mengma.dao.CustomerDao;

public class AnnotationTest {

    @Test

    public void test() {

        String xmlPath = "com/mengma/aspectj/xml/applicationContext.xml";

        ApplicationContext applicationContext = new ClassPathXmlApplicationContext(

                xmlPath);

        // 从spring容器获取实例

        CustomerDao customerDao = (CustomerDao) applicationContext

                .getBean("customerDao");

        // 执行方法

        customerDao.add();

    }

}

5. 运行项目并查看结果

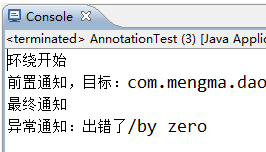
使用 JUnit 测试运行 test() 方法,运行成功后,控制台的输出结果

吴裕雄--天生自然JAVA SPRING框架开发学习笔记:Spring使用AspectJ开发AOP基于XML和基于Annotation的更多相关文章
- 吴裕雄--天生自然JAVA面向对象高级编程学习笔记:继承的应用
class Array{ // 表示数组 private int temp[] ; // 整型数组 private int foot ; // 定义添加位置 public Array(int len) ...
- 吴裕雄--天生自然JAVA面向对象高级编程学习笔记:匿名内部类
interface A{ public void printInfo() ; // } class B implements A{ // 实现接口 public void printInfo(){ S ...
- 吴裕雄--天生自然JAVA面向对象高级编程学习笔记:包装类
public class WrapperDemo01{ public static void main(String args[]){ int x = 30 ; // 基本数据类型 Integer i ...
- 吴裕雄--天生自然JAVA面向对象高级编程学习笔记:Object类
class Demo{ // 定义Demo类,实际上就是继承了Object类 }; public class ObjectDemo01{ public static void main(String ...
- 吴裕雄--天生自然JAVA面向对象高级编程学习笔记:宠物商店实例分析
interface Pet{ // 定义宠物接口 public String getName() ; public String getColor() ; public int getAge() ; ...
- 吴裕雄--天生自然JAVA面向对象高级编程学习笔记:抽象类与接口的应用
abstract class A{ // 定义抽象类A public abstract void print() ; // 定义抽象方法print() }; class B extends A { / ...
- 吴裕雄--天生自然JAVA面向对象高级编程学习笔记:instanceof关键字
class A{ // 定义类A public void fun1(){ // 定义fun1()方法 System.out.println("A --> public void fun ...
- 吴裕雄--天生自然JAVA面向对象高级编程学习笔记:对象的多态性
class A{ // 定义类A public void fun1(){ // 定义fun1()方法 System.out.println("A --> public void fun ...
- 吴裕雄--天生自然JAVA面向对象高级编程学习笔记:接口的基本实现
interface A{ // 定义接口A public static final String AUTHOR = "李兴华" ; // 全局常量 public abstract ...
- 吴裕雄--天生自然JAVA面向对象高级编程学习笔记:final关键字
final class A{ // 使用final定义类,不能有子类 }; class B extends A{ // 错误,不能被继承 }; class A{ public final void p ...
随机推荐
- 吴裕雄--天生自然HADOOP操作实验学习笔记:Wor的Count程序的编写
实验目的 理解mapreduce的工作原理 理解Partitioner的书写方法 理解GroupingComparator的书写方法 实验原理 我们已经学习了hadoop的大部分基础知识,剩下的就是利 ...
- thymeleaf html5
一.引用命名空间 <html xmlns:th="http://www.thymeleaf.org"> 在html中引入此命名空间,可避免编辑器出现html验证错误,虽 ...
- jgrid异步数据加载
参考:https://blog.csdn.net/hurryjiang/article/details/7077725
- #写一个登陆的程序 ( 1.最多登录失败3次 2.登陆成功,提示欢迎XX登录,今天的日期是XXX,程序结束 3.要检验输入是否为空,账户和密码不能为空 4.账户不区分大小写)
import datetime import MySQLdb today=datetime.datetime.today() username=str(input('请输入账户:')) passwd1 ...
- Ubuntu的妥协将支持精选的32位应用
据外媒Tom's hardware,Ubuntu开发人员Canonical在早先的时候宣布Ubuntu 19.10将不再更新32位软件包和应用程序,引来了诸多应用开发者的不满.现在,Ubuntu方面宣 ...
- mabatis--动态sql
1.mybatis核心,对sql语句进行灵活操作,通过表达式进行判断,对sql进行灵活拼接.组装: 2.使用if判断: <where> <if test="customer ...
- Lesson 44 Patterns of culture
What influences us from the moment of birth? Custom has not commonly been regarded as a subject of a ...
- Anaconda下的 Jupyter Notebook 安装 多python环境
装完 Anaconda 会自带一个pyhon环境 也会自带Jupyter Notebook 可以点击开始中的Jupyter Notebook 打开 浏览器 我这里是 3.x 想要装个2.7 的 ...
- 使用Vue 和 内网穿透:返回 invalid host header
原因:新版的webpack-dev-server出于安全考虑,默认检查hostname,如果它不是配置内的,将会中断访问. -------------------------------------- ...
- node批量修改文件名称
let fs = require('fs');//引用文件系统模块 let PATH = `./app_zijietiaodong/`;//当前文件夹 let ext = { readFileList ...
