Depthwise Separable Convolution(深度可分离卷积)的实现方式
按照普通卷积-深度卷积-深度可分离卷积的思路总结。
depthwise_conv2d来源于深度可分离卷积,如下论文:
Xception: Deep Learning with Depthwise Separable Convolutions
函数定义如下:
tf.nn.depthwise_conv2d(input,filter,strides,padding,rate=None,name=None,data_format=None)
除去name参数用以指定该操作的name,data_format指定数据格式,与方法有关的一共五个参数:
input:
指需要做卷积的输入图像,要求是一个4维Tensor,具有[batch, height, width, in_channels]这样的shape,具体含义是[训练时一个batch的图片数量, 图片高度, 图片宽度, 图像通道数]
filter:
相当于CNN中的卷积核,要求是一个4维Tensor,具有[filter_height, filter_width, in_channels, channel_multiplier]这样的shape,具体含义是[卷积核的高度,卷积核的宽度,输入通道数,输出卷积乘子],同理这里第三维in_channels,就是参数value的第四维
strides:
卷积的滑动步长。
padding:
string类型的量,只能是”SAME”,”VALID”其中之一,这个值决定了不同边缘填充方式。
rate:
这个参数的详细解释见【Tensorflow】tf.nn.atrous_conv2d如何实现空洞卷积?
结果返回一个Tensor,shape为[batch, out_height, out_width, in_channels * channel_multiplier],注意这里输出通道变成了in_channels * channel_multiplier
自定义卷积信息做实例:
img1 = tf.constant(value=[[[[1],[2],[3],[4]],[[1],[2],[3],[4]],[[1],[2],[3],[4]],[[1],[2],[3],[4]]]],dtype=tf.float32)
img2 = tf.constant(value=[[[[1],[1],[1],[1]],[[1],[1],[1],[1]],[[1],[1],[1],[1]],[[1],[1],[1],[1]]]],dtype=tf.float32)
img = tf.concat(values=[img1,img2],axis=3)
filter1 = tf.constant(value=0, shape=[3,3,1,1],dtype=tf.float32)
filter2 = tf.constant(value=1, shape=[3,3,1,1],dtype=tf.float32)
filter3 = tf.constant(value=2, shape=[3,3,1,1],dtype=tf.float32)
filter4 = tf.constant(value=3, shape=[3,3,1,1],dtype=tf.float32)
filter_out1 = tf.concat(values=[filter1,filter2],axis=2)
filter_out2 = tf.concat(values=[filter3,filter4],axis=2)
filter = tf.concat(values=[filter_out1,filter_out2],axis=3)
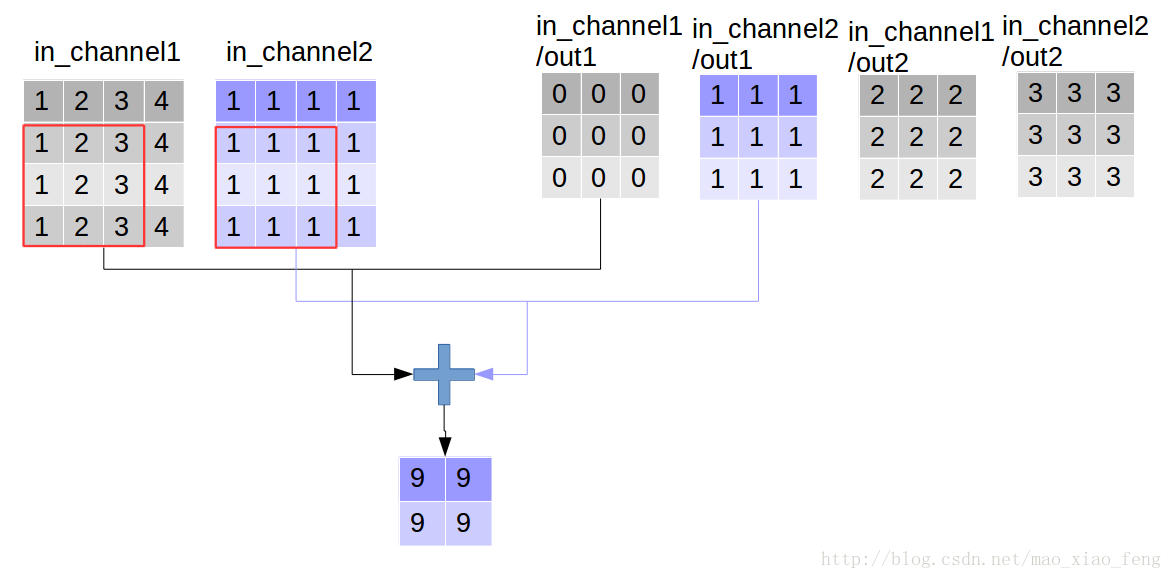
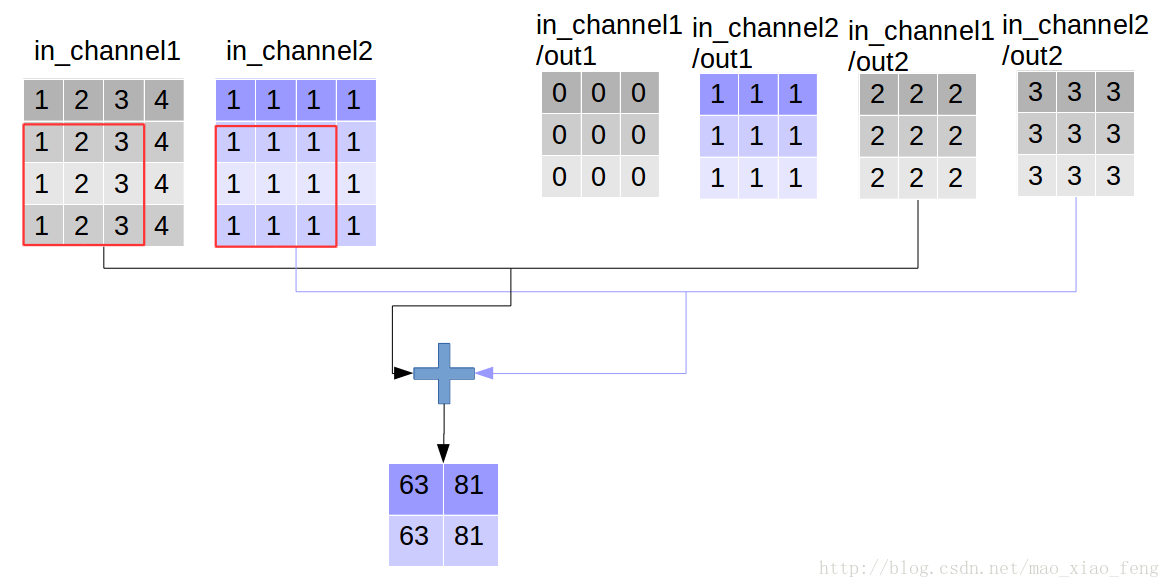
做普通卷积:
out_img = tf.nn.conv2d(input=img, filter=filter, strides=[1,1,1,1], padding='VALID')
普通卷积的实现过程如下系列图:
做深度卷积:
out_img = tf.nn.depthwise_conv2d(input=img, filter=filter, strides=[1,1,1,1], rate=[1,1], padding='VALID')
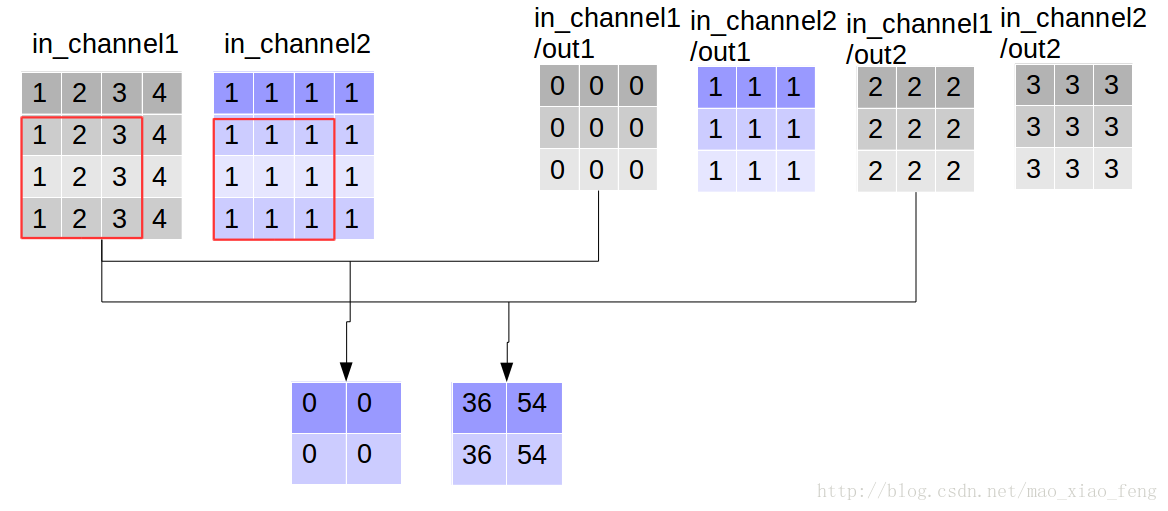

形象的解释一下depthwise_conv2d卷积了。看普通的卷积,我们对卷积核每一个out_channel的两个通道分别和输入的两个通道做卷积相加,得到feature map的一个channel,而depthwise_conv2d卷积,我们对每一个对应的in_channel,分别卷积生成两个out_channel,所以获得的feature map的通道数量可以用in_channel* channel_multiplier来表达,这个channel_multiplier,就可以理解为卷积核的第四维。
做深度可分离卷积:
如下,增加定义了point_filter 核。
import tensorflow as tf
img1 = tf.constant(value=[[[[1],[2],[3],[4]],[[1],[2],[3],[4]],[[1],[2],[3],[4]],[[1],[2],[3],[4]]]],dtype=tf.float32)
img2 = tf.constant(value=[[[[1],[1],[1],[1]],[[1],[1],[1],[1]],[[1],[1],[1],[1]],[[1],[1],[1],[1]]]],dtype=tf.float32)
img = tf.concat(values=[img1,img2],axis=3)
filter1 = tf.constant(value=0, shape=[3,3,1,1],dtype=tf.float32)
filter2 = tf.constant(value=1, shape=[3,3,1,1],dtype=tf.float32)
filter3 = tf.constant(value=2, shape=[3,3,1,1],dtype=tf.float32)
filter4 = tf.constant(value=3, shape=[3,3,1,1],dtype=tf.float32)
filter_out1 = tf.concat(values=[filter1,filter2],axis=2)
filter_out2 = tf.concat(values=[filter3,filter4],axis=2)
filter = tf.concat(values=[filter_out1,filter_out2],axis=3)
point_filter = tf.constant(value=1, shape=[1,1,4,4],dtype=tf.float32)
out_img = tf.nn.depthwise_conv2d(input=img, filter=filter, strides=[1,1,1,1],rate=[1,1], padding='VALID')
做深度分层卷积=做深度卷积,然后做pointwise卷积,因此在上代码添加做pointwise卷积代码即可完成,如下:
out_img = tf.nn.conv2d(input=out_img, filter=point_filter, strides=[1,1,1,1], padding='VALID')
输出:

使用官方函数编码查看结果,即:
out_img = tf.nn.separable_conv2d(input=img, depthwise_filter=filter, pointwise_filter=point_filter,strides=[1,1,1,1], rate=[1,1], padding='VALID')
输出:

ok,愉快地结束。
Depthwise Separable Convolution(深度可分离卷积)的实现方式的更多相关文章
- 深度可分离卷积结构(depthwise separable convolution)计算复杂度分析
https://zhuanlan.zhihu.com/p/28186857 这个例子说明了什么叫做空间可分离卷积,这种方法并不应用在深度学习中,只是用来帮你理解这种结构. 在神经网络中,我们通常会使用 ...
- 深度学习之depthwise separable convolution,计算量及参数量
目录: 1.什么是depthwise separable convolution? 2.分析计算量.flops 3.参数量 4.与传统卷积比较 5.reference
- 深度可分卷积(Depthwise Separable Conv.)计算量分析
上次读到深度可分卷积还是去年暑假,各种细节都有些忘了.记录一下,特别是计算量的分析过程. 1. 标准卷积和深度可分卷积 标准卷积(MobileNet论文中称为Standard Convolution, ...
- 可分离卷积详解及计算量 Basic Introduction to Separable Convolutions
任何看过MobileNet架构的人都会遇到可分离卷积(separable convolutions)这个概念.但什么是“可分离卷积”,它与标准的卷积又有什么区别?可分离卷积主要有两种类型: 空间可分离 ...
- 『高性能模型』深度可分离卷积和MobileNet_v1
论文原址:MobileNets v1 TensorFlow实现:mobilenet_v1.py TensorFlow预训练模型:mobilenet_v1.md 一.深度可分离卷积 标准的卷积过程可以看 ...
- Paper | Xception: Deep Learning with Depthwise Separable Convolutions
目录 故事 Inception结构和思想 更进一步,以及现有的深度可分离卷积 Xception结构 实验 这篇论文写得很好.只要你知道卷积操作或公式,哪怕没看过Inception,也能看懂. 核心贡献 ...
- CNN中各类卷积总结:残差、shuffle、空洞卷积、变形卷积核、可分离卷积等
CNN从2012年的AlexNet发展至今,科学家们发明出各种各样的CNN模型,一个比一个深,一个比一个准确,一个比一个轻量.我下面会对近几年一些具有变革性的工作进行简单盘点,从这些充满革新性的工作中 ...
- Spark MLlib Deep Learning Convolution Neural Network (深度学习-卷积神经网络)3.1
3.Spark MLlib Deep Learning Convolution Neural Network (深度学习-卷积神经网络)3.1 http://blog.csdn.net/sunbow0 ...
- Spark MLlib Deep Learning Convolution Neural Network (深度学习-卷积神经网络)3.2
3.Spark MLlib Deep Learning Convolution Neural Network(深度学习-卷积神经网络)3.2 http://blog.csdn.net/sunbow0 ...
随机推荐
- SpringBoot整合WebSocket实现前后端互推消息
小编写这篇文章是为了记录实现WebSocket的过程,受不了啰嗦的同学可以直接看代码. 前段时间做项目时设计了一个广播的场景,具体业务不再赘述,最终要实现的效果就是平台接收到的信息实时发布给所有的用户 ...
- 如何在Linux上使用xargs命令
大家好,我是良许. 在使用 Linux 时,你是否遇到过需要将一些命令串在一起,但是其中一个命令不接受管道输入的情况呢?在这种情况下,我们就可以使用 xargs 命令.xargs 可以将一个命令的输出 ...
- C语言复习-字符串与指针
C语言复习-字符串与指针 例一: [字符串处理 去除C代码中的注释] C/C++代码中有两种注释,/* */和//.编译器编译预处理时会先移除注释.就是把/*和*/之间的部分去掉,把//以及之后的部分 ...
- 关于对MyBatis.net框架的学习笔记( MyBatis.net是一款灵活性极大,sql由开发者自行在xml中编写, 轻量的ORM映射框架). 同时避免了sql硬编码到代码中不易维护的问题...
对于为什么要用ORM,为什么又要选择MyBatis.net,这个问题希望读者自行查找资料.这里直接贴出相关的调试笔记. 步骤1)下载与引用. http://code.google.com/p/myba ...
- openCV - 2. 矩阵的掩膜操作
获取图像像素指针.掩膜操作解释 获取图像像素指针 CV_Assert(myImage.depth() == CV_8U); Mat.ptr<uchar>(int i=0) 获取像素矩阵的指 ...
- CET-4 Word 计划表
a {text-decoration: none} CET-4 计划表 Sun Mon Tue Wed Thu Fri Sat 9/1 List-1 9/2 List-2 *List-1 9/3 Li ...
- 【转】Android 音量键+电源键 截屏代码小结
http://104zz.iteye.com/blog/1752961 原文地址:http://blog.csdn.net/hk_256/article/details/7306590 ,转载请注明出 ...
- springboot @valid与@validated的参数校验使用总结
好久没在这平台写博客了,最近整理了这东西,先给出总结 // @Valid只能用在controller,@Validated可以用在其他被spring管理的类上 // @Valid可以加在成员变量上(本 ...
- My Github Repository
最近在Github上整了个Repository来保存打过的比赛的代码,包括Codeforces,Google Code Jam和Google Kick Start等,之后应该也会搞一点刷题的代码. 之 ...
- leetcode刷题-61旋转链表
题目 给定一个链表,旋转链表,将链表每个节点向右移动 k 个位置,其中 k 是非负数. 示例 1: 输入: 1->2->3->4->5->NULL, k = 2输出: 4 ...