贪玩ML系列之一个BP玩一天
手写串行BP算法,可调batch_size
既要:1、输入层f(x)=x 隐藏层sigmoid 输出层f(x)=x
2、run函数实现单条数据的一次前馈
3、train函数读入所有数据for循环处理每条数据。
循环中:
首先调用run函数,得到各层的值
self.input_nodes_value
self.hidden_nodes_value
self.output_nodes_value
然后计算输出层误差和delta
4、关键函数:用于前馈的sigmoid和用于反馈的sigmoid的导数
 self.activation_function = lambda x : 1/(1+np.exp(-x))  # sigmoid函数,用于正向传播

 self.delta_activation_function = lambda x: x-x**2 # sigmoid一阶导,用于反向传播
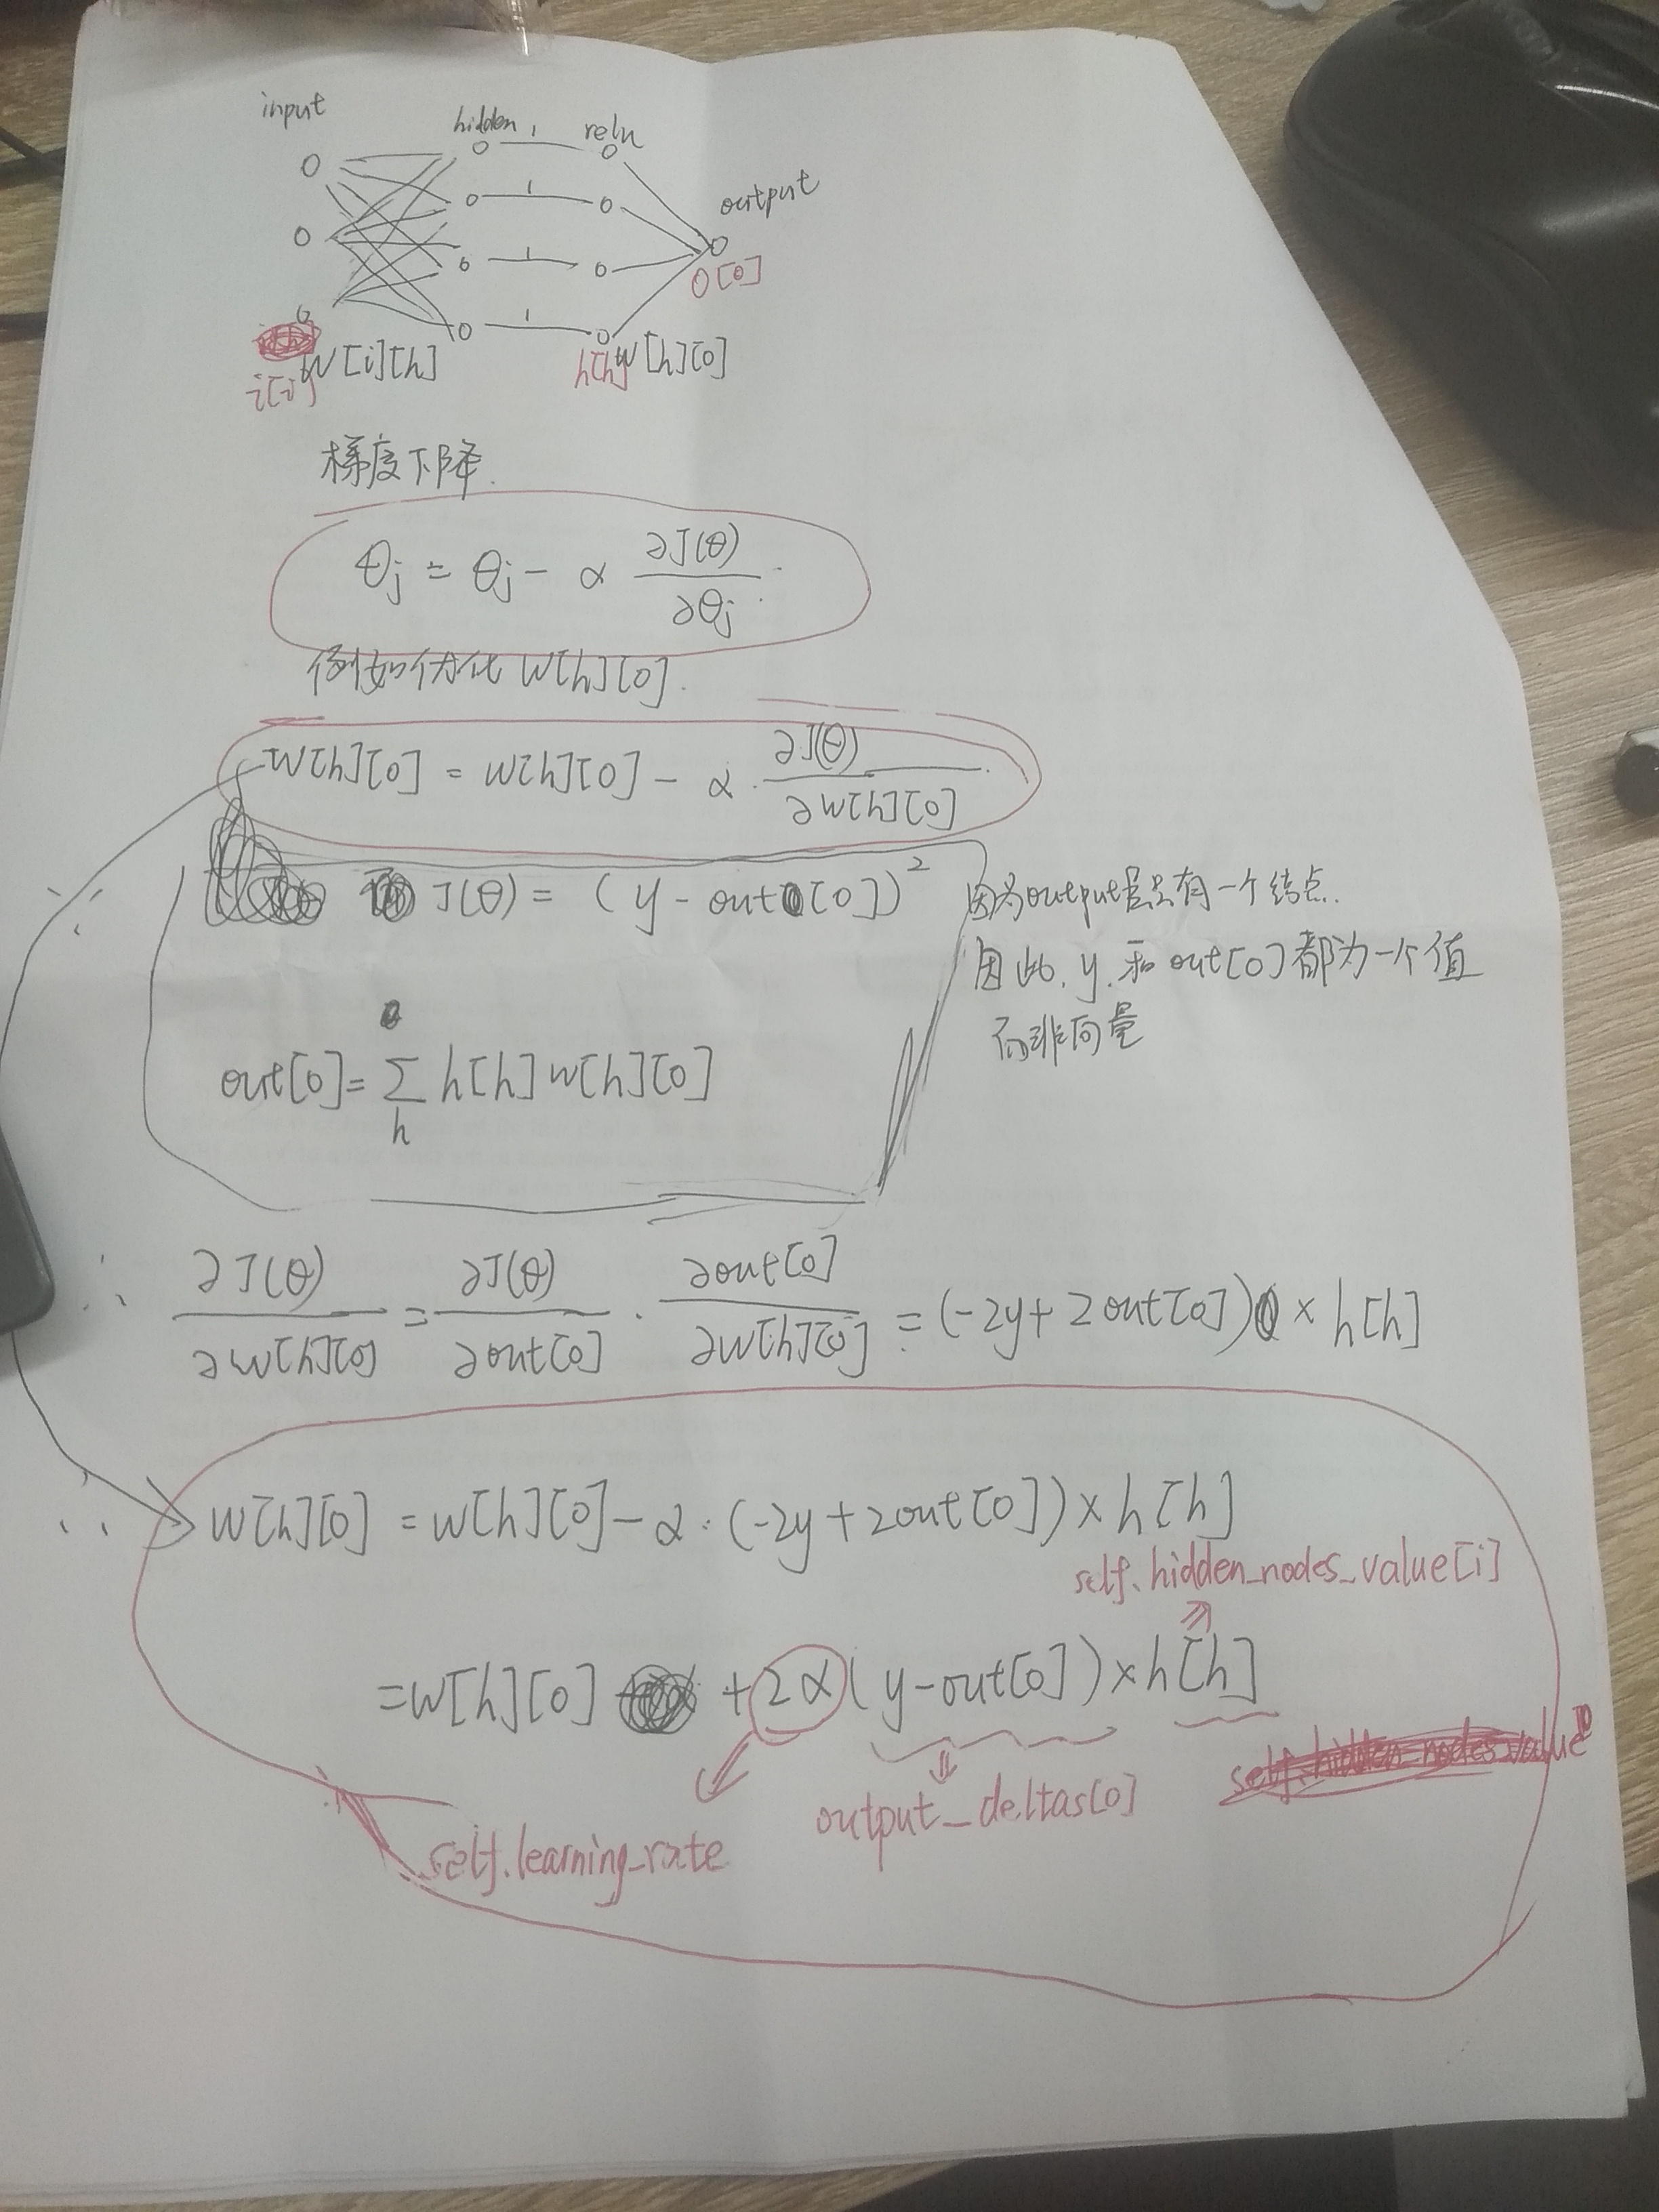
5、反向传播
使用梯度下降方法
下面是推导隐藏层(实际上为relu层)到输出层的权重w[h][o]的梯度下降公式的过程,对应的几个变量在下面的代码中用红色标出
关于梯度下降公式推导:
https://blog.csdn.net/wfei101/article/details/80807749
https://www.jianshu.com/p/17191c57d7e9
batch_size=1

# 输入层没有激活函数f(x)=x,隐藏层激活函数sigmoid,输出层激活函数f(x)=x

class NeuralNetwork(object):

    def __init__(self, input_nodes, hidden_nodes, output_nodes, learning_rate):

        # 各层节点个数

        self.input_nodes = input_nodes

        self.hidden_nodes = hidden_nodes

        self.output_nodes = output_nodes

#         创建三个一维数组存放三层节点的值

#         print(str(self.input_nodes)+" "+str(self.hidden_nodes)+" "+str(self.output_nodes))

        self.input_nodes_value=[0.0]*input_nodes

        self.hidden_nodes_value=[0.0]*hidden_nodes

        self.output_nodes_value=[0.0]*output_nodes

        # Initialize weights

        self.weights_input_to_hidden = np.random.normal(0.0, self.input_nodes**-0.5, (self.input_nodes, self.hidden_nodes))#输入层>>隐藏层权重矩阵

        self.weights_hidden_to_output = np.random.normal(0.0, self.hidden_nodes**-0.5, (self.hidden_nodes, self.output_nodes))#隐藏层>>输出层权重矩阵

        self.learning_rate = learning_rate#学习率

        self.activation_function = lambda x : 1/(1+np.exp(-x))  # sigmoid函数,用于正向传播

        self.delta_activation_function = lambda x: x-x**2 # sigmoid一阶导,用于反向传播

        self.change_to_fix_weights_h2o=[[0.0]*self.output_nodes]*self.hidden_nodes#存储隐藏层>>输出层权重调整量

        self.change_to_fix_weights_i2h=[[0.0]*self.hidden_nodes]*self.input_nodes#存储输入层>>隐藏层权重调整量

#         print("xxxx")

#         print(self.change_to_fix_weights_h2o)

#         print(self.change_to_fix_weights_i2h)

    def train(self, features, targets):#完成n条数据的一次前向传递和反向传递,每个batch调整一次权重矩阵

        '''

            features: 2D array, each row is one data record, each column is a feature

            targets: 1D array of target values

        '''

        n=features.shape[0]#数据条数

#         print(features)

#         print(targets)

        counter=batch_size

        for ii in range(0,n):

            self.run(features[ii])#调用前向传播

            print(self.output_nodes_value)

            error_o=[0.0]*self.output_nodes#输出层误差

            error_h=[0.0]*self.hidden_nodes#隐藏层误差

            output_deltas=[0.0]*self.output_nodes

            hidden_deltas=[0.0]*self.hidden_nodes

            for o in range(self.output_nodes): # 输 出 层

                error_o[o]=targets[ii][o]-self.output_nodes_value[o]#计算输出层误差

#                 output_deltas[o]=self.delta_activation_function(self.output_nodes_value[o])*error_o[o]#输出层反向传播(求导)

                output_deltas[o]=1*error_o[o]#输出层反向传播(求导)

            for h in range(self.hidden_nodes): # 隐 藏 层

                for o in range(self.output_nodes):

#                     print('weight::',self.weights_hidden_to_output[h][o])

                    error_h[h]+=output_deltas[o]*self.weights_hidden_to_output[h][o]#计算隐藏层误差

#                 print('....')

#                 print(self.hidden_nodes_value[h])

#                 print(error_h[h])

                hidden_deltas[h]=self.delta_activation_function(self.hidden_nodes_value[h])*error_h[h]#隐藏层反向传播

#                 print(hidden_deltas[h])

            for h in range(self.hidden_nodes):

                for o in range(self.output_nodes):

                    self.change_to_fix_weights_h2o[h][o]+=output_deltas[o]*self.hidden_nodes_value[h]#累计隐藏层>>输出层的权重矩阵的调整量

            for i in range(self.input_nodes):

                for h in range(self.hidden_nodes):

#                     print("......")

#                     print(hidden_deltas[h])

#                     print(self.input_nodes_value[i])

#                     print(self.change_to_fix_weights_i2h[i][h])

                    self.change_to_fix_weights_i2h[i][h]+=hidden_deltas[h]*self.input_nodes_value[i]#累计输入层>>隐藏层的权重矩阵的调整量

            counter-=1

            if counter==0:#完成一个batch的输入和计算后,调整一次权重

                #调整隐藏层>>输出层权重

                for h in range(self.hidden_nodes):

                    for o in range(self.output_nodes):

                        self.weights_hidden_to_output[h][o] += self.learning_rate*self.change_to_fix_weights_h2o[h][o]

                #调整输入层>>隐藏层权重

                for i in range(self.input_nodes):

                    for h in range(self.hidden_nodes):

#                         print("......")

#                         print(self.weights_input_to_hidden[i][h])

#                         print(self.learning_rate)

#                         print(self.change_to_fix_weights_i2h[i][h])

                        self.weights_input_to_hidden[i][h] += self.learning_rate*self.change_to_fix_weights_i2h[i][h]

#                         print(self.weights_input_to_hidden[i][h])

                #将权值调整量归零,计数器复位,开始输入下一个batch

                self.change_to_fix_weights_h2o=[[0.0]*self.output_nodes]*self.hidden_nodes

                self.change_to_fix_weights_i2h=[[0.0]*self.hidden_nodes]*self.input_nodes

                counter=batch_size

        return self.weights_hidden_to_output

    def run(self, features):#完成一条数据的一次前向传递

        '''

            features: 1D array of feature values

        '''

#         print(self.input_nodes_value)

        for i in range(self.input_nodes):

            self.input_nodes_value[i]=features[i]

#             self.input_nodes_value[i]=self.activation_function(features[i])

#         print(self.input_nodes_value)

#         print(self.hidden_nodes_value)

        for h in range(self.hidden_nodes):

            temp=0

            for i in range(self.input_nodes):

                temp+=self.input_nodes_value[i]*self.weights_input_to_hidden[i][h]

            temp=self.activation_function(temp)

            self.hidden_nodes_value[h]=temp

#         print(self.hidden_nodes_value)

#         print(self.output_nodes_value)

        for o in range(self.output_nodes):

            temp=0

            for h in range(self.hidden_nodes):

                temp+=self.hidden_nodes_value[h]*self.weights_hidden_to_output[h][o]

#             temp=self.activation_function(temp)

            self.output_nodes_value[o]=temp

#         print(self.output_nodes_value)

        return self.output_nodes_value
单元测试:
import unittest inputs = np.array([[0.5, -0.2, 0.1]])
targets = np.array([[0.4]])
test_w_i_h = np.array([[0.1, -0.2],
[0.4, 0.5],
[-0.3, 0.2]])
test_w_h_o = np.array([[0.3],
[-0.1]]) class TestMethods(unittest.TestCase): ##########
# Unit tests for data loading
########## def test_data_path(self):
# Test that file path to dataset has been unaltered
self.assertTrue(data_path.lower() == 'bike-sharing-dataset/hour.csv') def test_data_loaded(self):
# Test that data frame loaded
self.assertTrue(isinstance(rides, pd.DataFrame)) ##########
# Unit tests for network functionality
########## def test_activation(self):
network = NeuralNetwork(3, 2, 1, 0.5)
# Test that the activation function is a sigmoid
self.assertTrue(np.all(network.activation_function(0.5) == 1/(1+np.exp(-0.5)))) def test_train(self):
# Test that weights are updated correctly on training
network = NeuralNetwork(3, 2, 1, 0.5)
network.weights_input_to_hidden = test_w_i_h.copy()
network.weights_hidden_to_output = test_w_h_o.copy() network.train(inputs, targets)
print('@@@@test_train')
print("$$$$$$$$1")
print(network.weights_hidden_to_output)
print(network.weights_input_to_hidden) # network.train(inputs,targets) # print("$$$$$$$$2")
# print(network.weights_hidden_to_output)
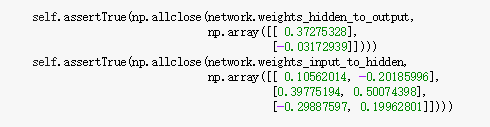
# print(network.weights_input_to_hidden) self.assertTrue(np.allclose(network.weights_hidden_to_output,
np.array([[ 0.37275328],
[-0.03172939]])))
self.assertTrue(np.allclose(network.weights_input_to_hidden,
np.array([[ 0.10562014, -0.20185996],
[0.39775194, 0.50074398],
[-0.29887597, 0.19962801]]))) def test_run(self):
# Test correctness of run method
network = NeuralNetwork(3, 2, 1, 0.5)
network.weights_input_to_hidden = test_w_i_h.copy()
network.weights_hidden_to_output = test_w_h_o.copy() self.assertTrue(np.allclose(network.run(inputs[0]), 0.09998924)) suite = unittest.TestLoader().loadTestsFromModule(TestMethods())
unittest.TextTestRunner().run(suite)
结果:
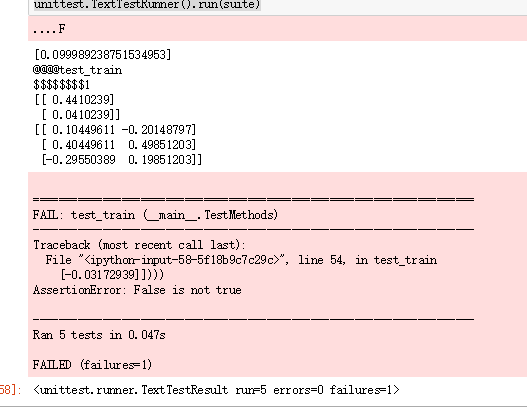
结果虽然比较接近,但是代码比较丑陋,并没有用numpy的矩阵相乘,而是用for循环实现了矩阵乘法,代码复杂,而且都是串行的。
贪玩ML系列之一个BP玩一天的更多相关文章
- 贪玩ML系列之CIFAR-10调参
调参方法:网格调参 tf.layers.conv2d()中的padding参数 取值“same”,表示当filter移出边界时,给空位补0继续计算.该方法能够更多的保留图像边缘信息.当图片较小(如CI ...
- 每日一译系列-模块化css怎么玩(译文)
原文链接:How Css Modules Work 原文作者是Preact的作者 这是一篇关于如何使用Css Modules的快速介绍,使用到的工具是Webpack吊炸的css-loader 首先,我 ...
- ROS与Matlab系列:一个简单的运动控制
ROS与Matlab系列:一个简单的运动控制 转自:http://blog.exbot.net/archives/2594 Matlab拥有强大的数据处理.可视化绘图能力以及众多成熟的算法函数,非常适 ...
- net core天马行空系列: 一个接口多个实现类,利用mixin技术通过自定义服务名,实现精准属性注入
系列目录 1.net core天马行空系列:原生DI+AOP实现spring boot注解式编程 2.net core天马行空系列: 泛型仓储和声明式事物实现最优雅的crud操作 哈哈哈哈,大家好,我 ...
- NET中小型企业项目开发框架系列(一个)
当时的前端,我们开发了基于Net一组结构sprint.NET+NHibernate+MVC+WCF+EasyUI等中小型企业级系统开发平台,如今把整个开发过程中的步步进展整理出来和大家分享,这个系列可 ...
- Office365开发系列——开发一个全功能的Word Add-In
2016年10月我参加了在北京举行的DevDays Asia 2016 - Office 365应用开发”48小时黑客马拉松“,我开发的一个Word Add-In Demo——WordTemplate ...
- http协议学习系列(一个博文链接)
深入理解HTTP协议(转) http协议学习系列(转自:http://www.blogjava.net/zjusuyong/articles/304788.html) 1. 基础概念篇 1.1 介绍 ...
- 造轮子系列(三): 一个简单快速的html虚拟语法树(AST)解析器
前言 虚拟语法树(Abstract Syntax Tree, AST)是解释器/编译器进行语法分析的基础, 也是众多前端编译工具的基础工具, 比如webpack, postcss, less等. 对于 ...
- 爱上MVC3系列~开发一个站点地图(俗称面包屑)
回到目录 原来早在webform控件时代就有了SiteMap这个东西,而进行MVC时代后,我们也希望有这样一个东西,它为我们提供了不少方便,如很方便的实现页面导航的内容修改,页面导航的样式换肤等. 我 ...
随机推荐
- 140726暑期培训.txt
1. 输入多组数据的时候 while(scanf("%s",s)!=EOF) while(gets(s)!=NULL) 用gets和scanf不 ...
- android studio - 使android studio 在提示时不区分大小写
- 使用 Bolt 实现 GridView 表格控件
用 Bolt 实现了一个表格控件: 1. 提供 Insert,Remove,Get,Set 接口,可以为表格增删数据: 2. 通过 ItemClass, ItemSetDataFunc 属性来指定显 ...
- 日期在苹果手机上显示NaN的处理方法
注意两点即可: 1.苹果只认识 yyyy/mmmm/dddd/ 这类格式的日期 2.如果输出后还要进行处理日期对比,苹果默认会带中文字,如:年月日,需要转成上面1当中的日期格式在转时间戳进行比较 G ...
- uinty实现玩家尾随鼠标位置平滑旋转角度
首先我们要在场景中加入一个quad平面作为地板, 然后指定Layer为Floor,然后移除mesh renderer组件 然后加入脚本 脚本主要思想是从屏幕中心投出一条射线到地板, 然后获取相应坐标, ...
- Python-Scrapy创建第一个项目
创建项目 在开始爬取之前,您必须创建一个新的Scrapy项目.进入您打算存储代码的目录中,运行下列命令: scrapy startproject tutorial 1 该命令行将会创建包含下列内容的t ...
- 全栈JavaScript之路(十四)HTML5 中与class属性相关的扩充
1. getElementByClassName() :支持getElementsByClassName()方法的浏览器有IE 9+.Firefox 3+.Safari 3.1+.Chrome 和 O ...
- 【复习】密码算法——AES
0 AES简介 1997年1月2号,美国国家标准技术研究所宣布希望征集一个安全性能更高的加密算法(AES)[3],用以取代DES.我们知道DES的密钥长度是64 bits,但实际加解密中使用的有效长度 ...
- Jmeter实现对字符串加密
最近测试移动端接口,但是请求内容是用MD5加密的,所以要先对请求内容进行加密,Jmeter内置的没有MD5加密方法,所以自己从网上copy了一份,实现了加密功能,以下是具体操作: 1.从网上copy了 ...
- 请写出5种常见到的runtime exception。
请写出5种常见到的runtime exception. 解答: NullPointerException:当操作一个空引用时会出现此错误. NumberFormatException:数据格式转换出现 ...