ROS naviagtion analysis: costmap_2d--Costmap2D
博客转载自:https://blog.csdn.net/u013158492/article/details/50492506


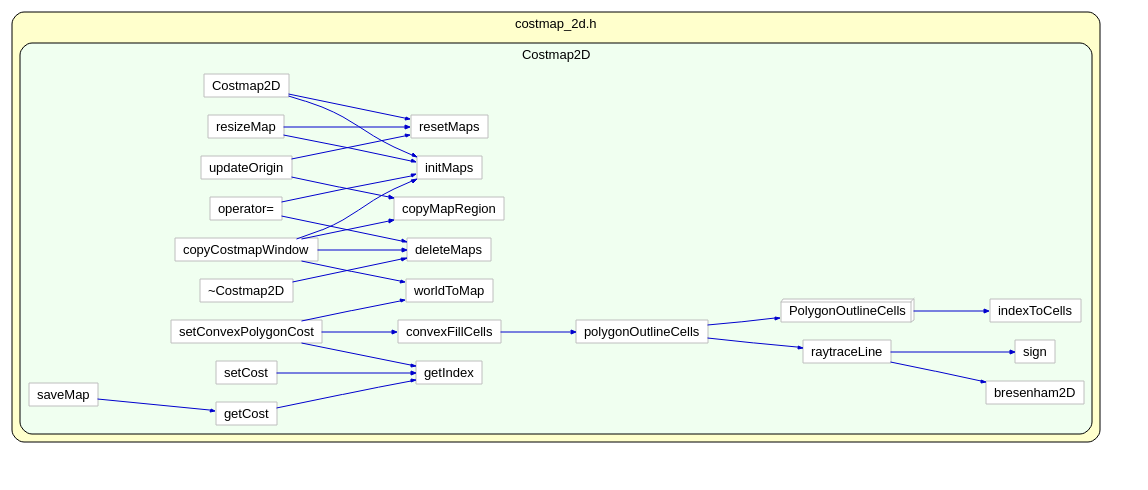
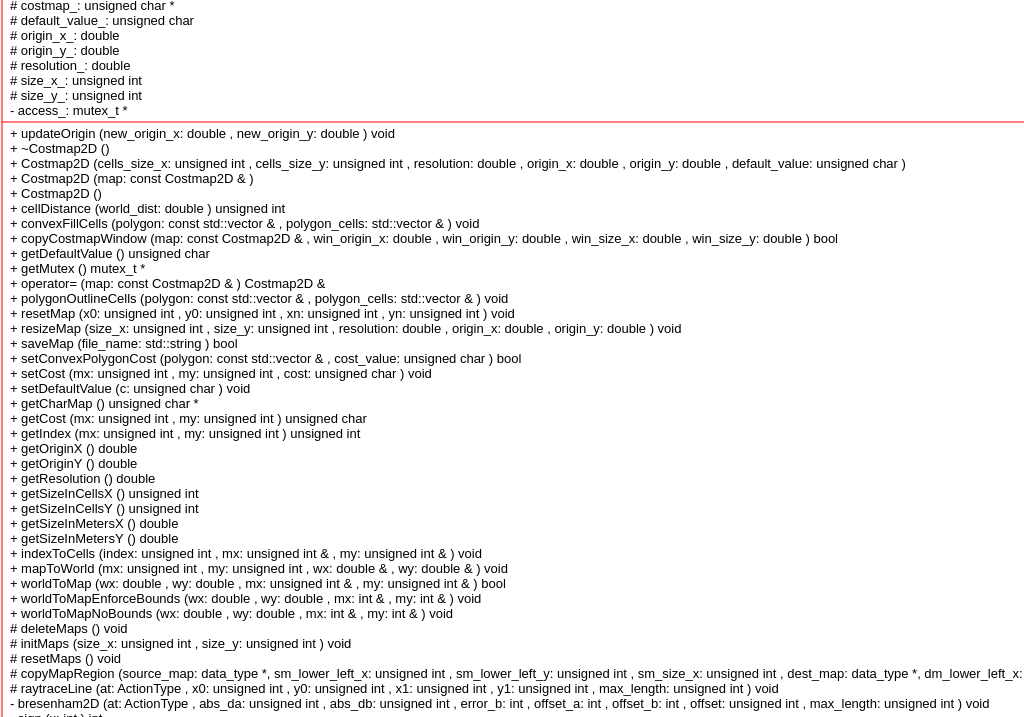
Costmap2D是存储地图数据的父类。真正的地图数据就存储在数据成员unsigned char *costmap_ 。
首先,分析类的构造函数:,默认构造函数:Costmap2D::Costmap2D()
// just initialize everything to NULL by default

Costmap2D::Costmap2D() :

    size_x_(0), size_y_(0), resolution_(0.0), origin_x_(0.0), origin_y_(0.0), costmap_(NULL)

{

  access_ = new mutex_t();

}
带参数的构造函数:Costmap2D::Costmap2D(unsigned int cells_size_x, unsigned int cells_size_y, double resolution, double origin_x, double origin_y, unsigned char default_value)
Costmap2D::Costmap2D(unsigned int cells_size_x, unsigned int cells_size_y, double resolution,

                     double origin_x, double origin_y, unsigned char default_value) :

    size_x_(cells_size_x), size_y_(cells_size_y), resolution_(resolution), origin_x_(origin_x),

    origin_y_(origin_y), costmap_(NULL), default_value_(default_value)

{

  access_ = new mutex_t();

  // create the costmap

  initMaps(size_x_, size_y_);

  resetMaps();

}
Copy 构造函数:Costmap2D::Costmap2D(const Costmap2D& map)
Costmap2D::Costmap2D(const Costmap2D& map) :

    costmap_(NULL)

{

  access_ = new mutex_t();

  *this = map;

}
Assignment 构造函数:Costmap2D& Costmap2D::operator=(const Costmap2D& map)
Costmap2D& Costmap2D::operator=(const Costmap2D& map)

{

  // check for self assignement

  if (this == &map)

    return *this;

  // clean up old data

  deleteMaps();

  size_x_ = map.size_x_;

  size_y_ = map.size_y_;

  resolution_ = map.resolution_;

  origin_x_ = map.origin_x_;

  origin_y_ = map.origin_y_;

  // initialize our various maps

  initMaps(size_x_, size_y_);

  // copy the cost map

  memcpy(costmap_, map.costmap_, size_x_ * size_y_ * sizeof(unsigned char));

  return *this;

}
每次对costmap_ 操作都需要上锁access_=new mutex_t(), ‘mutex_t’ 实际定义是typedef boost::recursive_mutex mutex_t递归锁。
函数Costmap2D::setConvexPolygonCost:
首先将机器人坐标系下的机器人轮廓点,全部转到地图坐标系下
 // we assume the polygon is given in the global_frame... we need to transform it to map coordinates

  std::vector<MapLocation> map_polygon;

  for (unsigned int i = 0; i < polygon.size(); ++i)

  {

    MapLocation loc;

    if (!worldToMap(polygon[i].x, polygon[i].y, loc.x, loc.y))

    {

      // ("Polygon lies outside map bounds, so we can't fill it");

      return false;

    }

    map_polygon.push_back(loc);

  }
然后通过下面的调用,得到在polygon内部的全部cell,存储在polygon_cells
std::vector<MapLocation> polygon_cells;

// get the cells that fill the polygon

// this function is to get all the cells inside the polygon

convexFillCells(map_polygon, polygon_cells);
然后获取这些内部cell的index,再对地图costmap_ 遍历进行赋值操作:
// set the cost of those cells

  for (unsigned int i = 0; i < polygon_cells.size(); ++i)

  {

    unsigned int index = getIndex(polygon_cells[i].x, polygon_cells[i].y);

    costmap_[index] = cost_value;

  }
那么问题 来了,convexFillCells(map_polygon, polygon_cells); 是怎么获取到的全部的内部点的呢?
// first get the cells that make up the outline of the polygon

  // this function will get the edges along the polygon

  polygonOutlineCells(polygon, polygon_cells);
首先获得轮廓点之间连线的cell的列表。然后对这些边缘点做一次排序:
MapLocation swap;

  unsigned int i = 0;

  while (i < polygon_cells.size() - 1)

  {

    if (polygon_cells[i].x > polygon_cells[i + 1].x)

    {

      swap = polygon_cells[i];

      polygon_cells[i] = polygon_cells[i + 1];

      polygon_cells[i + 1] = swap;

      if (i > 0)

        --i;

    }

    else

      ++i;

  }
操作完成后得到的polygon_cells 的cell都按照x坐标从小到大排序好了。然后开始沿着x轴,对每个相同的x,检查y值,获取y值最大的和y值最小的polygoncell:
while (i < polygon_cells.size() && polygon_cells[i].x == x)

    {

      if (polygon_cells[i].y < min_pt.y)

        min_pt = polygon_cells[i];

      else if (polygon_cells[i].y > max_pt.y)

        max_pt = polygon_cells[i];

      ++i;

    }
最后将y最大的和y最小的整个列的所有cell全部都塞进polygon_cells去:
 MapLocation pt;

 // loop though cells in the column

 for (unsigned int y = min_pt.y; y < max_pt.y; ++y)

 {

   pt.x = x;

   pt.y = y;

   polygon_cells.push_back(pt);

 }
回到刚才,根据轮廓点,就能获得轮廓点连线的全部的边缘点函数polygonOutlineCells:
void Costmap2D::polygonOutlineCells(const std::vector<MapLocation>& polygon, std::vector<MapLocation>& polygon_cells)

{

  PolygonOutlineCells cell_gatherer(*this, costmap_, polygon_cells);

  for (unsigned int i = 0; i < polygon.size() - 1; ++i)

  {

    raytraceLine(cell_gatherer, polygon[i].x, polygon[i].y, polygon[i + 1].x, polygon[i + 1].y);

  }

  if (!polygon.empty())

  {

    unsigned int last_index = polygon.size() - 1;

    // we also need to close the polygon by going from the last point to the first

    raytraceLine(cell_gatherer, polygon[last_index].x, polygon[last_index].y, polygon[0].x, polygon[0].y);

  }

}
主要的被调用的函数如下,它调用了bresenham2D 函数,这个算法实现了 对于离散的平面点,指定两个点,找到两点之间的其他点,使得这些中间组成一个尽可能趋近直线的点集。
template<class ActionType>

inline void raytraceLine(ActionType at, unsigned int x0, unsigned int y0, unsigned int x1, unsigned int y1,unsigned int max_length = UINT_MAX)
函数bool Costmap2D::saveMap(std::string file_name) 执行将costmap2D类中的costmap_这个指针指向的数据全部存储成文件。由于数据本身是一维的,所以需要在文件开头写入x,y的各自size值,另外加上一个分隔符0xff与地图数据分开。
Costmap2D 类分析就是这么多,相比之前的简单得多,毕竟主要是作为父类,供obstacle ,inflation,static, voxel继承用的。
ROS naviagtion analysis: costmap_2d--Costmap2D的更多相关文章
- ROS naviagtion analysis: costmap_2d--ObstacleLayer
博客转载自:https://blog.csdn.net/u013158492/article/details/50493676 构造函数 ObstacleLayer() { costmap_ = NU ...
- ROS naviagtion analysis: costmap_2d--StaticLayer
博客转载自:https://blog.csdn.net/u013158492/article/details/50493246 从UML中能够看到,StaticLayer主要是在实现Layer层要求实 ...
- ROS naviagtion analysis: costmap_2d--Costmap2DROS
博客转载自:https://blog.csdn.net/u013158492/article/details/50485418 在上一篇文章中moveBase就有关于costmap_2d的使用: pl ...
- ROS naviagtion analysis: move_base
博客转载自:https://blog.csdn.net/u013158492/article/details/50483123 这是navigation的第一篇文章,主要通过分析ROS代码级实现,了解 ...
- ROS naviagtion analysis: costmap_2d--CostmapLayer
博客转自:https://blog.csdn.net/u013158492/article/details/50493220 这个类是为ObstacleLayer StaticLayer voxelL ...
- ROS naviagtion analysis: costmap_2d--LayeredCostmap
博客转自:https://blog.csdn.net/u013158492/article/details/50490490 在数据成员中,有两个重要的变量:Costmap2D costmap_和 s ...
- ROS naviagtion analysis: costmap_2d--Layer
博客转载自:https://blog.csdn.net/u013158492/article/details/50493113 这个类中有一个LayeredCostmap* layered_costm ...
- costmap_2d 解析
costmap_2d这个包提供了一种2D代价地图的实现方案,该方案利用输入的传感器数据,构建数据2D或者3D代价地图(取决于是否使用基于voxel的实现),并根据占用网格和用户定义的膨胀半径计算2D代 ...
- ROS 教程之 navigation :在 catkin 环境下创建costmap layer plugin
在做机器人导航的时候,肯定见到过global_costmap和local_costmap.global_costmap是为了全局路径规划服务的,如从这个房间到那个房间该怎么走.local_costma ...
随机推荐
- HDU - 6241 :Color a Tree(不错的二分)
Bob intends to color the nodes of a tree with a pen. The tree consists of NN nodes. These nodes are ...
- SSM框架(1)
Spring MVC Framework有这样一些特点: 它是基于组件技术的.全部的应用对象,无论控制器和视图,还是业务对象之类的都是java组件.并且和Spring提供的其他基础结构紧密集成. 不依 ...
- SQL面试题-行列互换-if、【case when】
http://www.cda.cn/view/21469.html tb_lemon_grade中,表中字段id,student_name,course,score分别表示成绩id,学生姓名,课程名称 ...
- fn project 扩展
目前支持的扩展方式 Listeners - listen to API events such as a route getting updated and react accordingly. ...
- fn project 生产环境使用
此为官方的参考说明 Running Fn in Production The QuickStart guide is intended to quickly get started and kic ...
- 简述MVC模式
<!DOCTYPE html> <html lang="zh-CN"> <head> <meta charset="UTF-8& ...
- database - 数据库设计/使用容易忽略的细节
一.设计 1,数据类型尽量使用数字型,数字型的比较比字符型的快很多 2,数据类型尽量小,预测可以满足未来需求的前提 3,尽量建表时字段不允许为null,除非必要,可以用NOT NULL+DEFAULT ...
- npm包的发布
假设该待发布包在你本地的项目为 project1 包的本地安装测试 在发布之前往往希望在本地进行安装测试.那么需要一个其他的项目来本地安装待发布项目. 假设该其他项目为project2.假设proje ...
- CSS冷门但有用的知识整合
1. 滚动条样式设置 The ::-webkit-scrollbar CSS pseudo-element(伪元素) affects the style of the scrollbar of an ...
- .NET泛型与非泛型的问题
泛型集合通常情况下,建议您使用泛型集合,因为这样可以获得类型安全的直接优点而不需要从基集合类型派生并实现类型特定的成员.下面的泛型类型对应于现有的集合类型:1.List 是对应于 ArrayList ...
