An Intuitive Explanation of Fourier Theory
Reprinted from: http://cns-alumni.bu.edu/~slehar/fourier/fourier.html
Fourier theory is pretty complicated mathematically. But there are some beautifully simple holistic concepts behind Fourier theory which are relatively easy to explain intuitively. There are other sites on the web that can give you the mathematical formulation of the Fourier transform. I will present only the basic intuitive insights here, as applied to spatial imagery.
Basic Principles: How space is represented by frequency
Higher Harmonics: "Ringing" effects
An Analog Analogy: The Optical Fourier Transform
Fourier Filtering: Image Processing using Fourier Transforms
Basic Principles
Fourier theory states that any signal, in our case visual images, can be expressed as a sum of a series of sinusoids. In the case of imagery, these are sinusoidal variations in brightness across the image. For example the sinusoidal pattern shown below can be captured in a single Fouier term that encodes 1: the spatial frequency, 2: the magnitude (positive or negative), and 3: the phase.

These three values capture all of the information in the sinusoidal image. The spatial frequency is the frequency across space (the x-axis in this case) with which the brightness modulates. For example the image below shows another sinusoid with a higher spatial frequency.

The magnitude of the sinusoid corresponds to its contrast, or the difference between the darkest and brightest peaks of the image. A negative magnitude represents a contrast-reversal, i.e. the brights become dark, and vice-versa. The phase represents how the wave isshifted relative to the origin, in this case it represents how much the sinusoid is shifted left or right.
A Fourier transform encodes not just a single sinusoid, but a whole series of sinusoids through a range of spatial frequencies from zero (i.e. no modulation, i.e. the average brightness of the whole image) all the way up to the "nyquist frequency", i.e. the highest spatial frequency that can be encoded in the digital image, which is related to the resolution, or size of the pixels. The Fourier transform encodes all of the spatial frequencies present in an image simultaneously as follows. A signal containing only a single spatial frequency of frequency f is plotted as a single peak at point f along the spatial frequency axis, the height of that peak corresponding to the amplitude, or contrast of that sinusoidal signal.
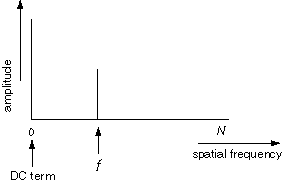
There is also a "DC term" corresponding to zero frequency, that represents the average brightness across the whole image. A zero DC term would mean an image with average brightness of zero, which would mean the sinusoid alternated between positive and negative values in the brightness image. But since there is no such thing as a negative brightness, all real images have a positive DC term, as shown here too.
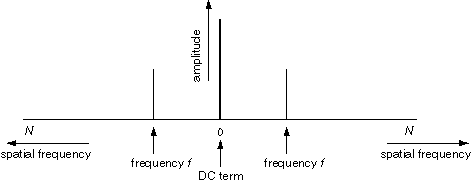
Actually, for mathematical reasons beyond the scope of this tutorial, the Fourier transform also plots a mirror-image of the spatial frequency plot reflected across the origin, with spatial frequency increasing in both directions from the origin. For mathematical reasons beyond the scope of this explanation, these two plots are always mirror-image reflections of each other, with identical peaks at f and -f as shown below.
What I have shown is actually the Fourier transform of a single
scan line of the sinusoidal image, which is a one-dimensional
signal. A full two-dimensional Fourier transform performs a 1-D
transform on every scan-line or row of the image, and another 1-D
transform on every column of the image, producing a 2-D Fourier
transform of the same size as the original image.
The image below shows a sinusoidal brightness image, and its
two-dimensional Fourier transform, presented here also as a brightness
image. Every pixel of the Fourier image is a spatial frequency value,
the magnitude of that value is encoded by the brightness of the
pixel. In this case there is a bright pixel at the very center - this
is the DC term, flanked by two bright pixels either side of the
center, that encode the sinusoidal pattern. The brighter the peaks in
the Fourier image, the higher the contrast in the brightness
image. Since there is only one Fourier component in this simple image,
all other values in the Fourier image are zero, depicted as black.
| Brightness Image | Fourier transform |
|
 |
Here is another sinusoidal brightness image, this time with a lower
spatial frequency, together with it's two-dimensional Fourier
transform showing three peaks as before, except this time the peaks
representing the sinusoid are closer to the central DC term,
indicating a lower spatial frequency.
| Brightness Image | Fourier transform |
|
 |
The significant point is that the Fourier image encodes exactly
the same information as the brightness image, except expressed in
terms of amplitude as a function of spatial frequency, rather than
brightness as a function of spatial displacement. An inverse Fourier
transform of the Fourier image produces an exact pixel-for-pixel
replica of the original brightness image.
The orientation of the sinusoid correlates with the orientation of the
peaks in the Fourier image relative to the central DC point. In this
case a tilted sinusoidal pattern creates a tilted pair of peaks in the
Fourier image.
| Brightness Image | Fourier transform |
 |
 |
Different Fourier coefficients combine additively to produce
combination patterns. For example the sinusoidal image shown below is
computed as the sum of the tilted sinusoid shown above, and the
vertical sinusoid of lower spatial frequency shown above that.
| Brightness Image | Fourier transform |
 |
 |
The brightness and the Fourier images are completely interchangable,
because they contain exactly the same information. The combined
brightness image shown above could have been produced by a
pixel-for-pixel adding of the two brightness images, or by a
pixel-for-pixel addition of the corresponding Fourier transforms,
followed by an inverse transform to go back to the brightness
domain. Either way the result would be exactly identical.
Higher Harmonics and "Ringing" effects
The basis set for the Fourier transform is the smooth sinusoidal
function, which is optimized for expressing smooth rounded shapes. But
the Fourier transform can actually represent any shape, even harsh
rectilinear shapes with sharp boundaries, which are the most difficult
to express in the Fourier code, because they need so many higher order
terms, or higher harmonics. How these "square wave" functions are
expressed as smooth sinusoids will be demonstrated by example.
The figure below shows four sinusoidal brightness images of
spatial frequency 1, 3, 5, and 7. The first one, of frequency 1, is
the fundamental, and the others are higher harmonics on that
fundamental, because they are integer multiples of the fundamental
frequency. These are in fact the "odd harmonics" on the fundamental,
and each one exhibits a bright vertical band through the center of the
image. The Fourier transform for each of these patterns is shown
below.
| 1 | 3 | 5 | 7 |
|
|
 |
 |
|
|
 |
 |
The next table shows the result of progressively adding higher
harmonics to the fundamental. Note how the central vertical band getssharper and stronger with each additional higher harmonic, while the
background drops down towards a uniform dark field. Note also how the
higher harmonics produce peaks in the Fourier images that spread
outward from the fundamental, defining a periodic pattern in frequency
space.
| 1 | 1+3 | 1+3+5 | 1+3+5+7 |
|
 |
 |
 |
|
 |
 |
 |
The images below show what would happen if this process were continued
all the way out to the Nyquist frequency - it would produce a thin
vertical stripe in the brightness image, with sharp boundaries, i.e. a
"square wave" in brightness along the x dimension. The Fourier
transform of this image exhibits an "infinite" series of harmonics or
higher order terms, although these do not actually go out to infinity
due to the finite resolution of the original image. This is how the
Fourier transform encodes sharp square-wave type features as the sum
of a series of smooth sinusoids.
| Brightness Image | Fourier transform |
 |
 |
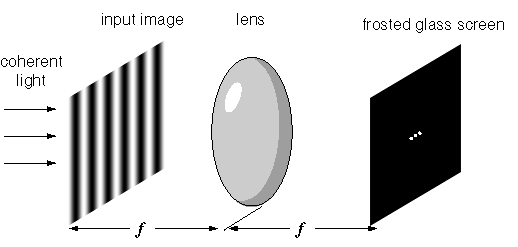
The Optical Fourier Transform
A great intuitive advance can be made in understanding the
principles of the Fourier transform once you learn that a simple lens
can perform a Fourier transform in real-time as follows. Place an
image, for example a slide transparency, at the focal length of the
lens, and illuminate that slide with coherent light, like a colimated
laser beam. At the other focus of the lens place a frosted glassscreen. Thats it! The lens will automatically perform a Fourier
transform on the input image, and project it onto the frosted glassscreen. For example if the input image is a sinusoidal grating, asshown below, the resultant Fourier image will have a bright spot at the
center, the DC term, with two flanking peaks on either side, whose
distance from the center will vary with the spatial frequency of the
sinusoid.
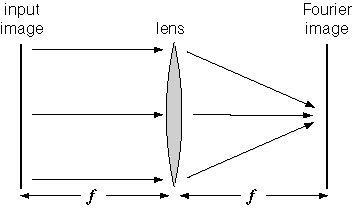
We can now see the holistic principle behind the Fourier
transform. Every point on the input image radiates an expanding cone
of rays towards the lens, but since the image is at the focus of the
lens, those rays will be refracted into a parallel beam that
illuminates the entire image at the ground-glass screen. In other
words, every point of the input image is spread uniformly over the
Fourier image, where constructive and destructive interference will
automatically produce the proper Fourier representation.

Conversely, parallel rays from the entire input image are focused onto
the single central point of the Fourier image, where it defines the
central DC term by the average brightness of the input image.
Note that the optical Fourier transformer automatically operates in
the reverse direction also, where it performs an inverse Fourier transform,
converting the Fourier representation back into a spatial brightness
image. Mathematically the forward and inverse transforms are identical
except for a minus sign that reverses the direction of the
computation.
Fourier Filtering
I will now show how the Fourier transform can be used to perform
filtering operations to adjust the spatial frequency content of an
image. We begin with an input image shown below, and perform a Fourier
transform on it, then we do an inverse transform to reconstruct the
original image. This reconstructed image is identical,
pixel-for-pixel, with the original brightness image.
| Brightness Image | Fourier Transform | Inverse Transformed |
 |
 |
|
I will now demonstrate how we can manipulate the transformed image to
adjust its spatial frequency content, and then perform an inverse
transform to produce the Fourier filtered image. We begin with a
low-pass filter, i.e. a filter that allows the low spatial-frequency
components to pass through, but cuts off the high spatial
frequencies. Since the low frequency components are found near the
central DC point, all we have to do is define a radius around the
DC point, and zero-out every point in the Fourier image that is beyond
that radius. In other words the low-pass filtered transform is
identical to the central portion of the Fourier transform, with the
rest of the Fourier image set to zero. An inverse Fourier transform
applied to this low-pass filtered image produces the inverse
transformed image shown below.
| Low-Pass Filtered | Inverse Transformed |
 |
 |
We see that the low-pass filtered image is blurred, preserving the low
frequency broad smooth regions of dark and bright, but losing the
sharp contours and crisp edges. Mathematically, low-pass filtering is
equivalent to an optical blurring function.
Next we try the converse, high-pass filtering, where we use the same
spatial frequency threshold to define a radius in the Fourier
image. All spatial frequency components that fall within that radius
are eliminated, preserving only the higher spatial frequency
components. After performing the inverse transform on this image we
see the effect of high-pass filtering, which is to preserve all of the
sharp crisp edges from the original, but it loses the larger regions
of dark and bright.
| High-Pass Filtered | Inverse Transformed |
 |
 |
If the low-pass filtered inverse-transformed image is added
pixel-for-pixel to the high-pass inverse-transformed image, this would
exactly restore the original unfiltered image. These images are
complementary therefore, each one encodes the information which is
missing from the other.
Next we will demonstrate a band-pass filtering that preserves only
those spatial frequencies that fall within a band, greater than a low
cut-off, but less than a higher cut-off.
| Band-Pass Filtered | Inverse Transformed |
 |
 |
The next simulation is the same as above, except with a narrower band
of spatial frequencies.
| Band-Pass Filtered | Inverse Transformed |
 |
 |
The next simulation shows band-pass filtering about a higher
spatial-frequency band,
| Band-Pass Filtered | Inverse Transformed |
 |
 |
and finally the same as above except again using a narrower
spatial-frequency band.
| Band-Pass Filtered | Inverse Transformed |
 |
 |
These computer simulations demonstrate that the Fourier representation
encodes image information in a holistic distributed manner that allows
manipulation of the global information content of the image by spatial
manipulations of the transformed image.
An Intuitive Explanation of Fourier Theory的更多相关文章
- False Discovery Rate, a intuitive explanation
[转载请注明出处]http://www.cnblogs.com/mashiqi Today let's talk about a intuitive explanation of Benjamini- ...
- [转]An Intuitive Explanation of Convolutional Neural Networks
An Intuitive Explanation of Convolutional Neural Networks https://ujjwalkarn.me/2016/08/11/intuitive ...
- What is an intuitive explanation of the relation between PCA and SVD?
What is an intuitive explanation of the relation between PCA and SVD? 36 FOLLOWERS Last asked: 30 Se ...
- An Intuitive Explanation of Convolutional Neural Networks
https://ujjwalkarn.me/2016/08/11/intuitive-explanation-convnets/ An Intuitive Explanation of Convolu ...
- 一目了然卷积神经网络 - An Intuitive Explanation of Convolutional Neural Networks
An Intuitive Explanation of Convolutional Neural Networks 原文地址:https://ujjwalkarn.me/2016/08/11/intu ...
- [OpenCV-Python] OpenCV 中的图像处理 部分 IV (六)
部分 IVOpenCV 中的图像处理 OpenCV-Python 中文教程(搬运)目录 23 图像变换 23.1 傅里叶变换目标本小节我们将要学习: • 使用 OpenCV 对图像进行傅里叶变换 • ...
- Why one-norm is an agreeable alternative for zero-norm?
[转载请注明出处]http://www.cnblogs.com/mashiqi Today I try to give a brief inspection on why we always choo ...
- (zhuan) Building Convolutional Neural Networks with Tensorflow
Ahmet Taspinar Home About Contact Building Convolutional Neural Networks with Tensorflow Posted on a ...
- Discover Feature Engineering, How to Engineer Features and How to Get Good at It
Feature engineering is an informal topic, but one that is absolutely known and agreed to be key to s ...
随机推荐
- BZOJ4237 稻草人 【CDQ分治】
Description JOI村有一片荒地,上面竖着N个稻草人,村民们每年多次在稻草人们的周围举行祭典. 有一次,JOI村的村长听到了稻草人们的启示,计划在荒地中开垦一片田地.和启示中的一样,田地需要 ...
- java面试题02
1.JAVA内部使用的编码格式是(utf-8) 2. public class Threads2 implements Runnable { @Overridepublic void run() {S ...
- mysql主从简单配置
第一步.配置主从,来自于博文 https://www.cnblogs.com/gl-developer/p/6170423.html 下面配置的步骤就直接复制了. 一.准备工作: 1.主从数据库版本最 ...
- 用firefox获取html页面元素的Xpath
Xpath在分析网页尤其是采集固定格式数据时,非常有用,且比正则表达式和首尾截取式更加简便.准确! 工具/原料 FireFox FireBug XpathChecker UserAgentSwit ...
- hbase单机及集群安装配置,整合到hadoop
问题导读:1.配置的是谁的目录conf/hbase-site.xml,如何配置hbase.rootdir2.如何启动hbase?3.如何进入hbase shell?4.ssh如何达到互通?5.不安装N ...
- Windows下Redis的使用
Redis介绍 Redis是一个开源的使用ANSI C语言编写.支持网络.可基于内存亦可持久化的日志型.Key-Value数据库,和Memcached类似,它支持存储的value类型相对更多,包括st ...
- autoconf 添加三方库(libcurl)简单试用
1. 参考项目 https://github.com/rongfengliang/autoconf-project 2. 项目说明 a. 项目结构 ├── Jenkinsfile # jenkins ...
- JS脚本不能运行
版权声明:本文为博主原创文章.未经博主同意不得转载. https://blog.csdn.net/moqiang02/article/details/25898295 这段时间在做前端的动态页面,出了 ...
- js各种效果
1.JavaScript 仿LightBox内容显示效果 2.固定高度的div,竖直方向出现滚动条,水平方向固定 http://www.jb51.net/css/109928.html <!do ...
- 安装 LAMP
卸载 并安装 MYSQL rpm -qa | grep mysql rpm -e mysql-libs--.el6.x86_64 -.el6.x86_64 cd /usr/local/src/ wge ...