Android进阶之绘制-自定义View完全掌握(五)
在自定义类继承View实现自定义控件的过程中,我们还应该对一些自定义属性有所了解。
我们通过一个案例来学习一下。
新建一个android项目,然后我们创建一个类MyAttributeView继承View。
贴出MyAttributeView的代码。
package com.itcast.test0501;

import android.content.Context;

import android.support.annotation.Nullable;

import android.util.AttributeSet;

import android.view.View;

/**

 *  自定义属性

 */

public class MyAttributeView extends View {

    public MyAttributeView(Context context, @Nullable AttributeSet attrs) {

        super(context, attrs);

    }

}
然后我们在activity_main.xml文件来使用。
<?xml version="1.0" encoding="utf-8"?>

<RelativeLayout xmlns:android="http://schemas.android.com/apk/res/android"

    xmlns:app="http://schemas.android.com/apk/res-auto"

    xmlns:tools="http://schemas.android.com/tools"

    android:layout_width="match_parent"

    android:layout_height="match_parent"

    tools:context="com.itcast.test0501.MainActivity">

    <com.itcast.test0501.MyAttributeView

        app:my_age="100"

        app:my_name="Android0501"

        app:my_bg="@drawable/a"

        android:layout_width="match_parent"

        android:layout_height="match_parent"/>

</RelativeLayout>
发现没有,my_age,my_name,my_bg都是我们自定义的属性,前面的命名空间我们可以随意命名,不一定非得叫app。那现在运行项目的话显然是不行的,因为我们属性还没去定义呢。
那么接下来我们就去定义我们的属性。
在values文件夹下新建attrs.xml文件。
<?xml version="1.0" encoding="utf-8"?>

<resources>

    <!--定义名字为MyAttributeView的属性集合-->

    <declare-styleable name="MyAttributeView">

        <!--定义名字为my_name,并且类型为string的属性-->

        <attr name="my_name" format="string" />

        <!--定义名字为my_age,并且类型为integer的属性-->

        <attr name="my_age" format="integer" />

        <!--定义名字为my_bg,并且类型为reference|color的属性-->

        <attr name="my_bg" format="reference|color" />

    </declare-styleable>

</resources>
这样我们的属性就定义好了。
我们可以思考一下,一个类在布局文件中使用,它是如何被呈现到屏幕上的,我们知道,在java中,一个类要想被使用,该类就必须被实例化,那么在android中,它是如何对这个自定义的View类进行实例化显示的呢?它使用的是反射技术。它会把所有属性封装到AttributeSet类中,那么你会发现,在自定义类中重写的构造方法的参数里就存在这么一个属性的集合类。所以我们就可以知道为什么自定义的控件需要写类的全路径,因为反射是需要一个类的完整路径的。在编译的时候,会对布局文件进行pull解析,遇到类,就利用类路径通过反射技术封装属性。
那接下来就是获取属性了,获取属性我们有三种方式。
1、用命名空间去获取
2、遍历属性集合
3、使用系统工具,获取属性
修改MyAttributeView类的代码。
package com.itcast.test0501;

import android.content.Context;

import android.content.res.TypedArray;

import android.graphics.Bitmap;

import android.graphics.BitmapFactory;

import android.graphics.drawable.BitmapDrawable;

import android.graphics.drawable.Drawable;

import android.support.annotation.Nullable;

import android.util.AttributeSet;

import android.util.Log;

import android.view.View;

/**

 *  自定义属性

 */

public class MyAttributeView extends View {

    private int myAge;

    private String myName;

    private Bitmap myBg;

    public MyAttributeView(Context context, @Nullable AttributeSet attrs) {

        super(context, attrs);

        //获取属性三种方式

        //1、用命名空间去获取

        String age = attrs.getAttributeValue("http://schemas.android.com/apk/res-auto", "my_age");

        String name = attrs.getAttributeValue("http://schemas.android.com/apk/res-auto", "my_name");

        String bg = attrs.getAttributeValue("http://schemas.android.com/apk/res-auto", "my_bg");

        Log.d("TAG1","age==" + age + ",name==" + name + ",bg==" + bg);

        //2、遍历属性集合

        for(int i = 0;i < attrs.getAttributeCount();i++){

            Log.d("TAG2",attrs.getAttributeName(i) + "==" + attrs.getAttributeValue(i));

        }

        //3、使用系统工具,获取属性

    }

}
运行项目,查看日志。

这样就把我们设置的属性值拿出来了。
但是,不知道大家发现了没有,这两种方法拿到的图片值都是地址值吧,我们要想将设置的图片属性值通过某种方法显式到屏幕上,对于地址值,我们有办法操作吗?应该是没有的,所以,我们采用第三种方式,使用系统工具来获取属性值。
我们修改MyAttributeView的代码。
package com.itcast.test0501;

import android.content.Context;

import android.content.res.TypedArray;

import android.graphics.Bitmap;

import android.graphics.BitmapFactory;

import android.graphics.Canvas;

import android.graphics.Paint;

import android.graphics.drawable.BitmapDrawable;

import android.graphics.drawable.Drawable;

import android.support.annotation.Nullable;

import android.util.AttributeSet;

import android.util.Log;

import android.view.View;

/**

 *  自定义属性

 */

public class MyAttributeView extends View {

    private int myAge;

    private String myName;

    private Bitmap myBg;

    public MyAttributeView(Context context, @Nullable AttributeSet attrs) {

        super(context, attrs);

        //获取属性三种方式

        //1、用命名空间去获取

        String age = attrs.getAttributeValue("http://schemas.android.com/apk/res-auto", "my_age");

        String name = attrs.getAttributeValue("http://schemas.android.com/apk/res-auto", "my_name");

        String bg = attrs.getAttributeValue("http://schemas.android.com/apk/res-auto", "my_bg");

        Log.d("TAG1","age==" + age + ",name==" + name + ",bg==" + bg);

        //2、遍历属性集合

        for(int i = 0;i < attrs.getAttributeCount();i++){

            Log.d("TAG2",attrs.getAttributeName(i) + "==" + attrs.getAttributeValue(i));

        }

        //3、使用系统工具,获取属性

        TypedArray typedArray = context.obtainStyledAttributes(attrs,R.styleable.MyAttributeView);

        for(int i = 0;i < typedArray.getIndexCount();i++){

            int index = typedArray.getIndex(i);

            switch (index){

                case R.styleable.MyAttributeView_my_age:

                    myAge = typedArray.getInt(index,0);

                    break;

                case R.styleable.MyAttributeView_my_name:

                    myName = typedArray.getString(index);

                    break;

                case R.styleable.MyAttributeView_my_bg:

                    Drawable drawable = typedArray.getDrawable(index);

                    BitmapDrawable drawable1 = (BitmapDrawable) drawable;

                    myBg = drawable1.getBitmap();

                    break;

            }

        }

    }

    @Override

    protected void onDraw(Canvas canvas) {

        super.onDraw(canvas);

        Paint paint = new Paint();

        canvas.drawText(myName + "---" + myAge,50,50,paint);

        canvas.drawBitmap(myBg,60,60,paint);

    }

}
通过系统工具,我们可以把图片的属性值转换为Bitmap,然后在onDraw()方法中将位图绘制出来。
我们运行项目,预览效果。
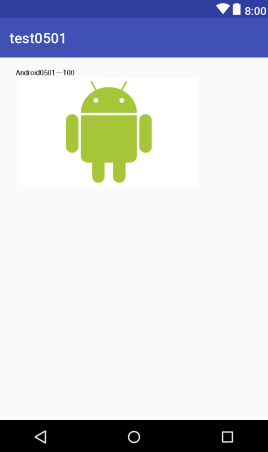
我们设置的属性信息都被成功绘制上来了。
由此,我们必须得掌握第三种获取属性值的方法,前两种有能力去掌握的也可以去理解一下。
源码我已上传至GitHub,感兴趣的同学可以下载阅读一下。
点击下载源码
Android进阶之绘制-自定义View完全掌握(五)的更多相关文章
- Android进阶之绘制-自定义View完全掌握(四)
前面的案例中我们都是使用系统的一些控件通过组合的方式来生成我们自定义的控件,自定义控件的实现还可以通过自定义类继承View来完成.从该篇博客开始,我们通过自定义类继承View来实现一些我们自定义的控件 ...
- Android进阶之绘制-自定义View完全掌握(二)
这是自定义View系列的第二篇博客,我们继续来学习关于自定义View的知识. 今天我们来实现一下广告条案例. 我们要实现的是这样的一个效果. 要想实现这样的效果,我们可以借助ViewPager控件,然 ...
- Android进阶之绘制-自定义View完全掌握(一)
Android的UI设计可以说是决定一个app质量的关键因素,因为人们在使用app的时候,最先映入眼帘的就是app的界面了,一个美观.充实的界面能够给用户带来非常好的体验,会在用户心中留下好的印象. ...
- Android进阶之绘制-自定义View完全掌握(三)
自定义View系列的第三篇博客,我们来学习如何实现自定义下拉框. 今天的程序,我们来实现这样的一个效果. 布局非常简单,我们直接开始编码. 修改activity_main.xml文件的代码. < ...
- Android显示框架:自定义View实践之绘制篇
文章目录 一 View 二 Paint 2.1 颜色处理 2.2 文字处理 2.3 特殊处理 三 Canvas 3.1 界面绘制 3.2 范围裁切 3.3 集合变换 四 Path 4.1 添加图形 4 ...
- 【Android - 进阶】之自定义视图浅析
1 概述 Android自定义View / ViewGroup的步骤大致如下: 1) 自定义属性: 2) 选择和设置构造方法: 3) 重写onMeasure()方法: 4) 重写onDra ...
- 【Android 应用开发】自定义View 和 ViewGroup
一. 自定义View介绍 自定义View时, 继承View基类, 并实现其中的一些方法. (1) ~ (2) 方法与构造相关 (3) ~ (5) 方法与组件大小位置相关 (6) ~ (9) 方法与触摸 ...
- Android ——利用OnDraw实现自定义View(转)
自定义View的实现方式大概可以分为三种,自绘控件.组合控件.以及继承控件.本文将介绍自绘控件的用法.自绘控件的意思是,这个控件上的内容是用onDraw函数绘制出来的.关于onDraw函数的介绍可参看 ...
- Android 用属性动画自定义view的渐变背景
自定义view渐变背景,同时监听手势自动生成小圆球. 宿主Activity如下: package com.edaixi.tempbak; import java.util.ArrayList; imp ...
随机推荐
- C语言入门8-数组-基本算法
一. 什么是数组 数组就是具有相同数据类型的有序集合. 分为一维数组.二维数组及多维数组. 一维数组就是用一个下标定义的数组 二维数组就是用二个下标定义的数组 我们把具有三个下标及三 ...
- python课堂整理9---函数1
函数 一. 函数就是为了完成某一个特定的功能 形式参数不占运行空间,只有传入实参后才占,用完立刻释放空间. 函数一遇到 return 就结束掉了 函数名() :运行函数,有返回值的话用变量承接 def ...
- Appium+python自动化(二十四)- 白素贞千年等一回许仙 - 元素等待(超详解)
简介 许仙小时候最喜欢吃又甜又软的汤圆了,一次一颗汤圆落入西湖,被一条小白蛇衔走了.十几年后,一位身着白衣.有青衣丫鬟相伴的美丽女子与许仙相识了,她叫白娘子.白娘子聪明又善良,两个人很快走到了一起.靠 ...
- springboot整合mybatis时无法读取xml文件解决方法(必读)
转 http://baijiahao.baidu.com/s?id=1588136004120071836&wfr=spider&for=pc 在springboot整合myba ...
- jsp对数据库的使用
JDBC由Sun公司制定,全称JavaDataBase Connectivity,是一种可以执行SQL语句并可返回结果的javaAPI,支持多种关系型数据库,封装在Java.sql.* 它的具体位置在 ...
- jquery插件——仿新浪微博限制输入字数的textarea
内容链接地址:http://www.cnblogs.com/jone-chen/p/5213851.html: <!DOCTYPE html> <html> <head& ...
- isMemberOfClass、isKindOfClass原理分析
isMemberOfClass - 调用者必须是传入的类的实例对象才返回YES- 判断调用者是否是传入对象的实例,别弄反了,如 [s1 isMemberOfClass:p1] ,意思是s1是否是p1的 ...
- java遍历所有目录和文件
package xian; import java.io.File; import java.util.ArrayList; public class GetFile { private static ...
- Maven项目的打包发布到Nexus私服和服务器
1.编写pom文件如下: <build> <plugins> <plugin> <groupId>org.apache.maven.plugins< ...
- 基于http(s)协议的模板化爬虫设计
声明:本文为原创,转载请注明出处 本文总共三章,前面两章废话吐槽比较多,想看结果的话,直接看第三章(后续会更新,最近忙着毕设呢,毕设也是我自己做的,关于射频卡的,有时间我也放上来,哈哈). 一,系统总 ...