spring源码深度解析— IOC 之 容器的基本实现
概述
上一篇我们搭建完Spring源码阅读环境,spring源码深度解析—Spring的整体架构和环境搭建 这篇我们开始真正的阅读Spring的源码,分析spring的源码之前我们先来简单回顾下spring核心功能的简单使用
容器的基本用法
bean是spring最核心的东西,spring就像是一个大水桶,而bean就是水桶中的水,水桶脱离了水也就没有什么用处了,我们简单看下bean的定义,代码如下:
package com.chenhao.spring;

/**

 * @author: ChenHao

 * @Description:

 * @Date: Created in 10:35 2019/6/19

 * @Modified by:

 */

public class MyTestBean {

    private String name = "ChenHao";

public String getName() {

        return name;

    }

    public void setName(String name) {

        this.name = name;

    }

}
源码很简单,bean没有特别之处,spring的的目的就是让我们的bean成为一个纯粹的的POJO,这就是spring追求的,接下来就是在配置文件中定义这个bean,配置文件如下:
<?xml version="1.0" encoding="UTF-8"?>

<beans xmlns="http://www.springframework.org/schema/beans"

       xmlns:xsi="http://www.w3.org/2001/XMLSchema-instance"

       xsi:schemaLocation="http://www.springframework.org/schema/beans http://www.springframework.org/schema/beans/spring-beans.xsd">

    <bean id="myTestBean" class="com.chenhao.spring.MyTestBean"/>

</beans>
在上面的配置中我们可以看到bean的声明方式,在spring中的bean定义有N种属性,但是我们只要像上面这样简单的声明就可以使用了。
具体测试代码如下:
import com.chenhao.spring.MyTestBean;

import org.junit.Test;

import org.springframework.beans.factory.BeanFactory;

import org.springframework.beans.factory.xml.XmlBeanFactory;

import org.springframework.core.io.ClassPathResource;

/**

 * @author: ChenHao

 * @Description:

 * @Date: Created in 10:36 2019/6/19

 * @Modified by:

 */

public class AppTest {

    @Test

    public void MyTestBeanTest() {

        BeanFactory bf = new XmlBeanFactory( new ClassPathResource("spring-config.xml"));

        MyTestBean myTestBean = (MyTestBean) bf.getBean("myTestBean");

        System.out.println(myTestBean.getName());

    }

}
运行上述测试代码就可以看到输出结果如下图:

其实直接使用BeanFactory作为容器对于Spring的使用并不多见,因为企业级应用项目中大多会使用的是ApplicationContext(后面我们会讲两者的区别,这里只是测试)
功能分析
接下来我们分析2中代码完成的功能;
- 读取配置文件spring-config.xml。
- 根据spring-config.xml中的配置找到对应的类的配置,并实例化。
- 调用实例化后的实例
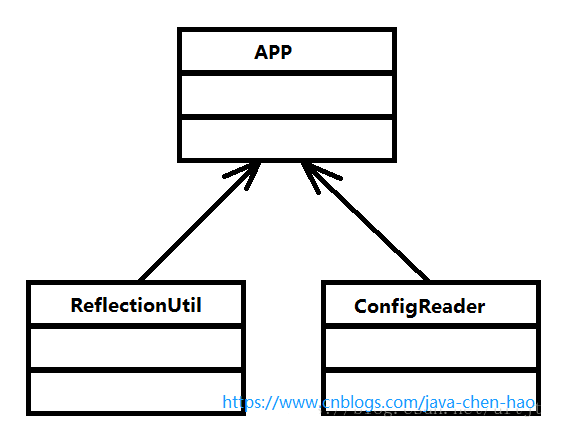
下图是一个最简单spring功能架构,如果想完成我们预想的功能,至少需要3个类:

ConfigReader :用于读取及验证自己直文件 我们妥用配直文件里面的东西,当然首先 要做的就是读取,然后放直在内存中.
ReflectionUtil :用于根据配置文件中的自己直进行反射实例化,比如在上例中 spring-config.xml 出现的<bean id="myTestBean" class="com.chenhao.spring.MyTestBean"/>,我们就可以根据 com.chenhao.spring.MyTestBean 进行实例化。
App :用于完成整个逻辑的串联。
工程搭建
spring的源码中用于实现上面功能的是spring-bean这个工程,所以我们接下来看这个工程,当然spring-core是必须的。
beans包的层级结构
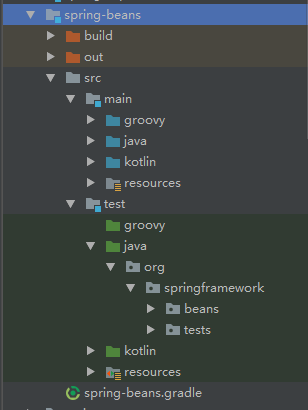
阅读源码最好的方式是跟着示例操作一遍,我们先看看beans工程的源码结构,如下图所示:

- src/main/java 用于展现Spring的主要逻辑
- src/main/resources 用于存放系统的配置文件
- src/test/java 用于对主要逻辑进行单元测试
- src/test/resources 用于存放测试用的配置文件
核心类介绍
接下来我们先了解下spring-bean最核心的两个类:DefaultListableBeanFactory和XmlBeanDefinitionReader
DefaultListableBeanFactory
XmlBeanFactory继承自DefaultListableBeanFactory,而DefaultListableBeanFactory是整个bean加载的核心部分,是Spring注册及加载bean的默认实现,而对于XmlBeanFactory与DefaultListableBeanFactory不同的地方其实是在XmlBeanFactory中使用了自定义的XML读取器XmlBeanDefinitionReader,实现了个性化的BeanDefinitionReader读取,DefaultListableBeanFactory继承了AbstractAutowireCapableBeanFactory并实现了ConfigurableListableBeanFactory以及BeanDefinitionRegistry接口。以下是ConfigurableListableBeanFactory的层次结构图以下相关类图

上面类图中各个类及接口的作用如下:
- AliasRegistry:定义对alias的简单增删改等操作
- SimpleAliasRegistry:主要使用map作为alias的缓存,并对接口AliasRegistry进行实现
- SingletonBeanRegistry:定义对单例的注册及获取
- BeanFactory:定义获取bean及bean的各种属性
- DefaultSingletonBeanRegistry:默认对接口SingletonBeanRegistry各函数的实现
- HierarchicalBeanFactory:继承BeanFactory,也就是在BeanFactory定义的功能的基础上增加了对parentFactory的支持
- BeanDefinitionRegistry:定义对BeanDefinition的各种增删改操作
- FactoryBeanRegistrySupport:在DefaultSingletonBeanRegistry基础上增加了对FactoryBean的特殊处理功能
- ConfigurableBeanFactory:提供配置Factory的各种方法
- ListableBeanFactory:根据各种条件获取bean的配置清单
- AbstractBeanFactory:综合FactoryBeanRegistrySupport和ConfigurationBeanFactory的功能
- AutowireCapableBeanFactory:提供创建bean、自动注入、初始化以及应用bean的后处理器
- AbstractAutowireCapableBeanFactory:综合AbstractBeanFactory并对接口AutowireCapableBeanFactory进行实现
- ConfigurableListableBeanFactory:BeanFactory配置清单,指定忽略类型及接口等
- DefaultListableBeanFactory:综合上面所有功能,主要是对Bean注册后的处理
XmlBeanFactory对DefaultListableBeanFactory类进行了扩展,主要用于从XML文档中读取BeanDefinition,对于注册及获取Bean都是使用从父类DefaultListableBeanFactory继承的方法去实现,而唯独与父类不同的个性化实现就是增加了XmlBeanDefinitionReader类型的reader属性。在XmlBeanFactory中主要使用reader属性对资源文件进行读取和注册
XmlBeanDefinitionReader
XML配置文件的读取是Spring中重要的功能,因为Spring的大部分功能都是以配置作为切入点的,可以从XmlBeanDefinitionReader中梳理一下资源文件读取、解析及注册的大致脉络,首先看看各个类的功能
ResourceLoader:定义资源加载器,主要应用于根据给定的资源文件地址返回对应的Resource
BeanDefinitionReader:主要定义资源文件读取并转换为BeanDefinition的各个功能
EnvironmentCapable:定义获取Environment方法
DocumentLoader:定义从资源文件加载到转换为Document的功能
AbstractBeanDefinitionReader:对EnvironmentCapable、BeanDefinitionReader类定义的功能进行实现
BeanDefinitionDocumentReader:定义读取Document并注册BeanDefinition功能
BeanDefinitionParserDelegate:定义解析Element的各种方法
整个XML配置文件读取的大致流程,在XmlBeanDefinitionReader中主要包含以下几步处理

(1)通过继承自AbstractBeanDefinitionReader中的方法,来使用ResourceLoader将资源文件路径转换为对应的Resource文件
(2)通过DocumentLoader对Resource文件进行转换,将Resource文件转换为Document文件
(3)通过实现接口BeanDefinitionDocumentReader的DefaultBeanDefinitionDocumentReader类对Document进行解析,并使用BeanDefinitionParserDelegate对Element进行解析
容器的基础XmlBeanFactory
通过上面的内容我们对spring的容器已经有了大致的了解,接下来我们详细探索每个步骤的详细实现,接下来要分析的功能都是基于如下代码:
BeanFactory bf = new XmlBeanFactory( new ClassPathResource("spring-config.xml"));
首先调用ClassPathResource的构造函数来构造Resource资源文件的实例对象,这样后续的资源处理就可以用Resource提供的各种服务来操作了。有了Resource后就可以对BeanFactory进行初始化操作,那配置文件是如何封装的呢?
配置文件的封装
Spring的配置文件读取是通过ClassPathResource进行封装的,Spring对其内部使用到的资源实现了自己的抽象结构:Resource接口来封装底层资源,如下源码:
public interface InputStreamSource {

    InputStream getInputStream() throws IOException;

}

public interface Resource extends InputStreamSource {

    boolean exists();

    default boolean isReadable() {

        return true;

    }

    default boolean isOpen() {

        return false;

    }

    default boolean isFile() {

        return false;

    }

    URL getURL() throws IOException;

    URI getURI() throws IOException;

    File getFile() throws IOException;

    default ReadableByteChannel readableChannel() throws IOException {

        return Channels.newChannel(getInputStream());

    }

    long contentLength() throws IOException;

    long lastModified() throws IOException;

    Resource createRelative(String relativePath) throws IOException;

    String getFilename();

    String getDescription();

}
InputStreamSource封装任何能返回InputStream的类,比如File、Classpath下的资源和Byte Array等, 它只有一个方法定义:getInputStream(),该方法返回一个新的InputStream对象 。
Resource接口抽象了所有Spring内部使用到的底层资源:File、URL、Classpath等。首先,它定义了3个判断当前资源状态的方法:存在性(exists)、可读性(isReadable)、是否处于打开状态(isOpen)。另外,Resource接口还提供了不同资源到URL、URI、File类型的转换,以及获取lastModified属性、文件名(不带路径信息的文件名,getFilename())的方法,为了便于操作,Resource还提供了基于当前资源创建一个相对资源的方法:createRelative(),还提供了getDescription()方法用于在错误处理中的打印信息。
对不同来源的资源文件都有相应的Resource实现:文件(FileSystemResource)、Classpath资源(ClassPathResource)、URL资源(UrlResource)、InputStream资源(InputStreamResource)、Byte数组(ByteArrayResource)等,相关类图如下所示:

在日常开发中我们可以直接使用spring提供的类来加载资源文件,比如在希望加载资源文件时可以使用下面的代码:
Resource resource = new ClassPathResource("spring-config.xml");

InputStream is = resource.getInputStream();
有了 Resource 接口便可以对所有资源文件进行统一处理 至于实现,其实是非常简单的,以 getlnputStream 为例,ClassPathResource 中的实现方式便是通 class 或者 classLoader 提供的底层方法进行调用,而对于 FileSystemResource 其实更简单,直接使用 FileInputStream 对文件进行实例化。
ClassPathResource.java
InputStream is;

if (this.clazz != null) {

    is = this.clazz.getResourceAsStream(this.path);

}

else if (this.classLoader != null) {

    is = this.classLoader.getResourceAsStream(this.path);

}

else {

    is = ClassLoader.getSystemResourceAsStream(this.path);

}
FileSystemResource.java
public InputStream getinputStream () throws IOException {

    return new FilelnputStream(this file) ;

}
当通过Resource相关类完成了对配置文件进行封装后,配置文件的读取工作就全权交给XmlBeanDefinitionReader来处理了。
接下来就进入到XmlBeanFactory的初始化过程了,XmlBeanFactory的初始化有若干办法,Spring提供了很多的构造函数,在这里分析的是使用Resource实例作为构造函数参数的办法,代码如下:
XmlBeanFactory.java
public XmlBeanFactory(Resource resource) throws BeansException {

    this(resource, null);

}

public XmlBeanFactory(Resource resource, BeanFactory parentBeanFactory) throws BeansException {

    super(parentBeanFactory);

    this.reader.loadBeanDefinitions(resource);

}
上面函数中的代码this.reader.loadBeanDefinitions(resource)才是资源加载的真正实现,但是在XmlBeanDefinitionReader加载数据前还有一个调用父类构造函数初始化的过程:super(parentBeanFactory),我们按照代码层级进行跟踪,首先跟踪到如下父类代码:
public DefaultListableBeanFactory(@Nullable BeanFactory parentBeanFactory) {

    super(parentBeanFactory);

}
然后继续跟踪,跟踪代码到父类AbstractAutowireCapableBeanFactory的构造函数中:
public AbstractAutowireCapableBeanFactory(@Nullable BeanFactory parentBeanFactory) {

    this();

    setParentBeanFactory(parentBeanFactory);

}

public AbstractAutowireCapableBeanFactory() {

    super();

    ignoreDependencyInterface(BeanNameAware.class);

    ignoreDependencyInterface(BeanFactoryAware.class);

    ignoreDependencyInterface(BeanClassLoaderAware.class);

}
这里有必要提及 ignoreDependencylnterface方法,ignoreDependencylnterface 的主要功能是 忽略给定接口的向动装配功能,那么,这样做的目的是什么呢?会产生什么样的效果呢?
举例来说,当 A 中有属性 B ,那么当 Spring 在获取 A的 Bean 的时候如果其属性 B 还没有 初始化,那么 Spring 会自动初始化 B,这也是 Spring 提供的一个重要特性 。但是,某些情况 下, B不会被初始化,其中的一种情况就是B 实现了 BeanNameAware 接口 。Spring 中是这样介绍的:自动装配时忽略给定的依赖接口,典型应用是边过其他方式解析 Application 上下文注册依赖,类似于 BeanFactor 通过 BeanFactoryAware 进行注入或者 ApplicationContext 通过 ApplicationContextAware 进行注入。
调用ignoreDependencyInterface方法后,被忽略的接口会存储在BeanFactory的名为ignoredDependencyInterfaces的Set集合中:
public abstract class AbstractAutowireCapableBeanFactory extends AbstractBeanFactory

        implements AutowireCapableBeanFactory {

    private final Set<Class<?>> ignoredDependencyInterfaces = new HashSet<>();

    public void ignoreDependencyInterface(Class<?> ifc) {

        this.ignoredDependencyInterfaces.add(ifc);

    }

...

}
ignoredDependencyInterfaces集合在同类中被使用仅在一处——isExcludedFromDependencyCheck方法中:
protected boolean isExcludedFromDependencyCheck(PropertyDescriptor pd) {

    return (AutowireUtils.isExcludedFromDependencyCheck(pd) || this.ignoredDependencyTypes.contains(pd.getPropertyType()) || AutowireUtils.isSetterDefinedInInterface(pd, this.ignoredDependencyInterfaces));

}
而ignoredDependencyInterface的真正作用还得看AutowireUtils类的isSetterDefinedInInterface方法。
public static boolean isSetterDefinedInInterface(PropertyDescriptor pd, Set<Class<?>> interfaces) {

    //获取bean中某个属性对象在bean类中的setter方法

    Method setter = pd.getWriteMethod();

    if (setter != null) {

        // 获取bean的类型

        Class<?> targetClass = setter.getDeclaringClass();

        for (Class<?> ifc : interfaces) {

            if (ifc.isAssignableFrom(targetClass) && // bean类型是否接口的实现类

                ClassUtils.hasMethod(ifc, setter.getName(), setter.getParameterTypes())) { // 接口是否有入参和bean类型完全相同的setter方法

                return true;

            }

        }

    }

    return false;

}
ignoredDependencyInterface方法并不是让我们在自动装配时直接忽略实现了该接口的依赖。这个方法的真正意思是忽略该接口的实现类中和接口setter方法入参类型相同的依赖。
举个例子。首先定义一个要被忽略的接口。
public interface IgnoreInterface {

    void setList(List<String> list);

    void setSet(Set<String> set);

}
然后需要实现该接口,在实现类中注意要有setter方法入参相同类型的域对象,在例子中就是List<String>和Set<String>。
public class IgnoreInterfaceImpl implements IgnoreInterface {

    private List<String> list;

    private Set<String> set;

    @Override

    public void setList(List<String> list) {

        this.list = list;

    }

    @Override

    public void setSet(Set<String> set) {

        this.set = set;

    }

    public List<String> getList() {

        return list;

    }

    public Set<String> getSet() {

        return set;

    }

}
定义xml配置文件:
<?xml version="1.0" encoding="UTF-8"?>

<beans xmlns="http://www.springframework.org/schema/beans"

       xmlns:xsi="http://www.w3.org/2001/XMLSchema-instance"

       xmlns:context="http://www.springframework.org/schema/context"

       xsi:schemaLocation="http://www.springframework.org/schema/beans

       http://www.springframework.org/schema/beans/spring-beans.xsd

       http://www.springframework.org/schema/context

       http://www.springframework.org/schema/context/spring-context.xsd"

default-autowire="byType">

    <bean id="list" class="java.util.ArrayList">

        <constructor-arg>

            <list>

                <value>foo</value>

                <value>bar</value>

            </list>

        </constructor-arg>

    </bean>

    <bean id="set" class="java.util.HashSet">

        <constructor-arg>

            <list>

                <value>foo</value>

                <value>bar</value>

            </list>

        </constructor-arg>

    </bean>

    <bean id="ii" class="com.chenhao.ignoreDependency.IgnoreInterfaceImpl"/>

    <bean class="com.chenhao.autowire.IgnoreAutowiringProcessor"/>

</beans>
最后调用ignoreDependencyInterface:
beanFactory.ignoreDependencyInterface(IgnoreInterface.class);
运行结果:
null
null
而如果不调用ignoreDependencyInterface,则是:
[foo, bar]
[bar, foo]
我们最初理解是在自动装配时忽略该接口的实现,实际上是在自动装配时忽略该接口实现类中和setter方法入参相同的类型,也就是忽略该接口实现类中存在依赖外部的bean属性注入。
典型应用就是BeanFactoryAware和ApplicationContextAware接口。
首先看该两个接口的源码:
public interface BeanFactoryAware extends Aware {

    void setBeanFactory(BeanFactory beanFactory) throws BeansException;

}

public interface ApplicationContextAware extends Aware {

    void setApplicationContext(ApplicationContext applicationContext) throws BeansException;

}
在Spring源码中在不同的地方忽略了该两个接口:
beanFactory.ignoreDependencyInterface(ApplicationContextAware.class);

ignoreDependencyInterface(BeanFactoryAware.class);
使得我们的BeanFactoryAware接口实现类在自动装配时不能被注入BeanFactory对象的依赖:
public class MyBeanFactoryAware implements BeanFactoryAware {

    private BeanFactory beanFactory; // 自动装配时忽略注入

    @Override

    public void setBeanFactory(BeanFactory beanFactory) throws BeansException {

        this.beanFactory = beanFactory;

    }

    public BeanFactory getBeanFactory() {

        return beanFactory;

    }

}
ApplicationContextAware接口实现类中的ApplicationContext对象的依赖同理:
public class MyApplicationContextAware implements ApplicationContextAware {

    private ApplicationContext applicationContext; // 自动装配时被忽略注入

    @Override

    public void setApplicationContext(ApplicationContext applicationContext) throws BeansException {

        this.applicationContext = applicationContext;

    }

    public ApplicationContext getApplicationContext() {

        return applicationContext;

    }

}
private void invokeAwareInterfaces(Object bean) {

    if (bean instanceof Aware) {

        if (bean instanceof EnvironmentAware) {

            ((EnvironmentAware) bean).setEnvironment(this.applicationContext.getEnvironment());

        }

        if (bean instanceof EmbeddedValueResolverAware) {

            ((EmbeddedValueResolverAware) bean).setEmbeddedValueResolver(this.embeddedValueResolver);

        }

        if (bean instanceof ResourceLoaderAware) {

            ((ResourceLoaderAware) bean).setResourceLoader(this.applicationContext);

        }

        if (bean instanceof ApplicationEventPublisherAware) {

            ((ApplicationEventPublisherAware) bean).setApplicationEventPublisher(this.applicationContext);

        }

        if (bean instanceof MessageSourceAware) {

            ((MessageSourceAware) bean).setMessageSource(this.applicationContext);

        }

        if (bean instanceof ApplicationContextAware) {

            ((ApplicationContextAware) bean).setApplicationContext(this.applicationContext);

        }

    }

}
通过这种方式保证了ApplicationContextAware和BeanFactoryAware中的容器保证是生成该bean的容器。
bean加载
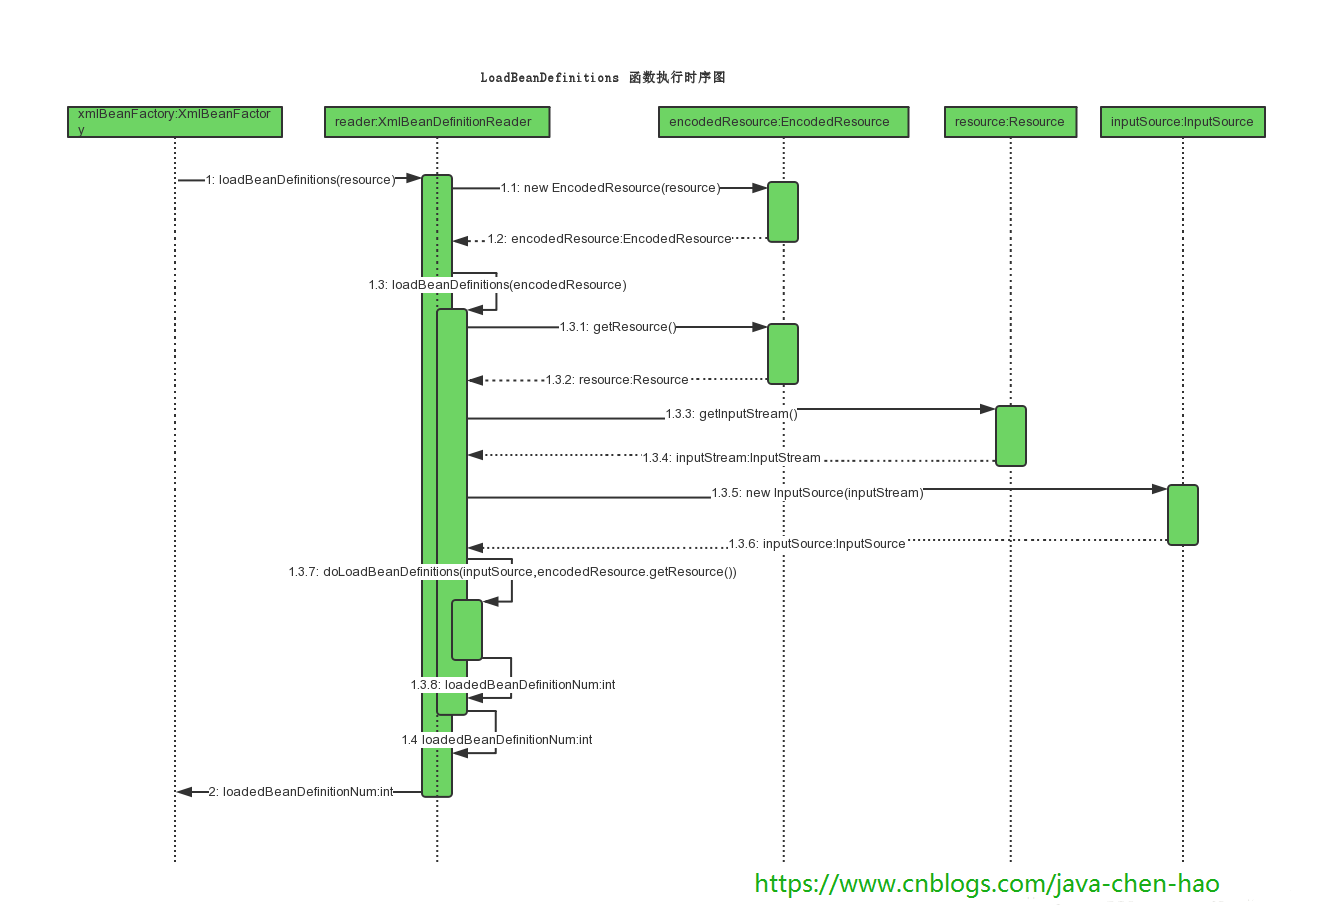
在之前XmlBeanFactory构造函数中调用了XmlBeanDefinitionReader类型的reader属性提供的方法this.reader.loadBeanDefinitions(resource),而这句代码则是整个资源加载的切入点,这个方法的时序图如下:

我们来梳理下上述时序图的处理过程:
(1)封装资源文件。当进入XmlBeanDefinitionReader后首先对参数Resource使用EncodedResource类进行封装
(2)获取输入流。从Resource中获取对应的InputStream并构造InputSource
(3)通过构造的InputSource实例和Resource实例继续调用函数doLoadBeanDefinitions,loadBeanDefinitions函数具体的实现过程:
public int loadBeanDefinitions(EncodedResource encodedResource) throws BeanDefinitionStoreException {

    Assert.notNull(encodedResource, "EncodedResource must not be null");

    if (logger.isTraceEnabled()) {

        logger.trace("Loading XML bean definitions from " + encodedResource);

    }

    Set<EncodedResource> currentResources = this.resourcesCurrentlyBeingLoaded.get();

    if (currentResources == null) {

        currentResources = new HashSet<>(4);

        this.resourcesCurrentlyBeingLoaded.set(currentResources);

    }

    if (!currentResources.add(encodedResource)) {

        throw new BeanDefinitionStoreException(

                "Detected cyclic loading of " + encodedResource + " - check your import definitions!");

    }

    try {

        InputStream inputStream = encodedResource.getResource().getInputStream();

        try {

            InputSource inputSource = new InputSource(inputStream);

            if (encodedResource.getEncoding() != null) {

                inputSource.setEncoding(encodedResource.getEncoding());

            }

            return doLoadBeanDefinitions(inputSource, encodedResource.getResource());

        }

        finally {

            inputStream.close();

        }

    }

    ...

}
EncodedResource的作用是对资源文件的编码进行处理的,其中的主要逻辑体现在getReader()方法中,当设置了编码属性的时候Spring会使用相应的编码作为输入流的编码,在构造好了encodeResource对象后,再次转入了可复用方法loadBeanDefinitions(new EncodedResource(resource)),这个方法内部才是真正的数据准备阶段,代码如下:
protected int doLoadBeanDefinitions(InputSource inputSource, Resource resource)

        throws BeanDefinitionStoreException {

    try {

        // 获取 Document 实例

        Document doc = doLoadDocument(inputSource, resource);

        // 根据 Document 实例****注册 Bean信息

        return registerBeanDefinitions(doc, resource);

    }

    ...

}
核心部分就是 try 块的两行代码。
- 调用
doLoadDocument()方法,根据 xml 文件获取 Document 实例。 - 根据获取的 Document 实例注册 Bean 信息
其实在doLoadDocument()方法内部还获取了 xml 文件的验证模式。如下:
protected Document doLoadDocument(InputSource inputSource, Resource resource) throws Exception {

    return this.documentLoader.loadDocument(inputSource, getEntityResolver(), this.errorHandler,

            getValidationModeForResource(resource), isNamespaceAware());

}
调用 getValidationModeForResource() 获取指定资源(xml)的验证模式。所以 doLoadBeanDefinitions()主要就是做了三件事情。
1. 调用 getValidationModeForResource() 获取 xml 文件的验证模式
2. 调用 loadDocument() 根据 xml 文件获取相应的 Document 实例。
3. 调用 registerBeanDefinitions() 注册 Bean 实例。
获取XML的验证模式
DTD和XSD区别
DTD(Document Type Definition)即文档类型定义,是一种XML约束模式语言,是XML文件的验证机制,属于XML文件组成的一部分。DTD是一种保证XML文档格式正确的有效方法,可以通过比较XML文档和DTD文件来看文档是否符合规范,元素和标签使用是否正确。一个DTD文档包含:元素的定义规则,元素间关系的定义规则,元素可使用的属性,可使用的实体或符合规则。
使用DTD验证模式的时候需要在XML文件的头部声明,以下是在Spring中使用DTD声明方式的代码:
<?xml version="1.0" encoding="UTF-8"?>

<!DOCTYPE beans PUBLIC "-//Spring//DTD BEAN 2.0//EN" "http://www.Springframework.org/dtd/Spring-beans-2.0.dtd">
XML Schema语言就是XSD(XML Schemas Definition)。XML Schema描述了XML文档的结构,可以用一个指定的XML Schema来验证某个XML文档,以检查该XML文档是否符合其要求,文档设计者可以通过XML Schema指定一个XML文档所允许的结构和内容,并可据此检查一个XML文档是否是有效的。
在使用XML Schema文档对XML实例文档进行检验,除了要声明名称空间外(xmlns=http://www.Springframework.org/schema/beans),还必须指定该名称空间所对应的XML Schema文档的存储位置,通过schemaLocation属性来指定名称空间所对应的XML Schema文档的存储位置,它包含两个部分,一部分是名称空间的URI,另一部分就该名称空间所标识的XML Schema文件位置或URL地址(xsi:schemaLocation=”http://www.Springframework.org/schema/beans http://www.Springframework.org/schema/beans/Spring-beans.xsd“),代码如下:
<?xml version="1.0" encoding="UTF-8"?>

<beans xmlns="http://www.springframework.org/schema/beans"

       xmlns:xsi="http://www.w3.org/2001/XMLSchema-instance"

       xsi:schemaLocation="http://www.springframework.org/schema/beans http://www.springframework.org/schema/beans/spring-beans.xsd">

    <bean id="myTestBean" class="com.chenhao.spring.MyTestBean"/>

</beans>
验证模式的读取
在spring中,是通过getValidationModeForResource方法来获取对应资源的验证模式,其源码如下:
protected int getValidationModeForResource(Resource resource) {

    int validationModeToUse = getValidationMode();

    if (validationModeToUse != VALIDATION_AUTO) {

        return validationModeToUse;

    }

    int detectedMode = detectValidationMode(resource);

    if (detectedMode != VALIDATION_AUTO) {

        return detectedMode;

    }

    // Hmm, we didn't get a clear indication... Let's assume XSD,

    // since apparently no DTD declaration has been found up until

    // detection stopped (before finding the document's root tag).

    return VALIDATION_XSD;

}
方法的实现还是很简单的,如果设定了验证模式则使用设定的验证模式(可以通过使用XmlBeanDefinitionReader中的setValidationMode方法进行设定),否则使用自动检测的方式。而自动检测验证模式的功能是在函数detectValidationMode方法中,而在此方法中又将自动检测验证模式的工作委托给了专门处理类XmlValidationModeDetector的validationModeDetector方法,具体代码如下:
public int detectValidationMode(InputStream inputStream) throws IOException {

    // Peek into the file to look for DOCTYPE.

    BufferedReader reader = new BufferedReader(new InputStreamReader(inputStream));

    try {

        boolean isDtdValidated = false;

        String content;

        while ((content = reader.readLine()) != null) {

            content = consumeCommentTokens(content);

            if (this.inComment || !StringUtils.hasText(content)) {

                continue;

            }

            if (hasDoctype(content)) {

                isDtdValidated = true;

                break;

            }

            if (hasOpeningTag(content)) {

                // End of meaningful data...

                break;

            }

        }

        return (isDtdValidated ? VALIDATION_DTD : VALIDATION_XSD);

    }

    catch (CharConversionException ex) {

        // Choked on some character encoding...

        // Leave the decision up to the caller.

        return VALIDATION_AUTO;

    }

    finally {

        reader.close();

    }

}
从代码中看,主要是通过读取 XML 文件的内容,判断内容中是否包含有 DOCTYPE ,如果是 则为 DTD,否则为 XSD,当然只会读取到 第一个 “<” 处,因为 验证模式一定会在第一个 “<” 之前。如果当中出现了 CharConversionException 异常,则为 XSD模式。
获取Document
经过了验证模式准备的步骤就可以进行Document加载了,对于文档的读取委托给了DocumentLoader去执行,这里的DocumentLoader是个接口,而真正调用的是DefaultDocumentLoader,解析代码如下:
public Document loadDocument(InputSource inputSource, EntityResolver entityResolver,

        ErrorHandler errorHandler, int validationMode, boolean namespaceAware) throws Exception {

    DocumentBuilderFactory factory = createDocumentBuilderFactory(validationMode, namespaceAware);

    if (logger.isDebugEnabled()) {

        logger.debug("Using JAXP provider [" + factory.getClass().getName() + "]");

    }

    DocumentBuilder builder = createDocumentBuilder(factory, entityResolver, errorHandler);

    return builder.parse(inputSource);

}
分析代码,首选创建DocumentBuildFactory,再通过DocumentBuilderFactory创建DocumentBuilder,进而解析InputSource来返回Document对象。对于参数entityResolver,传入的是通过getEntityResolver()函数获取的返回值,代码如下:
protected EntityResolver getEntityResolver() {

    if (this.entityResolver == null) {

        // Determine default EntityResolver to use.

        ResourceLoader resourceLoader = getResourceLoader();

        if (resourceLoader != null) {

            this.entityResolver = new ResourceEntityResolver(resourceLoader);

        }

        else {

            this.entityResolver = new DelegatingEntityResolver(getBeanClassLoader());

        }

    }

    return this.entityResolver;

}
这个entityResolver是做什么用的呢,接下来我们详细分析下。
EntityResolver 的用法
对于解析一个XML,SAX首先读取该XML文档上的声明,根据声明去寻找相应的DTD定义,以便对文档进行一个验证,默认的寻找规则,即通过网络(实现上就是声明DTD的URI地址)来下载相应的DTD声明,并进行认证。下载的过程是一个漫长的过程,而且当网络中断或不可用时,这里会报错,就是因为相应的DTD声明没有被找到的原因.
EntityResolver的作用是项目本身就可以提供一个如何寻找DTD声明的方法,即由程序来实现寻找DTD声明的过程,比如将DTD文件放到项目中某处,在实现时直接将此文档读取并返回给SAX即可,在EntityResolver的接口只有一个方法声明:
public abstract InputSource resolveEntity (String publicId, String systemId)

    throws SAXException, IOException;
它接收两个参数publicId和systemId,并返回一个InputSource对象,以特定配置文件来进行讲解
(1)如果在解析验证模式为XSD的配置文件,代码如下:
<?xml version="1.0" encoding="UTF-8"?>

<beans xmlns="http://www.Springframework.org/schema/beans"

    xmlns:xsi="http://www.w3.org/2001/XMLSchema-instance"

    xsi:schemaLocation="http://www.Springframework.org/schema/beans http://www.Springframework.org/schema/beans/Spring-beans.xsd">

....

</beans>
则会读取到以下两个参数
- publicId:null
- systemId:http://www.Springframework.org/schema/beans/Spring-beans.xsd

(2)如果解析验证模式为DTD的配置文件,代码如下:
<?xml version="1.0" encoding="UTF-8"?>

<!DOCTYPE beans PUBLIC "-//Spring//DTD BEAN 2.0//EN" "http://www.Springframework.org/dtd/Spring-beans-2.0.dtd">

....

</beans>
读取到以下两个参数
- publicId:-//Spring//DTD BEAN 2.0//EN
- systemId:http://www.Springframework.org/dtd/Spring-beans-2.0.dtd

一般都会把验证文件放置在自己的工程里,如果把URL转换为自己工程里对应的地址文件呢?以加载DTD文件为例来看看Spring是如何实现的。根据之前Spring中通过getEntityResolver()方法对EntityResolver的获取,我们知道,Spring中使用DelegatingEntityResolver类为EntityResolver的实现类,resolveEntity实现方法如下:
@Override

@Nullable

public InputSource resolveEntity(String publicId, @Nullable String systemId) throws SAXException, IOException {

    if (systemId != null) {

        if (systemId.endsWith(DTD_SUFFIX)) {

            return this.dtdResolver.resolveEntity(publicId, systemId);

        }

        else if (systemId.endsWith(XSD_SUFFIX)) {

            return this.schemaResolver.resolveEntity(publicId, systemId);

        }

    }

    return null;

}
不同的验证模式使用不同的解析器解析,比如加载DTD类型的BeansDtdResolver的resolveEntity是直接截取systemId最后的xx.dtd然后去当前路径下寻找,而加载XSD类型的PluggableSchemaResolver类的resolveEntity是默认到META-INF/Spring.schemas文件中找到systemId所对应的XSD文件并加载。 BeansDtdResolver 的解析过程如下:
public InputSource resolveEntity(String publicId, @Nullable String systemId) throws IOException {

    if (logger.isTraceEnabled()) {

        logger.trace("Trying to resolve XML entity with public ID [" + publicId +

                "] and system ID [" + systemId + "]");

    }

    if (systemId != null && systemId.endsWith(DTD_EXTENSION)) {

        int lastPathSeparator = systemId.lastIndexOf('/');

        int dtdNameStart = systemId.indexOf(DTD_NAME, lastPathSeparator);

        if (dtdNameStart != -1) {

            String dtdFile = DTD_NAME + DTD_EXTENSION;

            if (logger.isTraceEnabled()) {

                logger.trace("Trying to locate [" + dtdFile + "] in Spring jar on classpath");

            }

            try {

                Resource resource = new ClassPathResource(dtdFile, getClass());

                InputSource source = new InputSource(resource.getInputStream());

                source.setPublicId(publicId);

                source.setSystemId(systemId);

                if (logger.isDebugEnabled()) {

                    logger.debug("Found beans DTD [" + systemId + "] in classpath: " + dtdFile);

                }

                return source;

            }

            catch (IOException ex) {

                if (logger.isDebugEnabled()) {

                    logger.debug("Could not resolve beans DTD [" + systemId + "]: not found in classpath", ex);

                }

            }

        }

    }

    return null;

}
从上面的代码中我们可以看到加载 DTD 类型的 BeansDtdResolver.resolveEntity() 只是对 systemId 进行了简单的校验(从最后一个 / 开始,内容中是否包含 spring-beans),然后构造一个 InputSource 并设置 publicId、systemId,然后返回。 PluggableSchemaResolver 的解析过程如下:
public InputSource resolveEntity(String publicId, @Nullable String systemId) throws IOException {

    if (logger.isTraceEnabled()) {

        logger.trace("Trying to resolve XML entity with public id [" + publicId +

                "] and system id [" + systemId + "]");

    }

    if (systemId != null) {

        String resourceLocation = getSchemaMappings().get(systemId);

        if (resourceLocation != null) {

            Resource resource = new ClassPathResource(resourceLocation, this.classLoader);

            try {

                InputSource source = new InputSource(resource.getInputStream());

                source.setPublicId(publicId);

                source.setSystemId(systemId);

                if (logger.isDebugEnabled()) {

                    logger.debug("Found XML schema [" + systemId + "] in classpath: " + resourceLocation);

                }

                return source;

            }

            catch (FileNotFoundException ex) {

                if (logger.isDebugEnabled()) {

                    logger.debug("Couldn't find XML schema [" + systemId + "]: " + resource, ex);

                }

            }

        }

    }

    return null;

}
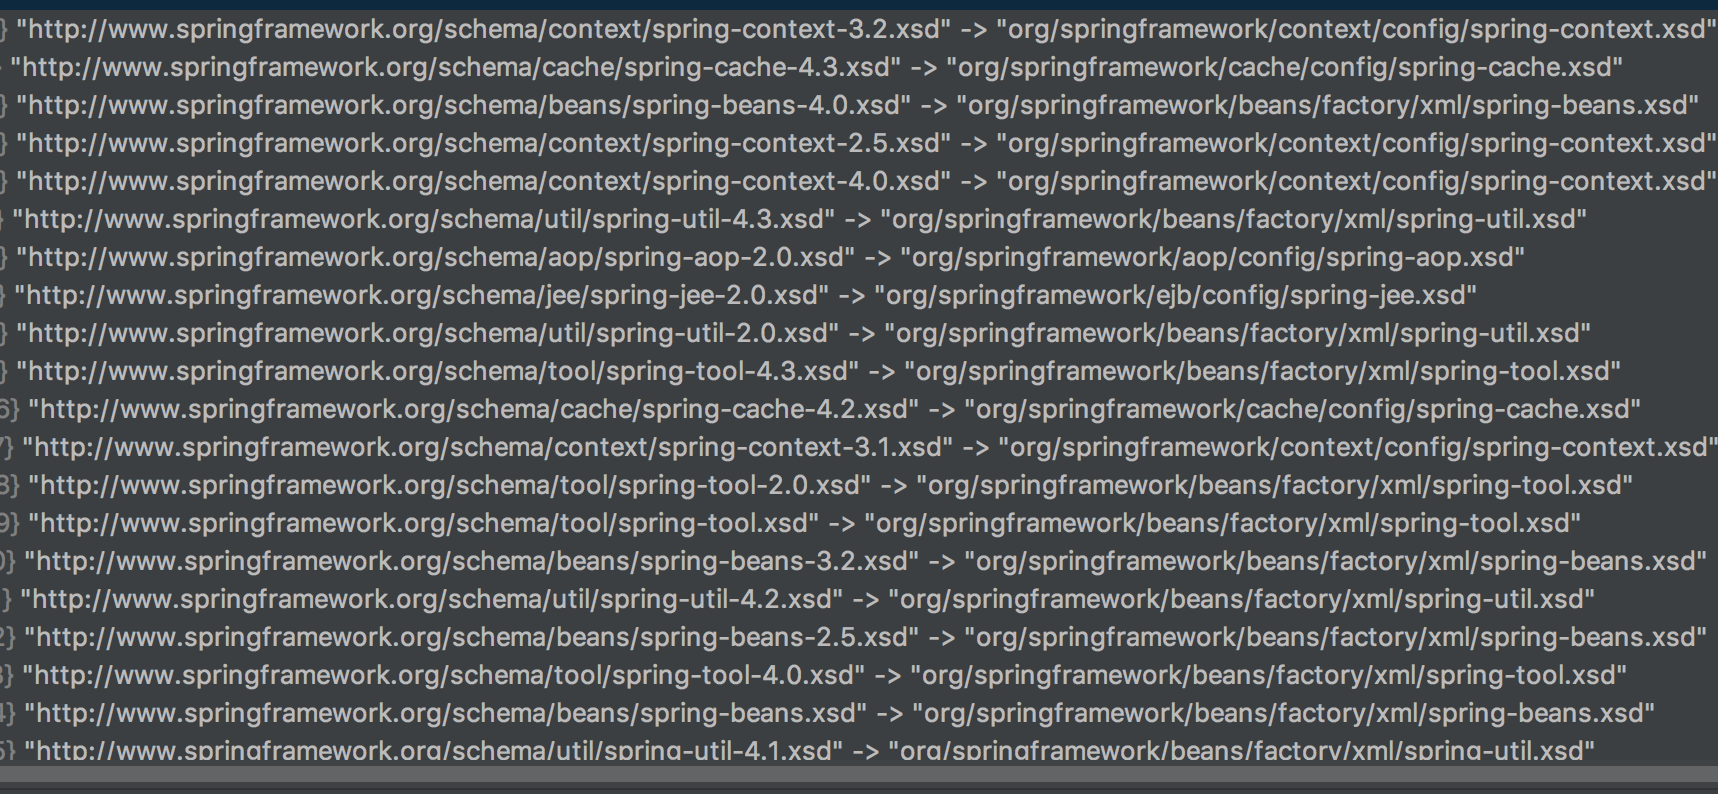
首先调用 getSchemaMappings() 获取一个映射表(systemId 与其在本地的对照关系),然后根据传入的 systemId 获取该 systemId 在本地的路径 resourceLocation,最后根据 resourceLocation 构造 InputSource 对象。 映射表如下(部分):

解析及注册BeanDefinitions
当把文件转换成Document后,接下来就是对bean的提取及注册,当程序已经拥有了XML文档文件的Document实例对象时,就会被引入到XmlBeanDefinitionReader.registerBeanDefinitions这个方法:
public int registerBeanDefinitions(Document doc, Resource resource) throws BeanDefinitionStoreException {

    BeanDefinitionDocumentReader documentReader = createBeanDefinitionDocumentReader();

    int countBefore = getRegistry().getBeanDefinitionCount();

    documentReader.registerBeanDefinitions(doc, createReaderContext(resource));

    return getRegistry().getBeanDefinitionCount() - countBefore;

}
其中的doc参数即为上节读取的document,而BeanDefinitionDocumentReader是一个接口,而实例化的工作是在createBeanDefinitionDocumentReader()中完成的,而通过此方法,BeanDefinitionDocumentReader真正的类型其实已经是DefaultBeanDefinitionDocumentReader了,进入DefaultBeanDefinitionDocumentReader后,发现这个方法的重要目的之一就是提取root,以便于再次将root作为参数继续BeanDefinition的注册,如下代码:
public void registerBeanDefinitions(Document doc, XmlReaderContext readerContext) {

    this.readerContext = readerContext;

    logger.debug("Loading bean definitions");

    Element root = doc.getDocumentElement();

    doRegisterBeanDefinitions(root);

}
通过这里我们看到终于到了解析逻辑的核心方法doRegisterBeanDefinitions,接着跟踪源码如下:
protected void doRegisterBeanDefinitions(Element root) {

    BeanDefinitionParserDelegate parent = this.delegate;

    this.delegate = createDelegate(getReaderContext(), root, parent);

    if (this.delegate.isDefaultNamespace(root)) {

        String profileSpec = root.getAttribute(PROFILE_ATTRIBUTE);

        if (StringUtils.hasText(profileSpec)) {

            String[] specifiedProfiles = StringUtils.tokenizeToStringArray(

                    profileSpec, BeanDefinitionParserDelegate.MULTI_VALUE_ATTRIBUTE_DELIMITERS);

            if (!getReaderContext().getEnvironment().acceptsProfiles(specifiedProfiles)) {

                if (logger.isInfoEnabled()) {

                    logger.info("Skipped XML bean definition file due to specified profiles [" + profileSpec +

                            "] not matching: " + getReaderContext().getResource());

                }

                return;

            }

        }

    }

    preProcessXml(root);

    parseBeanDefinitions(root, this.delegate);

    postProcessXml(root);

    this.delegate = parent;

}
我们看到首先要解析profile属性,然后才开始XML的读取,具体的代码如下:
protected void parseBeanDefinitions(Element root, BeanDefinitionParserDelegate delegate) {

    if (delegate.isDefaultNamespace(root)) {

        NodeList nl = root.getChildNodes();

        for (int i = 0; i < nl.getLength(); i++) {

            Node node = nl.item(i);

            if (node instanceof Element) {

                Element ele = (Element) node;

                if (delegate.isDefaultNamespace(ele)) {

                    parseDefaultElement(ele, delegate);

                }

                else {

                    delegate.parseCustomElement(ele);

                }

            }

        }

    }

    else {

        delegate.parseCustomElement(root);

    }

}
最终解析动作落地在两个方法处:parseDefaultElement(ele, delegate) 和 delegate.parseCustomElement(root)。我们知道在 Spring 有两种 Bean 声明方式:
- 配置文件式声明:<bean id="myTestBean" class="com.chenhao.spring.MyTestBean"/>
- 自定义注解方式:
<tx:annotation-driven>
两种方式的读取和解析都存在较大的差异,所以采用不同的解析方法,如果根节点或者子节点采用默认命名空间的话,则调用 parseDefaultElement() 进行解析,否则调用 delegate.parseCustomElement() 方法进行自定义解析。
而判断是否默认命名空间还是自定义命名空间的办法其实是使用node.getNamespaceURI()获取命名空间,并与Spring中固定的命名空间http://www.springframework.org/schema/beans进行对比,如果一致则认为是默认,否则就认为是自定义。
profile的用法
通过profile标记不同的环境,可以通过设置spring.profiles.active和spring.profiles.default激活指定profile环境。如果设置了active,default便失去了作用。如果两个都没有设置,那么带有profiles的bean都不会生成。
配置spring配置文件最下面配置如下beans
<!-- 开发环境配置文件 -->

<beans profile="development">

    <context:property-placeholder

            location="classpath*:config_common/*.properties, classpath*:config_development/*.properties"/>

</beans>

<!-- 测试环境配置文件 -->

<beans profile="test">

    <context:property-placeholder

            location="classpath*:config_common/*.properties, classpath*:config_test/*.properties"/>

</beans>

<!-- 生产环境配置文件 -->

<beans profile="production">

    <context:property-placeholder

            location="classpath*:config_common/*.properties, classpath*:config_production/*.properties"/>

</beans>
配置web.xml
<!-- 多环境配置 在上下文context-param中设置profile.default的默认值 -->

<context-param>

    <param-name>spring.profiles.default</param-name>

    <param-value>production</param-value>

</context-param>

<!-- 多环境配置 在上下文context-param中设置profile.active的默认值 -->

<!-- 设置active后default失效,web启动时会加载对应的环境信息 -->

<context-param>

    <param-name>spring.profiles.active</param-name>

    <param-value>test</param-value>

</context-param>
这样启动的时候就可以按照切换spring.profiles.active的属性值来进行切换了。
spring源码深度解析— IOC 之 容器的基本实现的更多相关文章
- spring源码深度解析— IOC 之 默认标签解析(上)
概述 接前两篇文章 spring源码深度解析—Spring的整体架构和环境搭建 和 spring源码深度解析— IOC 之 容器的基本实现 本文主要研究Spring标签的解析,Spring的标签 ...
- spring源码深度解析— IOC 之 开启 bean 的加载
概述 前面我们已经分析了spring对于xml配置文件的解析,将分析的信息组装成 BeanDefinition,并将其保存注册到相应的 BeanDefinitionRegistry 中.至此,Spri ...
- spring源码深度解析— IOC 之 默认标签解析(下)
在spring源码深度解析— IOC 之 默认标签解析(上)中我们已经完成了从xml配置文件到BeanDefinition的转换,转换后的实例是GenericBeanDefinition的实例.本文主 ...
- spring源码深度解析— IOC 之 bean 创建
在 Spring 中存在着不同的 scope,默认是 singleton ,还有 prototype.request 等等其他的 scope,他们的初始化步骤是怎样的呢?这个答案在这篇博客中给出. s ...
- spring源码深度解析— IOC 之 循环依赖处理
什么是循环依赖 循环依赖其实就是循环引用,也就是两个或则两个以上的bean互相持有对方,最终形成闭环.比如A依赖于B,B依赖于C,C又依赖于A.如下图所示: 注意,这里不是函数的循环调用,是对象的相互 ...
- spring源码深度解析— IOC 之 自定义标签解析
概述 之前我们已经介绍了spring中默认标签的解析,解析来我们将分析自定义标签的解析,我们先回顾下自定义标签解析所使用的方法,如下图所示: 我们看到自定义标签的解析是通过BeanDefinition ...
- spring源码深度解析— IOC 之 属性填充
doCreateBean() 主要用于完成 bean 的创建和初始化工作,我们可以将其分为四个过程: createBeanInstance() 实例化 bean populateBean() 属性填充 ...
- spring源码深度解析— IOC 之 bean 的初始化
一个 bean 经历了 createBeanInstance() 被创建出来,然后又经过一番属性注入,依赖处理,历经千辛万苦,千锤百炼,终于有点儿 bean 实例的样子,能堪大任了,只需要经历最后一步 ...
- Spring源码深度解析之Spring MVC
Spring源码深度解析之Spring MVC Spring框架提供了构建Web应用程序的全功能MVC模块.通过策略接口,Spring框架是高度可配置的,而且支持多种视图技术,例如JavaServer ...
随机推荐
- Swift 1
Swift 中函数使用指南 关于Swift中的各种函数的使用的总结 前言 时间久了,好多东西我们就会慢慢忘记,在这里总结一下Swift中函数的使用原则,把大部分的函数使用技巧用代码示例来做了演示,但是 ...
- echarts 堆叠折线
option = { title: { text: '折线图堆叠' }, tooltip: { trigger: 'axis' }, legend: { data:['邮件营销','联盟广告','视频 ...
- Customize Acrylic Brush in UWP Applications(在UWP中自定义亚克力笔刷)
原文 Customize Acrylic Brush in UWP Applications(在UWP中自定义亚克力笔刷) Windows 10 Fall Creators Update(Build ...
- hibernate validator 专题
JSR-303 原生支持的限制有如下几种 : 限制 说明 @Null 限制只能为 null @NotNull 限制必须不为 null @AssertFalse 限制必须为 false @AssertT ...
- 假设做一个循环滚动UIScrollView
先上效果图: 首先初始化: - (void)viewDidLoad { //加入最后一张图 用于循环 int length = 4; NSMutableArray *tempArray = [NSMu ...
- C#中HttpWebRequest与HttpWebResponse的使用方法
关键字:C# HttpWebRequest HttpWebResponse HTTP GET POST 请求 这个类是专门为HTTP的GET和POST请求写的,解决了编码,证书,自动带Cookie等问 ...
- WPF Label控件在数据绑定Content属性变化触发TargetUpdated事件简单实现类似TextChanged 事件效果
原文:WPF Label控件在数据绑定Content属性变化触发TargetUpdated事件简单实现类似TextChanged 事件效果 本以为Label也有TextChanged 事件,但在使 ...
- NS2网络模拟(7)-homework03.tcl
1: #NS2_有线部分\homework03.tcl 2: 3: #Create a simulator object 4: set ns [new Simulator] 5: 6: #Define ...
- MySQL第五个学习笔记 该数据表的操作
MySQL在创建表,创建.frm文件保存表和列定义.索引存储在一个.MYI(MYindex)且数据存储在有.MYD(MYData)扩展名的文件里. 一.用SHOW/ DESCRIBE语句显示数据表 ...
- XF 主从页面
using System; using Xamarin.Forms; using Xamarin.Forms.Xaml; [assembly: XamlCompilation (XamlCompila ...
