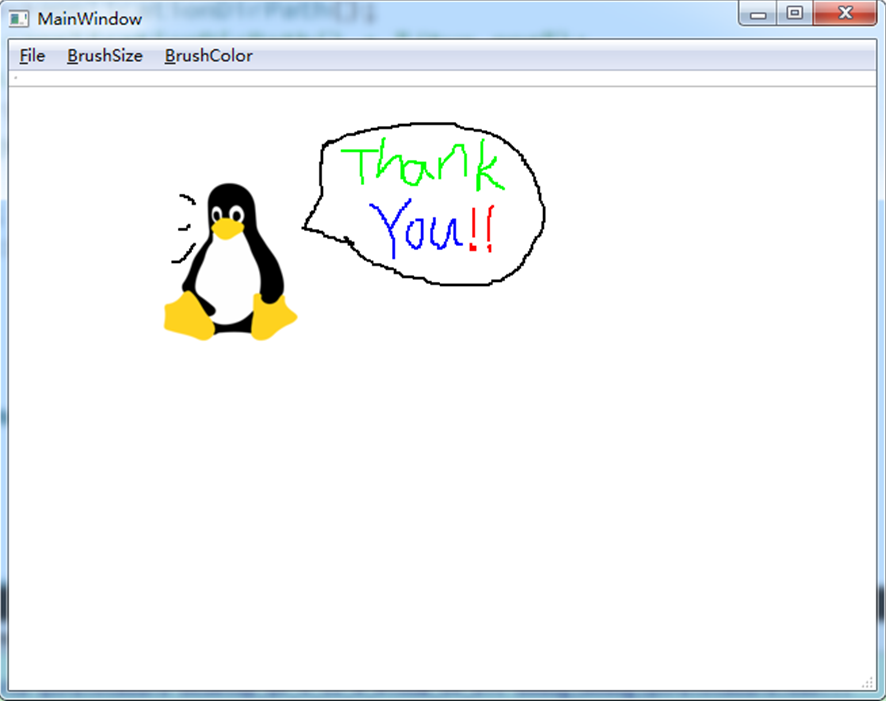
QT制作一个位图画图板程序
本文学习如何创建一个Qt绘制程序,用户将能够通过使用不同的尺寸和画笔的颜色来表达他们的创造力。
主要功能:保存画板内容为图片、清除画板内容、设置画板大小、设置画笔颜色
新建基于QMainWindow的应用程序,设置MainWindow.ui

代码如下:
|
1
2 3 4 5 6 7 8 9 10 11 12 13 14 15 16 17 18 19 20 21 22 23 24 25 26 27 28 29 30 31 32 33 34 35 36 37 38 39 40 41 42 43 44 45 46 47 48 49 50 51 |
#ifndef MAINWINDOW_H
#define MAINWINDOW_H #include <QMainWindow> #include <QPainter> namespace Ui { class MainWindow : public QMainWindow public: virtual void mousePressEvent(QMouseEvent *event); private slots: private: #endif // MAINWINDOW_H |
|
1
2 3 4 5 6 7 8 9 10 11 12 13 14 15 16 17 18 19 20 21 22 23 24 25 26 27 28 29 30 31 32 33 34 35 36 37 38 39 40 41 42 43 44 45 46 47 48 49 50 51 52 53 54 55 56 57 58 59 60 61 62 63 64 65 66 67 68 69 70 71 72 73 74 75 76 77 78 79 80 81 82 83 84 85 86 87 88 89 90 91 92 93 94 95 96 97 98 99 100 101 102 103 104 105 106 107 108 109 110 111 112 113 114 115 116 117 118 119 120 121 122 123 124 125 126 127 128 129 130 131 132 133 134 135 |
#include "MainWindow.h"
#include "ui_MainWindow.h" #include <QDebug> MainWindow::MainWindow(QWidget *parent) : // create a QImage object, which acts as the canvas QImage tux; drawing = false; } MainWindow::~MainWindow() void MainWindow::mousePressEvent(QMouseEvent *event) } void MainWindow::mouseMoveEvent(QMouseEvent *event) } void MainWindow::mouseReleaseEvent(QMouseEvent *event) } void MainWindow::paintEvent(QPaintEvent *event) void MainWindow::resizeEvent(QResizeEvent *event) } void MainWindow::on_action_2px_triggered() void MainWindow::on_action_5px_triggered() void MainWindow::on_action_10px_triggered() void MainWindow::on_action_Black_triggered() void MainWindow::on_action_White_triggered() void MainWindow::on_action_Red_triggered() void MainWindow::on_action_Green_triggered() void MainWindow::on_action_Blue_triggered() void MainWindow::on_action_Save_triggered() void MainWindow::on_action_Clear_triggered() |
|
1
2 3 4 5 6 7 8 9 10 11 12 13 14 |
#include "MainWindow.h"
#include <QApplication> int main(int argc, char *argv[]) MainWindow w; return a.exec(); |
编译运行,自由绘制吧!

QT制作一个位图画图板程序的更多相关文章
- 使用qt制作一个简单的计算器
前言:今天使用qt制作了一个很简单的计算器,觉得挺有意思的,所以在这里跟大家分享一下. 这里先跟大家说说使用到的函数: 一.槽连接函数 connect(信号发送者,发送的信号,信号接收者,信号接收者的 ...
- QT制作一个图片播放器
前言:使用qt制作了一个简单的图片播放器,可以播放gif.png等格式图片 先来看看播放器的功能(当然是很简陋的,没有很深入的设计): 1.点击图片列表中图片进行播放. 2.自动播放,播放的图片的间隔 ...
- 微信小程序-从零开始制作一个跑步微信小程序
来源:伯乐在线 - 王小树 链接:http://ios.jobbole.com/90603/ 点击 → 申请加入伯乐在线专栏作者 一.准备工作 1.注册一个小程序账号,得用一个没注册过公众号的邮箱注册 ...
- 利用Qt制作一个helloworld
使用QT创建第一个 工程: 1.打开应用程序: 2.单击画面中间偏上的 New Project按钮.[要学习使用啊~,传说它的跨平台行很好,QQ就是用它编辑的.] 3.直接点击右下角的选择 按钮. 4 ...
- java制作一个简单的抽签程序
首先需要导入import java.util.Random;才能使用随机类Random:Random生成随机数介绍:https://www.cnblogs.com/prodigal-son/p/128 ...
- QT制作窗口切换的小程序
前言:本次实验是在三个窗口之间自由切换,窗口中播放gif格式的动态图. 让我们先来看看使用到的主要的函数: 一.播放gif格式动态图的函数 QMovie *movie = new QMovie(&qu ...
- 关于Qt 5-MSVC 2015 64位在 win7 64位系统debug程序崩溃的问题
关于Qt 5-MSVC 2015 64位在 win7 64位系统debug程序崩溃的问题 在win7 64位系统安装VC2015的编译器,并安装了 Qt 5.6 -5.7 VC2015 64位版本测 ...
- Sprite Kit教程:制作一个通用程序 2
注1:本文译自Sprite Kit Tutorial: Making a Universal App: Part 2 目录 动画的定义:可行性 属性列表 添加游戏逻辑 添加音效 何去何从 上一篇文章中 ...
- 使用apache-cxf-2.2.10来制作一个极简版WebService程序
原想拿最新版cxf来制作的,无奈Apache的zip包总下不下来,国内的apache-cxf-2.2.10却一蹴而就,也就用了这个版本.下载地址是:http://pan.baidu.com/s/1td ...
随机推荐
- Spring AOP技术本质认识
Spring AOP技术本质认识 一.AOP简介 AOP(Aspect Oriented Programming,面向切面编程),把某一类问题集中在一个地方进行处理,比如处理程序中的点击事件.打印 ...
- 费马平方和定理&&斐波那契恒等式&&欧拉四平方和恒等式&&拉格朗日四平方和定理
费马平方和定理 费马平方和定理的表述是:奇素数能表示为两个平方数之和的充分必要条件是该素数被4除余1. 1. 如果两个整数都能表示为两个平方数之和的形式,则他们的积也能表示为两个平方数之和的形式. $ ...
- 【mybatis】清空数据库表数据
<update id="truncateTable"> truncate table ${tableName} </update> <update i ...
- qhclass
http://www.qhclass.com/classroom/62/courses
- 12 opencv图像合成
#include < stdio.h > #include < opencv2\opencv.hpp > #include < opencv2\stitching.hpp ...
- three.js 设置透明度
原文:https://www.cnblogs.com/amy2011/p/6148736.html 材质: 材质就像物体的皮肤,决定了几何体的外表,例如是否像草地/金属,是否透明,是否显示线框等 Th ...
- vue之父子组件通信
一. 父-子组件间通信 let children={ template:`<div><h1>{{send}}</h1></div>`, # 将传 ...
- Kubernetes之Taints与Tolerations 污点和容忍
NodeAffinity节点亲和性,是Pod上定义的一种属性,使Pod能够按我们的要求调度到某个Node上,而Taints则恰恰相反,它可以让Node拒绝运行Pod,甚至驱逐Pod. Taints(污 ...
- c#比较器辅助类
/// <summary> /// 比较器帮助类 /// 创建人:苏本东 :: /// </summary> public class ComparerHelper<T& ...
- storm杂记+性能调优
1.默认情况下: 1个supervisor节点启动4个worker进程. 每一个topology默认占用一个worker进程. 每个worker会启动executor. 每个executor默认启动一 ...
