Django REST framework —— 认证组件源码分析
我在前面的博客里已经讲过了,我们一般编写API的时候用的方式
class CoursesView(ViewSetMixin,APIView):

        pass
这种方式的有点是,灵活性比较大,可以根据自己的业务逻辑来自定义各种组件逻辑。
这边文章,我将带大家对 认证组件做一个源码分析,写这边文章的原因也是因为自己虽然知道怎么写,但是不知道为什么要这么写,今天看了源码,所以想把自己的一些心得写出来和大家分享。
先看代码
 class ShoppingCarView(ViewSetMixin, APIView):

     authentication_classes = [LuffyAuthtication,]

         def list(self,request, *args, **kwargs):

         """

         查看购物车信息

         :param args:

         :param kwargs:

         :return:

         """

         try:

             ret = BaseResponse()

             pay_course_list = []

             # key = 'shoppingcar_%s_%s' % (USERID, '*')

             key = settings.SHOPCAR_FORMAT.format( request.user.id, "*")

             user_key_list = COON.keys(pattern=key)  # 取到这个用户对应的所有课程字典 对应的键

             for key in user_key_list:

                 # 对应的每个键值 去取每个课程对应的信息 和价格列表

                 temp = {

                     'id': COON.hget(key, 'id').decode('utf8'),

                     'name': COON.hget(key, 'name').decode('utf8'),

                     'img': COON.hget(key, 'img').decode('utf8'),

                     'default': COON.hget(key, 'default').decode('utf8'),

                     'price_dict': json.loads(COON.hget(key, 'price_dict').decode('utf8')),

                 }

                 pay_course_list.append(temp)

             ret.data = pay_course_list

         except Exception as e:

             ret.data = '查看失败'

             ret.code = 00000

         return Response(ret.dict)
视图类
 1 from app01 import models

 2 from rest_framework.authentication import BaseAuthentication

 3 from rest_framework.exceptions import AuthenticationFailed

 4

 5

 6 class LuffyAuthtication(BaseAuthentication):

 7

 8     def authenticate(self, request):

 9         """

10         用于做用户认证

11         :param request:

12         :return:

13         """

14         token = request.query_params.get('token')

15         token_obj = models.UserToken.objects.filter(token=token).first()

16         if not  token_obj:

17             raise AuthenticationFailed({'code':10000,'error':'认证失败'})

18         return token_obj.user,token_obj
认证类
urlpatterns = [

    url(r'^payment/$', payment.PaymentView.as_view({'post': 'create','put': 'update','get':'list'})),

]
url
以上的就是逻辑代码,就是一个必须要验证为注册用户才能查看购物车的内容。
下面来进行源码分析,来看代码是如何走到我自定义的认证类中的。
1.首先从url中分析
1.先来到视图类中的as.view()方法

而我们的自定义的方法中没有as.view()方法,那就要去父类ViewSetMixin和APIView中去找,好看源码
2.分析源码
1.先看ViewSetMixin类中
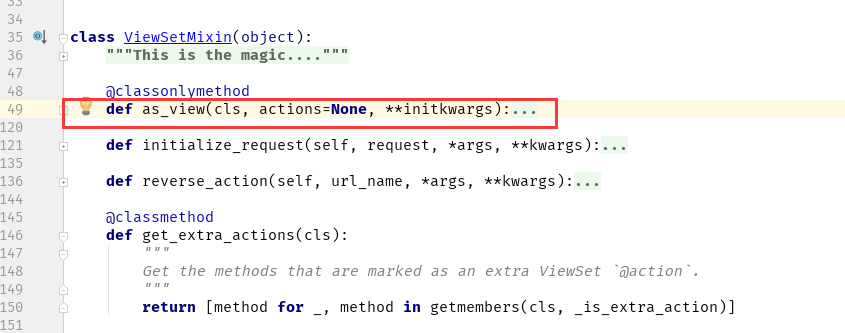
class ViewSetMixin(object):

    """

    This is the magic.

    Overrides `.as_view()` so that it takes an `actions` keyword that performs

    the binding of HTTP methods to actions on the Resource.

    For example, to create a concrete view binding the 'GET' and 'POST' methods

    to the 'list' and 'create' actions...

    view = MyViewSet.as_view({'get': 'list', 'post': 'create'})

    """

    @classonlymethod

    def as_view(cls, actions=None, **initkwargs):

        """

        Because of the way class based views create a closure around the

        instantiated view, we need to totally reimplement `.as_view`,

        and slightly modify the view function that is created and returned.

        """

        # The suffix initkwarg is reserved for displaying the viewset type.

        # eg. 'List' or 'Instance'.

        cls.suffix = None

        # The detail initkwarg is reserved for introspecting the viewset type.

        cls.detail = None

        # Setting a basename allows a view to reverse its action urls. This

        # value is provided by the router through the initkwargs.

        cls.basename = None

        # actions must not be empty

        if not actions:

            raise TypeError("The `actions` argument must be provided when "

                            "calling `.as_view()` on a ViewSet. For example "

                            "`.as_view({'get': 'list'})`")

        # sanitize keyword arguments

        for key in initkwargs:

            if key in cls.http_method_names:

                raise TypeError("You tried to pass in the %s method name as a "

                                "keyword argument to %s(). Don't do that."

                                % (key, cls.__name__))

            if not hasattr(cls, key):

                raise TypeError("%s() received an invalid keyword %r" % (

                    cls.__name__, key))

        def view(request, *args, **kwargs):

            self = cls(**initkwargs)

            # We also store the mapping of request methods to actions,

            # so that we can later set the action attribute.

            # eg. `self.action = 'list'` on an incoming GET request.

            self.action_map = actions

            # Bind methods to actions

            # This is the bit that's different to a standard view

            for method, action in actions.items():

                handler = getattr(self, action)

                setattr(self, method, handler)

            if hasattr(self, 'get') and not hasattr(self, 'head'):

                self.head = self.get

            self.request = request

            self.args = args

            self.kwargs = kwargs

            # And continue as usual
       # 前面都是在对传参做判断和重新赋值,重要的是下面这一步,最后return 调用了dispatch方法

            return self.dispatch(request, *args, **kwargs)
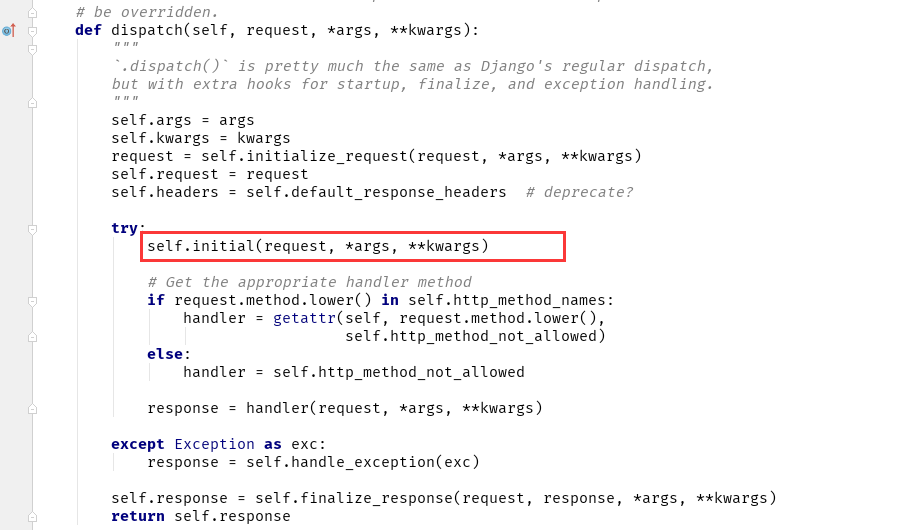
2.找dispatch方法在哪里,答案肯定是在APIView中
 def dispatch(self, request, *args, **kwargs):

        """

        `.dispatch()` is pretty much the same as Django's regular dispatch,

        but with extra hooks for startup, finalize, and exception handling.

        """

        self.args = args

        self.kwargs = kwargs

        request = self.initialize_request(request, *args, **kwargs)
     ## request = Request(.....)

        self.request = request

        self.headers = self.default_response_headers

        try:

            self.initial(request, *args, **kwargs)

            # Get the appropriate handler method

            if request.method.lower() in self.http_method_names:

                handler = getattr(self, request.method.lower(),

                                  self.http_method_not_allowed)

            else:

                handler = self.http_method_not_allowed

            response = handler(request, *args, **kwargs)

        except Exception as exc:

            response = self.handle_exception(exc)

        self.response = self.finalize_response(request, response, *args, **kwargs)

        return self.response
所有的关键点都在dispatch方法里面:
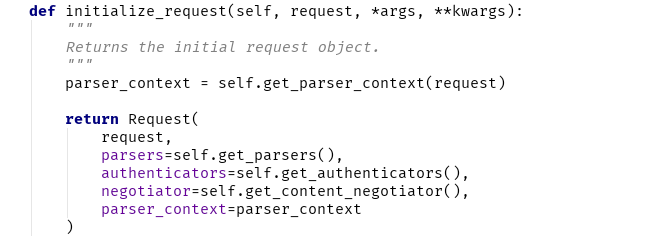
(1) request = self.initialize_request(request, *args, **kwargs)
def initialize_request(self, request, *args, **kwargs):

        """

        Returns the initial request object.

        """

        parser_context = self.get_parser_context(request)

        return Request(

            request,

            parsers=self.get_parsers(),

            authenticators=self.get_authenticators(),    #[BasicAuthentication(),],把对象封装到request里面了

       negotiator=self.get_content_negotiator(), parser_context=parser_context )
(2)authenticators=self.get_authenticators(),
通过列表生成式,返回对象的列表
 def get_authenticators(self):

        """

        Instantiates and returns the list of authenticators that this view can use.

        """

        return [auth() for auth in self.authentication_classes]
(3)authentication_classes
APIView里面有个 authentication_classes 字段 ,这里如果写了静态变量就直接在类的静态变量中找,否则就到全局配置文文件中去找
可以看到默认是去全局的配置文件找(api_settings)
class APIView(View):

    # The following policies may be set at either globally, or per-view.

    renderer_classes = api_settings.DEFAULT_RENDERER_CLASSES

    parser_classes = api_settings.DEFAULT_PARSER_CLASSES

    authentication_classes = api_settings.DEFAULT_AUTHENTICATION_CLASSES

    throttle_classes = api_settings.DEFAULT_THROTTLE_CLASSES

    permission_classes = api_settings.DEFAULT_PERMISSION_CLASSES

    content_negotiation_class = api_settings.DEFAULT_CONTENT_NEGOTIATION_CLASS

    metadata_class = api_settings.DEFAULT_METADATA_CLASS

    versioning_class = api_settings.DEFAULT_VERSIONING_CLASS
(4)开始验证
(5)self.initial(request,*args,**kwargs)
    def initial(self, request, *args, **kwargs):

        """

        Runs anything that needs to occur prior to calling the method handler.

        """

        self.format_kwarg = self.get_format_suffix(**kwargs)

        # Perform content negotiation and store the accepted info on the request

        neg = self.perform_content_negotiation(request)

        request.accepted_renderer, request.accepted_media_type = neg

        # Determine the API version, if versioning is in use.

        version, scheme = self.determine_version(request, *args, **kwargs)

        request.version, request.versioning_scheme = version, scheme

        # Ensure that the incoming request is permitted

        self.perform_authentication(request)    认证

        self.check_permissions(request)      权限

        self.check_throttles(request)        频率
(6)self.perform_authentication(request)
def perform_authentication(self, request):
"""
Perform authentication on the incoming request. Note that if you override this and simply 'pass', then authentication
will instead be performed lazily, the first time either
`request.user` or `request.auth` is accessed.
"""
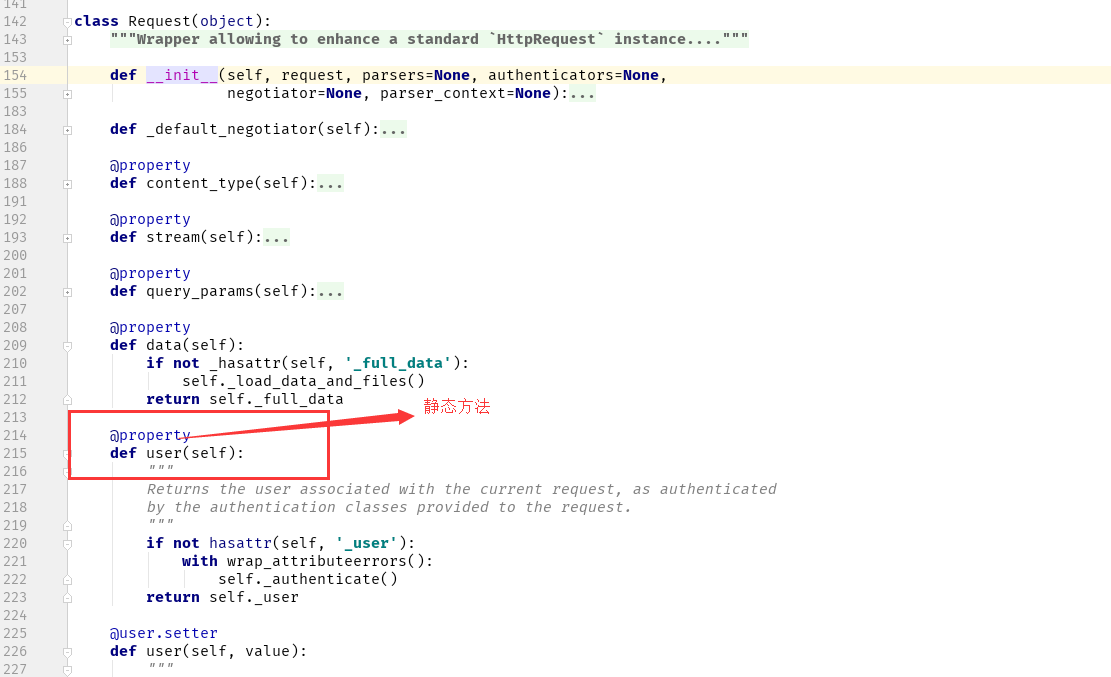
request.user 这里没有返回值,直接调用了request.user,那这个user方法是谁的呢????
还记得这个Request吧,对没错就是他的,我们点进去看看
(7)request.user
(8)self._authenticate() 方法
def _authenticate(self):

        """

        Attempt to authenticate the request using each authentication instance

        in turn.

        """

        #循环认证类的所有对象

        for authenticator in self.authenticators:

            try:

                #执行认证类的authenticate方法

                #这里分三种情况

                #1.如果authenticate方法抛出异常,self._not_authenticated()执行

                #2.有返回值,必须是元组:(request.user,request.auth)

                #3.返回None,表示当前认证不处理,等下一个认证来处理

                user_auth_tuple = authenticator.authenticate(self)

            except exceptions.APIException:

                self._not_authenticated()

                raise

            if user_auth_tuple is not None:

                self._authenticator = authenticator

                self.user, self.auth = user_auth_tuple    元祖

                return

        self._not_authenticated()
返回的元组就是上面自定义认证类代码中的
token_obj.user, 可以再后续的request.user中取到
token_obj ,可以再后续的request.auth中取到
到这里整个认证组件的源码就分析完了
自己写认证类方法梳理
(1)创建认证类
- 继承BaseAuthentication --->>1.重写authenticate方法;2.authenticate_header方法直接写pass就可以(这个方法必须写)
(2)authenticate()返回值(三种)
- None ----->>>当前认证不管,等下一个认证来执行,可用于对请求的过滤上
- raise exceptions.AuthenticationFailed('用户认证失败') # from rest_framework import exceptions
- 有返回值元祖形式:(元素1,元素2) #元素1复制给request.user; 元素2复制给request.auth
(3)局部使用
- authentication_classes = [BaseAuthentication,]
(4)全局使用
#设置全局认证

REST_FRAMEWORK = {

    "DEFAULT_AUTHENTICATION_CLASSES":['API.utils.auth.Authentication',]

}
源码流程
--->>dispatch
--封装request
---获取定义的认证类(全局/局部),通过列表生成式创建对象
---initial
----peform_authentication
-----request.user (每部循环创建的对象)
Django REST framework —— 认证组件源码分析的更多相关文章
- Django REST framework —— 权限组件源码分析
在上一篇文章中我们已经分析了认证组件源码,我们再来看看权限组件的源码,权限组件相对容易,因为只需要返回True 和False即可 代码 class ShoppingCarView(ViewSetMix ...
- Django-restframework 源码之认证组件源码分析
Django-restframework 源码之认证组件源码分析 一 前言 之前在 Django-restframework 的流程分析博客中,把最重要的关于认证.权限和频率的方法找到了.该方法是 A ...
- Django rest framework框架——APIview源码分析
一.什么是rest REST其实是一种组织Web服务的架构,而并不是我们想象的那样是实现Web服务的一种新的技术,更没有要求一定要使用HTTP.其目标是为了创建具有良好扩展性的分布式系统. 可用一句话 ...
- Django框架之DRF 认证组件源码分析、权限组件源码分析、频率组件源码分析
认证组件 权限组件 频率组件
- Django rest framework 权限操作(源码分析)
知识回顾http://www.cnblogs.com/ctztake/p/8419059.html 这一篇是基于上一篇写的,上一篇谢了认证的具体流程,看懂了上一篇这一篇才能看懂, 当用户访问是 首先执 ...
- DRF框架(一)——restful接口规范、基于规范下使用原生django接口查询和增加、原生Django CBV请求生命周期源码分析、drf请求生命周期源码分析、请求模块request、渲染模块render
DRF框架 全称:django-rest framework 知识点 1.接口:什么是接口.restful接口规范 2.CBV生命周期源码 - 基于restful规范下的CBV接口 3.请求组件 ...
- element-ui 组件源码分析整理笔记目录
element-ui button组件 radio组件源码分析整理笔记(一) element-ui switch组件源码分析整理笔记(二) element-ui inputNumber.Card .B ...
- Django的settings文件部分源码分析
Django的settings文件部分源码分析 在编写Django项目的过程中, 其中一个非常强大的功能就是我们可以在settings文件配置许多选项来完成我们预期的功能, 并且这些配置还必须大写, ...
- ceph-csi组件源码分析(1)-组件介绍与部署yaml分析
更多ceph-csi其他源码分析,请查看下面这篇博文:kubernetes ceph-csi分析目录导航 ceph-csi组件源码分析(1)-组件介绍与部署yaml分析 基于tag v3.0.0 ht ...
随机推荐
- asp.net core使用水晶报表问题
背景 最近项目上遇到一个需求,要后台通过定时任务把水晶报表生成pdf文件,然后邮件发送给相关人. 技术实现思路 选用ASP.NET Core框架(基于2.2版本),通过IHostedS ...
- Java进阶——Java中的字符串常量池
转载. https://blog.csdn.net/qq_30379689/article/details/80518283 字符串常量池 JVM为了减少字符串对象的重复创建,其内部维护了一个特殊的内 ...
- springcloud使用之断路器hystrix
上一篇文章提到我们最近开了个新项目,目的是将新的业务放到新项目中,老项目单独维护,再逐步迁移老项目到新项目里.但就在前端时间生产环境发生了一个事故,事故开始的异常是我们的业务发现前端h5页面办理很慢, ...
- Java多线程编程(4)--线程同步机制
一.锁 1.锁的概念 线程安全问题的产生是因为多个线程并发访问共享数据造成的,如果能将多个线程对共享数据的并发访问改为串行访问,即一个共享数据同一时刻只能被一个线程访问,就可以避免线程安全问题.锁 ...
- day22——从空间角度研究类、类与类之间的关系
day22 从空间角度研究类 何处添加对象属性 在类的______init______可以添加 class Human: mind = "有思想的" def __init__(se ...
- 【实战经验】STM32烧录
1.编译 2.配置烧录工具 2.配置烧录工具 3.配置烧录工具(一般街上Jlink就能检测到对应的STM32芯片) 5.选择FLASH 4.烧录 5.烧录完成
- yii2 AppAsset.php 和 assetManager 组件
01) 背景:Yii2中使用了 AdminLTE 3.0.0 后框架自带的bootstrap.css 与 admin样式有冲突,需要去掉 bootstrap.css 在 backend/config ...
- Jmeter相关参数
一.线程组 线程组主要包含三个参数:线程数.准备时长(Ramp-Up Period(in seconds)).循环次数. 线程数:虚拟用户数.一个虚拟用户占用一个进程或线程.设置多少虚拟用户数在这里也 ...
- Js判断对象是否是数组的方法
1.ECMAScript5中有一个现成的方法:Array.isArray(). var obj = {1:[1],2:[2]}, arr = [1], str = "1"; Arr ...
- Node.js实现用户评论社区(体验前后端开发的乐趣)
前面 接着上一节的内容来,今天我们要完成一个用Node开发后台服务器,实现一个简单的用户评论社区.可以先看下效果图: 开始 建立项目文件夹comment-list,在里面新建一个public文件夹,p ...