spring集成cxf实现webservice接口功能
由于cxf的web项目已经集成了Spring,所以cxf的服务类都是在spring的配置文件中完成的。以下是步骤:
第一步:建立一个web项目。
第二步:准备所有jar包。将cxf_home\lib项目下的所有jar包全部copy到新项目的lib目录下,里面已经包含了spring3.0的jar包。
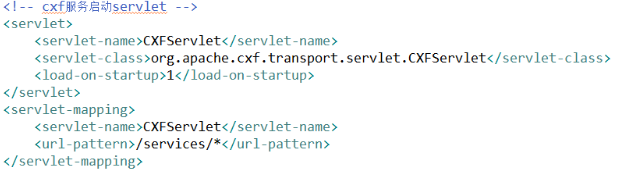
第三步:在web.xml中配置cxf的核心servlet,CXFServlet。
第四步:创建(最好是Copy)cxf-servlet.xml文件。这是一个spring的配置文件。
1、web.xml中配置servlet
如果没有提供给cxf默认的/WEB-INF/cxf-servlet.xml配置文件,则必须要在spring的配置文件中配置以下三行配置(import)。否则将不能加载名称为cxf的bean.从而启动失败。
2、applicationContext.xml
<!--spring发布webservice服务配置 -->

<import resource="classpath:META-INF/cxf/cxf.xml" />

<import resource="classpath:META-INF/cxf/cxf-extension-soap.xml" />

<import resource="classpath:META-INF/cxf/cxf-servlet.xml" />

<!-- 注入webservice服务 -->

<!-- 统一工号管理接口 -->

<bean id="UnifiedNoServiceBean" class="com.webservice.unifiedno.service.impl.UnifiedNoServiceImpl" />

<jaxws:server id="UnifiedNoService" serviceClass="com.webservice.unifiedno.service.UnifiedNoService" address="/unifiedNoService">

<jaxws:serviceBean>

<ref bean="UnifiedNoServiceBean" />

</jaxws:serviceBean>

</jaxws:server>
注意:
1、<import>的三个文件是否需要全部引入根据cxf框架版本不同而不同
2、address的值为webservice注解的值:@WebService(serviceName = "unifiedNoService")
3、必须要在声明为serviceClass的接口上声明@WebSerive注解,因为,要使用了接口,在接口上添加的注解才会有效。
4、serviceClass:必须为一个接口,并在接口上必须使用@WebService注解否则调用时会抛出异常
5、serviceBean:是实际服务的类,必须是serviceClass的子类,此类上面即可以使用@WebService注解,也可以不使用
6、address:访问地址,省去前面的ip:port,注意在此注册的类,必须要添加@WebService的注解
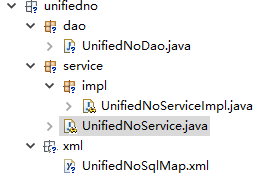
3、写接口及实现类
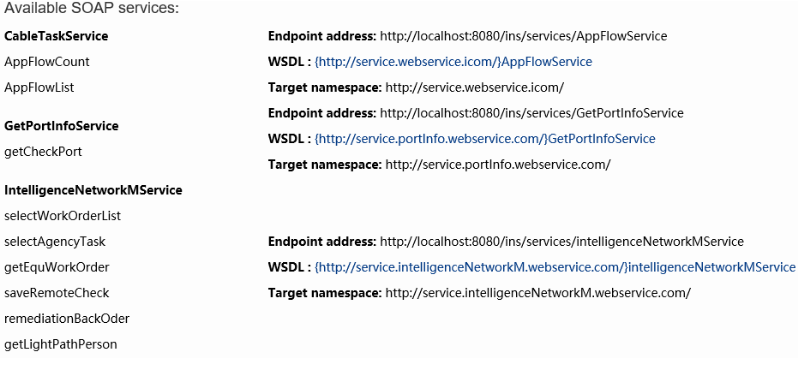
启动项目,测试cxf是否配置成功:
访问:http://localhost:8080/ins/services,会列出所有已经发布的webservice接口服务
4、测试
http://localhost:8080/ins/services/unifiedNoService?wsdl

Java项目代码调用服务:
使用纯Java项目调用
1、根据客户端生成的代码来调用。(优选这种方式)
请先生成然后在任意的Java项目中调用 。
2、客户端只拥有一个接口,使用JaxWsProxyFactoryBean来调用。
因为以下使用了JaxWsProxyFactoryBean,所以,仍然需要CXF的环境,而使用此环境就会造成Jar文件的大量冗余,所以大家要谨慎选择。
1、注意,此处所说的是在Java项目中调用Spring的服务,并不是在JavaEE项目中调用。后期将会讲到如何在JavaEE项目中调用。
2、建议从wsdl地址获取接口文件,也仅需要接口文件。
JaxWsProxyFactoryBean client = new JaxWsProxyFactoryBean();

client.setAddress("http://localhost:7777/xcxf2_web/ws/one");

client.setServiceClass(IOneService.class);

IOneService one = client.create(IOneService.class);

String ss = one.sayHi("OK你好");

System.err.println(ss);
在Spring项目中,通过配置文件调用:
以下是使用Spring的配置文件调用:
新建立一个Java项目,并加载cxf的所有包。
只需要生成的接口文件。
在classpath下新建立一个ClientBeans.xml文件.
优点与缺点:
此种情况,适合于一个Javaweb项目已经集成了Spring。并希望通过CXF配置的方式调用Web服务。
此种情况,仍然需要导入CXF的大量jar包。
这种情况也存在一定人优点,如可以将外部的Web服务通过配置文件注入(DI)到Action类中。
说明:
通过<jaxws:client/>来获取WebService,id就不用说了吧。
address是不包含?wsdl的服务地址。
serviceClass是本地的接口名,与服务接口名保持相同才可以。
1、以下是ClientBeans.xml的文件的源代码:
<?xml version="1.0" encoding="UTF-8"?>

<beans xmlns="http://www.springframework.org/schema/beans"

       xmlns:xsi="http://www.w3.org/2001/XMLSchema-instance"

       xmlns:jaxws="http://cxf.apache.org/jaxws"

       xmlns:jaxrs="http://cxf.apache.org/jaxrs"

       xmlns:cxf="http://cxf.apache.org/core"

       xsi:schemaLocation="http://www.springframework.org/schema/beans

                              http://www.springframework.org/schema/beans/spring-beans.xsd

            http://cxf.apache.org/jaxrs http://cxf.apache.org/schemas/jaxrs.xsd

            http://cxf.apache.org/jaxws http://cxf.apache.org/schemas/jaxws.xsd

            http://cxf.apache.org/core http://cxf.apache.org/schemas/core.xsd">

    <jaxws:client id="helloClient"

                   address="http://127.0.0.1:9999/cxf2.4_spring_web/ws/helloworld"

                   serviceClass="com.itcast.cxf.first.IHelloWorld">

    </jaxws:client>

</beans>
1、以下是CxfJavaClient.java的源代码:
package com.itcast.cxfweb.java.client;

import org.springframework.context.ApplicationContext;

import org.springframework.context.support.ClassPathXmlApplicationContext;

import com.itcast.cxf.first.IHelloWorld;

/**

 * Java项目的客户端

 * @author wangjianme

 */

public class CxfJavaClient {

    public static void main(String[] args) {

        //读取配置文件

        ApplicationContext ctx =

            new ClassPathXmlApplicationContext("ClientBeans.xml");

        //get到接口类型并调用

        IHelloWorld hello = (IHelloWorld)ctx.getBean("helloClient");

        String str = hello.sayHello("WJ");

        System.err.println(str);

    }

}
在本域使用jquery访问: --查询所有用户:
<script type="text/javascript">

      $(function(){

          $("#btn1").click(function(){

              var url = "http://localhost:7777/ws2/ws/user";

              var soap = '<soapenv:Envelope xmlns:soapenv="http://schemas.xmlsoap.org/soap/envelope/" '+

                         'xmlns:q0="http://service.ws2.itcast.cn/" '+

                         'xmlns:xsd="http://www.w3.org/2001/XMLSchema" '+

                         'xmlns:xsi="http://www.w3.org/2001/XMLSchema-instance">'+

                         '<soapenv:Body><q0:getUsers/></soapenv:Body></soapenv:Envelope>';

              $.ajax({

                  url:url,//访问的url

                  dataType:'xml',//返回的数据类型

                  type:'post',//请求方式

                  contentType:'application/soap+xml;charset=UTF-8',

                  data:soap,//数据

                  success:function(data,status,xhr){

                      //对返回后的数据进行解析

                      $(data).find("return").each(function(){

                          var nm = $(this).find("name").text();

                          var age = $(this).find("age").text();

                          alert(nm+","+age);

                      });

                  },

                  error:function(xhr,status){

                      alert("出错了:"+status);

                  }

              });

          });

      });

  </script>
向服务器保存用户:
以下是jsclient.jsp的源代码:
<%@ page language="java" contentType="text/html; charset=UTF-8"%>

<%@ taglib uri="http://java.sun.com/jsp/jstl/core" prefix="c"%>

<html>

  <head>

      <script type="text/javascript"

              src="<c:url value='/js/jquery-1.5.js'/>"></script>

  </head>

  <body>

        <label for="name">姓名:</label>

        <input type="text" id="name" name="name"/>

        <br/>

        <a href="#" id="ok">确定</a>

  </body>

  <script type="text/javascript">

      $(function(){

        $("#ok").click(function(){

            var val = $("#name").val();

            if($.trim(val)==""){

                alert("请输入名称");

                return;

            }

            var str = '<?xml version="1.0" encoding="UTF-8"?>'+

                      '<soap:Envelope xmlns:soap="http://schemas.xmlsoap.org/soap/envelope/">'+

                      '<soap:Body><ns2:sayHello xmlns:ns2="http://first.cxf.itcast.com/">'+

                      '<arg0>'+val+'</arg0>'+

                      '</ns2:sayHello></soap:Body></soap:Envelope>';

            $.ajax({

                contentType:'application/xml;charset="UTF-8"',

                dataType:'xml',

                type:'post',

                url:'http://localhost:9999/cxf2.4_spring_web/ws/helloworld',        //直接发向这个地址

                data:str,

                success:function(data){

                    //$(data).find("return").each(function(){

                    //    alert($(this).text());

                    //});                    //使用上面的方法也是可以的

                    var ss = $(data).find("return").first().text();

                    $("<div>").html(ss)

                        .css("border","1px solid blue")

                        .css({width:'50%'}).

                        appendTo($("body"));

                    $("#name").val("");

                }

            },"xml");

        });

      });

  </script>

</html>
spring集成cxf实现webservice接口功能的更多相关文章
- Spring集成CXF发布WebService并在客户端调用
Spring集成CXF发布WebService 1.导入jar包 因为官方下载的包里面有其他版本的sprring包,全导入会产生版本冲突,所以去掉spring的部分,然后在项目根目录下新建了一个CXF ...
- Spring MVC + CXF实现webservice接口
本来都是WebAPI/RestfulAPI接口对外提供接口的,突然有个需求要提供WebService接口,本想着Spring和CXF这么成熟的两个产品,这么的也整不出什么幺蛾子来啊. 结果还真是出了几 ...
- 使用CXF与Spring集成实现RESTFul WebService
以下引用与网络中!!! 一种软件架构风格,设计风格而不是标准,只是提供了一组设计原则和约束条件.它主要用于客户端和服务器交互类的软件.基于这个风格设计的软件可以更简洁,更有层次,更易于实现缓存 ...
- Spring Boot+CXF搭建WebService(转)
概述 最近项目用到在Spring boot下搭建WebService服务,对Java语言下的WebService了解甚少,而今抽个时间查阅资料整理下Spring Boot结合CXF打架WebServi ...
- struts1+spring+myeclipse +cxf 开发webservice以及普通java应用调用webservice的实例
Cxf + Spring+ myeclipse+ cxf 进行 Webservice服务端开发 使用Cxf开发webservice的服务端项目结构 Spring配置文件applicationCont ...
- 使用cxf开发webservice接口
项目中经常用到开发webservice接口,及调用webService接口.这里讲解如何使用cxf开发webService接口. 一.webservice介绍及理解 webservice是一种跨平台, ...
- spring mvc + mybaties + mysql 完美整合cxf 实现webservice接口 (服务端、客户端)
spring-3.1.2.cxf-3.1.3.mybaties.mysql 整合实现webservice需要的完整jar文件 地址:http://download.csdn.net/detail/xu ...
- 脱离spring集成cxf(基于nutz框架)
什么是webService WebService是一种跨编程语言和跨操作系统平台的远程调用技术. 理论资料: http://blog.csdn.net/wooshn/article/details/8 ...
- Spring boot+CXF开发WebService
最近工作中需要用到webservice,而且结合spring boot进行开发,参照了一些网上的资料,配置过程中出现的了一些问题,于是写了这篇博客,记录一下我这次spring boot+cxf开发的w ...
随机推荐
- Hadoop记录-hive操作示范
- 异常来自 HRESULT:0x80070057 (E_INVALIDARG)(转)
莫名其妙的编译总会报错 异常来自 HRESULT:0x80070057 (E_INVALIDARG) 未能加载程序集....... 几次删除引用然后重新引用程序集还是报错 奔溃中.... 网上搜索还真 ...
- java使用google开源工具实现图片压缩【转】
jar包名 import net.coobird.thumbnailator.Thumbnails; import net.coobird.thumbnailator.geometry.Positio ...
- 【leetcode-88,21】 合并两个有序数组/链表
合并两个有序数组 (easy,1过) 给定两个有序整数数组 nums1 和 nums2,将 nums2 合并到 nums1 中,使得 num1 成为一个有序数组. 说明: 初始化 nums1 和 nu ...
- Asp.net+WebSocket+Emgucv实时人脸识别
上个月在网上看到一个用web实现简单AR效果的文章,然后自己一路折腾,最后折腾出来一个 Asp.net+WebSocket+Emgucv实时人脸识别的东西,网上也有不少相关资料,有用winform的也 ...
- [Android] Android Studio 修改Gradle使用国内源
Gradle 仓库中心的项目,下载速度又比较慢, 网上查询了下, 使用阿里云的Maven镜像仓库 在 project 的 build.gradle中修改如下: allprojects { reposi ...
- 细说REST API安全之认证授权
认证授权包含2个方面:(1)访问某个资源时必须携带用户身份信息,如:用户登录时返回用户access_token,访问资源时携带该参数.(2)检查用户是否具备访问当前资源(url或数据)的权限:访问资源 ...
- Silverlight分页
对于分页,首先要明确一些高效率的策略: 1.一次获取还是每次获取一页的数据 既然考虑了分页,肯定是数据量大,大到不能一页来显示,可能会很多页,我的做法更倾向于,首先要考虑用户可能看的页数,就是说用户可 ...
- 【深入理解JVM】:Java类继承关系中的初始化顺序
尝试着仔细阅读thinking in java 看到一篇很好的文章http://blog.csdn.net/u011080472/article/details/51330114
- Linux 下杀毒可用工具 clamav
clamav 杀毒工具:Linux下可用的杀毒工具: 下载地址: 最新 包 0.101 官网下载地址:http://www.clamav.net/downloads最新包地址: https://cla ...