[转] An Introduction to Mutual SSL Authentication
1. Introduction
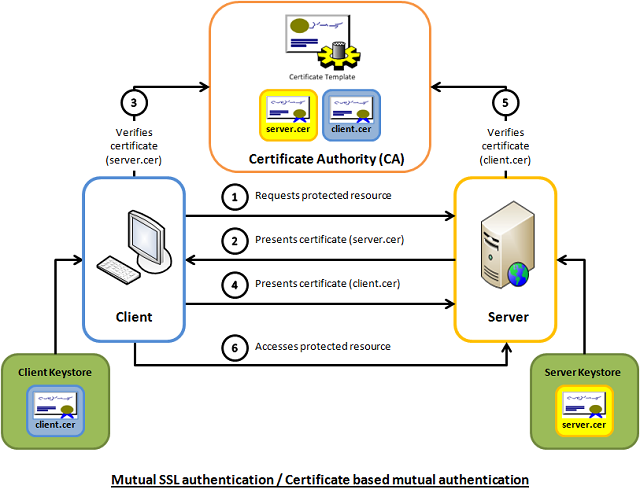
Mutual SSL authentication or certificate based mutual authentication refers to two parties authenticating each other through verifying the provided digital certificate so that both parties are assured of the others' identity. In technology terms, it refers to a client (web browser or client application) authenticating themselves to a server (website or server application) and that server also authenticating itself to the client through verifying the public key certificate/digital certificate issued by the trusted Certificate Authorities (CAs). Because authentication relies on digital certificates, certification authorities such as Verisign or Microsoft Certificate Server are an important part of the mutual authentication process. From a high-level point of view, the process of authenticating and establishing an encrypted channel using certificate-based mutual authentication involves the following steps:
- A client requests access to a protected resource.
- The server presents its certificate to the client.
- The client verifies the server’s certificate.
- If successful, the client sends its certificate to the server.
- The server verifies the client’s credentials.
- If successful, the server grants access to the protected resource requested by the client.
2. Background
Mutual SSL authentication works similar to SSL (Secure Socket Layer) authentication, with the addition of client authentication using digital signatures. Thus, SSL authentication and Mutual SSL authentication also informally known as 1-way SSL authentication and 2-way SSL authentication, respectively. As a developer, if you're interested in developing or be able to debug the mutual SSL authentication effectively, it can be very useful to understand the intricacies of the handshake messages happening under the hood.
2.1 SSL authentication (server --> client)
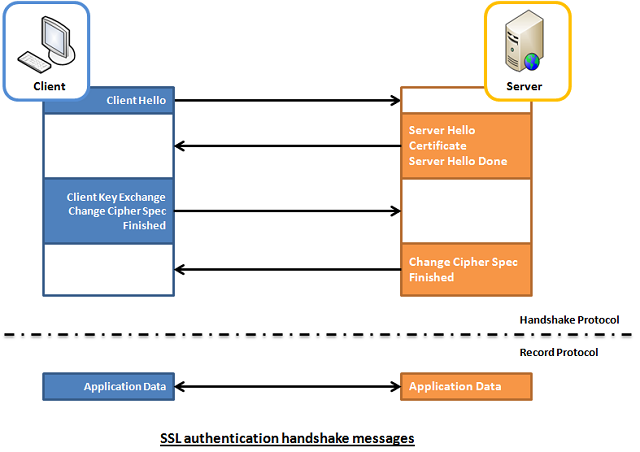
In SSL authentication, the client is presented with a server’s certificate, the client computer might try to match the server’s CA against the client’s list of trusted CAs. If the issuing CA is trusted, the client will verify that the certificate is authentic and has not been tampered with. In this aspect, both client and server use 9 handshake messages to establish the encrypted channel prior to message exchanging.
- Client sends
ClientHellomessage proposing SSL options. - Server responds with
ServerHellomessage selecting the SSL options. - Server sends
Certificatemessage, which contains the server's certificate. - Server concludes its part of the negotiation with
ServerHelloDonemessage. - Client sends session key information (encrypted with server's public key) in
ClientKeyExchangemessage. - Client sends
ChangeCipherSpecmessage to activate the negotiated options for all future messages it will send. - Client sends
Finishedmessage to let the server check the newly activated options. - Server sends
ChangeCipherSpecmessage to activate the negotiated options for all future messages it will send. - Server sends
Finishedmessage to let the client check the newly activated options.
2.2 Mutual SSL Authentication (server <--> client)
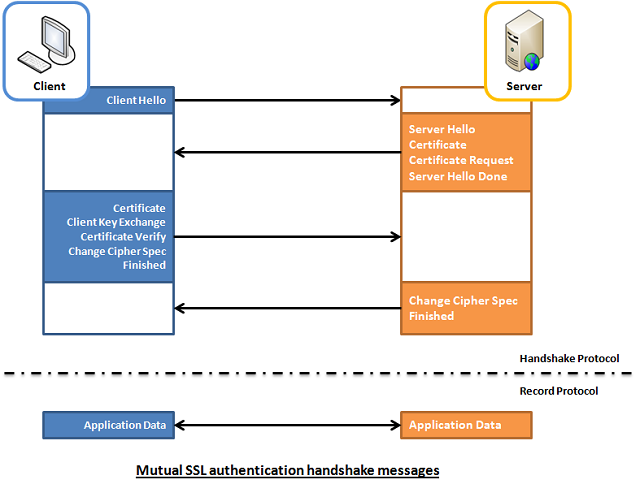
Whereas in mutual SSL authentication, both client and server authenticate each other through the digital certificate so that both parties are assured of the others' identity. In this aspect, both client and server use 12 handshake messages to establish the encrypted channel prior to message exchanging.
- Client sends
ClientHellomessage proposing SSL options. - Server responds with
ServerHellomessage selecting the SSL options. - Server sends
Certificatemessage, which contains the server's certificate. - Server requests client's certificate in
CertificateRequestmessage, so that the connection can be mutually authenticated. - Server concludes its part of the negotiation with
ServerHelloDonemessage. - Client responds with
Certificatemessage, which contains the client's certificate. - Client sends session key information (encrypted with server's public key) in
ClientKeyExchangemessage. - Client sends a
CertificateVerifymessage to let the server know it owns the sent certificate. - Client sends
ChangeCipherSpecmessage to activate the negotiated options for all future messages it will send. - Client sends
Finishedmessage to let the server check the newly activated options. - Server sends
ChangeCipherSpecmessage to activate the negotiated options for all future messages it will send. - Server sends
Finishedmessage to let the client check the newly activated options.
3. Capture and Analyze
To help readers better visualize what's happening under the hood, I've enhanced a code example taken from the Microsoft website so that both client and server are capable of authenticating each other using the mutual SSL authentication. The code sample is very simple, and I won't illustrate much here. Basically, what it does is the client application sends a "Hello from the client." message to the server and the server application replies with a "Hello from the server." message, right after the mutual SSL authentication is completed successfully.
To capture the handshake messages transacted between the client and server, I use one of the popular and open-source packet analyzer tools called WireShark. It is a powerful and easy to use packet capture and analyzer tool, which can captures messages over a hundred of protocols. To learn more about how you can make use of this tool, please visit its website.
However, due to the lack of supported Loopback Interface in Windows operating system, I've to setup the client and server application running on two different machines in order to use Wireshark to capture their handshake messages. The handshake messages captured while running the applications are shown in the screenshot below, and the IP address "10.5.3.28" and "10.5.3.18" in the Source or Destination columns represents "The Client" and "The Server", respectively.
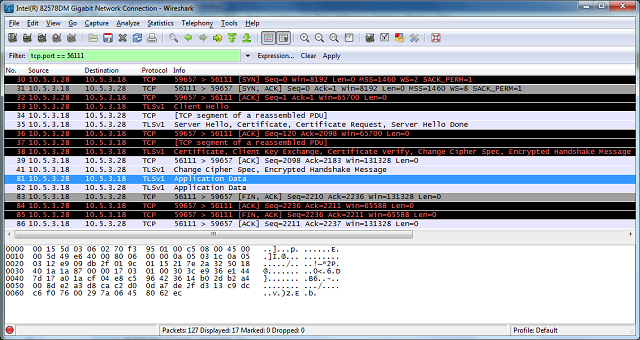
For analysis and verifying purposes, the handshake messages that we're concerned about are summarized and listed below:
No.30, 31 and 32 are the TCP (Transmission Control Protocol) handshake messages.
No.33 - Corresponding to Section 2.2 - Item 1.
No.35 - It contains 4 messages, which are:
- Server Hello - corresponding to Section 2.2 - Item 2.
- Certificate - corresponding to Section 2.2 - Item 3.
- Certificate Request - corresponding to Section 2.2 - Item 4.
- Server Hello Done - corresponding to Section 2.2 - Item 5.
No.38 - It contains 5 messages, which are
- Certificate - corresponding to Section 2.2 - Item 6.
- Client Key Exchange - corresponding to Section 2.2 - Item 7.
- Certificate Verify - corresponding to Section 2.2 - Item 8.
- Change Cipher Spec - corresponding to Section 2.2 - Item 9.
- Encrypted Handshake Message - corresponding to the Finish message listed in Section 2.2 - Item 10.
No.41 - It contains 2 messages, which are
- Change Cipher Spec - corresponding to Section 2.2 - Item 11.
- Encrypted Handshake Message - corresponding to the Finish message listed in Section 2.2 - Item 12.
Messages from No.81 onwards are application data messages exchange between the client and server.
4. Using the Code
The demo project included in this article, which is available for download at the top of this article, is intended to be run locally as opposed to the captured one shown above. This is because the certificates included in the demo project are generated for "localhost" use only. If you would like to try it out, please follow the steps outlined below to get it up and running on your workstation.
4.1 Install the Client and Server Certificate
Follow the steps outlined below to install the client and server certificates into the Windows certificate store:
- Unzip the downloaded demo project anywhere on the file system.
- Open a Snap-in window
- Start -> Run -> Type mmc
- Add/Remove Snap-in... (Ctrl-M)
- Add a Certificates snap-in for ‘My user account’
- Expand the (Trusted Root Certification Authorities)/Certificates node
- Right click the Certificates folder and choose All Tasks – Import
- Browse to the "Certificates" folder included in the demo project.
- Import the "MyServer.cer" and click through the remaining windows and finish.
- Repeat the step 4 and 5.
- Import the "MyClient.cer" certificate and click through the remaining windows and finish.
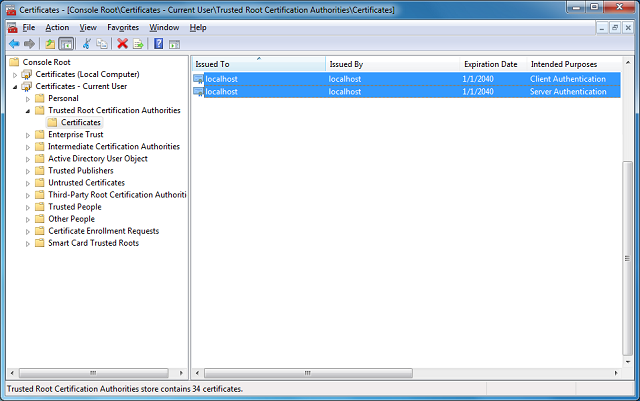
- Now, you should see the 2 imported certificates, which has the same details as the screenshot below (other irrelevant certificates are not shown here)
4.2 Build and Run the Solution
- Open the "MutualSslDemo.sln" solution in Visual Studio.
- Hit F5 to run the solution.
- Now, you shall see similar results as the one shown below:
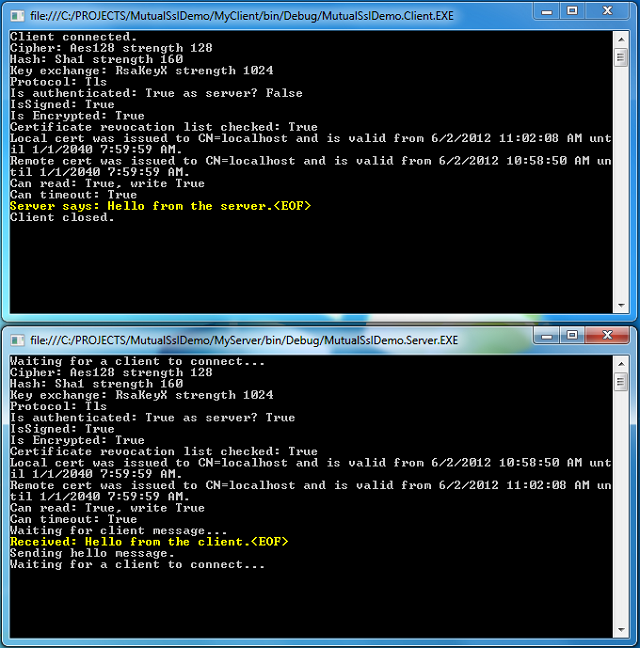
Of course, you can switch between the Mutual SSL authentication and SSL authentication behavior in the demo project (MyServer) by setting the argument "clientCertificateRequired" of the SslStream.AuthenticateAsServer function to true and false, respectively.
 Collapse | Copy Code
// Mutual SSL authentication (requires client certificate)

   sslStream.AuthenticateAsServer(certificate, true, SslProtocols.Default, true);

// SSL authentication only (do not require client certificate)

   sslStream.AuthenticateAsServer(certificate, false, SslProtocols.Default, true);
[转] An Introduction to Mutual SSL Authentication的更多相关文章
- SSL (Secure Sockets Layer)
本文转载自SSL (Secure Sockets Layer) TLS简介 The Transport Layer Security (TLS) protocol aims primarily to ...
- 推荐一个比FiddlerCore好用的HTTP(S)代理服务器
为什么不用FiddlerCore? 说到FiddlerCore大家可能会比较陌生,那么它哥Fiddler就比较熟悉了:抓包.模拟低带宽.修改请求我平时比较常用.Fiddler的本质就是一个HTTP代理 ...
- 你想要了解但是却羞于发问的有关SSL的一切
Everything You Ever Wanted to Know About SSL (but Were Afraid to Ask) Or perhaps more accurately, &q ...
- Using JAAS Authentication in Java Clients---weblogic document
The following topics are covered in this section: JAAS and WebLogic Server JAAS Authentication Devel ...
- Cryptographic method and system
The present invention relates to the field of security of electronic data and/or communications. In ...
- 网络服务器之HTTPS服务
import ssl, socket, time if __name__ == "__main__": context = ssl.SSLContext(ssl.PROTOCOL_ ...
- Network Load Balancing Technical Overview--reference
http://technet.microsoft.com/en-us/library/bb742455.aspx Abstract Network Load Balancing, a clusteri ...
- mailsend - Send mail via SMTP protocol from command line
Introduction mailsend is a simple command line program to send mail via SMTP protocol. I used to sen ...
- How To Setup a CA
How To Setup a CA Original Version by Ian AldermanUpdated by Zach Miller Introduction You can set up ...
随机推荐
- 【c # 数据库】存储过程
可理解存储过程是方法,快速调用,方便使用. 数据库建立新的存储过程: CREATE PROCEDURE myProc -- Add the parameters for the stored proc ...
- TZOJ 2289 Help Bob(状压DP)
描述 Bob loves Pizza but is always out of money. One day he reads in the newspapers that his favorite ...
- CentOS7+CDH5.14.0安装全流程记录,图文详解全程实测-3禁止交换和禁用大页面
1.禁止交换(每台机器都要做): 执行命令:vim /etc/sysctl.conf 增加一行:vm.swappiness=0 执行命令:sudo sysctl vm.swappiness=0 2.禁 ...
- Ztree的onClick和onCheck事件
如下图所示,点击框选中,再点击框取消.现在需加上点击字体也能选中,再点击则取消 思路:点击事件是onClick,勾选的回调函数为onCheck,要实现上面需求,我们只需要在callback里新增一个点 ...
- Mysql数据库性能优化(一)
参考 http://www.jb51.net/article/82254.htm 今天,数据库的操作越来越成为整个应用的性能瓶颈了,这点对于Web应用尤其明显.关于数据库的性能,这并不只是DBA才需要 ...
- ORACLE设置用户密码不过期
1.查看用户的 profile 是哪个,一般是 default SELECT USERNAME, PROFILE FROM dba_users; 2.查看指定概要文件(这里是1中对应的profile) ...
- clean-room 洁净室软件工程
众所周知,软件工程的主要目的是提高软件的开发效率和软件质量.近年来发展起来的洁净室软件工程(cleanroom software engineering)提出了用统计的质量控制方法管理软件 ...
- 关于js中操作数组的一些方法
网上找的通篇看了一遍讲的很透收藏了! 转自(https://www.cnblogs.com/blogs-8888/p/6518683.html) 1.锁定数组的长度(让数组的长度变成只读). 1 2 ...
- 分析easyswoole3.0源码,体验es3(三)
demo在手,总得去试试看效果吧.我们先把默认的服务改成webserver,并且添加数据库的配置. 建立数据库,github里面有相关内容 CREATE TABLE `user_list` ( `us ...
- 异步async与await的简单探究
在学习.net core的过程中,到处见到异步的使用,Task.async.await随处可见.有点疑惑,就去了解了下这个过程是怎样的. 下面是一段代码,去看看是怎么执行的吧. 一.看看异步执行的方式 ...