spring深入学习(四)-----spring aop
AOP概述
aop其实就是面向切面编程,举个例子,比如项目中有n个方法是对外提供http服务的,那么如果我需要对这些http服务进行响应时间的监控,按照传统的方式就是每个方法中添加相应的逻辑,但是这些逻辑是重复的,我无非是需要记录请求的时间以及响应时间,另外可能需要加上请求入参以及响应出参。这时候就可以把这些http服务看成切面,通过aop的方式在方法前和方法后去做点什么操作。
aop的实现者有很多,包括AspectJ、Spring AOP等等,当然我们重点就放在Spring aop上了。
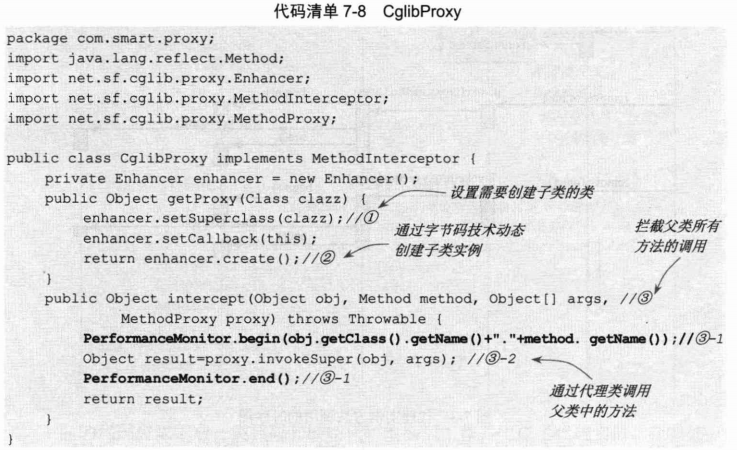
在spring中,aop可以由jdk动态代理或cglib实现,这地方的示例可以看下本人之前的文章了动态代理
jdk动态代理跟cglib有个重要的区别就是jdk动态代理的类必须要实现了某个接口,但是cglib则没这个要求。
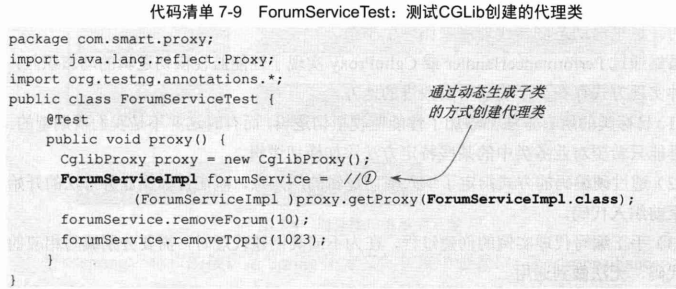
针对cglib,举例如下:
spring aop简单示例
业务代码
@Component("knight")

public class BraveKnight {

    public void saying(){

        System.out.println("我是骑士..(切点方法)");

    }

}
package com.cjh.aop2;

import org.aspectj.lang.ProceedingJoinPoint;

import org.aspectj.lang.annotation.After;

import org.aspectj.lang.annotation.Around;

import org.aspectj.lang.annotation.Aspect;

import org.aspectj.lang.annotation.Before;

import org.aspectj.lang.annotation.Pointcut;

import org.springframework.stereotype.Component;

/**

 * 注解方式声明aop

 * 1.用@Aspect注解将类声明为切面(如果用@Component("")注解注释为一个bean对象,那么就要在spring配置文件中开启注解扫描,<context:component-scan base-package="com.cjh.aop2"/>

 *      否则要在spring配置文件中声明一个bean对象)

 * 2.在切面需要实现相应方法的前面加上相应的注释,也就是通知类型。

 * 3.此处有环绕通知,环绕通知方法一定要有ProceedingJoinPoint类型的参数传入,然后执行对应的proceed()方法,环绕才能实现。

 */

@Component("annotationTest")

@Aspect

public class AnnotationTest {

    //定义切点

    @Pointcut("execution(* *.saying(..))")

    public void sayings(){}

    /**

     * 前置通知(注解中的sayings()方法,其实就是上面定义pointcut切点注解所修饰的方法名,那只是个代理对象,不需要写具体方法,

     * 相当于xml声明切面的id名,如下,相当于id="embark",用于供其他通知类型引用)

     * <aop:config>

        <aop:aspect ref="mistrel">

            <!-- 定义切点 -->

            <aop:pointcut expression="execution(* *.saying(..))" id="embark"/>

            <!-- 声明前置通知 (在切点方法被执行前调用) -->

            <aop:before method="beforSay" pointcut-ref="embark"/>

            <!-- 声明后置通知 (在切点方法被执行后调用) -->

            <aop:after method="afterSay" pointcut-ref="embark"/>

        </aop:aspect>

       </aop:config>

     */

    @Before("sayings()")

    public void sayHello(){

        System.out.println("注解类型前置通知");

    }

    //后置通知

    @After("sayings()")

    public void sayGoodbey(){

        System.out.println("注解类型后置通知");

    }

    //环绕通知。注意要有ProceedingJoinPoint参数传入。

    @Around("sayings()")

    public void sayAround(ProceedingJoinPoint pjp) throws Throwable{

        System.out.println("注解类型环绕通知..环绕前");

        pjp.proceed();//执行方法

        System.out.println("注解类型环绕通知..环绕后");

    }

}
<?xml version="1.0" encoding="UTF-8"?>

<beans xmlns="http://www.springframework.org/schema/beans"

    xmlns:xsi="http://www.w3.org/2001/XMLSchema-instance"

    xmlns:context="http://www.springframework.org/schema/context"

    xmlns:aop="http://www.springframework.org/schema/aop"

    xsi:schemaLocation="http://www.springframework.org/schema/beans http://www.springframework.org/schema/beans/spring-beans.xsd

        http://www.springframework.org/schema/aop http://www.springframework.org/schema/aop/spring-aop-4.3.xsd

        http://www.springframework.org/schema/context http://www.springframework.org/schema/context/spring-context-4.3.xsd">

    <!-- 开启注解扫描 -->

    <context:component-scan base-package="com.cjh.aop2"/>

    <!-- 开启aop注解方式,此步骤不能少,这样java类中的aop注解才会生效 -->

    <aop:aspectj-autoproxy/>

</beans>
测试:
package com.cjh.aop2;

import org.springframework.context.ApplicationContext;

import org.springframework.context.support.ClassPathXmlApplicationContext;

public class Test {

    public static void main(String[] args) {

        ApplicationContext ac = new ClassPathXmlApplicationContext("com/cjh/aop2/beans.xml");

        BraveKnight br = (BraveKnight) ac.getBean("knight");

        br.saying();

    }

}
自动创建代理
1、BeanNameAutoProxyCreator
通过名字就可以看出来是干嘛的,可以根据bean的名字来创建自动代理,示例如下:
业务类:
public interface UserService {

    void print();

}

public class UserServiceImpl implements UserService {

    public void print(){

        System.out.println(getClass()+"#print");

    }

}
拦截器:
public class MyMethodInterceptor implements MethodInterceptor {

    @Override

    public Object invoke(MethodInvocation invocation) throws Throwable {

        System.out.println(getClass()+"调用方法前");

        Object ret=invocation.proceed();

        System.out.println(getClass()+"调用方法后");

        return ret;

    }

}
配置类:
@Configuration

public class AppConfig {

    //要创建代理的目标Bean

    @Bean

    public UserService userService(){

        return new UserServiceImpl();

    }

    //创建Advice或Advisor

    @Bean

    public Advice myMethodInterceptor(){

        return new MyMethodInterceptor();

    }

    //使用BeanNameAutoProxyCreator来创建代理

    @Bean

    public BeanNameAutoProxyCreator beanNameAutoProxyCreator(){

        BeanNameAutoProxyCreator beanNameAutoProxyCreator=new BeanNameAutoProxyCreator();

        //设置要创建代理的那些Bean的名字

        beanNameAutoProxyCreator.setBeanNames("userSer*");

        //设置拦截链名字(这些拦截器是有先后顺序的)

        beanNameAutoProxyCreator.setInterceptorNames("myMethodInterceptor");

        return beanNameAutoProxyCreator;

    }

}
测试:
public class Main {

    public static void main(String[] args) {

        ApplicationContext applicationContext=new AnnotationConfigApplicationContext(AppConfig.class);

        UserService userService= applicationContext.getBean(UserService.class);

        userService.print();

    }

}
自定义注解+BeanNameAutoProxyCreator
基于上面说的,对一些http接口做个响应时间监控,先以一个接口为例吧!
注解(PerformanceMonitor):
package com.ty.annotation;

import java.lang.annotation.ElementType;

import java.lang.annotation.Retention;

import java.lang.annotation.RetentionPolicy;

import java.lang.annotation.Target;

//代表此注解是运行过程中生效

@Retention(RetentionPolicy.RUNTIME)

//此注解作用于方法上

@Target(ElementType.METHOD)

public @interface PerformanceMonitor {

    String value() default "";

}
AnnotationController:
package com.ty.controller;

import com.ty.annotation.PerformanceMonitor;

import org.springframework.stereotype.Controller;

@Controller

public class AnnotationController {

    @PerformanceMonitor

    public String testServer() {

        System.out.println("do someThing");

        return "test";

    }

}
BeanNameAutoProxyConfig:
package com.ty.configuration;

import org.springframework.aop.framework.autoproxy.BeanNameAutoProxyCreator;

import org.springframework.context.annotation.Bean;

import org.springframework.context.annotation.Configuration;

@Configuration

public class BeanNameAutoProxyConfig {

    @Bean

    public BeanNameAutoProxyCreator create() {

        BeanNameAutoProxyCreator beanNameAutoProxyCreator = new BeanNameAutoProxyCreator();

        //为所有的controller创建自动动态代理

        beanNameAutoProxyCreator.setBeanNames("*Controller");

        //代理的具体的业务逻辑交给bean-----performanceInterceptor

        beanNameAutoProxyCreator.setInterceptorNames("performanceInterceptor");

        return beanNameAutoProxyCreator;

    }

}
PerformanceInterceptor:
package com.ty.interceptor;

import com.ty.annotation.PerformanceMonitor;

import org.aopalliance.intercept.MethodInterceptor;

import org.aopalliance.intercept.MethodInvocation;

import org.springframework.cglib.proxy.MethodProxy;

import org.springframework.stereotype.Service;

import java.lang.reflect.Method;

@Service

public class PerformanceInterceptor implements MethodInterceptor {

    public Object invoke(MethodInvocation methodInvocation) throws Throwable {

        Object result = null;

        //判断被代理类的方法上是否使用了@PerformanceMonitor注解

        PerformanceMonitor performanceMonitor = methodInvocation.getMethod().getAnnotation(PerformanceMonitor.class);

        if(performanceMonitor != null) {

            //具体的代理逻辑,实现aop的效果

            System.out.println("----------before----" + methodInvocation.getMethod().getName());

            result = methodInvocation.proceed();

            System.out.println("----------after----" + methodInvocation.getMethod().getName() + ";该笔调用耗时:" + (System.currentTimeMillis() - t1) + "ms");
        }else {

            //不使用该注解,则走原方法的调用逻辑

            result = methodInvocation.proceed();

        }

        return result;

    }

}
applicationContext.xml:
<?xml version="1.0" encoding="UTF-8"?>

<beans xmlns="http://www.springframework.org/schema/beans"

       xmlns:xsi="http://www.w3.org/2001/XMLSchema-instance"

       xmlns:context="http://www.springframework.org/schema/context"

       xsi:schemaLocation="http://www.springframework.org/schema/beans http://www.springframework.org/schema/beans/spring-beans.xsd http://www.springframework.org/schema/context http://www.springframework.org/schema/context/spring-context.xsd">

    <!--自动扫描包配置-->

    <context:component-scan base-package="com.ty"/>

    <bean id="student" class="com.ty.beans.Student">

        <!-- property代表的是set方法注入-->

        <property name="age" value="27"></property>

        <property name="name" value="马云"></property>

    </bean>

    <bean id="school" class="com.ty.beans.School">

        <!-- constructor代表的是构造器注入-->

        <constructor-arg ref="student"></constructor-arg>

    </bean>

</beans>
测试类:
package com.ty.beans;

import com.ty.controller.AnnotationController;

import javafx.application.Application;

import org.junit.Test;

import org.junit.runner.RunWith;

import org.springframework.beans.factory.BeanFactory;

import org.springframework.beans.factory.xml.XmlBeanFactory;

import org.springframework.context.ApplicationContext;

import org.springframework.context.support.ClassPathXmlApplicationContext;

import org.springframework.test.context.ContextConfiguration;

import org.springframework.test.context.junit4.AbstractJUnit4SpringContextTests;

import org.springframework.test.context.junit4.SpringJUnit4ClassRunner;

@ContextConfiguration(locations = { "classpath:applicationContext.xml" })

@RunWith(SpringJUnit4ClassRunner.class)

public class IOCTest  {

    @Test

    public void testAnnotation() {

        ApplicationContext context = new ClassPathXmlApplicationContext("classpath:applicationContext.xml");

        AnnotationController annotationController = (AnnotationController) context.getBean("annotationController");

        annotationController.testServer();

    }

}
运行结果:
----------before----testServer
do someThing
----------after----testServer;该笔调用耗时:8ms
这样也就实现了性能监控的目的,并且以后项目中所有的controller的接口,只要需要这个功能,加个注解即可。
@AspectJ
基于@AspectJ实现aop是相对简单的方式,上面也有类似的案例,下面详细的说说这个玩意。
aop主要包括切面、切入点、增强方法等核心组成部分。
1、切面
//用来声明这是一个AspectJ

@Aspect

//在此处声明一个Component 是因为Spring扫描注解并不能识别AspectJ 因此在此处声明,不必在applicationContext.xml配置bean标签了

@Component

public class ServiceLog {

    。。。

}
2、切入点
@Pointcut("execution(* com.sample.service.impl..*.*(..))")

public void pc() {}
a、execution()是最常用的切点函数,整个表达式可以分为五个部分,其语法如下所示:
- execution(): 表达式主体。
- 第一个*号:表示返回类型,*号表示所有的类型。
- 包名:表示需要拦截的包名,后面的两个句点表示当前包和当前包的所有子包,com.sample.service.impl包、子孙包下所有类的方法。
- 第二个*号:表示类名,*号表示所有的类。
- *(..):最后这个星号表示方法名,*号表示所有的方法,后面括弧里面表示方法的参数,两个句点表示任何参数。
b、@annotation
另外切入点中的execution()也可以用@Annotation代替,如下:
@AfterReturning("@annotation(com.ty.annotation.PerformanceMonitor)")

public void needTestFun() {

    System.out.println("可以对注明@PerformanceMonitor的方法进行增强");

}
对于所有注明@PerformanceMonitor的方法进行增强。
或者还有一种用法,可以方便拿到注解上的信息
@Around(value = "@annotation(apiOperation)")

public Object logApiCallInfo(ProceedingJoinPoint joinPoint, ApiOperation apiOperation) {

    //TODO 1、这里方便拿到注解的信息。不过注意@annotation(apiOperation)名称要与参数名称一致

    String apiCode = apiOperation.value();

    //TODO 调用业务接口

    result = joinPoint.proceed();

    //TODO 获取接口请求参数,并拼装成json,格式化输出

    Object[] args = joinPoint.getArgs();

    MethodSignature methodSignature = (MethodSignature) joinPoint.getSignature();

    String[] parameterNames = methodSignature.getParameterNames();

    JSONObject jsonObject = new JSONObject();

    if(parameterNames != null && parameterNames.length > 0 && args != null && args.length > 0) {

        for(int i = 0; i < parameterNames.length; i++) {

            jsonObject.put(parameterNames[i], args[i]);

        }

        //标准化输出

        jsonObject.toJsonString();

    }

}
3、增强方法
//环绕通知注解,pc()则是上面的pointcut切入点

@Around("pc()")

//环绕通知会多ProceedingJoinPoint这个参数

public Object log(ProceedingJoinPoint pjp) throws Throwable {

    。。。

}
- @Before
- @AfterReturning
- @Around
- @AfterThrowing
- @After
4、applicationContext.xml
<aop:aspectj-autoproxy/>
spring深入学习(四)-----spring aop的更多相关文章
- (转)SpringMVC学习(四)——Spring、MyBatis和SpringMVC的整合
http://blog.csdn.net/yerenyuan_pku/article/details/72231763 之前我整合了Spring和MyBatis这两个框架,不会的可以看我的文章MyBa ...
- Spring的第四天AOP之注解版
Spring的第四天AOP之注解版 ssm框架 spring 在上一篇博客中,介绍了Spring的AOP的xml版本的使用,在这篇博客中,我将介绍一下,注解版的使用. 常用注解 注解 通知 @Aft ...
- Spring Boot 项目学习 (四) Spring Boot整合Swagger2自动生成API文档
0 引言 在做服务端开发的时候,难免会涉及到API 接口文档的编写,可以经历过手写API 文档的过程,就会发现,一个自动生成API文档可以提高多少的效率. 以下列举几个手写API 文档的痛点: 文档需 ...
- Spring Cloud 学习 之 Spring Cloud Eureka(源码分析)
Spring Cloud 学习 之 Spring Cloud Eureka(源码分析) Spring Boot版本:2.1.4.RELEASE Spring Cloud版本:Greenwich.SR1 ...
- Spring Cloud 学习 之 Spring Cloud Eureka(搭建)
Spring Boot版本:2.1.4.RELEASE Spring Cloud版本:Greenwich.SR1 文章目录 搭建服务注册中心: 注册服务提供者: 高可用注册中心: 搭建服务注册中心: ...
- [ SSH框架 ] Spring框架学习之三(AOP开发和注解的使用)
一.Spring 使用 AspectJ 进行 AOP 的开发:注解的方式 1.1 引入相关的jar包 1.2 引入spring的配置文件 <?xml version="1.0" ...
- Spring的学习(IoC,AOP)等
下面这个系列是非常好的例子: http://www.yiibai.com/spring/spring-3-hello-world-example.html 正在看,把一些基础夯实. IoC可以从下面一 ...
- spring boot 学习(四)Druid连接池的使用配置
Druid介绍 Druid是一个JDBC组件,druid 是阿里开源在 github 上面的数据库连接池,它包括三部分: * DruidDriver 代理Driver,能够提供基于Filter-Cha ...
- Spring Cloud学习笔记--Spring Boot初次搭建
1. Spring Boot简介 初次接触Spring的时候,我感觉这是一个很难接触的框架,因为其庞杂的配置文件,我最不喜欢的就是xml文件,这种文件的可读性很不好.所以很久以来我的Spring学习都 ...
随机推荐
- 一个suse11 sp1的crash工具版本问题
这几年排查的各种类型的crash也比较多了,各种类型的也算见过,但是排查这个crash,走了不该走的弯路,事后显得很low,为了防止自己犯类似错误,也同时提醒后人,记录之. 内核是suse11,sp1 ...
- 两个对象的 hashCode()或equals相同,equals或hashCode不一定相同--《案例演示》
两个对象的 hashCode()或equals相同,equals或hashCode不一定相同 1.两个对象的equals相同,hashCode不一定相同 在重写equals方法,未重写hashCode ...
- Habits of Considerate People
Habits of Considerate People体贴人的八种习惯哲学家亚瑟·叔本华曾经说过:“蜡之可贵,在于燃烧自己温暖他人,人之可贵,在于屈尊敬贤彬彬有礼”,事实的确如此.善意与体贴能够抚慰 ...
- java split方法
String a = "O|O||"; System.out.println(a.split("\\|").length); //["O", ...
- python基础系列教程,数学基础系列教程,数据分析系列教程,神经网络系列教程,深度学习系列视频教程分享交流
大家好,我是一个技术爱好者,目前对大数据人工智能很是痴迷,虽然学历只有高中,目前正在大踏步的向着人工智能狂奔,如果你也想学习,那就来吧 我的学习进度python基础(Numpy,pandas,matp ...
- KCF:High-Speed Tracking with Kernelized Correlation Filters 的翻译与分析(一)。分享与转发请注明出处-作者:行于此路
High-Speed Tracking with Kernelized Correlation Filters 的翻译与分析 基于核相关滤波器的高速目标跟踪方法,简称KCF 写在前面,之所以对这篇文章 ...
- C#中生成GUID的四种格式
var uuid = Guid.NewGuid().ToString(); // 9af7f46a-ea52-4aa3-b8c3-9fd484c2af12 var uuidN = Guid.NewGu ...
- 复杂JSON对象的查询与合并
一个表里存放了全国各地地区.省.市.县区的数据,为了提高加载速度我保存成了本地的JSON文件 结构大致如下: [{ "text": "中华人民共和国", &qu ...
- Linux中Nginx安装教程
Nginx 是一个很强大的高性能Web和反向代理服务器,它具有很多非常优越的特性: 在连接高并发的情况下,Nginx是Apache服务器不错的替代品:Nginx在美国是做虚拟主机生意的老板们经常选择的 ...
- Android 网络编程的陷阱
陷阱一,不要在主线程或者UI线程中建立网络连接 Androd4.0以后,不允许在主线程中建立网络连接,不然会出现莫名其妙的程序退出情况.正确的做法是在主线程中,创建新的线程来运行网络连接程序. // ...