【python】进程与线程
No1:
多进程
from multiprocessing import Process
import os # 子进程要执行的代码
def run_proc(name):
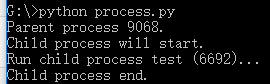
print('Run child process %s (%s)...' % (name, os.getpid())) if __name__=='__main__':
print('Parent process %s.' % os.getpid())
p = Process(target=run_proc, args=('test',))
print('Child process will start.')
p.start()
p.join()
print('Child process end.')
运行结果
创建一个Process实例,用start()方法启动,join()方法可以等待子进程结束后再继续往下运行,通常用于进程间的同步。
No2:
进程池
from multiprocessing import Pool
import os, time, random def long_time_task(name):
print('Run task %s (%s)...' % (name, os.getpid()))
start = time.time()
time.sleep(random.random() * 3)
end = time.time()
print('Task %s runs %0.2f seconds.' % (name, (end - start))) if __name__=='__main__':
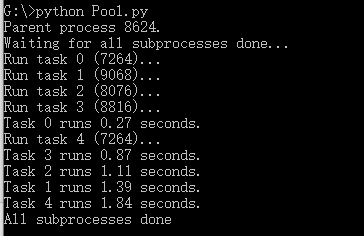
print('Parent process %s.' % os.getpid())
p = Pool(4)
for i in range(5):
p.apply_async(long_time_task, args=(i,))
print('Waiting for all subprocesses done...')
p.close()
p.join()
print('All subprocesses done.')
运行结果
No3:
子进程
import subprocess
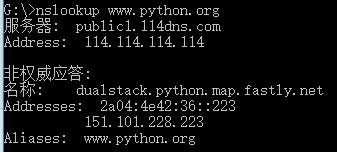
print('$ nslookup www.python.org')
r = subprocess.call(['nslookup','www.python.org'])
print('Exit code:',r)
运行结果
No4:
import subprocess
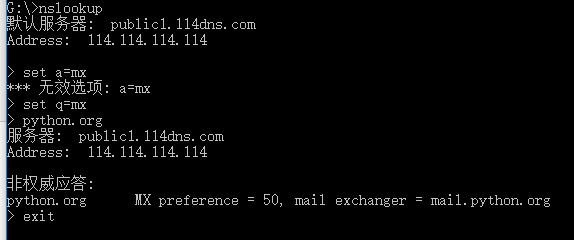
print('$ nslookup')
p=subprocess.Popen(['nslookup'],stdin=subprocess.PIPE,stdout=subprocess.PIPE,stderr=subprocess.PIPE)
output,err=p.communicate(b'set q=mx\npython.org\nexit\n')
print(output.decode('utf-8'))
print('Exit code:',p.returncode)
运行结果
No5:
进程间通信
from multiprocessing import Process,Queue

import os,time,random

def write(q):

    print('Process to write: %s' % os.getpid())

    for value in['A','B','C']:

        print('Put %s to queue...' % value)

        q.put(value)

        time.sleep(random.random())

def read(q):

    print('Process to read: %s' % os.getpid())

    while True:

        value = q.get(True)

        print('Get %s from queue.' % value)

if __name__=='__main__':

    q=Queue()

    pw=Process(target=write,args=(q,))

    pr=Process(target=read,args=(q,))

    pw.start()

    pr.start()

    pw.join()

    pr.terminate()
在Unix/Linux下,可以使用fork()调用实现多进程。
要实现跨平台的多进程,可以使用multiprocessing模块。
进程间通信是通过Queue、Pipes等实现的。
No6:
多线程
Python的标准库提供了两个模块:_thread和threading,_thread是低级模块,threading是高级模块,对_thread进行了封装。绝大多数情况下,我们只需要使用threading这个高级模块。
import time,threading

def loop():

    print('thread %s is running...' % threading.current_thread().name)

    n=0

    while n<5:

        n=n+1

        print('thread %s >>> %s' % (threading.current_thread().name,n))

        time.sleep(1)

    print('thread %s ended.' % threading.current_thread().name)

print('thread %s is running...' % threading.current_thread().name)

t = threading.Thread(target=loop,name='LoopThread')

t.start()

t.join()

print('thread %s ended.' % threading.current_thread().name)
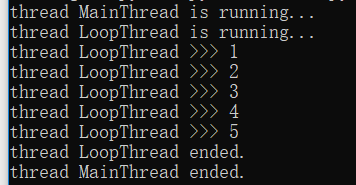
运行结果
No7:
锁Lock
import time,threading

blance=0

lock=threading.Lock()

def run_thread(n):

    for i in range(100000):

        lock.acquire()

        try:

            change_it(n)

        finally:

            lock.release()
死锁
import threading,multiprocessing

def loop():

    x=0

    while True:

        x = x^1

for i in range(multiprocessing.cpu_count()):

    t = threading.Thread(target=loop)

    t.start()
Python的线程虽然是真正的线程,但解释器执行代码时,有一个GIL锁:Global Interpreter Lock,任何Python线程执行前,必须先获得GIL锁,然后,每执行100条字节码,解释器就自动释放GIL锁,让别的线程有机会执行。这个GIL全局锁实际上把所有线程的执行代码都给上了锁,所以,多线程在Python中只能交替执行,即使100个线程跑在100核CPU上,也只能用到1个核。
GIL是Python解释器设计的历史遗留问题,通常我们用的解释器是官方实现的CPython,要真正利用多核,除非重写一个不带GIL的解释器。
所以,在Python中,可以使用多线程,但不要指望能有效利用多核。如果一定要通过多线程利用多核,那只能通过C扩展来实现,不过这样就失去了Python简单易用的特点。
不过,也不用过于担心,Python虽然不能利用多线程实现多核任务,但可以通过多进程实现多核任务。多个Python进程有各自独立的GIL锁,互不影响。
No8:
ThreadLocal
import threading

local_school=threading.local

def process_student():

    std = local_school.student

    print('Hello,%s (in %s)' % (std,threading.current_thread().name))

def process_thread(name):

    local_school.student=name

    process_student()

t1=threading.Thread(target=process_thread,args=('Alice',),name='Thread-A')

t2=threading.Thread(target=process_thread,args=('Bob',),name='Thread-B')

t1.start()

t2.start()

t1.join()

t2.join()
No9:
分布式进程
# task_master.py

import random, time, queue

from multiprocessing.managers import BaseManager

# 发送任务的队列:

task_queue = queue.Queue()

# 接收结果的队列:

result_queue = queue.Queue()

# 从BaseManager继承的QueueManager:

class QueueManager(BaseManager):

    pass

# 把两个Queue都注册到网络上, callable参数关联了Queue对象:

QueueManager.register('get_task_queue', callable=lambda: task_queue)

QueueManager.register('get_result_queue', callable=lambda: result_queue)

# 绑定端口5000, 设置验证码'abc':

manager = QueueManager(address=('', 5000), authkey=b'abc')

# 启动Queue:

manager.start()

# 获得通过网络访问的Queue对象:

task = manager.get_task_queue()

result = manager.get_result_queue()

# 放几个任务进去:

for i in range(10):

    n = random.randint(0, 10000)

    print('Put task %d...' % n)

    task.put(n)

# 从result队列读取结果:

print('Try get results...')

for i in range(10):

    r = result.get(timeout=10)

    print('Result: %s' % r)

# 关闭:

manager.shutdown()

print('master exit.')
# task_worker.py

import time, sys, queue

from multiprocessing.managers import BaseManager

# 创建类似的QueueManager:

class QueueManager(BaseManager):

    pass

# 由于这个QueueManager只从网络上获取Queue,所以注册时只提供名字:

QueueManager.register('get_task_queue')

QueueManager.register('get_result_queue')

# 连接到服务器,也就是运行task_master.py的机器:

server_addr = '127.0.0.1'

print('Connect to server %s...' % server_addr)

# 端口和验证码注意保持与task_master.py设置的完全一致:

m = QueueManager(address=(server_addr, 5000), authkey=b'abc')

# 从网络连接:

m.connect()

# 获取Queue的对象:

task = m.get_task_queue()

result = m.get_result_queue()

# 从task队列取任务,并把结果写入result队列:

for i in range(10):

    try:

        n = task.get(timeout=1)

        print('run task %d * %d...' % (n, n))

        r = '%d * %d = %d' % (n, n, n*n)

        time.sleep(1)

        result.put(r)

    except Queue.Empty:

        print('task queue is empty.')

# 处理结束:

print('worker exit.')
【python】进程与线程的更多相关文章
- python 进程和线程
python中的进程.线程(threading.multiprocessing.Queue.subprocess) Python中的进程与线程 学习知识,我们不但要知其然,还是知其所以然.你做到了你就 ...
- Python进程、线程、协程
进程和线程的解释 进程(process)和线程(thread)是操作系统的基本概念,计算机的核心是CPU,它承担了所有的计算任务: 单个CPU一次只能运行一个任务,代表单个CPU总是运行一个进程,其他 ...
- python进程、线程、协程(转载)
python 线程与进程简介 进程与线程的历史 我们都知道计算机是由硬件和软件组成的.硬件中的CPU是计算机的核心,它承担计算机的所有任务. 操作系统是运行在硬件之上的软件,是计算机的管理者,它负责资 ...
- Python进程和线程
引入进程和线程的概念及区别 1.线程的基本概念 概念 线程是进程中执行运算的最小单位,是进程中的一个实体,是被系统独立调度和分派的基本单位,线程自己不拥有系统资源,只拥有一点在运行中必不可少的资源,但 ...
- Python进程、线程、协程详解
进程与线程的历史 我们都知道计算机是由硬件和软件组成的.硬件中的CPU是计算机的核心,它承担计算机的所有任务. 操作系统是运行在硬件之上的软件,是计算机的管理者,它负责资源的管理和分配.任务的调度. ...
- python——进程、线程、协程
Python线程 Threading用于提供线程相关的操作,线程是应用程序中工作的最小单元. 1 2 3 4 5 6 7 8 9 10 11 12 13 14 #!/usr/bin/env pytho ...
- Python进程与线程
进程与线程:*进程: 进程是系统中程序执行和资源分配的基本单元, 每个进程都有自己的数据段(存储数据).代码段(存储代码).堆栈段(对象和变量). # 全局变量等资源在多个进程中不能 ...
- python进程和线程(六)
协程 协程,又称微线程,纤程.英文名Coroutine.顾名思义,协程是协作式的,也就是非抢占式的程序(线程是抢占式的).协程的关键字是yield,一看到这个就想到了生成器对不对?那就顺便回顾一下生成 ...
- python 进程、线程与协程的区别
进程.线程与协程区别总结 - 1.进程是计算器最小资源分配单位 - 2.线程是CPU调度的最小单位 - 3.进程切换需要的资源很最大,效率很低 - 4.线程切换需要的资源一般,效率一般(当然了在不考虑 ...
- python进阶:Python进程、线程、队列、生产者/消费者模式、协程
一.进程和线程的基本理解 1.进程 程序是由指令和数据组成的,编译为二进制格式后在硬盘存储,程序启动的过程是将二进制数据加载进内存,这个启动了的程序就称作进程(可简单理解为进行中的程序).例如打开一个 ...
随机推荐
- css之relative
一.relative对absolute的限制作用 1.限制left/top/right/bottom定位.absolute默认是在也没的左上角,当父类设定为relative,absolute就被限制在 ...
- socket-WebSocket HttpListener TcpListener 服务端客户端的具体使用案例
/// <summary>/// 启动服务监听的ip和端口的主线程/// </summary>/// <param name="tunnelPort" ...
- Oracle_plsql_开发工具搭建最小化客户端
一:资源下载获取路径: 二:配置方法 1:前提是安装好plsql开发工具 具体安装步骤略 2:配置 简化版的客户端工具. 具体格式:可以参照下文来修改编写使用. orcl_1521 = (DESCRI ...
- Oracle存储过程中跳出循环的写法
注:本文来源于: < Oracle存储过程中跳出循环的写法 > Oracle存储过程中跳出循环的写法 记录exit和return的用法 1:exit用来跳出循环 loop IF V_ ...
- python使用 HTMLTestRunner.py生成测试报告
HTMLTestRunner.py python 2版本 下载地址:http://tungwaiyip.info/software/HTMLTestRunner.html 使用时,先建立一个”PyDe ...
- Linux----centos安装mysql
第一步wget http://repo.mysql.com/mysql-community-release-el7-5.noarch.rpm 第二步rpm -ivh mysql-community-r ...
- 两种lca的求法:树上倍增,tarjan
第一种:树上倍增 f[x,k]表示x的2^k辈祖先,即x向根结点走2^k步达到的结点. 初始条件:f[x][0]=fa[x] 递推式:f[x][k]=f[ f[x][k-1] ][k-1] 一次bfs ...
- 关于vue项目去除margin和padding后设置元素width和height为100%后,出现滚动条问题(移动端)
bug点,这个页面设置100%(100vw和100vh).页面出现抖动. 经过一番检察,原因出现在,vue项目自动添加的一个div上.就是body里的最后一个.如果选中这个元素,右键删除它.页面就不会 ...
- Android Studio 创建不恰当的虚拟设备导致程序不正常运行
操作系统:Windows 10 x64 IDE:Android Studio 3.2.1 使用Android Studio新建第一个Android程序,一开始在虚拟设备上面调试,不管程序怎么修改,运行 ...
- 解决beego中同时开启http和https时,https端口占用问题
在beego的app.go文件中, 找到 // run normal mode if BConfig.Listen.EnableHTTPS { go func() { time.Sleep( * ti ...