webpack+react+redux+es6
一、预备知识
node, npm, react, redux, es6, webpack
二、学习资源
Redux 入门教程 redux middleware 详解 Redux研究
三、工程搭建
之前有写过 webpack+react+es6开发模式 ,文章里介绍了一些简单的配置,欢迎访问。
1.可以npm init, 创建一个新的工程。创建package.json文件,定义需要的dependency,scripts,version等等。
2.新增webpack.config.json文件,定义插件项配置,页面入口文件,文件输出,加载器的配置,其他解决方案配置等。下面提供了简单配置的demo,更详细的讲解,请参考 webpack 入门指南: w2bc.com/Article/50764。
- var webpack = require('webpack');
- var commonsPlugin = new webpack.optimize.CommonsChunkPlugin('common.js');
- module.exports = {
- //插件项
- plugins: [commonsPlugin],
- //页面入口文件配置
- entry: {
- bundle: './index.js'
- },
- //入口文件输出配置
- output: {
- path: './build/',
- filename: '[name].js'
- },
- module: {
- //加载器配置
- loaders: [
- { test: /\.css$/, loader: 'style-loader!css-loader' },
- { test: /\.js$/, loader: 'jsx-loader?harmony' },
- { test: /\.scss$/, loader: 'style!css!sass?sourceMap'},
- { test: /\.(png|jpg)$/, loader: 'url-loader?limit=8192'}
- ]
- },
- //其它解决方案配置
- resolve: {
- root: '******', //绝对路径
- extensions: ['', '.js', '.json', '.scss'],
- alias: {
- AppStore : 'js/stores/AppStores.js',
- ActionType : 'js/actions/ActionType.js',
- AppAction : 'js/actions/AppAction.js'
- }
- }
- };
3.编写如果文件 main.js。这里创建了provider,store,history,router。实现页面的路由以及react组件以及组件间的state交互。关于react-redux内容请参考 react-redux概念理解,关于react-router内容请参考 React Router 使用教程 。
- var React = require('react');
- var ReactDOM = require('react-dom');
- var { Provider } = require('react-redux');
- import { Router } from 'react-router';
- import routes from 'routes';
- import { createHashHistory, useBasename } from 'history';
- import { syncReduxAndRouter } from 'redux-simple-router';
- import { routeReducer } from 'redux-simple-router';
- var configureStore = require('./stores/configureStore');
- // Run our app under the /base URL.
- const history = useBasename(createHashHistory)({
- basename: '/',
- });
- const store = configureStore(window.__INITIAL_STATE__);
- syncReduxAndRouter(history, store);
- ReactDOM.render
- (
- <Provider store={store}>
- <Router history={history}>
- {routes}
- </Router>
- </Provider>,
- document.getElementById('root')
- );
4.创建工程的各个模块
- |--demo1
- |--src //源码
- |--actions // 存放当前触发Redux的动作行为
- |--components // 存放工程内部的公共组件
- |--modules // 存放工程各模块代码
- |--constants // action动作常量
- |--reducers // 存放reducer函数,用来修改store状态
- |--routes // 放置页面路由 react router
- |--stores // 放置stores配置文件
- |--main.js // 入口js
- |--index.html // 工程入口文件html
- |--node_modules // 存放依赖的第三方模块库,使用命令 npm install
- |--build //打包文件存放的目录
- |--webpack.config.js
- |--package.json
四、功能开发
1.做一个简单的Home页面
(1).在modules文件夹新建Home.js, 使用antd 的Menu组件, 展示我们要演示的功能。
- import React from 'react';
- import 'less/home.less';
- import { Scrollbars } from 'react-custom-scrollbars';
- import {Menu} from 'antd';
- //首页
- export class Home extends React.Component{
- constructor(props) {
- super(props);
- this.changeRoute = this.changeRoute.bind(this);
- }
- componentDidMount() {
- }
- changeRoute(e) {
- this.context.history.pushState({}, e.key);
- }
- render() {
- return (
- <div className='home'>
- <Scrollbars style={{ height: 600 }}>
- <Menu className='menu' onClick={this.changeRoute}>
- <Menu.Item key='showSelfMsg'>页面渲染展示信息</Menu.Item>
- <Menu.Item key='frontAndRearInteractive'>模拟前后台交互</Menu.Item>
- <Menu.Item key='pageExchange'>页面切换</Menu.Item>
- <Menu.Item key='extend'>子组件扩展</Menu.Item>
- </Menu>
- </Scrollbars>
- </div>
- );
- }
- }
- Home.contextTypes = {
- history: React.PropTypes.object.isRequired,
- };
- module.exports = Home;
(2).注册Home页面的路由,对应routes/index.js加入如下代码。
- <Route path="/" component={ModuleRouters}>
- <IndexRoute component={Home} />
- </Route>
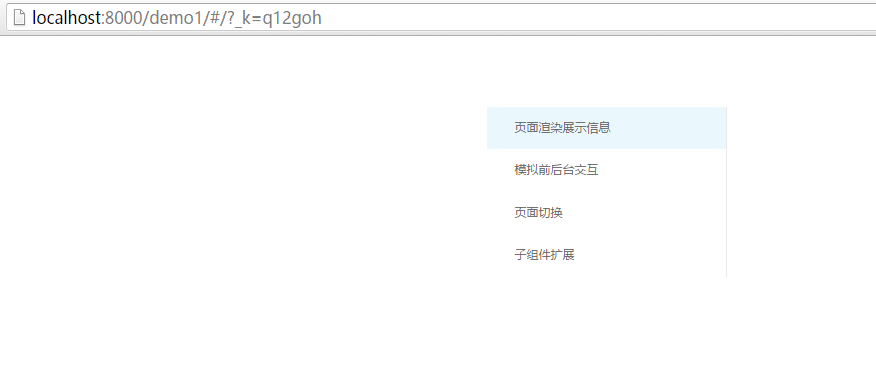
(3).启动工程, npm run dev, 浏览器中输入 http://localhost:8000/demo1,即可预览我们的Home页面。
2.单页面渲染,完成数据的展示和隐藏
(1).在component目录下新建ShowSelfMsg.js, 通过改变state状态,重新渲染页面.
- import React from 'react';
- import {connect} from 'react-redux';
- import {Button} from 'antd';
- import 'less/common.less';
- var mapStateToProps = function(state){
- };
- class ShowSelfMsg extends React.Component{
- constructor(props){
- super(props);
- this.state = {
- showContent: false
- };
- this.showContent = this.showContent.bind(this);
- }
- showContent() {
- this.setState({
- showContent: !this.state.showContent
- });
- }
- componentDidMount() {
- const { dispatch} = this.props;
- //加载该页面的数据
- }
- componentWillReceiveProps(nextProps) {
- }
- render() {
- let showContent = this.state.showContent;
- return (
- <div className='main'>
- <div className='content'>
- <Button type="ghost" onClick={this.showContent}>{!this.state.showContent ? '单击显示内容' : '单击隐藏内容'}</Button>
- {
- showContent ? (<div><span>大家好,我是hjzgg</span></div>) : (null)
- }
- <div className='back'>
- <Button type="ghost" onClick={()=>this.context.history.pushState({}, '/')}>返回</Button>
- </div>
- </div>
- </div>
- );
- }
- }
- ShowSelfMsg.contextTypes = {
- history: React.PropTypes.object.isRequired,
- };
- module.exports = connect(mapStateToProps)(ShowSelfMsg);
(2).注册路由,在routes/index.js中加入如下代码。
- <Route path="/showSelfMsg" component={ShowSelfMsg} />
(3).在Home页面中点击 ‘页面渲染展示信息’,即可进入这个页面。

3.模拟前后台交互
(1).代码编写如下。
(I).在constants新建ActoinTypesjs,定动作类型;
(II).在actions目录中新建simulationRquest.js, 定义要分发的动作;
(III)在reducers目录新建simulationRquest.js,存放reducer函数,用来修改store状态,然后将该函数放入到reducers/index.js中的combineReducers函数中,最终会合并成一个新的reducer;
(IV)components目录中新建FrontAndRearInteractive.js, dispatch 自定义的动作,实现模拟前后台交互功能。
ActionType.js
- export const SIMULATION_REQUEST_SUCCESS = 'SIMULATION_REQUEST_SUCCESS';
- export const SIMULATION_REQUEST_FAIL = 'SIMULATION_REQUEST_FAIL';
- export const INIT_EXTEND_DATA_SUCCESS = 'INIT_EXTEND_DATA_SUCCESS';
- export const INIT_EXTEND_DATA_FAIL = 'INIT_EXTEND_DATA_FAIL';
- export const SAVE_EXTEND_DATA_SUCCESS = 'SAVE_EXTEND_DATA_SUCCESS';
FrontAndRearInteractive.js
- import React from 'react';
- import {connect} from 'react-redux';
- import {Button} from 'antd';
- import {simulationRquestAction} from 'actions/simulationRequest';
- var mapStateToProps = function(state){
- return {
- myRequest: state.myRequest,
- }
- };
- class FrontAndRearInteractive extends React.Component{
- constructor(props){
- super(props);
- this.state = {
- showContent: false
- };
- this.simulationRequest = this.simulationRequest.bind(this);
- }
- simulationRequest() {
- const {dispatch} = this.props;
- console.log('props>>>dispath:' + dispatch);
- dispatch(simulationRquestAction());
- }
- componentDidMount() {
- const { dispatch} = this.props;
- //加载该页面的数据
- }
- componentWillReceiveProps(nextProps) {
- const { myRequest } = nextProps;
- if(myRequest.code && myRequest.msg)
- alert('请求结果:code=' + myRequest.code + ', msg=' + myRequest.msg);
- }
- render() {
- const { myRequest } = this.props;
- return (
- <div className='main'>
- <div className='content'>
- <Button type="ghost" onClick={this.simulationRequest}>模拟请求</Button>
- {
- myRequest && myRequest.data ? (<div><span>{myRequest.data}</span></div>) : (null)
- }
- <div className='back'>
- <Button type="ghost" onClick={()=>this.context.history.pushState({}, '/')}>返回</Button>
- </div>
- </div>
- </div>
- );
- }
- }
- FrontAndRearInteractive.contextTypes = {
- history: React.PropTypes.object.isRequired,
- };
- module.exports = connect(mapStateToProps)(FrontAndRearInteractive);
actions/simulationRquest.js
- import {ajax} from 'utils/ajax';
- import url from 'utils/Url';
- import {
- SIMULATION_REQUEST_SUCCESS, SIMULATION_REQUEST_FAIL,
- } from 'constants/ActionTypes';
- function simulationRquestSuccess(data, msg){
- return {
- type: SIMULATION_REQUEST_SUCCESS,
- data,
- msg,
- }
- }
- function simulationRquestFail(msg){
- return {
- type: SIMULATION_REQUEST_FAIL,
- msg,
- }
- }
- export function simulationRquestAction(args){
- return function (dispatch) {
- console.log('actions>>>dispath:' + dispatch);
- /*
- //真是请求
- ajax({
- method : 'GET',
- url : url.QUERY_ALL_USER,
- query : {'args': args},
- type : 'json',
- success : function(data) {
- return dispatch(simulationRquestSuccess(data));
- },
- error : function(data) {
- return dispatch(simulationRquestFail('request fail'));
- }
- });
- */
- //假设请求成功
- return dispatch(simulationRquestSuccess('我是后台返回数据:hjzgg!!!', '获取数据成功'));
- };
- }
reducers/simulationRquest.js
- import {
- SIMULATION_REQUEST_SUCCESS, SIMULATION_REQUEST_FAIL,
- } from 'constants/ActionTypes';
- import assign from 'lodash/assign';
- function myRequest(state = {
- data: null,
- msg: null,
- code: null,
- }, action) {
- console.log('reducer action属性>>>>>' + JSON.stringify(action));
- switch(action.type) {
- case SIMULATION_REQUEST_SUCCESS:
- return assign({}, state, {
- msg: action.msg,
- data: action.data,
- code: 'success',
- });
- case SIMULATION_REQUEST_FAIL:
- return assign({}, state, {
- msg: action.msg,
- data: null,
- code: 'fail',
- });
- default:
- return state;
- }
- }
- module.exports = myRequest;
(2).路由注册,在routes/index.js增加如下代码。
- <Route path="/frontAndRearInteractive" component={FrontAndRearInteractive} />
(3).在Home页面中点击 ‘模拟前后台交互’,即可进入页面。

4.页面切换
(1).在components目录新建PageExchange.js 和 Childpage.js,分别为父页面和子页面。注意,这里父页面的变量信息 是通过路由的方式传递过去的,当然也可以通过state方式传递过去。
PageExchange.js
- import React from 'react';
- import {connect} from 'react-redux';
- import {Button} from 'antd';
- import 'less/common.less';
- var mapStateToProps = function(state){
- };
- class PageExchange extends React.Component{
- constructor(props){
- super(props);
- this.state = {
- showContent: false
- };
- this.gotoChildPage = this.gotoChildPage.bind(this);
- }
- gotoChildPage() {
- console.log('this.context.history>>>>>>' + JSON.stringify(this.context.history));
- this.context.history.pushState({}, 'childDemoPage/' + '我是父页面信息');
- }
- componentDidMount() {
- const { dispatch} = this.props;
- //加载该页面的数据
- }
- componentWillReceiveProps(nextProps) {
- }
- render() {
- let showContent = this.state.showContent;
- return (
- <div className='main'>
- <div className='content'>
- <Button type="ghost" onClick={this.gotoChildPage}>进入子页面</Button>
- <div className='back'>
- <Button type="ghost" onClick={()=>this.context.history.pushState({}, '/')}>返回</Button>
- </div>
- </div>
- </div>
- );
- }
- }
- PageExchange.contextTypes = {
- history: React.PropTypes.object.isRequired,
- };
- module.exports = connect(mapStateToProps)(PageExchange);
Childpage.js
- import React from 'react';
- import {connect} from 'react-redux';
- import {Button} from 'antd';
- import 'less/common.less';
- var mapStateToProps = function(state){
- return {
- }
- };
- class ChildPage extends React.Component{
- constructor(props){
- super(props);
- this.returnParentPage = this.returnParentPage.bind(this);
- }
- componentDidMount() {
- const { dispatch} = this.props;
- //加载该页面的数据
- }
- componentWillReceiveProps(nextProps) {
- }
- returnParentPage() {
- this.context.history.pushState(null, 'pageExchange');
- }
- render() {
- const parentPageMsg = this.props.params.parentPageMsg;
- return (
- <div className='main'>
- <div className='content'>
- <Button type="ghost" onClick={this.returnParentPage}>返回父页面</Button>
- {
- parentPageMsg ? (<div><span>{parentPageMsg}</span></div>) : (null)
- }
- </div>
- </div>
- );
- }
- }
- ChildPage.contextTypes = {
- history: React.PropTypes.object.isRequired,
- };
- module.exports = connect(mapStateToProps)(ChildPage);
(2).注册路由,在routes/index.js中加入如下代码。
- <Route path="/pageExchange" component={PageExchange} />
- <Route path="/childDemoPage(/:parentPageMsg)" component={ChildPage}/>
(3).在Home页面中点击‘页面切换’,即可进入页面。

5.自定义扩展组件
(1).先说一下应用场景:多个页面可能需要类似的扩展功能,通过自定义扩展组件,完成对信息的加载。主页面信息保存时,通知扩展组件要保存信息了,扩展组件将最新修改的信息告知主页面,主页面获取到全部信息后,一起将数据传给后台,完成主页面信息和扩展信息的保存。
(2).在components目录下新建Page.js和ExtendPage.js,分别为主页面和自定义扩展组件。
Page.js
- import React from 'react';
- import {connect} from 'react-redux';
- import {Button, Input, Form} from 'antd';
- import ExtendPage from 'components/ExtendPage';
- import 'less/common.less';
- const FormItem = Form.Item;
- var mapStateToProps = function(state){
- return {
- extendStore: state.extendStore
- }
- };
- class Page extends React.Component{
- constructor(props){
- super(props);
- this.state = {
- childState: false,
- }
- this.handleSubmit = this.handleSubmit.bind(this);
- this.onSaveExtendPage = this.onSaveExtendPage.bind(this);
- }
- componentDidMount() {
- const { dispatch} = this.props;
- //加载该页面的数据
- }
- componentWillReceiveProps(nextProps) {
- }
- //通知扩展组件,准备保存了
- onSaveExtendPage() {
- if(this.state.childState) {
- this.setState({
- childState: false,
- });
- }
- }
- save(values) {
- //打印父级和子级文本
- alert(JSON.stringify(values));
- }
- handleSubmit() {
- var self = this;
- this.props.form.validateFields((err, values) => {
- if (!err) {//表单符合标准
- //values 为当前父页面的数据,接下来获取子页面的数据
- this.setState({childState: true}, function() {
- const { extendStore } = self.props;
- values.extendData = extendStore && extendStore.data || extendStore;
- self.save(values);
- });
- }
- });
- }
- render() {
- const { getFieldProps } = this.props.form;
- const inputProps = getFieldProps('inputText', {
- initialValue: '',
- rules: [
- {required: true, message: 'the input is required' },
- ],
- validateTrigger: "onBlur"
- });
- return (
- <div style={{marginTop: 50, width: 600, marginLeft: 'auto', marginRight: 'auto'}}>
- <Form onSubmit={this.handleSubmit}>
- <FormItem {...{labelCol: { span: 6 }, wrapperCol: { span: 14 }}} label="父级文本: ">
- <Input {...inputProps} id='inputText' type='text'/>
- </FormItem>
- <FormItem wrapperCol={{ span: 12, offset: 6 }}>
- <Button type="primary" htmlType="submit">提交</Button>
- </FormItem>
- </Form>
- <ExtendPage
- childState={this.state.childState}
- callBack={this.onSaveExtendPage}
- />
- <div style={{float: 'right'}}>
- <Button type="ghost" onClick={()=>this.context.history.pushState({}, '/')}>返回</Button>
- </div>
- </div>
- );
- }
- }
- Page.contextTypes = {
- history: React.PropTypes.object.isRequired,
- };
- Page = Form.create()(Page);
- module.exports = connect(mapStateToProps)(Page);
ExtendPage.js
- import React from 'react';
- import {connect} from 'react-redux';
- import {Button, Form, Input, message} from 'antd';
- const FormItem = Form.Item;
- import {initExtendData, saveExtendDataAction} from 'actions/extendPage';
- var mapStateToProps = function(state){
- return {
- extendStore: state.extendStore
- }
- };
- class ExtendPage extends React.Component{
- constructor(props){
- super(props);
- this.state = {
- }
- this.saveExtendData = this.saveExtendData.bind(this);
- this.checkText = this.checkText.bind(this);
- }
- checkText(rule, value, callBack) {
- if(/\s+/.test(value)) {
- callBack("不能有空白字符");
- } else {
- callBack();
- }
- }
- saveExtendData() {
- this.props.callBack();//保存成功后,更改父页面的childState的状态
- this.props.form.validateFields((err, values) => {
- if (!err) {//表单符合标准
- console.log('save ExtendPage values: ' + JSON.stringify(values));
- const {dispatch} = this.props;
- dispatch(saveExtendDataAction(values));
- }
- });
- }
- componentDidMount() {
- const { dispatch} = this.props;
- //初始化扩展页的数据
- dispatch(initExtendData());
- }
- componentWillReceiveProps(nextProps) {
- const { extendStore, childState } = nextProps;
- if(extendStore && extendStore.msg) {
- message.info(extendStore.msg, 5);
- extendStore.msg = null;
- }
- if(childState) {//父页面 改变 子页面的状态
- this.saveExtendData();
- }
- }
- render() {
- const { getFieldProps } = this.props.form;
- const { extendStore } = this.props;
- const inputValue = extendStore && extendStore.data && extendStore.data.extendInputText || null;
- const inputProps = getFieldProps('extendInputText', {
- initialValue: inputValue,
- rules: [
- {required: true, message: 'the input is required' },
- {validator: this.checkText}
- ],
- validateTrigger: "onBlur"
- });
- return (
- <div>
- <Form>
- <FormItem {...{labelCol: { span: 6 }, wrapperCol: { span: 14 }}} label="扩展本文: ">
- <Input {...inputProps} type="text" id="extendInputText"/>
- </FormItem>
- </Form>
- </div>
- );
- }
- }
- ExtendPage = Form.create()(ExtendPage);
- module.exports = connect(mapStateToProps)(ExtendPage);
(3).说一下组件的扩展机制
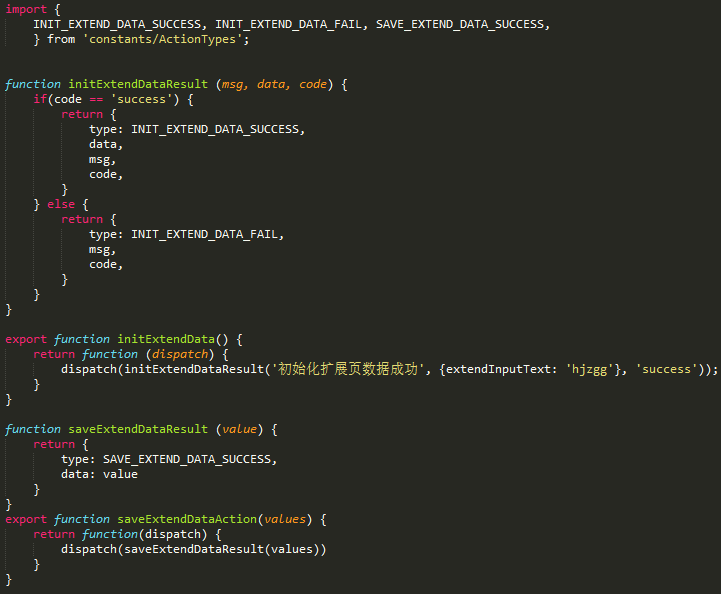
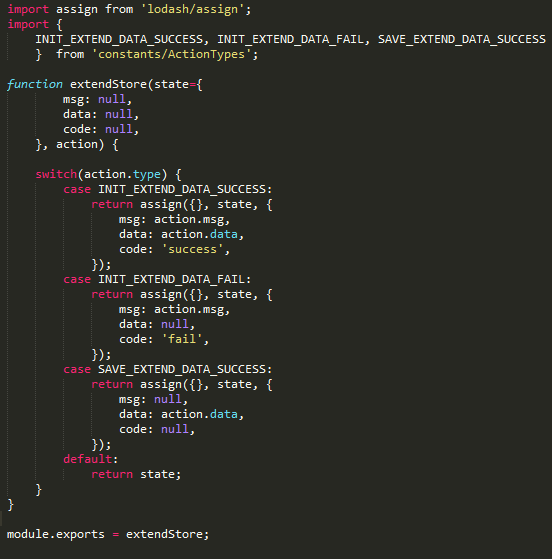
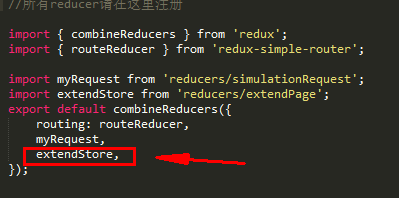
(I).扩展组件自身会维护更新自己state状态,在触发扩展组件保存时,扩展组件将自身数据通过dispatch进行分发,最后通过对应的reducer(这个reducer会通过combineReducers函数合并成一个新的reducer)进行处理,根据逻辑生成新的state。
>>定义动作类型
>>分发动作

>>reducer处理动作,返回新的state
>>自定义的reducer函数通过combineReducers函数进行合并
(II).父级组件如何获取扩展组件的状态?

也就是store中的状态树变化的时候,组件可以通过 mapStateToProps 函数从状态树中获取最新的state。
(III).父级组件如何通知扩展组件 准备保存数据了?

>>扩展组件接收父级组件两个参数:childState, 通知扩展组件状态发生变化; callBack, 修改childState状态,扩张组件通知父级组件更新完成。
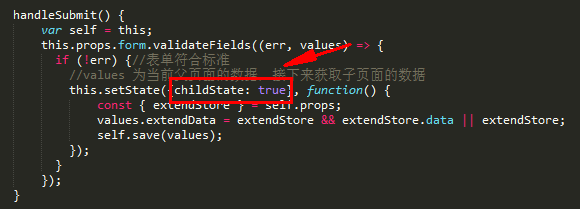
>>父级组件保存数据时,首先获取到自己的数据,然后通过setState()方法改变childState的值,通知扩展组件。最后通过setState方法传入的回调函数(该函数在组件更新完成之后调用)获取到扩展组件的最新state。

>>扩展组件接收到父级组件的通知,刷新store中的state。这样父级组件和扩展组件自身都可以通过mapStateToProps方法获取到最新的state。
(4).注册路由,在routes/index.js中加入如下代码。

(5).在Home页面中点击‘页面切换’,即可进入页面。

五、问题解惑
1.module.filename、__filename、__dirname、process.cwd(): http://www.tuicool.com/articles/bQre2a
2.node.js之path模块: http://www.jianshu.com/p/fe41ee02efc8
3.react-router: http://www.ruanyifeng.com/blog/2016/05/react_router.html?utm_source=tool.lu
4.出现如下错误:Cannot sync router: route state does not exist. Did you install the routing reducer,参考:
5.module.exprots, export, export default区别:
- export default variation
- import variation from 'js file'
- export variation
- import {variation} from 'js file'
- module.exports=variation
- import variation from 'js file'
参考:
http://www.2cto.com/kf/201412/360211.html
http://www.jb51.net/article/33269.htm
http://blog.csdn.net/zhou_xiao_cheng/article/details/52759632
http://blog.csdn.net/zhou_xiao_cheng/article/details/52759632
六、完整项目下载
webpack+react+redux+es6的更多相关文章
- webpack+react+redux+es6开发模式
一.预备知识 node, npm, react, redux, es6, webpack 二.学习资源 ECMAScript 6入门 React和Redux的连接react-redux Redux 入 ...
- webpack+react+redux+es6开发模式---续
一.前言 之前介绍了webpack+react+redux+es6开发模式 ,这个项目对于一个独立的功能节点来说是没有问题的.假如伴随着源源不断的需求,前段项目会涌现出更多的功能节点,需要独立部署运行 ...
- 使用 webpack + react + redux + es6 开发组件化前端项目
因为最近在工作中尝试了 webpack.react.redux.es6 技术栈,所以总结出了一套 boilerplate,以便下次做项目时可以快速开始,并进行持续优化.对应的项目地址:webpack- ...
- react案例->新闻移动客户端--(react+redux+es6+webpack+es6的spa应用)
今天分享一个react应用,应在第一篇作品中说要做一个react+redux+xxx的应用.已经做完一部分,拿出来分享.github地址为:点我就可以咯~ 这里实现了一个新闻移动站的spa.本来想写p ...
- 6周学习计划,攻克JavaScript难关(React/Redux/ES6 etc.)
作者:余博伦链接:https://zhuanlan.zhihu.com/p/23412169来源:知乎著作权归作者所有.商业转载请联系作者获得授权,非商业转载请注明出处. 和大家一样,最近我也看了Jo ...
- 如何从零搭建一个webpack+react+redux+react-redux的开发环境一入门
阅读本文章的时候,你要有一定的基础知识储备,简单的es6知识,模块化思想知识,js基础知识,node基础知识,react等 首先执行npm init,此时我的文件叫case; 下面安装一些需要的npm ...
- webpack+react+es6开发模式
一.前言 实习了两个月,把在公司用到的前端开发模式做个简单的整理.公司里前端开发模式webpack+react+redux+es6,这里去掉了redux. webpack, react, redux等 ...
- 使用react+redux+react-redux+react-router+axios+scss技术栈从0到1开发一个applist应用
先看效果图 github地址 github仓库 在线访问 初始化项目 #创建项目 create-react-app applist #如果没有安装create-react-app的话,先安装 npm ...
- Webpack+React+ES6开发模式入门指南
React无疑是今年最火的前端框架,github上的star直逼30,000,基于React的React Native的star也直逼20,000.有了React,组件化似乎不再步履蹒跚,有了Reac ...
随机推荐
- Volley网络连接
一.Volley a burst or emission of many things or a large amount at once Volley是Android平台上的网络通信库,能使网络通信 ...
- 【原】error C2679: binary '<<' : no operator found which takes a right-hand operand of type 'std::string'
今天遇到一个非常难以排查的BUG,谷歌度娘都问过了依旧无解,最后自己重新尝试之后找到解决方案: 先看一下报错信息: 1>.\lenz.cpp(2197) error C2679: binary ...
- XtraScheduler 日程控件显示自定义标题
下面代码实现一个自定义日程标题 public class CustomHeaderCaptionService : HeaderCaptionServiceWrapper { public Custo ...
- Effetive Java 22 Favor static member classes over nonstatic
Nested class types Usage and remark Advantage Disadvantage static member classes Use for public help ...
- JavaScript Patterns 4.4 Self-Defining Functions
If you create a new function and assign it to the same variable that already holds another function, ...
- 【SQL查询】集合查询之INTERSECT
[SQL查询]集合查询之INTERSECT 1 BLOG文档结构图 2 前言部分 2.1 导读和注意事项 各位技术爱好者,看完本文后,你可以掌握如下的技能,也可以学到一些其它你所不知道的知识,~ ...
- 【php】mysql全局ID生成方案
生产系统随着业务增长总会经历一个业务量由小变大的过程,可扩展性是考量数据库系统高可用性的一个重要指标;在单表/数据库数据量过大,更新量不断飙涨时,MySQL DBA往往会对业务系统提出sharding ...
- 问题解决——XP线程池找不到QueueUserWorkItem
2013年7月11号 主管让同事写一个并发100的小工具进行什么压力测试,据说是创建100个线程. 我表示这真真的是在坑人! 线程创建消耗资源,以自己的笔记本来跑这个东西,时间片都消耗在了线程切换上了 ...
- 设计模式C#实现(五)——抽象工厂模式
抽象工厂模式 意图:提供一个创建一系列相关或相互依赖对象的接口,而无需指定他们具体的类. UML类图: 场景:抽象村商店想销售Pizza和Hamburg等多种商品,而在美国店和中国店要出售本土化的口味 ...
- pushd
# MAN 手册原文: pushd [-n] [+n] [-n] pushd [-n] [dir] Adds a directory to ...
