android 进程/线程管理(三)----Thread,Looper / HandlerThread / IntentService
Thread,Looper的组合是非常常见的组合方式。
Looper可以是和线程绑定的,或者是main looper的一个引用。
下面看看具体app层的使用。
首先定义thread:
package com.joyfulmath.androidstudy.thread;

import com.joyfulmath.androidstudy.TraceLog;

import android.os.Bundle;

import android.os.Handler;

import android.os.Looper;

import android.os.Message;

public class MyLoopThread extends Thread {

    private Looper myLooper = null;

    private MyHandler mHandler = null;

    public MyLoopThread()

    {

        super();

    }

    @Override

    public void run() {

        TraceLog.i("MyLoopThread looper prepare");

        Looper.prepare();

//        myLooper = Looper.getMainLooper(); /*using this can be set as main handler*/

        myLooper = Looper.myLooper();

        mHandler =  new MyHandler(myLooper);

        TraceLog.i("MyLoopThread looper loop");

        Looper.loop();

    }

    public void doAction(int index,String params)

    {

        if(index>0 && index <=3)

        {

            Message msg = mHandler.obtainMessage(index);

            Bundle bundle = new Bundle();

            bundle.putString("key", params);

            msg.setData(bundle);

            mHandler.sendMessage(msg);

        }

        else

        {

            TraceLog.w(index+"");

        }

    }

    public static  class MyHandler extends Handler{

        public MyHandler()

        {

            super();

        }

        public MyHandler(Looper loop)

        {

            super(loop);

        }

        /*make sure that the looper is main or not

         *so you can update UI or send main handler to do it.

         * */

        @Override

        public void handleMessage(Message msg) {

            Bundle bundle = msg.getData();

            String params = bundle.getString("key");

            TraceLog.i(params);

            switch(msg.what)

            {

            case ThreadConstant.INDEX_1:

                TraceLog.d("INDEX_1");

                break;

            case ThreadConstant.INDEX_2:

                TraceLog.d("INDEX_2");

                break;

            case ThreadConstant.INDEX_3:

                TraceLog.d("INDEX_3");

                break;

            }

        }

    }

}
上面这个MyLoopThread类把,hangler,looper,thread融合在一起了,我们看看关键的地方:
    @Override

    public void run() {

        TraceLog.i("MyLoopThread looper prepare");

        Looper.prepare();

//        myLooper = Looper.getMainLooper(); /*using this can be set as main handler*/

        myLooper = Looper.myLooper();

        mHandler =  new MyHandler(myLooper);

        TraceLog.i("MyLoopThread looper loop");

        Looper.loop();

    }
如上,Thread只在说一件是,消息循环。而且可以发送消息到主线程来处理。
如果MyLoopThread里面定义两个handler,会不会有冲突呢?
我们用代码试试看。
我们修改下run以及添加doaction2:
@Override

    public void run() {

        TraceLog.i("MyLoopThread looper prepare");

        Looper.prepare();

//        myLooper = Looper.getMainLooper(); /*using this can be set as main handler*/

        myLooper = Looper.myLooper();

        mHandler =  new MyHandler(myLooper);

        mHandler2 = new Handler(myLooper){

            @Override

            public void handleMessage(Message msg) {

                Bundle bundle = msg.getData();

                String params = bundle.getString("key");

                TraceLog.i("Handler2 "+params);

                switch(msg.what)

                {

                case ThreadConstant.INDEX_1:

                    TraceLog.d("Handler2 INDEX_1");

                    break;

                case ThreadConstant.INDEX_2:

                    TraceLog.d("Handler2 INDEX_2");

                    break;

                case ThreadConstant.INDEX_3:

                    TraceLog.d("Handler2 INDEX_3");

                    break;

                }

            }

        };

        TraceLog.i("MyLoopThread looper loop");

        Looper.loop();

    }
    public void doAction2(int index,String params)

    {

        if(index>0 && index <=3)

        {

            Message msg = mHandler2.obtainMessage(index);

            Bundle bundle = new Bundle();

            bundle.putString("key", params);

            msg.setData(bundle);

            mHandler2.sendMessage(msg);

        }

        else

        {

            TraceLog.w(index+"");

        }

    }
08-03 17:04:40.679: I/MyLoopThread(25483): run: MyLoopThread looper prepare [at (MyLoopThread.java:22)]

08-03 17:04:40.679: I/MyLoopThread(25483): run: MyLoopThread looper loop [at (MyLoopThread.java:50)]

08-03 17:04:40.769: I/Timeline(25483): Timeline: Activity_idle id: android.os.BinderProxy@224def46 time:141675759

08-03 17:04:42.709: I/MyLoopThread$MyHandler(25483): handleMessage: time millseconds one [at (MyLoopThread.java:107)]

08-03 17:04:42.709: D/MyLoopThread$MyHandler(25483): handleMessage: INDEX_2 [at (MyLoopThread.java:114)]

08-03 17:04:47.299: I/MyLoopThread$1(25483): handleMessage: Handler2 time millseconds two [at (MyLoopThread.java:33)]

08-03 17:04:47.299: D/MyLoopThread$1(25483): handleMessage: Handler2 INDEX_2 [at (MyLoopThread.java:40)]

08-03 17:04:52.829: I/MyLoopThread$MyHandler(25483): handleMessage: time millseconds one [at (MyLoopThread.java:107)]

08-03 17:04:52.829: D/MyLoopThread$MyHandler(25483): handleMessage: INDEX_3 [at (MyLoopThread.java:117)]

08-03 17:04:53.479: I/MyLoopThread$MyHandler(25483): handleMessage: time millseconds one [at (MyLoopThread.java:107)]

08-03 17:04:53.479: D/MyLoopThread$MyHandler(25483): handleMessage: INDEX_3 [at (MyLoopThread.java:117)]

08-03 17:04:54.909: I/MyLoopThread$1(25483): handleMessage: Handler2 time millseconds two [at (MyLoopThread.java:33)]

08-03 17:04:54.909: D/MyLoopThread$1(25483): handleMessage: Handler2 INDEX_1 [at (MyLoopThread.java:37)]

08-03 17:04:56.309: I/MyLoopThread$1(25483): handleMessage: Handler2 time millseconds two [at (MyLoopThread.java:33)]

08-03 17:04:56.309: D/MyLoopThread$1(25483): handleMessage: Handler2 INDEX_3 [at (MyLoopThread.java:43)]
查看消息可以看到, handler很好的处理了消息,没有出现错乱的问题。
我们知道,对于每个thread,looper,messagequeue都是唯一的,那为什么没有出错呢?
我们看看之前在《android 进程/线程管理(一)----消息机制的框架》http://www.cnblogs.com/deman/p/4688054.html
中的looper.loop()
里面有一句:
msg.target.dispatchMessage(msg);
是的,这就是分发和处理消息。而target就是我们的handler。
HandlerThread:
对于上面的例子,google提供了一个更方便的解决方案:HandlerThread。
下面是HandlerThread的源码:
@Override

    public void run() {

        mTid = Process.myTid();

        Looper.prepare();

        synchronized (this) {

            mLooper = Looper.myLooper();

            notifyAll();

        }

        Process.setThreadPriority(mPriority);

        onLooperPrepared();

        Looper.loop();

        mTid = -1;

    }
可以看到,handlerThread自己把looper给启动了。
下面是使用handlerthread的代码,比thread,looper更为简单。
package com.joyfulmath.androidstudy.thread;

import com.joyfulmath.androidstudy.TraceLog;

import android.os.Bundle;

import android.os.Handler;

import android.os.HandlerThread;

import android.os.Looper;

import android.os.Message;

public class MyHandlerThread extends HandlerThread{

    MyHandler myHandler = null;

    public MyHandlerThread(String name) {

        super(name);

    }

    @Override

    protected void onLooperPrepared() {

        super.onLooperPrepared();

        myHandler = new MyHandler(getLooper());

    }

    public void doAction(int index,String params)

    {

        if(index>0 && index <=3)

        {

            Message msg = myHandler.obtainMessage(index);

            Bundle bundle = new Bundle();

            bundle.putString("key", params);

            msg.setData(bundle);

            myHandler.sendMessage(msg);

        }

        else

        {

            TraceLog.w(index+"");

        }

    }

    public static  class MyHandler extends Handler{

        public MyHandler()

        {

            super();

        }

        public MyHandler(Looper loop)

        {

            super(loop);

        }

        /*make sure that the looper is main or not

         *so you can update UI or send main handler to do it.

         * */

        @Override

        public void handleMessage(Message msg) {

            Bundle bundle = msg.getData();

            String params = bundle.getString("key");

            TraceLog.i(params);

            switch(msg.what)

            {

            case ThreadConstant.INDEX_1:

                TraceLog.d("INDEX_1");

                break;

            case ThreadConstant.INDEX_2:

                TraceLog.d("INDEX_2");

                break;

            case ThreadConstant.INDEX_3:

                TraceLog.d("INDEX_3");

                break;

            }

        }

    }

}
    private void initView() {

        ...

        btnStart3 = (Button) findViewById(R.id.thread_start_id3);

        btnStart3.setOnClickListener(new OnClickListener() {

            @Override

            public void onClick(View v) {

                myHandlerThread.doAction((int)(Math.random()*3)+1, "handlerthread time millseconds");

            }

        });

    }
以上是启动handlerthread的代码。
IntentService:
我们可以看看源码:
intentservice 本质上就是 service + handlerthread的组成方式!
public abstract class IntentService extends Service {

    private volatile Looper mServiceLooper;

    private volatile ServiceHandler mServiceHandler;

    private String mName;

    private boolean mRedelivery;

    private final class ServiceHandler extends Handler {

        public ServiceHandler(Looper looper) {

            super(looper);

        }

        @Override

        public void handleMessage(Message msg) {

            onHandleIntent((Intent)msg.obj);

            stopSelf(msg.arg1);

        }

    }

    /**

     * Creates an IntentService.  Invoked by your subclass's constructor.

     *

     * @param name Used to name the worker thread, important only for debugging.

     */

    public IntentService(String name) {

        super();

        mName = name;

    }

    /**

     * Sets intent redelivery preferences.  Usually called from the constructor

     * with your preferred semantics.

     *

     * <p>If enabled is true,

     * {@link #onStartCommand(Intent, int, int)} will return

     * {@link Service#START_REDELIVER_INTENT}, so if this process dies before

     * {@link #onHandleIntent(Intent)} returns, the process will be restarted

     * and the intent redelivered.  If multiple Intents have been sent, only

     * the most recent one is guaranteed to be redelivered.

     *

     * <p>If enabled is false (the default),

     * {@link #onStartCommand(Intent, int, int)} will return

     * {@link Service#START_NOT_STICKY}, and if the process dies, the Intent

     * dies along with it.

     */

    public void setIntentRedelivery(boolean enabled) {

        mRedelivery = enabled;

    }

    @Override

    public void onCreate() {

        // TODO: It would be nice to have an option to hold a partial wakelock

        // during processing, and to have a static startService(Context, Intent)

        // method that would launch the service & hand off a wakelock.

        super.onCreate();

        HandlerThread thread = new HandlerThread("IntentService[" + mName + "]");

        thread.start();

        mServiceLooper = thread.getLooper();

        mServiceHandler = new ServiceHandler(mServiceLooper);

    }

    @Override

    public void onStart(Intent intent, int startId) {

        Message msg = mServiceHandler.obtainMessage();

        msg.arg1 = startId;

        msg.obj = intent;

        mServiceHandler.sendMessage(msg);

    }

    /**

     * You should not override this method for your IntentService. Instead,

     * override {@link #onHandleIntent}, which the system calls when the IntentService

     * receives a start request.

     * @see android.app.Service#onStartCommand

     */

    @Override

    public int onStartCommand(Intent intent, int flags, int startId) {

        onStart(intent, startId);

        return mRedelivery ? START_REDELIVER_INTENT : START_NOT_STICKY;

    }

    @Override

    public void onDestroy() {

        mServiceLooper.quit();

    }

    /**

     * Unless you provide binding for your service, you don't need to implement this

     * method, because the default implementation returns null.

     * @see android.app.Service#onBind

     */

    @Override

    public IBinder onBind(Intent intent) {

        return null;

    }

    /**

     * This method is invoked on the worker thread with a request to process.

     * Only one Intent is processed at a time, but the processing happens on a

     * worker thread that runs independently from other application logic.

     * So, if this code takes a long time, it will hold up other requests to

     * the same IntentService, but it will not hold up anything else.

     * When all requests have been handled, the IntentService stops itself,

     * so you should not call {@link #stopSelf}.

     *

     * @param intent The value passed to {@link

     *               android.content.Context#startService(Intent)}.

     */

    protected abstract void onHandleIntent(Intent intent);

}
IntentService
我们首先看onCreate:
    public void onCreate() {

        // TODO: It would be nice to have an option to hold a partial wakelock

        // during processing, and to have a static startService(Context, Intent)

        // method that would launch the service & hand off a wakelock.

        super.onCreate();

        HandlerThread thread = new HandlerThread("IntentService[" + mName + "]");

        thread.start();

        mServiceLooper = thread.getLooper();

        mServiceHandler = new ServiceHandler(mServiceLooper);

    }
开启了一个handlerthread,并且初始化mServiceHandler,
mServiceHandler就是一个普通的handler,只是把消息处理给了onHandleIntent
        public void handleMessage(Message msg) {

            onHandleIntent((Intent)msg.obj);

            stopSelf(msg.arg1);

        }
所以intentservice实例就需要实现onHandleIntent方法,来处理消息。
一下是intentservice使用的一个demo:
package com.joyfulmath.androidstudy.thread;

import com.joyfulmath.androidstudy.TraceLog;

import android.app.IntentService;

import android.content.Intent;

public class MyIntentService extends IntentService {

    public MyIntentService() {

        super("MyIntentService");

    }

    @Override

    public void onCreate() {

        super.onCreate();

        TraceLog.i();

    }

    @Override

    protected void onHandleIntent(Intent intent) {

        TraceLog.i();

        doAction(intent);

    }

    @Override

    public void onDestroy() {

        super.onDestroy();

        TraceLog.i();

    }

    private void doAction(Intent intent)

    {

        String params = intent.getStringExtra("key");

        TraceLog.i(params);

        int index = intent.getIntExtra("index", -1);

        TraceLog.i(index+"");

    }

}
MyIntentService
可以看下log:
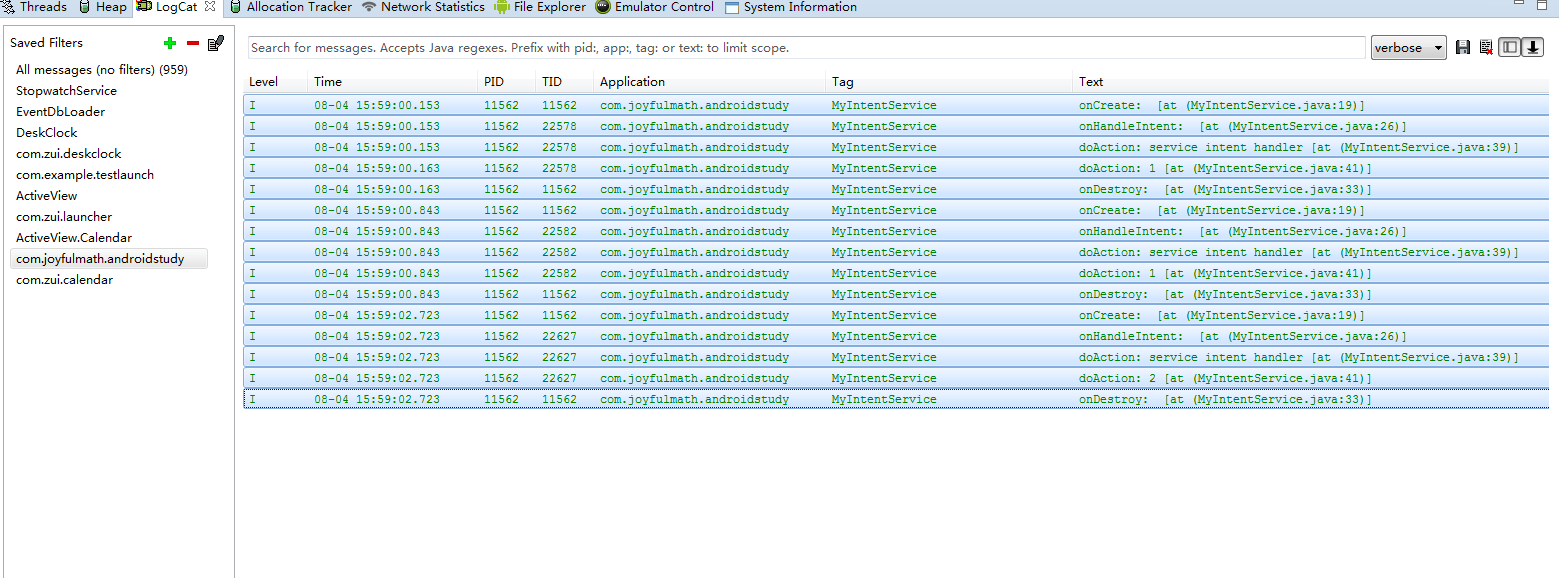
导出的log,没有tid,所以上传了图片。可以看到onHandleIntent运行在工作线程里面。
IntentService会在处理完了以后,直接destory掉。
android 进程/线程管理(三)----Thread,Looper / HandlerThread / IntentService的更多相关文章
- android 进程/线程管理(一)----消息机制的框架
一:android 进程和线程 进程是程序运行的一个实例.android通过4大主件,弱化了进程的概念,尤其是在app层面,基本不需要关系进程间的通信等问题. 但是程序的本质没有变,尤其是多任务系统, ...
- android 进程/线程管理(二)----关于线程的迷思
一:进程和线程的由来 进程是计算机科技发展的过程的产物. 最早计算机发明出来,是为了解决数学计算而发明的.每解决一个问题,就要打纸带,也就是打点. 后来人们发现可以批量的设置命令,由计算机读取这些命令 ...
- android 进程/线程管理(四)续----消息机制的思考(自定义消息机制)
继续分析handler 和looper 先看看handler的 public void dispatchMessage(Message msg) { if (msg.callback != null) ...
- android 进程/线程管理(四)----消息机制的思考(自定义消息机制)
关于android消息机制 已经写了3篇文章了,想要结束这个系列,总觉得少了点什么? 于是我就在想,android为什么要这个设计消息机制,使用消息机制是现在操作系统基本都会有的特点. 可是andro ...
- Android线程管理之Thread使用总结
前言 最近在一直准备总结一下Android上的线程管理,今天先来总结一下Thread使用. 线程管理相关文章地址: Android线程管理之Thread使用总结 Android线程管理之Executo ...
- 并发编程---线程---开启方式---进程线程的区别----Thread的其他属性
线程 进程只是用来把资源集中到一起(进程只是一个资源单位,或者说资源集合)而线程才是cpu上的执行单位 1.同一个进程内的多个线程共享该进程内的地址资源 2.创建线程的开销远小于创建进程的开销(创建一 ...
- 解析Android消息处理机制:Handler/Thread/Looper & MessageQueue
解析Android消息处理机制 ——Handler/Thread/Looper & MessageQueue Keywords: Android Message HandlerThread L ...
- android学习-进程/线程管理-完整
我们知道,应用程序的主入口都是main函数--"它是一切事物的起源" main函数工作也是千篇一律的, 初始化 比如ui的初始化,向系统申请资源等. 进入死循环 再循环中处理各种事 ...
- python进阶------进程线程(三)
python中的进程 1.multiprocessing模块 由于GIL的存在,python中的多线程其实并不是真正的多线程,如果想要充分地使用多核CPU的资源,在python中大部分情况需要使用多进 ...
随机推荐
- iOS-验证码倒计时60秒
一. 要求 1.点击获取验证码按钮,60秒倒计时,按钮变成不可点击状态,按钮文字变成倒计时的秒数. 2.当倒计时为0的时候,释放掉定时器NSTimer,按钮变成可以点击状态,按钮文字变成"获 ...
- 转载:混淆包含SlidingMenu、gson等Android代码的proguard写法
描述:作为一个写了几年c#的码农,咱的java水平实在不敢恭维,但是最近有个任务需要弄点java的代码,还要研究混淆.网上百度并实验了整整一天,终于算是有点成果了.其中混淆的时候由于用到了gson包, ...
- UWP开发入门(十五)——在FlipView中通过手势操作图片
本篇的最终目的,是模拟系统的照片APP可以左右滑动,缩放图片的操作.在实现的过程中,我们会逐步分析UWP编写UI的一些思路和技巧. 首先我们先实现一个横向的可以浏览图片的功能,也是大部分APP中的实现 ...
- 查找最小的k 个元素之C#算法实现
紧接着上一篇微软编程面试100题,这次想解决的是查找最小的K个元素,题目是:输入n 个整数,输出其中最小的k 个.例如输入1,2,3,4,5,6,7 和8 这8 个数字,则最小的4 个数字为1,2,3 ...
- hibernate用注解(annotation)配置sequence
@Id@SequenceGenerator(name="sequenceGenerator",sequenceName="ACTIVITIESSCOPE_SEQ" ...
- ADO.NET---ExcuteScalar()方法复习
ExcuteScalar(),返回的是查询结果的第一行第一列,返回值是object类型,一般用来查询表中有多少条数据,求最大值等 现在我们用ExcuteScalar()做个测试,需求:我要查询学生表里 ...
- Winform开发框架之附件管理应用
在很多常规的管理系统里面,都可能有附件管理的需求,在我做的一系列医疗行业的病人信息管理系统里面,都希望能很好的管理病人的相关资料,分门别类的进行存储,需要的时候可以预览查看,那么这个功能我们可以把它独 ...
- ajax请求跨域问题
ajax跨域,这个是面试的时候常被问到,也是在做项目的时候会遇到的问题,在之前的项目中就有遇到过,这里根据经验写了三种分享下 1.使用中间层过渡的方式 简单来说就是"后台代理",把 ...
- [新手学Java]反射学习笔记
示例类 @SuppressWarnings("unused") public class Person { public String Name; private int Age; ...
- Ubuntu系统操作快捷键
Ubuntu操作基本快捷键* 打开主菜单 = Alt + F1* 运行 = Alt + F2* 显示桌面 = Ctrl + Alt + d* 最小化当前窗口 = Alt + F9* 最大化当前窗口 = ...