okio:定义简短高效
欢迎关注公众号,第一时间获取最新文章:

本篇目录
一、前言
okio是大名鼎鼎的square公司开发出来的,其是okhttp的底层io操作库,既然已经有java原生的io库为什么还要自己费尽开发一套呢?java原生的io操作存在很多问题,比如读写阻塞,内存管理并不高效,体系臃肿,api调用不精简,以上我个人认为okio改进最大的地方是内存管理方面,比如我们拷贝数据java原生io数据转移大体过程如下:

而okio中过程如下:

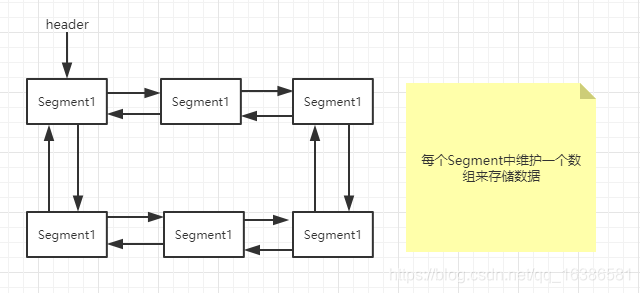
少了一个中间数据拷贝的过程,这样效率会提升很多,并且okio中数据缓存的处理更是精心设计的,我觉得这部分才是其精华所在:okio将数据(Buffer)采用双向循环链表的方式组织在一起,并且链表每个结点数据存储在一个个数组(Segment)中,结构如下:
这样的存储结构有很多好处,拷贝数据我们可以直接移动指针而不像原生io那样需要一个个字节拷贝过去,这样会大大提高数据转移的效率。
再来简要看一下API的使用简洁性
向file中写入数据,原生io实现如下:
- 1public static void writeTest(File file) {
- 2 try {
- 3 FileOutputStream fos = new FileOutputStream(file);
- 4 OutputStream os = new BufferedOutputStream(fos);
- 5 DataOutputStream dos = new DataOutputStream(os);
- 6 dos.writeUTF("write string by utf-8.\n");
- 7 dos.writeInt(1234);
- 8 dos.flush();
- 9 fos.close();
- 10 } catch (Exception e) {
- 11 e.printStackTrace();
- 12 }
- 13}
用okio实现:
- 1 public static void writeTest(File file) {
- 2 try {
- 3 Okio.buffer(Okio.sink(file))
- 4 .writeUtf8("write string by utf-8.\n")
- 5 .writeInt(1234).close();
- 6 } catch (Exception e) {
- 7 e.printStackTrace();
- 8 }
- 9 }
以上demo很好的体现了okio api的简洁性。
通过以上比较你应该能感受到okio的强大之处,但是也要明白一点okio也是完全基于原生InputStream与OutputStream来进行封装的,并没有完全舍弃原生io,可以理解为对原生io的封装扩展,重点优化了缓存部分,至于缓存部分后续分析完源码你会有更深入的理解。
另外okio提供数据访问的超时机制,访问资源可以控制时间。
okio的源码比较简短,建议有时间好好阅读一下。
二、顶级接口Source与Sink
Source与Sink是Okio中的输入流接口和输出流接口,对应原生IO的InputStream和OutputStream。
先看下Source源码:
- 1 public interface Source extends Closeable {
- 2
- 3 long read(Buffer sink, long byteCount) throws IOException;
- 4
- 5 Timeout timeout();
- 6
- 7 @Override void close() throws IOException;
- 8 }
很简单就定义了几个方法,读数据到sink中以及关闭资源的方法,至于timeout方法暂时先不用管,后面提超时机制的时候会分析。
Sink源码:
- 1 public interface Sink extends Closeable, Flushable {
- 2
- 3 void write(Buffer source, long byteCount) throws IOException;
- 4
- 5 @Override void flush() throws IOException;
- 6
- 7 Timeout timeout();
- 8
- 9 @Override void close() throws IOException;
- 10 }
同样比较简单,没什么好说的,自己看一下就可以了。
三、BufferedSource与BufferedSink
BufferedSource与BufferedSink同样是两个接口类,分别继承Source与Sink接口,BufferedSource与BufferedSink是具有缓存功能的接口,各自维护了一个buffer,同时提供了很多实用的api调用接口,平时我们使用也主要是调用这两个类中定义的方法。
BufferedSink类:
- 1 public interface BufferedSink extends Sink {
- 2 /** Returns this sink's internal buffer. */
- 3 Buffer buffer();
- 4
- 5 BufferedSink write(ByteString byteString) throws IOException;
- 6
- 7 BufferedSink write(byte[] source) throws IOException;
- 8
- 9 BufferedSink write(byte[] source, int offset, int byteCount) throws IOException;
- 10
- 11 long writeAll(Source source) throws IOException;
- 12
- 13 BufferedSink write(Source source, long byteCount) throws IOException;
- 14
- 15 BufferedSink writeUtf8(String string) throws IOException;
- 16
- 17 BufferedSink writeUtf8(String string, int beginIndex, int endIndex) throws IOException;
- 18
- 19 /** Encodes {@code codePoint} in UTF-8 and writes it to this sink. */
- 20 BufferedSink writeUtf8CodePoint(int codePoint) throws IOException;
- 21
- 22 /** Encodes {@code string} in {@code charset} and writes it to this sink. */
- 23 BufferedSink writeString(String string, Charset charset) throws IOException;
- 24
- 25 BufferedSink writeString(String string, int beginIndex, int endIndex, Charset charset)
- 26 throws IOException;
- 27
- 28 /** Writes a byte to this sink. */
- 29 BufferedSink writeByte(int b) throws IOException;
- 30
- 31 BufferedSink writeShort(int s) throws IOException;
- 32
- 33 BufferedSink writeShortLe(int s) throws IOException;
- 34
- 35 BufferedSink writeInt(int i) throws IOException;
- 36
- 37 BufferedSink writeIntLe(int i) throws IOException;
- 38
- 39 BufferedSink writeLong(long v) throws IOException;
- 40
- 41 BufferedSink writeLongLe(long v) throws IOException;
- 42
- 43 BufferedSink writeDecimalLong(long v) throws IOException;
- 44
- 45 BufferedSink writeHexadecimalUnsignedLong(long v) throws IOException;
- 46
- 47 @Override void flush() throws IOException;
- 48
- 49 BufferedSink emit() throws IOException;
- 50
- 51 BufferedSink emitCompleteSegments() throws IOException;
- 52
- 53 /** Returns an output stream that writes to this sink. */
- 54 OutputStream outputStream();
- 55 }
就是定义了一些写方便的方法,其中emit()与flush()方法刚接触同学可能有些生疏,去看下源码中注释就明白了,其余都比较简单了,不熟悉可以看下注释,老外写代码挺注重注释的~
BufferedSource类源码这里只看一部分了,与BufferedSink对应:
- 1 public interface BufferedSource extends Source {
- 2
- 3 /** Returns this source's internal buffer. */
- 4 Buffer buffer();
- 5
- 6 /**
- 7 * Returns when the buffer contains at least {@code byteCount} bytes. Throws an
- 8 * {@link java.io.EOFException} if the source is exhausted before the required bytes can be read.
- 9 */
- 10 void require(long byteCount) throws IOException;
- 11
- 12 /**
- 13 * Returns true when the buffer contains at least {@code byteCount} bytes, expanding it as
- 14 * necessary. Returns false if the source is exhausted before the requested bytes can be read.
- 15 */
- 16 boolean request(long byteCount) throws IOException;
- 17
- 18 /** Removes a byte from this source and returns it. */
- 19 byte readByte() throws IOException;
- 20
- 21 short readShort() throws IOException;
- 22
- 23 short readShortLe() throws IOException;
- 24
- 25 long readLong() throws IOException;
- 26
- 27 /** Removes all bytes bytes from this and returns them as a byte string. */
- 28 ByteString readByteString() throws IOException;
- 29
- 30 /** Removes {@code byteCount} bytes from this and returns them as a byte array. */
- 31 byte[] readByteArray(long byteCount) throws IOException;
- 32
- 33 int read(byte[] sink) throws IOException;
- 34
- 35 void readFully(byte[] sink) throws IOException;
- 36
- 37 int read(byte[] sink, int offset, int byteCount) throws IOException;
- 38
- 39 long readAll(Sink sink) throws IOException;
- 40
- 41 String readUtf8() throws IOException;
- 42
- 43 String readUtf8Line() throws IOException;
- 44
- 45 /** Returns an input stream that reads from this source. */
- 46 InputStream inputStream();
- 47 }
这里只是列出了部分定义的方法,大体看一下就可以了,就是各种读的方法。
四、 RealBufferedSink 和 RealBufferedSource
上面提到的都是接口类,具体的实现类分别是RealBufferedSink和 RealBufferedSource ,其实这两个类也不算具体实现类,只是Buffer类的代理类,具体功能都在Buffer类里面实现的。
RealBufferedSink类部分源码:
- 1 final class RealBufferedSink implements BufferedSink {
- 2 public final Buffer buffer = new Buffer();
- 3 public final Sink sink;
- 4 boolean closed;
- 5
- 6 RealBufferedSink(Sink sink) {
- 7 if (sink == null) throw new NullPointerException("sink == null");
- 8 this.sink = sink;
- 9 }
- 10
- 11 @Override public Buffer buffer() {
- 12 return buffer;
- 13 }
- 14
- 15 @Override public void write(Buffer source, long byteCount)
- 16 throws IOException {
- 17 if (closed) throw new IllegalStateException("closed");
- 18 //调用buffer的write方法
- 19 buffer.write(source, byteCount);
- 20 emitCompleteSegments();
- 21 }
- 22
- 23 @Override public BufferedSink write(ByteString byteString) throws IOException {
- 24 if (closed) throw new IllegalStateException("closed");
- 25 //调用buffer的write方法
- 26 buffer.write(byteString);
- 27 return emitCompleteSegments();
- 28 }
- 29
- 30 @Override public BufferedSink writeUtf8(String string) throws IOException {
- 31 if (closed) throw new IllegalStateException("closed");
- 32 //调用buffer的writeUtf8方法
- 33 buffer.writeUtf8(string);
- 34 return emitCompleteSegments();
- 35 }
- 36 。。。。。。。。
- 37
- 38 @Override public BufferedSink emitCompleteSegments() throws IOException {
- 39 if (closed) throw new IllegalStateException("closed");
- 40 long byteCount = buffer.completeSegmentByteCount();
- 41 //将缓存中的数据写出到流中
- 42 if (byteCount > 0) sink.write(buffer, byteCount);
- 43 return this;
- 44 }
- 45
- 46 @Override public BufferedSink emit() throws IOException {
- 47 if (closed) throw new IllegalStateException("closed");
- 48 long byteCount = buffer.size();
- 49 //将缓存中的数据写出到流中
- 50 if (byteCount > 0) sink.write(buffer, byteCount);
- 51 return this;
- 52 }
- 53
- 54 @Override public void flush() throws IOException {
- 55 if (closed) throw new IllegalStateException("closed");
- 56 if (buffer.size > 0) {
- 57 //先写出数据
- 58 sink.write(buffer, buffer.size);
- 59 }
- 60 sink.flush();
- 61 }
- 62
- 63 @Override public void close() throws IOException {
- 64 if (closed) return;
- 65
- 66 // Emit buffered data to the underlying sink. If this fails, we still need
- 67 // to close the sink; otherwise we risk leaking resources.
- 68 Throwable thrown = null;
- 69 try {
- 70 if (buffer.size > 0) {
- 71 //先写出数据
- 72 sink.write(buffer, buffer.size);
- 73 }
- 74 } catch (Throwable e) {
- 75 thrown = e;
- 76 }
- 77
- 78 try {
- 79 //关闭流
- 80 sink.close();
- 81 } catch (Throwable e) {
- 82 if (thrown == null) thrown = e;
- 83 }
- 84 closed = true;
- 85
- 86 if (thrown != null) Util.sneakyRethrow(thrown);
- 87 }
- 88
- 89 @Override public Timeout timeout() {
- 90 return sink.timeout();
- 91 }
- 92
- 93 @Override public String toString() {
- 94 return "buffer(" + sink + ")";
- 95 }
- 96 }
看到了吧,RealBufferedSink实现BufferedSink接口,内部维护了一个Buffer,操作基本都是由Buffer来完成的,写数据首先将数据写到Buffer中,然后调用emitCompleteSegments方法将数据写到流中。
RealBufferedSource 类部分源码
- 1 final class RealBufferedSource implements BufferedSource {
- 2 public final Buffer buffer = new Buffer();//缓存的buffer
- 3 public final Source source;//数据源,其实就是InputStream
- 4 boolean closed;
- 5
- 6 RealBufferedSource(Source source) {
- 7 if (source == null) throw new NullPointerException("source == null");
- 8 this.source = source;
- 9 }
- 10
- 11 @Override public Buffer buffer() {
- 12 return buffer;
- 13 }
- 14 //读数据到输出流sink中
- 15 @Override public long read(Buffer sink, long byteCount) throws IOException {
- 16 if (sink == null) throw new IllegalArgumentException("sink == null");
- 17 if (byteCount < 0) throw new IllegalArgumentException("byteCount < 0: " + byteCount);
- 18 if (closed) throw new IllegalStateException("closed");
- 19 //检查缓存中是否有数据
- 20 if (buffer.size == 0) {
- 21 //缓存中没有数据则先读取 Segment.SIZE数量数据到buffer缓存中
- 22 long read = source.read(buffer, Segment.SIZE);
- 23 if (read == -1) return -1;
- 24 }
- 25 //buffer可能没有byteCount数量数据,这里检查一下
- 26 long toRead = Math.min(byteCount, buffer.size);
- 27 return buffer.read(sink, toRead);
- 28 }
- 29 //申请byteCount数量数据到缓存中
- 30 @Override public void require(long byteCount) throws IOException {
- 31 if (!request(byteCount)) throw new EOFException();
- 32 }
- 33
- 34 @Override public boolean request(long byteCount) throws IOException {
- 35 if (byteCount < 0) throw new IllegalArgumentException("byteCount < 0: " + byteCount);
- 36 if (closed) throw new IllegalStateException("closed");
- 37 //申请数据到缓存中:缓存中的数据
- 38 while (buffer.size < byteCount) {//缓存中没有足够数据,则从数据源source读取数据到buffer中
- 39 if (source.read(buffer, Segment.SIZE) == -1) return false;
- 40 }
- 41 return true;
- 42 }
- 43
- 44 @Override public byte readByte() throws IOException {
- 45 require(1);//先申请数据到缓存中,然后在读出来
- 46 return buffer.readByte();
- 47 }
- 48
- 49 @Override public ByteString readByteString() throws IOException {
- 50 buffer.writeAll(source);//将数据源source中数据全部读取到buffer中
- 51 return buffer.readByteString();//buffer中读取全部数据
- 52 }
- 53
- 54 。。。。
- 55
- 56 @Override public void close() throws IOException {
- 57 if (closed) return;
- 58 closed = true;
- 59 source.close();
- 60 buffer.clear();
- 61 }
- 62
- 63 @Override public Timeout timeout() {
- 64 return source.timeout();
- 65 }
- 66
- 67 @Override public String toString() {
- 68 return "buffer(" + source + ")";
- 69 }
- 70 }
RealBufferedSource 实现BufferedSource 接口,内部同样维护了一个Buffer,读数据大体流程都是先将数据从数据源source读取到缓存buffer中,然后再从buffer读取就完了。
看完上述大体流程应该明白Buffer缓存类是okio中的核心了,其实个人看完okio源码觉得其余方面都不用太关心,okio嫌弃的就是原生io的缓存机制有点“low”,所以这部分才是重点,至于其余TimeOut超时机制都是小功能了,下面我们一起看看okio的缓存机制。
OKIO中的缓存机制
先来简单看一下Buffer类:
- 1 public final class Buffer implements BufferedSource, BufferedSink, Cloneable {
- 2 。。。。
- 3 Segment head;
- 4 long size;
- 5
- 6 public Buffer() {
- 7 }
- 8
- 9 @Override public Buffer buffer() {
- 10 return this;
- 11 }
- 12
- 13。。。。。
- 14
- 15 /** Write {@code byteCount} bytes from this to {@code out}. */
- 16 public Buffer writeTo(OutputStream out, long byteCount) throws IOException {
- 17 if (out == null) throw new IllegalArgumentException("out == null");
- 18 checkOffsetAndCount(size, 0, byteCount);
- 19
- 20 Segment s = head;
- 21 while (byteCount > 0) {
- 22 int toCopy = (int) Math.min(byteCount, s.limit - s.pos);
- 23 out.write(s.data, s.pos, toCopy);
- 24
- 25 s.pos += toCopy;
- 26 size -= toCopy;
- 27 byteCount -= toCopy;
- 28
- 29 if (s.pos == s.limit) {
- 30 Segment toRecycle = s;
- 31 head = s = toRecycle.pop();
- 32 SegmentPool.recycle(toRecycle);
- 33 }
- 34 }
- 35 return this;
- 36 }
- 37 }
这里我只是列出了一部分Buffer类源码可以看到类中用到了Segment与SegmentPool,在开篇中已经说过okio的缓存结构,这里再看一下:
Buffer类内部维护了一个Segment构成的双向循环链表,okio将缓存切成一个个很小的片段,每个片段就是Segment,我们写数据或者读数据都是操作的Segment中维护的一个个数组,而SegmentPool维护被回收的Segment,这样创建Segment的时候从SegmentPool取就可以了,有缓存直接用缓存的,没有再新创建Segment。
五、 Segment解析
我们先看一下Segment类源码:
Segment中的变量:
- 1 //每一个Segment所包含最大数据量
- 2 static final int SIZE = 8192;
- 3
- 4 //分享数据的时候会用到,后续会介绍
- 5 static final int SHARE_MINIMUM = 1024;
- 6 //盛放数据的数组
- 7 final byte[] data;
- 8
- 9 //data数组中第一个可读的位置
- 10 int pos;
- 11
- 12 //data中第一个可写的位置
- 13 int limit;
- 14
- 15 //分享数据相关,如果有别的Segment使用同样的data[]则为true
- 16 //如果我们将自己的数据分享给了别的Segment则置为true
- 17 boolean shared;
- 18
- 19 //当前Segment拥有data[]并且能写入数据则为true
- 20 boolean owner;
- 21
- 22 //前一个Segment
- 23 Segment next;
- 24
- 25 //后一个Segment
- 26 Segment prev;
都比较简单,分享数据相关的字段先放一下,后面会详细说明,这里要明白pos与limit含义,Segment中data[]数据整体说明如下:
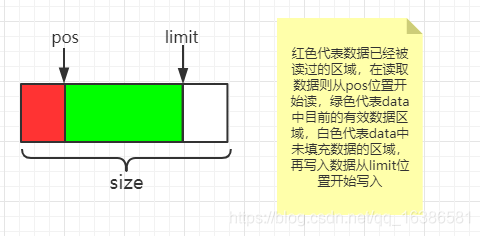
所以Segment中数据量计算方式为:limit-pos。
Segment中构造函数
- 1 //此方式创建Segment,data数据是自己创建的,不是分享而来的,所以owner为true,shared为false
- 2 Segment() {
- 3 this.data = new byte[SIZE];
- 4 this.owner = true;
- 5 this.shared = false;
- 6 }
- 7 //此方式创建Segment,data数据是别的Segment分享而来的,所以owner为false,shared为true
- 8 Segment(Segment shareFrom) {
- 9 this(shareFrom.data, shareFrom.pos, shareFrom.limit);
- 10 shareFrom.shared = true;//别的Segment分享了自己的数据,同样标记shared为true
- 11 }
- 12 //此方式创建Segment,data数据是外部传入的,所以owner为false,shared为true
- 13 Segment(byte[] data, int pos, int limit) {
- 14 this.data = data;
- 15 this.pos = pos;
- 16 this.limit = limit;
- 17 this.owner = false;
- 18 this.shared = true;
- 19 }
通过以上构造函数我们应该明白如果一个Segment的数据分享给了别的Segment或者自己的数据是别的Segment分享而来的,那么shared都会标记为true,表示分享了数据或者数据被分享而来的。
这个分享是什么鸟意思呢?到这里记住有这个玩意就可以了,后面会用的。
接下来看一下Segment中的方法
pop方法:
- 1 public Segment pop() {
- 2 Segment result = next != this ? next : null;
- 3 prev.next = next;
- 4 next.prev = prev;
- 5 next = null;
- 6 prev = null;
- 7 return result;
- 8 }
pop方法很简单就是将当前segment结点从循环链表中弹出并返回下一个segment,如果你对链表增删不熟悉自己一定画一下,源码中很多这种操作,都是很简单的,这里不过多解释。
push方法
- 1 public Segment push(Segment segment) {
- 2 segment.prev = this;
- 3 segment.next = next;
- 4 next.prev = segment;
- 5 next = segment;
- 6 return segment;
- 7 }
push方法就是将segment加入到当前segment的后面,并返回加入的segment,链表的操作如果看不出来就自己画一下。
split分割方法
- 1 //将一个Segment分割成两个Segment,byteCount为分割出去多少数据
- 2 public Segment split(int byteCount) {
- 3 if (byteCount <= 0 || byteCount > limit - pos) throw new IllegalArgumentException();
- 4 Segment prefix;
- 5 //一下这段注释很重要,可以说是时间空间的平衡
- 6 // We have two competing performance goals://我们有两个目标
- 7 // - Avoid copying data. We accomplish this by sharing segments.//为了避免拷贝数据,我们采用分享数据的方法
- 8 // - Avoid short shared segments. These are bad for performance because they are readonly and
- 9 // may lead to long chains of short segments.//分享后数据只能只读,不能再写入数据,
- 10 // To balance these goals we only share segments when the copy will be large.
- 11 //综上,okio分割数据时为了性能的考虑,这里只有在涉及大量数据拷贝的时候才会采用分享数据的策略,而不是拷贝数据,分享数据就是创建一个新的Segment,然后将当前Segment数据分享byteCount数量给新的Segmen
- 12 if (byteCount >= SHARE_MINIMUM) {//分割数据量大于SHARE_MINIMUM约定的数量okio则认为是大数据量
- 13 //采用分享数据的方式,创建新的Segment,而不是拷贝数据消耗CPU,空间换时间
- 14 prefix = new Segment(this);
- 15 } else {
- 16 //数据量小则直接拷贝数据就可以了,消耗不了多少CPU性能
- 17 prefix = SegmentPool.take();
- 18 System.arraycopy(data, pos, prefix.data, 0, byteCount);
- 19 }
- 20 //新Segment的写位置limit为pos加上byteCount
- 21 prefix.limit = prefix.pos + byteCount;
- 22 //当前Segment中data的读位置往后移byteCount
- 23 pos += byteCount;
- 24 prev.push(prefix);
- 25 return prefix;
- 26 }
上面已经给了详细注释,这里用图画一下分割完Segment变化:
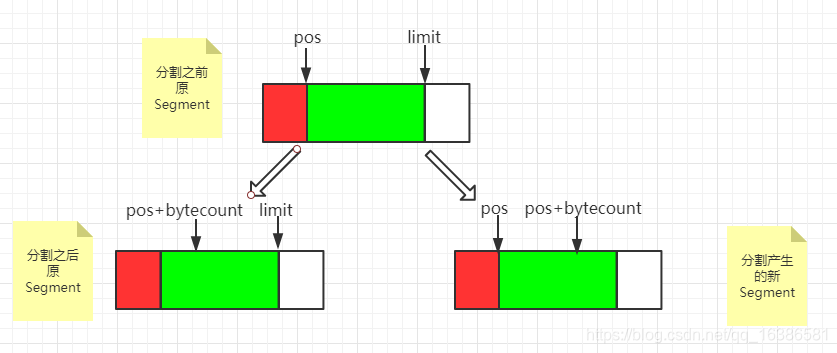
这里要明白一点,分割之后两个Segment都引用的同一个data[],只是数据的读写位置索引发生了改变,正是两个Segment都引用了同一个data[],所以data一旦被分享则不允许再写入数据,data被分享也就是多个Segment引用了同一个data,如果还允许写那肯定就乱了,就不能很好的控制data中的数据了,所以只能读。
那这个split分割操作有什么用呢?okio中Buffer类的write(Buffer source, long byteCount)方法有一段注释如下:
- 1 // Splitting segments
- 2 //
- 3 // Occasionally we write only part of a source buffer to a sink buffer. For
- 4 // example, given a sink [51%, 91%], we may want to write the first 30% of
- 5 // a source [92%, 82%] to it. To simplify, we first transform the source to
- 6 // an equivalent buffer [30%, 62%, 82%] and then move the head segment,
- 7 // yielding sink [51%, 91%, 30%] and source [62%, 82%].
解释一下:有时候我们需要将source buffer缓冲区数据部分写入sink buffer缓冲区,比如,sink buffer缓冲区数据状态为 [51%, 91%],source buffer缓冲区数据状态为[92%, 82%] ,我们只想写30%的数据到sink buffer缓冲区,这时我们首先将source buffer中的92%容量的Segment分割为30%与62%,然后将30%的Segment一次写出去就可以了,这样是不是就高效多了,我们不用一点点的写出去,先分割然后一次性写出去显然效率高很多。
writeTo方法: 将Segment数据写入到另一个Segment中去
- 1 /** Moves {@code byteCount} bytes from this segment to {@code sink}. */
- 2 public void writeTo(Segment sink, int byteCount) {
- 3 //首先判断是否能写入数据,分享的Segment则不能写入数据,只能读数据
- 4 if (!sink.owner) throw new IllegalArgumentException();
- 5 //首先判断剩余空间能否容纳byteCount数量的数据
- 6 if (sink.limit + byteCount > SIZE) {//不能容纳byteCount数量的数据,考虑向前移动数据为了容纳byteCount数量数据
- 7 // We can't fit byteCount bytes at the sink's current position. Shift sink first.
- 8 //daata[]数据被分享了不能再移动其数据块
- 9 if (sink.shared) throw new IllegalArgumentException();
- 10 if (sink.limit + byteCount - sink.pos > SIZE) throw new IllegalArgumentException();
- 11 //不拷贝数据,只是将原数据整体往前移动到开头位置
- 12 System.arraycopy(sink.data, sink.pos, sink.data, 0, sink.limit - sink.pos);
- 13 sink.limit -= sink.pos;//写数据位置向前移动
- 14 sink.pos = 0;//重置读数据位置为0
- 15 }
- 16 //到这里说明剩余空间放得下byteCount数量数据
- 17 System.arraycopy(data, pos, sink.data, sink.limit, byteCount);
- 18 //拷贝完同样移动读写数据位置
- 19 sink.limit += byteCount;
- 20 pos += byteCount;
- 21 }
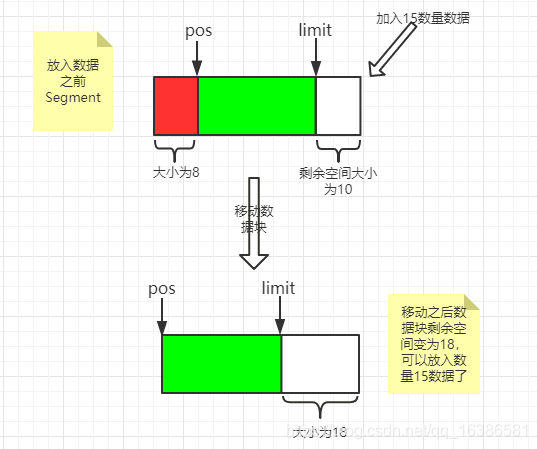
writeTo方法大体逻辑:当我们将byteCount数据写入一个Segment中的时候会检查剩余可写的数据块能否盛放下byteCount数据,如果不能则考虑将已经存在的数据整体向前移动,如果还不能则抛出异常,如果可以则移动数据后将byteCount数据放入Segment中,再用图来表示一下移动数据块流程:
compact()方法
- 1 /**
- 2 * 如果当前链表尾部Segment与其前一个Segment(也就是链表中头部Segment)的数据均为占满其整体容量的50%,则考虑压缩这两个Segment为一个Segment,这样就可以节省空间了
- 3 * Call this when the tail and its predecessor may both be less than half
- 4 * full. This will copy data so that segments can be recycled.
- 5 */
- 6 public void compact() {
- 7 if (prev == this) throw new IllegalStateException();
- 8 //前面的Segment是不可写的则不能压缩数据:data[]不是自己拥有
- 9 if (!prev.owner) return; // Cannot compact: prev isn't writable.
- 10 //当前Segment的数据量byteCount
- 11 int byteCount = limit - pos;
- 12 //前一个Segment的可用空间:如果data[]没有被分享则从0开始到pos的空间也算在可用空间内,writeTo方法内部会移动数据块到data[]开始的位置
- 13 int availableByteCount = SIZE - prev.limit + (prev.shared ? 0 : prev.pos);
- 14 //要写入的数据量byteCount大于可用空间则直接返回,表示盛放不下
- 15 if (byteCount > availableByteCount) return; // Cannot compact: not enough writable space.
- 16 //当前Segment数据写入前一个Segment中
- 17 writeTo(prev, byteCount);
- 18 //链表中断开当前Segment
- 19 pop();
- 20 //回收当前Segment进缓存池,循环利用
- 21 SegmentPool.recycle(this);
- 22 }
compact()主要作用就是合并两个Segment,节省内存,这里也是优化的作用,可见okio对很多方面做了优化。
六、 SegmentPool解析
接下来我们看下SegmentPool,也就是Segment的缓存池,SegmentPool内部维持一条单链表保存被回收的Segment,缓存池的大小限制为64KB,每个Segment大小最大为8KB,所以SegmentPool最多存储8个Segment。
SegmentPool存储结构为单向链表,结构如图:

SegmentPool源码解析:
- 1 final class SegmentPool {
- 2 //缓存池的大小限制为64KB
- 3 static final long MAX_SIZE = 64 * 1024; // 64 KiB.
- 4 //链表头部指针
- 5 static Segment next;
- 6
- 7 //已经存储的缓存大小
- 8 static long byteCount;
- 9
- 10 private SegmentPool() {
- 11 }
- 12
- 13 //从SegmentPool获取一个Segment
- 14 static Segment take() {
- 15 synchronized (SegmentPool.class) {
- 16 if (next != null) {//缓存池中有缓存的Segment
- 17 //一下就是单向链表删除结点的逻辑,比较简单
- 18 Segment result = next;
- 19 next = result.next;
- 20 result.next = null;
- 21 byteCount -= Segment.SIZE;
- 22 return result;
- 23 }
- 24 }
- 25 //如果缓存中没有Segment则新建一个Segment返回
- 26 return new Segment();
- 27 }
- 28
- 29 //回收Segment进入SegmentPool
- 30 static void recycle(Segment segment) {
- 31 if (segment.next != null || segment.prev != null) throw new IllegalArgumentException();
- 32 //分享的Segment不能被回收
- 33 if (segment.shared) return; // This segment cannot be recycled.
- 34 synchronized (SegmentPool.class) {
- 35 //容量判断
- 36 if (byteCount + Segment.SIZE > MAX_SIZE) return; // Pool is full.
- 37 byteCount += Segment.SIZE;
- 38 //将Segment加入单向链表中
- 39 segment.next = next;
- 40 segment.pos = segment.limit = 0;
- 41 next = segment;
- 42 }
- 43 }
- 44 }
SegmentPool 很简单,内部维护一个回收的单向Segment的链表,方便复用,节省GC操作。
以上介绍了Segment与SegmentPool类,现在我们可以回头看Buffer类了。
七、 Buffer类核心解析
Buffer类是读写操作的具体实现,实现了BufferedSource, BufferedSink接口。
Segment的split,compact操作是Buffer类中的write(Buffer source, long byteCount)方法,该方法把传入的source Buffer的前byteCount个字节写到调用该方法的Buffer中去,接下来我们仔细分析一下write(Buffer source, long byteCount)方法:
- 1public final class Buffer implements BufferedSource, BufferedSink, Cloneable {
- 2
- 3 Segment head;//Buffer类中双向循环链表的头结点
- 4 long size;//Buffer中存储的数据大小
- 5
- 6 public Buffer() {
- 7 }
- 8
- 9 。。。。。。
- 10 //将传入的source Buffer中byteCount数量数据写入调用此方法的Buffer中
- 11 @Override public void write(Buffer source, long byteCount) {
- 12 //以下英文注释基本描述了该类的核心
- 13 // Move bytes from the head of the source buffer to the tail of this buffer
- 14 // while balancing two conflicting goals: don't waste CPU and don't waste
- 15 // memory.
- 16 //
- 17 //
- 18 // Don't waste CPU (ie. don't copy data around).
- 19 //
- 20 // Copying large amounts of data is expensive. Instead, we prefer to
- 21 // reassign entire segments from one buffer to the other.
- 22 //
- 23 //
- 24 // Don't waste memory.
- 25 //
- 26 // As an invariant, adjacent pairs of segments in a buffer should be at
- 27 // least 50% full, except for the head segment and the tail segment.
- 28 //
- 29 // The head segment cannot maintain the invariant because the application is
- 30 // consuming bytes from this segment, decreasing its level.
- 31 //
- 32 // The tail segment cannot maintain the invariant because the application is
- 33 // producing bytes, which may require new nearly-empty tail segments to be
- 34 // appended.
- 35 //
- 36 //
- 37 // Moving segments between buffers
- 38 //
- 39 // When writing one buffer to another, we prefer to reassign entire segments
- 40 // over copying bytes into their most compact form. Suppose we have a buffer
- 41 // with these segment levels [91%, 61%]. If we append a buffer with a
- 42 // single [72%] segment, that yields [91%, 61%, 72%]. No bytes are copied.
- 43 //
- 44 // Or suppose we have a buffer with these segment levels: [100%, 2%], and we
- 45 // want to append it to a buffer with these segment levels [99%, 3%]. This
- 46 // operation will yield the following segments: [100%, 2%, 99%, 3%]. That
- 47 // is, we do not spend time copying bytes around to achieve more efficient
- 48 // memory use like [100%, 100%, 4%].
- 49 //
- 50 // When combining buffers, we will compact adjacent buffers when their
- 51 // combined level doesn't exceed 100%. For example, when we start with
- 52 // [100%, 40%] and append [30%, 80%], the result is [100%, 70%, 80%].
- 53 //
- 54 //
- 55 // Splitting segments
- 56 //
- 57 // Occasionally we write only part of a source buffer to a sink buffer. For
- 58 // example, given a sink [51%, 91%], we may want to write the first 30% of
- 59 // a source [92%, 82%] to it. To simplify, we first transform the source to
- 60 // an equivalent buffer [30%, 62%, 82%] and then move the head segment,
- 61 // yielding sink [51%, 91%, 30%] and source [62%, 82%].
- 62
- 63 if (source == null) throw new IllegalArgumentException("source == null");
- 64 if (source == this) throw new IllegalArgumentException("source == this");
- 65 checkOffsetAndCount(source.size, 0, byteCount);
- 66
- 67 while (byteCount > 0) {
- 68 // Is a prefix of the source's head segment all that we need to move?
- 69 //要写的数据量byteCount 小于source 头结点的数据量,也就是链表第一个Segment包含的数据量大于byteCount
- 70 if (byteCount < (source.head.limit - source.head.pos)) {
- 71 //获取链表尾部的结点Segment
- 72 Segment tail = head != null ? head.prev : null;
- 73 //尾部结点Segment可写并且能够盛放byteCount 数据
- 74 if (tail != null && tail.owner
- 75 && (byteCount + tail.limit - (tail.shared ? 0 : tail.pos) <= Segment.SIZE)) {
- 76 // Our existing segments are sufficient. Move bytes from source's head to our tail.
- 77 //直接写入尾部结点Segment即可,Segment的writeTo方法上面已经分析
- 78 source.head.writeTo(tail, (int) byteCount);
- 79 //改变缓存Buffer中数据量
- 80 source.size -= byteCount;
- 81 size += byteCount;
- 82 return;
- 83 } else {
- 84 // We're going to need another segment. Split the source's head
- 85 // segment in two, then move the first of those two to this buffer.
- 86 //尾部Segment不能盛放下byteCount数量数据,那就将source中头结点Segment进行分割,split方法上面已经分析过
- 87 source.head = source.head.split((int) byteCount);
- 88 }
- 89 }
- 90
- 91 // Remove the source's head segment and append it to our tail.
- 92 //获取source中的头结点
- 93 Segment segmentToMove = source.head;
- 94 long movedByteCount = segmentToMove.limit - segmentToMove.pos;
- 95 //将头结点segmentToMove从原链表中弹出
- 96 source.head = segmentToMove.pop();
- 97 //检查要加入的链表头结点head是否为null
- 98 if (head == null) {//head为null情况下插入链表
- 99 head = segmentToMove;
- 100 head.next = head.prev = head;
- 101 } else {//head不为null
- 102 Segment tail = head.prev;
- 103 //将segmentToMove插入新的链表中
- 104 tail = tail.push(segmentToMove);
- 105 //掉用compact尝试压缩
- 106 tail.compact();
- 107 }
- 108 source.size -= movedByteCount;
- 109 size += movedByteCount;
- 110 byteCount -= movedByteCount;
- 111 }
- 112 }
- 113 }
write(Buffer source, long byteCount)描述了将一个Buffer数据写入另一个Buffer中的核心逻辑,Buffer之间数据的转移就是将一个Buffer从头部数据开始写入另一个Buffer的尾部,但是上述有个特别精巧的构思:如果目标Segment能够容纳下要写入的数据则直接采用数组拷贝的方式,如果容纳不下则先split拆分source头结点Segment,然后整段移动到目标Buffer链表尾部,注意这里是移动也就是操作指针而不是数组拷贝,这样就非常高效了,而不是一味地数组拷贝方式转移数据,okio将数据分割成一小段一小段并且用链表连接起来也是为了这样的操作来转移数据,对数据的操作更加灵活高效。
我们再来看Buffer类中的read方法,相比于write方法,read方法就比较简单了,平时使用中读取字符串操作算是比较比较多的了,我们看下Buffer中readString方法:
- 1 @Override public String readString(long byteCount, Charset charset) throws EOFException {
- 2 checkOffsetAndCount(size, 0, byteCount);
- 3 if (charset == null) throw new IllegalArgumentException("charset == null");
- 4 if (byteCount > Integer.MAX_VALUE) {
- 5 throw new IllegalArgumentException("byteCount > Integer.MAX_VALUE: " + byteCount);
- 6 }
- 7 if (byteCount == 0) return "";
- 8
- 9 Segment s = head;
- 10 //如果缓存中head结点Segment存储的数据小于byteCount ,则转移调用readByteArray方法读取
- 11 if (s.pos + byteCount > s.limit) {
- 12 // If the string spans multiple segments, delegate to readBytes().
- 13 return new String(readByteArray(byteCount), charset);
- 14 }
- 15 //缓存中head结点Segment存储的数据大于等于byteCount,也就是能从head结点Segment读取全部数据,直接读取就可以了
- 16 String result = new String(s.data, s.pos, (int) byteCount, charset);
- 17 s.pos += byteCount;
- 18 size -= byteCount;
- 19 //读取完当前Segment没有数据了,那么就可以回收了
- 20 if (s.pos == s.limit) {
- 21 head = s.pop();
- 22 SegmentPool.recycle(s);
- 23 }
- 24
- 25 return result;
- 26 }
是不是很简单,至于涉及的readByteArray自己看一下就可以了。
以上介绍了okio的缓存结构,其实最核心的就是Buffer类以及Segment类的操作,希望你能真正理解,在我们平时使用中接触最多的是okio类,也就是对外暴露的api都定义在这个类中,我们简要看一下。
八、 okio类解析
最开始我们介绍了一段写操作的代码:
- 1//向File中写入数据
- 2public static void writeTest(File file) {
- 3 try {
- 4 Okio.buffer(Okio.sink(file))
- 5 .writeUtf8("write string by utf-8.\n")
- 6 .writeInt(1234).close();
- 7 } catch (Exception e) {
- 8 e.printStackTrace();
- 9 }
- 10}
拆分一下上述代码:
- 1//向File中写入数据
- 2public static void writeTest(File file) {
- 3 try {
- 4 Sink sink = Okio.sink(file);
- 5 BufferedSink bufferedSink = Okio.buffer(sink );
- 6 bufferedSink .writeUtf8("write string by utf-8.\n");
- 7 bufferedSink .writeInt(1234);
- 8 bufferedSink.close();
- 9 } catch (Exception e) {
- 10 e.printStackTrace();
- 11 }
- 12}
Sink sink = Okio.sink(file)做了什么?
- 1 /** Returns a sink that writes to {@code file}. */
- 2 public static Sink sink(File file) throws FileNotFoundException {
- 3 if (file == null) throw new IllegalArgumentException("file == null");
- 4 return sink(new FileOutputStream(file));
- 5 }
- 6
- 7 /** Returns a sink that writes to {@code out}. */
- 8 public static Sink sink(OutputStream out) {
- 9 return sink(out, new Timeout());
- 10 }
- 11
- 12 private static Sink sink(final OutputStream out, final Timeout timeout) {
- 13 if (out == null) throw new IllegalArgumentException("out == null");
- 14 if (timeout == null) throw new IllegalArgumentException("timeout == null");
- 15
- 16 return new Sink() {
- 17 @Override public void write(Buffer source, long byteCount) throws IOException {
- 18 checkOffsetAndCount(source.size, 0, byteCount);
- 19 while (byteCount > 0) {
- 20 timeout.throwIfReached();
- 21 Segment head = source.head;
- 22 int toCopy = (int) Math.min(byteCount, head.limit - head.pos);
- 23 out.write(head.data, head.pos, toCopy);
- 24
- 25 head.pos += toCopy;
- 26 byteCount -= toCopy;
- 27 source.size -= toCopy;
- 28
- 29 if (head.pos == head.limit) {
- 30 source.head = head.pop();
- 31 SegmentPool.recycle(head);
- 32 }
- 33 }
- 34 }
- 35
- 36 @Override public void flush() throws IOException {
- 37 out.flush();
- 38 }
- 39
- 40 @Override public void close() throws IOException {
- 41 out.close();
- 42 }
- 43
- 44 @Override public Timeout timeout() {
- 45 return timeout;
- 46 }
- 47
- 48 @Override public String toString() {
- 49 return "sink(" + out + ")";
- 50 }
- 51 };
- 52 }
最终就是调用sink(final OutputStream out, final Timeout timeout) 方法new了一个Sink对象,并且write,close等方法也都是调用OutputStream的相应方法,所以okio底层还是用的原生OutputStream输出流,只是再次基础上封装了自己的缓存逻辑。
Okio.buffer(sink)做了什么?
- 1 /**
- 2 * Returns a new sink that buffers writes to {@code sink}. The returned sink
- 3 * will batch writes to {@code sink}. Use this wherever you write to a sink to
- 4 * get an ergonomic and efficient access to data.
- 5 */
- 6 public static BufferedSink buffer(Sink sink) {
- 7 return new RealBufferedSink(sink);
- 8 }
这就更简单了,返回一个RealBufferedSink对象而已。
好了okio类就介绍到这里,至于source自己看一下就可以了,okio只是封装了一些方便外部调用的api而已。
九、 GZIP压缩解压的实现
okio自带GZIP压缩以及解压功能,具体实现由GzipSource与GzipSink完成:
GzipSink 实现Sink接口,是带有压缩功能的Sink,会将要写出的数据压缩之后再写出,内部有CRC32对象负责将原生sink的数据进行Gzip压缩,然后由DeflaterSink对象负责将压缩后的数据写出。
GzipSource 实现了Source接口,是带有解压功能的Source,由InflaterSource读取压缩的数据,然后CRC32解压数据,得到原始的数据。
GZip压缩在网络通信中经常用来压缩传输的数据以节省流量,okhttp的例子中对数据的压缩就使用了okio中的GzipSink来实现数据的压缩,官方demo中有一个类 RequestBodyCompression,向我们展示了如何实现 RequestBody 的 Gzip 压缩:
- 1 public final class RequestBodyCompression {
- 2
- 3 /**
- 4 * The Google API KEY for OkHttp recipes. If you're using Google APIs for anything other than
- 5 * running these examples, please request your own client ID!
- 6 * https://console.developers.google.com/project
- 7 */
- 8
- 9 public static final String GOOGLE_API_KEY = "AIzaSyAx2WZYe0My0i-uGurpvraYJxO7XNbwiGs";
- 10 public static final MediaType MEDIA_TYPE_JSON = MediaType.get("application/json");
- 11
- 12 private final OkHttpClient client = new OkHttpClient.Builder()
- 13 .addInterceptor(new GzipRequestInterceptor())
- 14 .build();
- 15
- 16 private final Moshi moshi = new Moshi.Builder().build();
- 17
- 18 private final JsonAdapter<Map<String, String>> mapJsonAdapter = moshi.adapter(
- 19 Types.newParameterizedType(Map.class, String.class, String.class));
- 20
- 21 public void run() throws Exception {
- 22
- 23 Map<String, String> requestBody = new LinkedHashMap<>();
- 24
- 25 requestBody.put("longUrl", "https://publicobject.com/2014/12/04/html-formatting-javadocs/");
- 26
- 27 RequestBody jsonRequestBody = RequestBody.create(
- 28
- 29 MEDIA_TYPE_JSON, mapJsonAdapter.toJson(requestBody));
- 30
- 31 Request request = new Request.Builder()
- 32 .url("https://www.googleapis.com/urlshortener/v1/url?key=" + GOOGLE_API_KEY)
- 33 .post(jsonRequestBody)
- 34 .build();
- 35
- 36 try (Response response = client.newCall(request).execute()) {
- 37
- 38 if (!response.isSuccessful()) throw new IOException("Unexpected code " + response);
- 39 System.out.println(response.body().string());
- 40 }
- 41 }
- 42
- 43 public static void main(String... args) throws Exception {
- 44
- 45 new RequestBodyCompression().run();
- 46 }
- 47
- 48 /** This interceptor compresses the HTTP request body. Many webservers can't handle this! */
- 49
- 50 static class GzipRequestInterceptor implements Interceptor {
- 51
- 52 @Override public Response intercept(Chain chain) throws IOException {
- 53
- 54 Request originalRequest = chain.request();
- 55
- 56 if (originalRequest.body() == null || originalRequest.header("Content-Encoding") != null) {
- 57
- 58 return chain.proceed(originalRequest);
- 59 }
- 60
- 61 Request compressedRequest = originalRequest.newBuilder()
- 62 .header("Content-Encoding", "gzip")
- 63 .method(originalRequest.method(), gzip(originalRequest.body()))
- 64 .build();
- 65 return chain.proceed(compressedRequest);
- 66 }
- 67
- 68 private RequestBody gzip(final RequestBody body) {
- 69
- 70 return new RequestBody() {
- 71
- 72 @Override public MediaType contentType() {
- 73
- 74 return body.contentType();
- 75 }
- 76
- 77 @Override public long contentLength() {
- 78
- 79 return -1; // We don't know the compressed length in advance!
- 80 }
- 81 @Override public void writeTo(BufferedSink sink) throws IOException {
- 82 //GZIP压缩实现
- 83 BufferedSink gzipSink = Okio.buffer(new GzipSink(sink));
- 84 body.writeTo(gzipSink);
- 85 gzipSink.close();
- 86 }
- 87 };
- 88 }
- 89 }
- 90 }
十、总结
以上介绍了okio中最核心的部分,okio中还有其余功能没有介绍比如:超时机制,ByteString,实现生产者消费者功能的Pipe类,HashSink与HashSource等等,其实这些自己去看看就可以了,这些功能也都只是边角的扩展而已,okio最核心的就是其缓存功能,希望你静下心来好好研究一下,这里我不想说什么原生io多不堪,okio多么优秀等等,okio确实优秀但也只是对原生io的扩展:舍弃原生io的缓存机制,自己另起炉灶撸起袖子自己实现,同时也给我们很多启发在我们改造优化项目的时候不是把几个方法合并一起就叫做优化了,更高级的做法就像okio一样充分理解原生功能明白其缺点在其之上进行改造,这样才最有意义。
很多同学初次接触okio估计都是从okhttp开始知道的,作为okhttp底层的io库,其高效的缓存也为上层okhttp的高效提供了很好的基础,在我们夸赞okhttp的同时也要知道底层默默付出的okio啊,另外okio完全可以单独使用,同时也建议项目中io操作使用okio。
好了,本篇到此为止,希望对你有用。
okio:定义简短高效的更多相关文章
- Css 进阶篇
一.Css2 高阶知识(常用) 1. css 优先权 优先权(从低到高) 浏览器缺省设置 外部样式表 内部样式表(位于 <head> 标签内部) 内联样式(在 HTML 元素内部) 因此, ...
- 编写可维护的CSS
在参与规模庞大.历时漫长且参与人数众多的项目时,所有开发者遵守如下规则极为重要: 保持 CSS 便于维护 保持代码清晰易懂 保持代码的可拓展性 为了实现这一目标,我们要采用诸多方法. 本文档第一部分将 ...
- CSS编写指导规范和建议
在参与规模庞大.历时漫长且参与人数众多的项目时,所有开发者遵守如下规则极为重要: 保持 CSS 易于维护 保持代码清晰易懂 保持 CSS 的可拓展性 为了实现这一目标,我们要采用诸多方法. 本文档第一 ...
- 通用 CSS 笔记、建议与指导
在参与规模庞大.历时漫长且人手众多的项目时,所有开发者遵守如下规则极为重要: + **保持 CSS 的可维护性** + **保持代码清晰易懂** + **保持代码的可拓展性** 为了实现这一目标,我们 ...
- BAT&注册表重定向劫持
RunJS 常用引导,有时启动某个应用需要环境变量可以这样启动应用,会对启动的进程生效,即被继承 set PATH=D:\Developer\sdk\platform-tools;%PATH% D: ...
- python 生成器等语法
生成器 调用生成器函数,不会执行生成器函数中的代码,而是返回一个对象, 这个对象是生成器(可用type()函数判断这个对象类型), 如果要运行生成器函数中的代码, 需要调用 next()方法, ...
- C#序列化及反序列化Json对象通用类JsonHelper
当今的程序界Json大行其道.因为Json对象具有简短高效等优势,广受广大C#码农喜爱.这里发一个序列化及反序列化Json对象通用类库,希望对大家有用. public class JsonHelper ...
- 【GoLang】50 个 Go 开发者常犯的错误
1. { 换行: Opening Brace Can't Be Placed on a Separate Line 2. 定义未使用的变量: Unused Variables 2. import ...
- [Python爬虫] Selenium实现自动登录163邮箱和Locating Elements介绍
前三篇文章介绍了安装过程和通过Selenium实现访问Firefox浏览器并自动搜索"Eastmount"关键字及截图的功能.而这篇文章主要简单介绍如何实现自动登录163邮箱,同时 ...
随机推荐
- jieba库分词词频统计
代码已发至github上的python文件 词频统计结果如下(词频为1的词组数量已省略): {'是': 5, '风格': 4, '擅长': 4, '的': 4, '兴趣': 4, '宣言': 4, ' ...
- 部署Dubbo监控中心
1.部署监控中心: [root@localhost ~]# cp dubbo-admin-2.5.4.war apache-tomcat-7.0.47/webapps/dubbo-admin.war ...
- oracle的事务级别
ooracle的事务级别是不提交的,如果在sql语句中插入数据,如果不提交(commit).在程序里面试读不出来数据的.长时间不用oracle竟然忘了这些东西,特此记下.方便以后查看
- iOS 波浪效果的实现
iOS 波浪效果的实现 p.p1 { margin: 0.0px 0.0px 0.0px 0.0px; font: 14.0px Menlo; color: #4f8187; background-c ...
- Linux 内核模块编译 Makefile
驱动编译分为静态编译和动态编译:静态编译即为将驱动直接编译进内核,动态编译即为将驱动编译成模块. 而动态编译又分为两种: a -- 内部编译 在内核源码目录内编译 b -- 外部编译 在内核源码的目录 ...
- Android 样式的开发(转)
Android(2) 目录(?)[-] rectangle oval line ring layer-list篇 普通图片 bitmap标签 点九图片 nine-patch标签 color标签 ...
- mysql由于权限问题看不到用户数据库
一.登录数据库 [root@localhost ~]# mysql -u root mysql > show databases; +--------------------+| Databas ...
- Jmeter性能测试 如何利用SQLserver造出大批的数据
作为一个测试人员,需要做性能测试时候,如果没有实际数据,或者实际数据不适合做压测,就要自己着手造数据了. 以下面的接口测试为例,简单介绍下需要的数据: 这是一个会员注册接口,入参比较多,你可以选用全部 ...
- SSM-SpringMVC-04:SpringMVC深入浅出理解HandleMapping(源码刨析)
------------吾亦无他,唯手熟尔,谦卑若愚,好学若饥------------- 先从概念理解,从中央调度器,携带参数request,调度到HandleMapping处理器映射器,处理器映射器 ...
- SSM-MyBatis-07:Mybatis中SqlSession的insert和delete底层到底做了什么
------------吾亦无他,唯手熟尔,谦卑若愚,好学若饥------------- 先点进去看一下insert方法 用ctrl加鼠标左键点进去看 发现是一个接口SqlSession的方法,没有实 ...